0xc101aa is a common type of video error displayed when the Windows media application cannot play your selected file. It can happen if the file is corrupted or the media player is facing some issues. But several other reasons can cause this problem. If you've encountered this error while watching a video, you’re not alone—many Windows users face this frustrating issue.
This article will introduce you to the 0xc10100aa video error, different solutions to fix it, and provide tips on how to prevent this error from happening again in the future.Ready to fix? Keep reading to find out how to resolve this issue quickly and effectively.
In this article
Part 1. What Is 0xc10100aa Error in Windows?
Several Windows users might have encountered the same problem: the Microsoft Movies and TV application is not working and showing a "0xc10100aa" video error code. This error signifies that the video you are trying to play is not working due to some reason.
There are several reasons why you receive this error:
- You might be running into a memory issue. There must be enough memory to play the audio, but the video stream buffer might be choked.
- Lack of buffer, cache, and memory management can cause this problem.
Part 2. How to Fix the 0xc10100aa Error in Windows?
Video error '0xc10100aa' is a common issue for several Windows users, often occurring in Microsoft Movies and TV app not working. As you open a video file in this in-built app, you receive a message, "Your device does not contain enough memory to run this," including an error code. If your system has enough disk space, then it could be a matter of annoyance and curiosity.
The error "0xc10100aa" in this application on Windows might occur because of the virtual memory problem or small paging file size. The overuse of resources by the background programs or a malware attack can also be the same.
These are the solutions that can help you to resolve this particular problem.
Solution 1. Check and Install Drivers
This is a common solution for this type of problem. If you find that your system drivers are missing, you must check thoroughly and install the missing driver to resolve the issue.
Step 1: Right-click on the Windows button and click on "Device Manager."
Step 2: You will receive a list of devices; in that list, select "Display Drivers" to expand it.
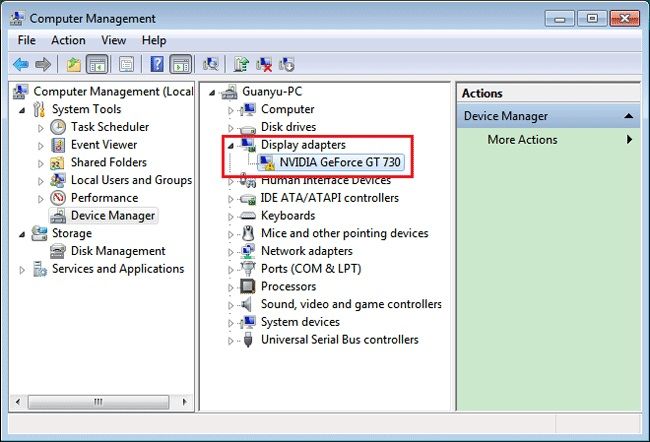
Step 3: Then, right-click on the device and click on "Uninstall."
Step 4: Ensure that the option to delete the driver package from the computer is selected and checked so that the installed driver package is removed.
Step 5: Visit the Action menu.
Step 6: Select "Scan for Hardware Changes" to re-install the deleted driver.
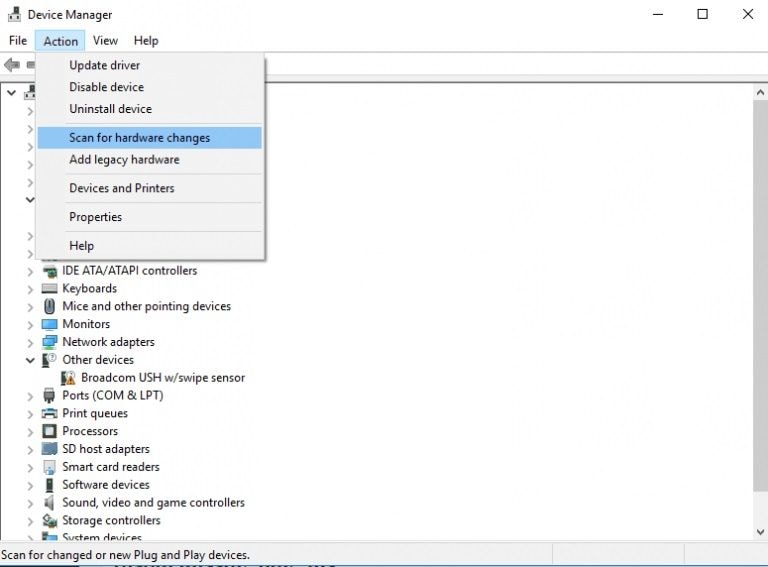
Step 7: Then, you must close and restart your system.
Solution 2. Play Videos with Other Windows APP
If the problem is still not fixed when you have re-installed the drivers, you must go for a third-party application, as it is capable of justifying the error. Several Windows users have reported that their problem stopped occurring once they have shifted to a third-party video player application like a VLC media player.
So, if you are facing the issue again, try playing your file in this program. Here is the guide to install and use VLC media player to prevent the Error Code 0xc10100aa:
Step 1: Open the browser and visit the VLC media player website. Once you get there, click on the "Download" option to download the latest version of VLC.
Step 2: When the application is fully downloaded, double-click on the icon and follow the instruction to install the software.
Step 3: When the installation process is complete, close the installation window. Then, try playing your audio/video file, which was failing previously. Right-click on the selected file and click on "Open With," then select VLC media player.
Step 4: If your audio and video content is playing without any issue with a third-party app, you must continue to play your content while staying away from in-built apps causing problems.
Solution 3. Update Windows Computer
If you face issues while playing your audio and video files and continuously receiving an error message "0xc10100aa," you must try updating your windows computer. As it can help resolve the issues, and your system will be up to date.
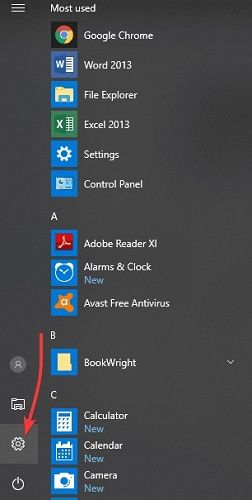
Step 1: Click on the Windows button and search for Settings.
Step 2: In the Settings window, open Update and Security.

Step 3: In that section, select "Windows Update."
Step 4: Then click on "Check for Updates."
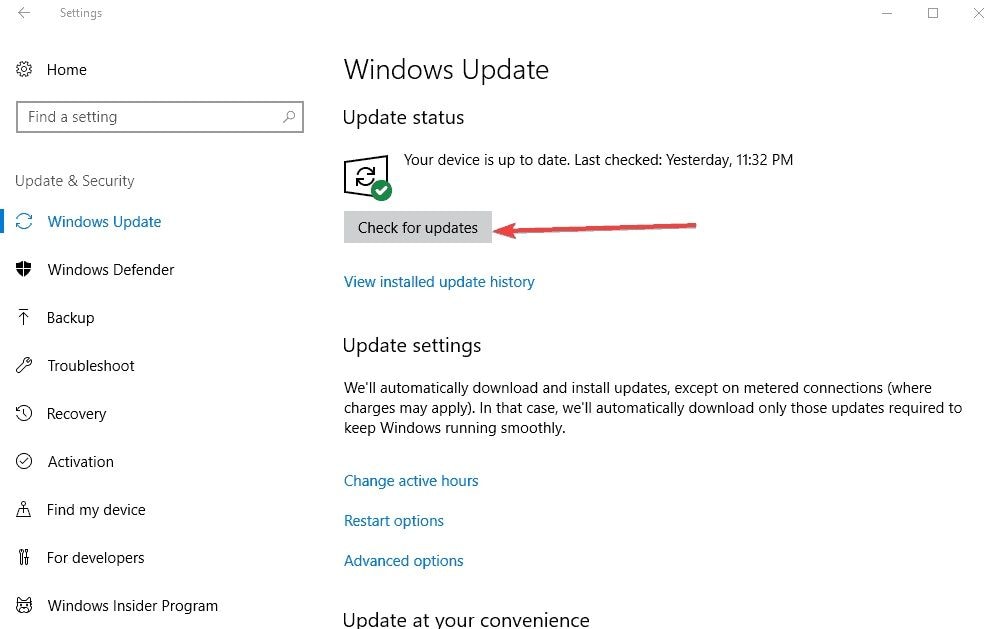
Step 5: Install all the updates that are pending on your system.
Solution 4. Fix Windows Movies & TV App
If your audio and video files are still not playing in Windows Movies and TV app, it will help if you tried fixing it. Some methods can help you to fix the issue.
Method 1: Check your system settings
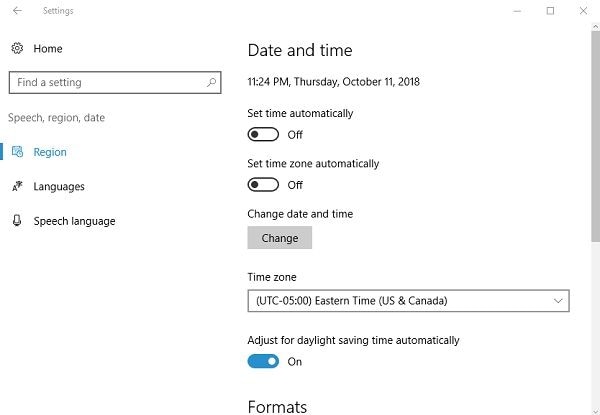
Make sure that your system's region, language, date, and time settings are correct.
Step 1: Open the start menu, click on Settings, and select "time and language."
Step 2: Ensure that all the setting of region, language, date, and time is set up correctly.
Method 2: Delete the Temp folder
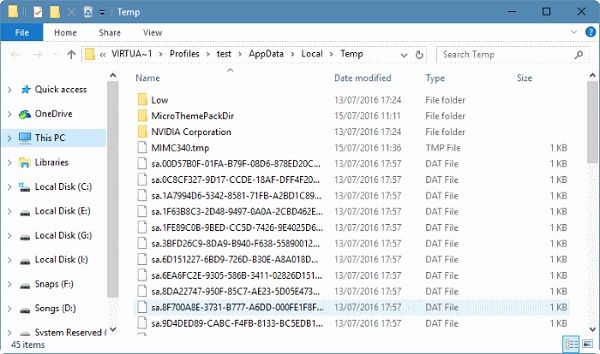
By deleting the temporary files on your computer, you can easily remove the glitches restricting the Movies and TV app from running correctly. Here is the procedure to delete the temp folder on Windows.
Step 1: Press the Windows + R key to open the Run Box.
Step 2: Then type "Temp" in the dialogue box and press Enter.
Step 3: Select all the files, right-click on them, and select Delete.
Method 3: Reset the internet settings
There might be some internet problems when the Movies and TV application cannot play videos on Windows. You can reset the internet settings on Windows's default web browser, Internet Explorer.
Step 1: Open Internet Explorer.
Step 2: Select the Tools and open the Internet option.
Step 3: Click on the advanced tab and select "Reset."
Step 4: A pop-up box will appear. Click on Reset.
Method 4: Restore the Windows Library
Here are the steps to restore the Windows Libraries on Windows Explorer.
Step 1: Open the Libraries.
Step 2: Select Libraries, located in the left column.
Step 3: Right-click on the Libraries and select "Restore Default Libraries."
This restoration process will never damage the data present in the Libraries.
Method 5: Re-install the Movies and TV App on Windows
If any of the above methods cannot resolve your issue, you must consider reinstalling the application. These are the steps to uninstall and reinstall the Movies and TV app.
Step 1: Open the Start menu and Type "Windows Powershell."
Step 2: Right-click on the icon and select "Run as administrator."
Step 3: Then type the command "remove-appx package" in the Powershell to uninstall the Movies and TV application.
Step 4: Also, you can re-install the Movies and TV application from the Microsoft App Store.
Solution 5. Repair Corrupted Video Files
If you cannot fix the video file that is already saved on your system, you might issue the media player or the video file itself. To fix error 0xc10100aa, you can try playing it on some other application or repair the corrupted files.
Here we have brought to you a user-friendly software for you - Wondershare Repairit Video Repair. It is a reliable application that can repair videos of every significant format like AVI, FLV, MP4, MKV, MOV, and more.
This application can fix the video files under all scenarios, from a basic error in the file to some syncing problems and from video corruption to the damaged videos. It provides two repairing modes, advanced and quick video repair, which you can select as per your needs.
You may want to know the benefits of this software to make it workable and productive.

Wondershare Repairit - Video Repair
Security Verified. Over 7,302,189 people have downloaded it.
-
Repair damaged videos with all levels of corruption, such as video not playing, video no sound, out-of-sync video or audio, playback errors, header corruption, flickering video, missing video codec, etc.
-
Repair videos of 15+ different formats, including MOV, MP4, M2TS, MKV, MTS, 3GP, AVI, FLV, MXF, KLV, INSV, M4V, WMV, MPEG, ASF, etc.
-
Repair damaged or corrupted videos caused by video compression, system crash, video format change, etc.
-
Repair critically damaged or corrupted videos available on SD cards, mobile phones, cameras, USB flash drives, etc.
-
Repairit has a quick and advanced scanning mode. You can use either depending on the level of corruption the video file has undergone.
-
No limit to the number and size of the repairable videos.
-
Support Windows 11/10/8/7/Vista, Windows Server 2003/2008/2012/2016/2019/2022, and macOS 10.10~macOS 14.
These are the easy steps to fix the saved video files on your system.
Step 1 Load the corrupted and damaged videos
You must install and open the Recoverit Video Repair toll on your system. Drag the video files that you want to fix and drop them on the application's home screen. You can also click on the '+' icon to open the browser window to select several videos to load.

Step 2 Fix the added video files
Once all the video files are added, you must click on the "Repair" tab to begin the process. You can load multiple or a single video file as per your needs. Then allow the tool to complete the process, and don't interrupt the process to get the best results.

Step 3 Save the repaired videos
You will receive a notification once the repairing process is complete. Now, you can save the repaired video files wherever you want them on your computer.

Step 4 Perform an advanced repair (Optional)
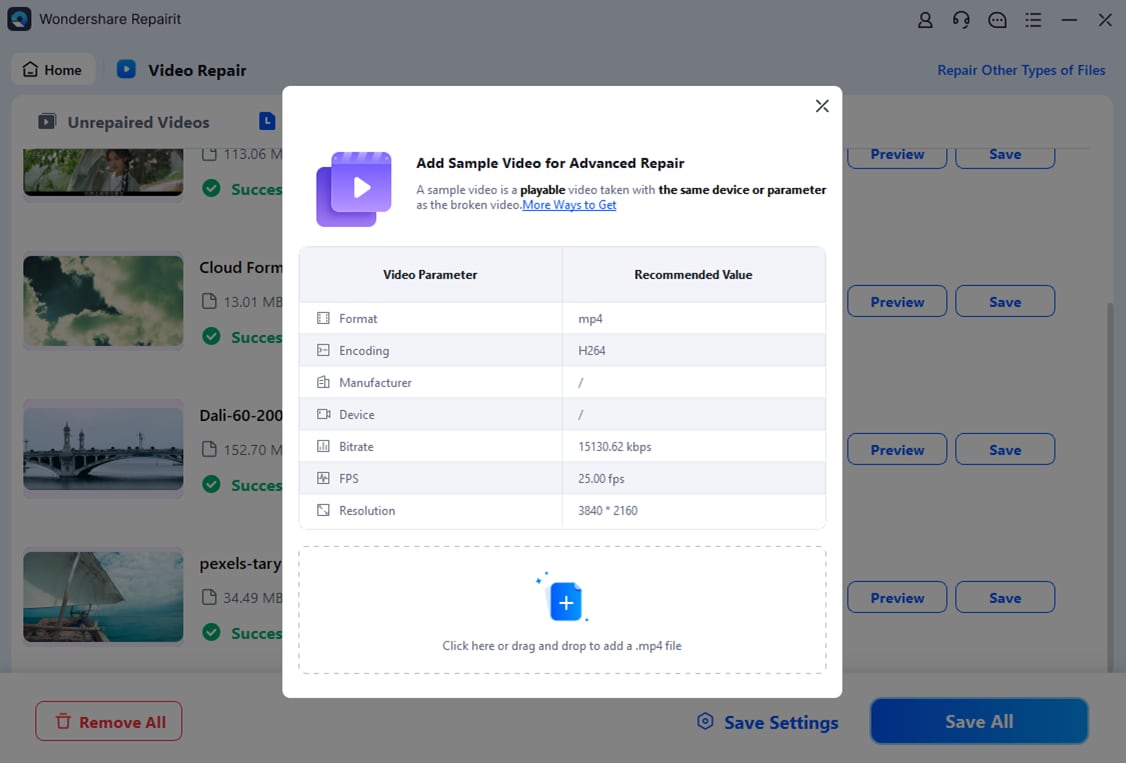
If you cannot fix the video file in quick mode, you must click on the "Advanced Repair" option in the application. Then a tool will ask you to upload a sample video file that is of the same format. The tool will remember it as a reference to perform an advanced repairing procedure on the video file. At last, click on the Repair tab to fix your video file.
Note: If your video file is corrupted, but the file is less than 3GB, you could use a professional online video repair tool like Wondershare Repairit Online Tool. With this tool in hand, all corrupted videos will be up and running in no time.

Wondershare Repairit Online
-
Repair different video corruption issues with ease.
-
It supports customers repair 150 videos per month and supports each video of 3GB online.
-
The online version supports various video formats: MOV/MP4/M2TS/MKV/MTS/3GP/AVI/FLV/MXF/M4V.
-
Security enough: videos are transferred via a 2048-bit encrypted connection and deleted after 3 hours.
-
It fixes videos online without damaging the original quality or integrity.
For your help, several steps for the Wondershare Repairit Online Tool are provided. Kindly follow them accurately to have fruitful results.
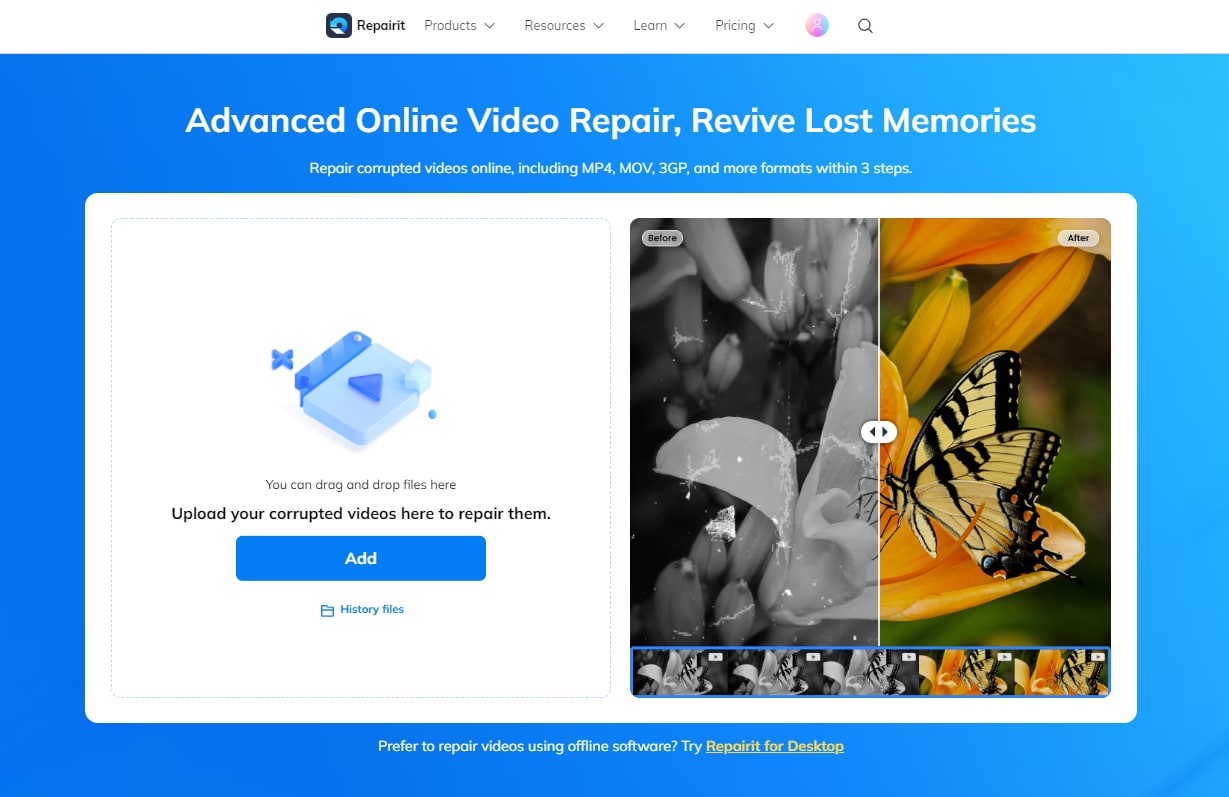
Step 1: Inserting the Infected Video into the Interface
The first and the last thing that the tool asks you is to upload the video. Hence, you have to browse the video in the (+) option. After that, the uploading of the video starts.
Step 2: Automatic Initialization of Repair Process
The upload bar will be 100%, and the software initiates the repairing process automatically without any prompt. This ensures that the user's time is saved.
Step 3: Previewing and Saving Process
The last step is where you will have a repaired video in your hands. After the repairing process, the video pops-up on the screen. You can preview it and then save it. The software also offers you to repair the next video immediately without wasting any time.
Part 3. How to Prevent 0xc10100aa in Windows
"0xc10100aa" is a type of Windows Films and TV error that does not allow you to play your video files.
The error might flash if it cannot run the operation as the application's location has changed. You can also try re-installing and uninstalling the app to check if it helps you resolve the issue.
Here are some ways to prevent the error from coming.
1. Prevent Video File Damage
You must always avoid damaging the video files, as it is the main reason that causes this error. Be careful while shifting your files from one place to another.
2. Prevent Windows Movies and TV Crash
If your Windows Movies and TV application crash somehow, you will not play your video files on that app. It can happen if you change the application's location or any malware deletes any file from the application.
3. Use System File Checker
Some of your Windows files might get corrupted or accidentally deleted from your system that can interfere with your system's ability to play the audio and video files.
So, you must use the System File Checker application to fix the corrupted or missing files.
4. Try Reinstalling the Video Compression
Sometimes resizing your file size can corrupt or damage the original file. It can happen if the compression process is not completed or interrupted. So, you must try reinstalling the tool, as it will have new files and prevent video file corruption.
5. Fix the error by updating codecs for the Windows Media Player
Here are the steps that can help to update video codec files automatically:
- Click on the "tools" button from the menu above your Windows Media Player.
- Now, select Options.
- Open the "player" tab and select the "Download codecs automatically check box" option.
- Then, click, OK.
Try playing your file again. If the media player wants to install a codec file, click on Install.
Part 4. Key Video Error Codes and How to Resolve Them
0xc00d36c4: Error code 0xc00d36c4 is a type of media error that might show up when the user tries to open an audio/video file right after the fresh Windows installation.
0xc00d36e5: Error code 0xc00d36e5 is a common issue with Windows 10 users. It usually occurs when you try to play videos in Windows Media Player or Movie Maker.
0xc1010103: The Windows OS uses the 0xc1010103 error code to alert the system users and programmers to an issue. Mostly it happens if a user tries to play a corrupted video file using the default Windows media player.
0xc10100aa: This error is indicated whenever the location of the application is changed. You can resolve the issue by trying reinstalling and uninstalling the application.
0xc10100bf: This kind of error is displayed when the file is not playable. It mostly occurs when the file is corrupt, the file extension is incorrect, or the file type is unsupported.
0xc00d36cb: Whenever you try to modify or rename an MP3 or MP4 file's details, this error code will come up.
0xc00d3e8c: The error 0xc00d3e8c occurs when the file you selected is not in the supported formats. You can try changing the extension to play the media files.
Relevant tips: Methods to fix Video_Dxgkrnl_Fatal_Error in Windows 10.
Closing Words
When the video files are not working on your system, it's either your media application attempts to display them or if the video file is corrupt. Video file corruption can be caused by something as basic as a changed extension or something serious as malware or virus.
This article covered several causes and solutions to fix the 0xc10100aa video error. For a more seamless repair process, consider using tools like Wondershare Repairit to quickly restore your corrupted videos with ease.
Related Content You Might Want to Know
-
1. Can you fix the corrupted video file?
Yes, you can fix a corrupted video, either manually or by using an application like "Recoverit Repair Tool." It is the best tool for recovering corrupted video files of any cause. -
2. How do I fix corrupted video files on Windows 10?
Yes, of course, you can fix corrupted video files on Windows 10. You can do it by playing the video file on some other application like a VLC media player or use an expert tool like "Recoverit Repair Tool." Both methods are effective in repairing corrupted video files. -
3. Is Wondershare Repairit Video Repair free?
The Wondershare Repairit Online Tool is free to use. But the Wondershare Repairit for desktop is not. -
4. How do I fix movies and TV apps on Windows 10?
There are several solutions to fix your Movies and TV app on Windows 10:
By verifying your settings.
Clearing the "Temp" folder.
Resetting Internet Explorer settings.
Restoring default libraries.
Using System File Checker.


 ChatGPT
 Perplexity
 Google AI Mode
 Grok
Grok
