
Rack focus is a classic cinematography move you have seen in movies, TV shows, commercials, YouTube videos, and even smartphone clips. With one smooth focus pull, the sharpness glides from one subject to another in the same frame, shifting your attention without a cut. Understanding how this technique works, when to use it, and how to protect your best shots helps you create more cinematic, story-driven footage across any camera or platform.
Repair Corrupted Files To Save Your Data
 Security Verified. Over 7,302,189 people have downloaded it.
In this article
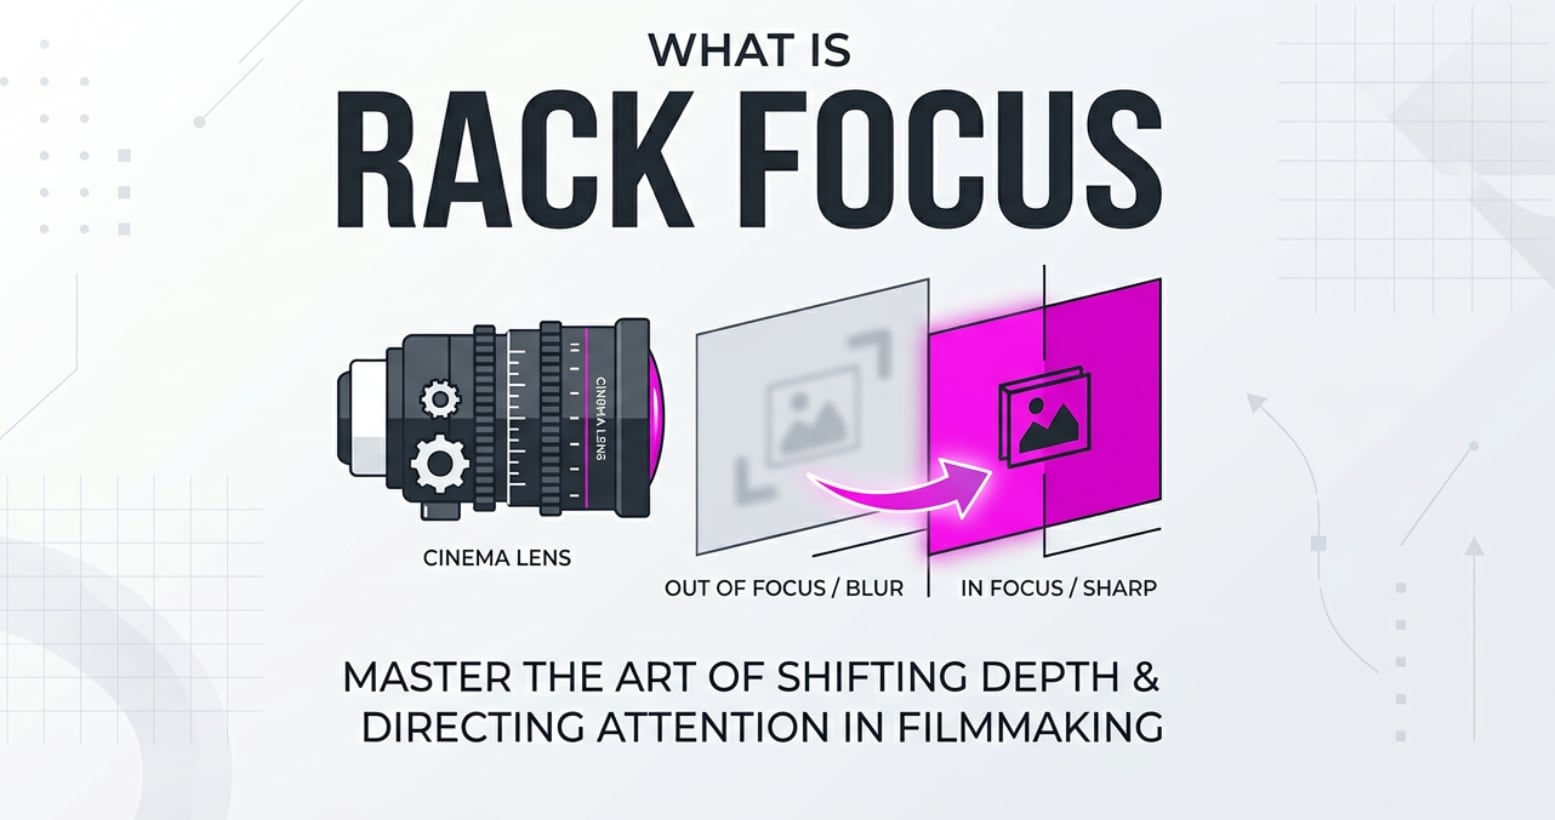
What Is Rack Focus?
Rack focus (also called a focus pull or focus shifting) is a cinematography technique where you change the camera’s focus from one subject or distance to another during a single shot. Instead of moving the camera, you move the sharp focus plane so one area becomes crisp while another falls out of focus.
It is a core cinematography technique used in narrative films, documentaries, interviews, product videos, and even vlogs. By controlling camera focus and depth of field, a rack focus lets you guide the viewer’s eye to what matters most at a specific moment in the scene.
On set, a camera operator or dedicated focus puller turns the lens’s focus ring (often using a follow-focus system) to execute the shift. In digital workflows, this focus move is captured in the recording, carried through editing and color grading, and finally viewed on streaming platforms or social media players.
How Does Rack Focus Affect Your Image or Footage?
Visual changes you will notice
The main impact of a rack focus is how it changes the distribution of sharpness and blur across your frame:
- Depth of field emphasis: A rack focus makes your depth of field feel more dynamic. The background can melt into blur while the foreground pops into sharp detail, or vice versa.
- Attention control: The viewer’s eye automatically follows the sharpest area. Shifting focus is like pointing an invisible spotlight inside the frame.
- Perceived motion without camera movement: Even if the camera is locked on a tripod, a focus pull creates a sense of motion and energy.
- Subject separation: By isolating one layer in focus against a soft, defocused layer, you add a cinematic look and separate characters or objects from their environment.
- Emotional tone: Slow, gentle focus shifts can feel thoughtful or romantic; fast, snappy pulls can feel tense, surprising, or comedic.
Other visual qualities can change subtly:
- Background bokeh behavior: As focus shifts, highlights in the background (bokeh) may change shape or intensity depending on your lens design.
- Apparent framing “breathing”: Some still-photo lenses “breathe” when you change focus, so the framing slightly zooms in or out during the rack focus.
- Noise and sharpness in low light: To get shallow depth of field for a strong rack focus, you may use a wide aperture and higher ISO, which can introduce noise or softer detail in darker areas.
Impact on editing, exporting, and playback
Because a focus pull is baked into the shot, your choices on set affect every stage afterwards:
- Editing: Well-timed rack focuses act as built-in transitions between story beats or characters. A messy focus hunt can be hard to hide in the cut.
- Color grading: Graders often protect the in-focus subject and gently de-emphasize the blurred areas with vignettes or selective corrections.
- Encoding and exporting: Highly blurred areas compress efficiently; sharp, detailed zones need more data. Aggressive compression for streaming can cause blockiness or shimmering, especially in finely textured in-focus areas.
- Streaming and playback: Lower bitrate streams may soften the contrast between focused and defocused areas, making subtle focus shifting less visible on small screens.
- Platform compatibility: Different platforms (YouTube, Instagram Reels, TikTok) re-encode your uploads. To preserve delicate video focus transitions, export in a high-quality master and let the platform handle downscaling from a strong source.
How Does Rack Focus Work in Real Shooting?
Where you control rack focus on your gear
In practice, a rack focus is created through precise control of camera focus hardware and settings:
- Lens focus ring: On DSLR, mirrorless, and cinema lenses, you manually rotate the focus ring to move focus from subject A to subject B.
- Follow-focus systems: On cinema rigs, a follow focus or wireless focus unit gives a focus puller a larger wheel and marked focus points to hit focus distances accurately.
- Autofocus aids: Some cameras allow programmable focus transitions between AF points or subjects, simulating a focus pull at a chosen speed.
- Monitoring tools: Focus peaking, magnified view, and external monitors help you see exactly where the plane of focus sits, especially at wide apertures.
- Distance marks and tape: On narrative sets, focus pullers measure distances with a tape measure and mark them on the lens or follow-focus disk for repeatable pulls.
Practical on-set examples
Here are some common ways creators use rack focus in real-world workflows:
- Interviews: Start in focus on the interviewer in the foreground, then shift focus to the interviewee as they begin answering. This works well on talking head setups recorded for YouTube or corporate videos.
- Narrative scenes: While shooting a dialogue on a cinema camera, you may rack focus from one character in the foreground to another in the background to show who is emotionally “in control” of the moment.
- Product videos: Begin with a brand logo or detail in sharp focus, then pull focus to reveal the full product. This works across DSLR, mirrorless, and smartphone campaigns and survives through color grading and online delivery.
- Establishing clues: In mystery or tutorial videos, you might start on a character’s face and then rack focus to an important clue, prop, or interface in the background.
- Live streaming and events: Operators of PTZ or mirrorless cameras may manually perform gentle focus shifting during concerts or conferences, synchronized with lighting or music cues.
Once captured, those focus moves are visible in your NLE (like Premiere Pro, DaVinci Resolve, or Final Cut Pro), encoded into your exports (H.264, HEVC, ProRes), and remain part of the viewing experience on web players and TVs.
Best Uses, Common Mistakes, and Quick Tips
When rack focus matters most
- To reveal new information without cutting, such as a sign, screen, or important object.
- To highlight relationships between characters placed at different depths.
- To add cinematic polish to simple setups like desk shots, tutorials, and interviews.
- To guide attention in busy environments where many elements compete for the viewer’s eye.
Common mistakes with rack focus
- Hunting focus: Overshooting and snapping back makes the move look unintentional and amateurish.
- Too fast or too slow pulls: A speed that does not match the mood or dialogue can feel distracting.
- Insufficient depth separation: If both subjects are at similar distances or the aperture is too closed, the focus shift looks minor and unmotivated.
- Shaky camera or lens: Turning a stiff focus ring on a lightweight rig can introduce jitters in the frame.
- Ignoring exposure and noise: Opening the aperture for shallow depth of field without compensating ISO or shutter can lead to noisy or overexposed footage.
Quick tips for better focus pulls
- Use a lens with a smooth manual focus ring and visible focus distance markings whenever possible.
- Pre-measure and mark your focus points using tape or follow-focus disks, especially for repeated takes.
- Rehearse the movement at the intended speed before you roll to find a natural rhythm.
- Use focus peaking or magnified preview to confirm both start and end points are perfectly sharp.
- Balance your aperture, ISO, and distance so the depth of field clearly separates foreground and background subjects.
- For web and social delivery, export a high-quality master so compression does not muddy your delicate video focus transitions.
The takeaway: a well-planned rack focus is not just a visual trick; it is a storytelling tool that directs attention, reveals information, and supports the mood of your scene.
How to Use Repairit to Fix a Corrupted Photo File
Repairit introduction
When an important rack focus setup is supported by stills, continuity photos, or behind-the-scenes images, losing those files to corruption can disrupt your entire production. Wondershare Repairit is designed to rescue damaged media so your visual references and deliverables stay intact. Visit the Repairit official website to repair corrupted photos and videos from DSLRs, mirrorless cameras, action cams, and smartphones with a straightforward workflow that fits smoothly into any film or content pipeline.
Key features of Repairit
- Repair corrupted video files and broken photos from multiple cameras, memory cards, and formats, restoring valuable focus-critical shots.
- Offer an intuitive guided repair process with preview options so you can verify image quality before saving the final recovered files.
- Support batch processing, letting you fix multiple focus-related stills and clips from a shoot in a single session to save time.
Step-by-step: Repair corrupted photo files
- Add corrupted photo files
Open Repairit on your computer and go to the dedicated Photo Repair module. Click the option to add files, then navigate to the folder that stores your corrupted, unopenable, or distorted photos from your rack focus session. Select all the images you want to fix and load them into the list so they are ready for processing.

- Repair photo files
After importing your damaged images, start the repair task from the main interface. Repairit automatically scans each file, looks for structural issues or header damage, and applies targeted corrections in the background. When the process finishes, use the built-in preview to check that faces, fine textures, and focus transitions in the photos look clean and usable again.

- Save the repaired photo files
If the previews meet your expectations, choose a safe output folder that is different from the original source location. Save all selected items so you keep both the untouched originals and the repaired versions. Your recovered photos are now ready to be brought into your editing software, used for continuity, or archived with your rack focus footage for future projects.

Conclusion
Rack focus is a simple but powerful way to shift the viewer’s attention within a single shot. By smoothly changing which subject is sharp, you can highlight important details, reveal information, and add a polished, cinematic feel to interviews, narratives, and product videos on any platform.
When you understand how focus shifting interacts with depth of field, camera settings, and final delivery formats, you can plan cleaner pulls and avoid distracting focus hunts. And if corrupted media threatens your best work, tools like Wondershare Repairit help you recover essential images and clips so your carefully crafted focus moves remain part of the final story.
Next: Subject Tracking Autofocus
FAQ
-
1. What is rack focus in simple terms?
Rack focus is a technique where you shift the camera’s focus from one subject or distance to another within the same shot. The framing stays mostly the same, but the sharpness glides from one plane to another, directing the viewer’s eye. -
2. Do I need a special lens or camera to perform rack focus?
You do not need a cinema camera, but a lens with a smooth manual focus ring makes precise focus pulls much easier. Focus aids like peaking, magnification, and external monitors also help you see exactly where the focus plane is during the move. -
3. Is rack focus the same as zooming?
No. Zooming changes focal length and magnification, altering how large subjects appear in the frame. Rack focus keeps the composition mostly the same and only changes which distance is in sharp focus. -
4. When should I use rack focus in a scene?
Use it when you want to reveal important information, switch emphasis between characters, or highlight a crucial prop without cutting. It is most effective when the change in focus clearly supports the story or emotion of the moment. -
5. Can I fix a bad rack focus shot in post-production?
Some advanced tools can simulate or partially refine focus changes, but results are limited. Getting a clean rack focus in-camera is still the most natural and reliable option, so it is worth rehearsing and planning your focus pulls on set.
