
 TL;DR:
You can improve low-quality photos manually by balancing Gaussian blur and sharpening effects in desktop editors, or use dedicated AI repair software to automatically reconstruct and upscale heavily corrupted files.
● Fixing images manually in Photoshop requires applying a Gaussian Blur to reduce pixelation followed by an Unsharp filter, or utilizing a Soft Light blending layer combined with the Despeckle noise filter.
● Wondershare Repairit is ideal for severely damaged camera formats like CR2, NEF, and NRW, offering an 8X AI Image Upscaler and unlimited file size processing for macOS 10.13 to 15 and Windows Vista through 11.
● To prevent pixelation and blur before the post-processing stage, shoot strictly in RAW format to avoid compression loss, minimize your camera ISO settings to prevent grain, and stabilize the lens with a tripod.
Ask AI for a summary
 ChatGPT
 Perplexity
 Gemini
 Claude
 Grok
Grok
Capturing photos holds a distinctive beauty, and images can hold great significance in our everyday lives. Thus, it is undoubtedly a bummer when your pictures do not come out as expected. Images that retain low quality come off as unappealing and unpleasant. Therefore, it is essential to maintain the quality of pictures taken to procure impressive results.
Here, we'll guide you through how to fix low quality photos and improve photo clarity using both manual and AI-powered tools with simple tips and techniques. So, without further ado, let's get started.

Part 1: How to Fix Picture Quality? (3 Tested Methods)
The process to fix "low quality images" is a relatively simple task if you are aware of the right methods. Here, we have compiled the best ways to let you know"how to fix a bad-quality picture" easily.
Method 1: Use Photoshop
Before jumping into AI tools, let's explore manual fixes you can try. Photoshop is a tool that effectively improves almost all aspects of your image, including picture quality. It has several options and utilities that let you"fix image quality" quite effectively. To learn "how to fix bad-quality pictures in Photoshop, follow the steps given below.
1. Launch Photoshop and open the image.
2. Select the option "Filter and Blur."
3. Choose the option 'Gaussian Blur' and slide to obtain a suitable range.
4. Click on OK.
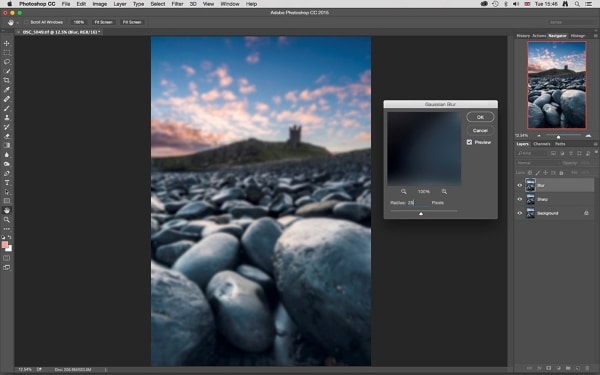
5. Then, go to the 'Filter and Sharpen' option.
6. Select 'Unsharp."
7. Slide until your required results are produced, and click on OK.
8. Now go to 'File' and save the image.
If this method doesn't work, you can try another way to fix the quality of an image. Here is how.
1. Launch Photoshop on your device.
2. Go to 'File' and click on 'Open' to open your file.
3. Right-click on the image.
4. From the drop-down menu that appears, choose "Layer" to create a new layer.
5. Locate "Blending Options" from the menu on top and select the option "Soft Light."
6. Go to "Filter and Noise."
7. Select 'Despeckle' and choose a suitable level.
8. Next, find a preferable level of brightness and contrast.
9. Lastly, save the image.
Notes, Here is a complete guide to fix damaged photos in photoshop.
Method 2: Fix Low Quality Photos by Using Best AI Tool Repairit Photo Repair
You can quickly fix your pixelated, corrupted, or otherwise damaged images using the Wondershare Repairit. It helps you remove blur from photos and turn bad quality photo to good quality. The program has a high repair rate and is also compatible with both Windows and Mac. The following are its main features:

Wondershare Repairit - Photo Repair
 Security Verified. Over 7,302,189 people have downloaded it.
-
Repair damaged photos with all levels of corruption, such as grainy photos, dark photos, pixelated photos, faded photos, etc.
-
Repair images of diverse formats, such as JPG, JPEG, PNG, CR3, CR2, NEF, NRW, etc.
-
Repair critically damaged or corrupted photos available on SD cards, phones, cameras, USB flash drives, and more.
-
Repairit has a quick and advanced repairing mode. You can use either depending on the level of corruption the photos has undergone.
-
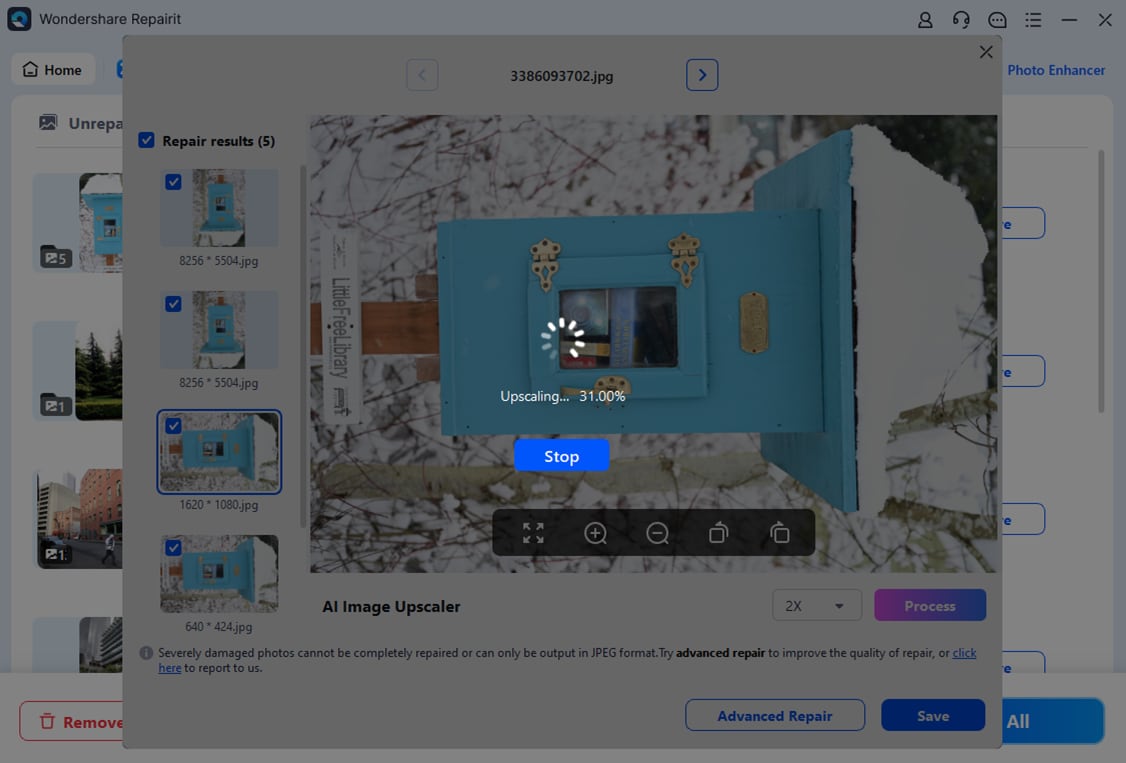
The "AI Image Upscaler" feature can enlarge the repaired photos to 2X, 4X, and 8X.
-
Intelligently restore old/scratched photo and colorize black and white photos with various AI effects.
-
No limit to the number and size of the repairable photos compared with the online version of Repairit.
-
Support Windows 11/10/8/7/Vista, Windows Server 2003/2008/2012/2016/2019/2022, and macOS 10.13~macOS 15.
Here is how you can use the tool:
Step 1: Target the Corrupted File
After launching the program, you need to go to "More Types Repair" and choose "Photo Repair.
Then add your desired file by clicking on the 'Add File' button.

Step 2: Begin Repairing
After uploading the corrupted photos, please click on "Repair" to let the program start the photo repair process.

Step 3: Preview and Save the Image
Waiting for the photo repair process finishes, just need a few seconds, then you can preview the quality of the repaired photos. Here you can save the image to your desired location by clicking the "Save" button.

Attention: Before saving the photos locally, you can also use the "AI Image Upscaler" function to enlarge the repaired photos to 2x, 4x, or 8x, without changing the clarity of the photos.
Method 3: Try Paint.net
Another alternative to make bad quality picture better is paint.net. To adjust the quality of your image using this free tool, proceed as below.
1. Open the image in paint.net.
2. Go to the 'Effects' tab.
3. Go to the 'Blur' option.
4. Choose Gaussian blur and slide to reduce pixelation.
5. From the Effects tab, go to "Photo" and then choose "Sharpen."
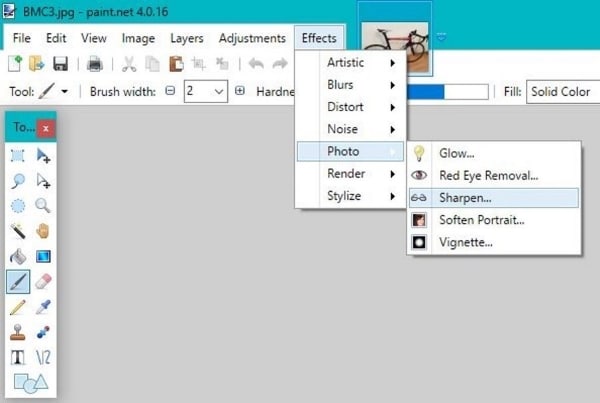
6. Use the slider to get a suitable level.
7. Save the image, and you are all done.
A Video Tutorial on how to Fix Low Resolution Photos?
Part 2: What is Image Quality?
Image quality is a measure of the excellence of an image. It defines how sharp, clean, and detailed your photos look. Generally, there are two methods in which image quality can be assessed: objectively and subjectively.
Subjective techniques signify a viewer evaluating the quality and superiority of an image. Whereas objective methods define set standards by which images can be assessed. Resolution of an image is a term commonly used for defining the quality of an image.
Resolution symbolizes the number of pixels that are viewed on a set area of the screen or on paper. Generally, image resolution is measured in PPI (pixels per inch). A higher resolution signifies the higher quality of the image produced. It is addressed in the format Width x Height.
Bonus: Are you ready for photo shooting, editing, managing or sharing? Do you have a question about what makes your photo corrupted? If the answer is yes, let's check your intimate guard to photos with any corruption scenarios - Photo Corrupted? Let's Rescue Them Right Now!
Part 3: What Factors may Cause low quality Pictures?
Before knowing how to fix a low quality picture, it is necessary to register its causes. Several reasons can produce a low quality image. A few of them are listed below.
 Resizing the Image: One of the most common reasons that cause pixelation of images is resizing. When you try to resize a photo without proper work, it might be rendered low on quality. Particularly when smaller images are enlarged, they can get blurry and of low quality.
 Unfocused Shots: In often cases, when images are taken, the lens is not properly focused on the subject. Hence, images get out of focus, blurry, and pixelated. All of this can significantly reduce the quality of the image.
 Camera Errors: The device or lens you are using to take a picture on may be damaged. Due to this, image quality can be significantly lowered. To fix the quality of the photo, you will need to fix your device first. By the way, we have an article tell you the most common digital camera errors and how to fix them.
 Incompatibility Issues: A possible reason for your images being low in quality might be that the file format is not supported by the application that is being used to view the file. Hence, file quality is reduced, and you encounter pixelation or blurriness.
- Shaky Camera: Shaky camerawork often produces results that are blurred and pixelated. Images of low quality are produced when a camera is not stable. If you wish to fix the quality of a picture, you can start by stabilizing your device.
Part 4: Tips to Avoid low quality Photos
There are specific ways by which you can avoid low quality images. Following these will certainly help you in improving your photo quality to a great extent.
- Adjust ISO: A high ISO can cause grainy and pixelated images. Keep your ISO to a minimum to take better quality pictures. The 3GP file format is developed to record and play multimedia files.
- Perfect your Lighting: Lighting matters a lot when perfecting an image. You should adjust the lighting to maximize the quality of your image.
- Stabilize your Device: Using a tripod or monopod to stabilize your camera can significantly help to"fix image quality.
- Capture in RAW: The good idea is to capture your images in RAW formats, which can reduce damage due to compression and editing, avoiding bad quality.
- Post-Process the Images: After taking the picture, it is essential to edit and fix various aspects such as sharpness and exposure, to bring out the best in your photo
After taking the picture, it is essential to edit and fix various aspects such as sharpness and exposure, to bring out the best in your photo.
Further Reading:
Here are the useful articles to help you.
1. Repair Damaged Photos Everywhere.
2. PNG, JPG, or JPEG: What is the Difference?
3. Invalid JPEG Marker Type is Found.
Conclusion
Image quality is of prime importance when your work's value is in question. With the help of the above-mentioned tips and techniques, you now hopefully know how to fix picture quality quickly. Try these methods the next time you need to fix picture quality and produce discernable results in record time. If your photos are already damaged, don’t waste time editing manually — let Repairit AI Photo Repair restore them in one click.
People Also Ask
-
Can AI really fix blurry or low-quality photos?
Yes. AI photo repair tools use deep learning to detect blur, noise, and pixel loss, then reconstruct missing details to improve photo quality automatically. They’re especially effective for restoring old or low-resolution photos. -
Does upscaling reduce or improve image quality?
Traditional upscaling can make images appear softer or pixelated, but AI image upscalers enhance resolution while preserving texture and detail. This helps fix low-resolution photos and make them look naturally sharper. -
How can I improve picture quality without Photoshop?
You can enhance photo clarity using AI tools such as AI Image Upscaler or AI Photo Repair. They automatically fix blurry photos, reduce noise, and improve brightness and detail without manual editing.