
 TL;DR:
Repairing damaged photos requires either manual visual restoration using Adobe Photoshop's specialized editing tools or automated file corruption correction via Wondershare Repairit.
● Manual restoration in Adobe Photoshop relies on specific tools like the Reduce Noise filter, Photo Filter adjustment layers, the Healing Brush for pixelated spots, and the Patch tool for background replacement.
● Wondershare Repairit serves as an automated alternative for severe file corruption, featuring an Advanced Repair mode that strictly requires loading an uncorrupted sample image of the identical format shot on the same device.
● A web-based version of the Repairit tool is available for non-technical users seeking automated fixes, strictly limited to corrupted image files that do not exceed 300MB.
Ask AI for a summary
 ChatGPT
 Perplexity
 Gemini
 Claude
 Grok
Grok
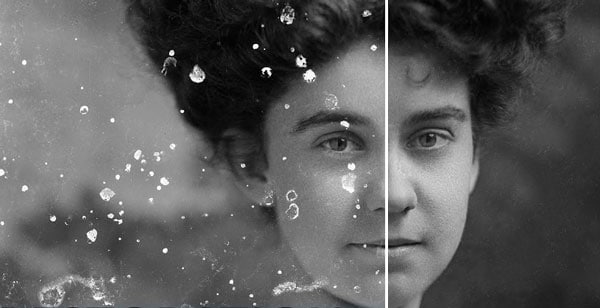
Lets face it there are times when while transferring, editing, or downloading our images, they can get damaged. While there are so many possible reasons for image corruption, there are only a handful of ways to fix them. For instance, one of the best ways to repair a damaged picture is by using Adobe Photoshop. Dont worry even if you have no prior technical experience, you can fix damaged photos in Photoshop. Here, I will provide a step-by-step tutorial for repairing damaged images via Adobe Photoshop.
Part 1: Adobe Photoshop 101 - Things to Know
Developed by Adobe, Photoshop is one of the most popular raster graphics editing tools that work on Windows and Mac. While the tool was first released in 1988 by Thomas and John Knoll, the software has become the industry standard not only in raster graphics editing, but in digital art as a whole. Also, it has certainly undergone a lot of development in the last few years.
There are tons of readily available and AI-integrated features in Photoshop that you can use to repair an image. It can edit and compose raster images in multiple layers and supports masks, alpha compositing and several color models including RGB, CMYK, CIELAB, spot color, and duotone.
Photoshop utilizes its own PSD and PSB file formats to support those features. In addition to raster graphics, it has limited abilities to edit or render text and vector graphics (especially through clipping path for the latter), as well as 3D graphics and video. Its set of features can be expanded by plug-ins; developed and distributed programs independent of Photoshop that run inside and offer new or improved features. For instance, you can reduce the noise on your photos or treat some damaged areas. From altering its saturation to vibrancy, there are so many things that you can do in Photoshop to get the desired editing results.
Here are some articles related to Photoshop:
1. Fix Photoshop Error: Invalid JPEG Marker Type is Found.
2. Repair Photoshop Problem Parsing the JPEG Data.
3. JPEG Colour Change Export in Photoshop CC .
Part 2: A Stepwise Solution to Fix Damaged Photos in Photoshop
Since Adobe Photoshop can be a bit overwhelming for beginners, you might find it hard to navigate its features. Therefore, I would recommend following this simple approach that can help you fix damaged photos in Photoshop.
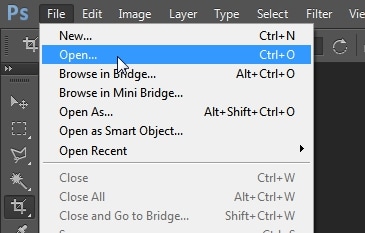
Step 1: Open a Damaged Photo in Adobe Photoshop
At first, you can just install and launch Adobe Photoshop on your system and make sure the photo you wish to repair is saved on it. Now, just can either drag and drop the photo on its interface or go to its File Open feature to browse and load the damaged image on Photoshop.
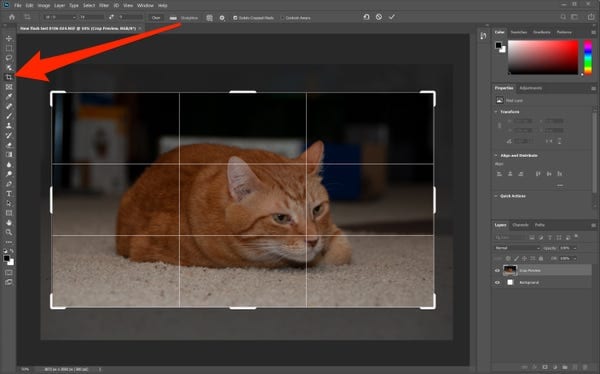
Step 2: Make Basic Adjustments: Crop, Straighten, and Rotate
After loading the image on Adobe Photoshop, you can make all the needed adjustments to improve its quality.
For instance, you can first go to the 'Crop' icon from the sidebar. Now, you can simply select the area that you wish to keep (and what you want to remove).
Furthermore, you can also right-click the image you want to edit and click on the Ruler tool. This will let you straighten your image by getting grid lines on Photoshops interface.

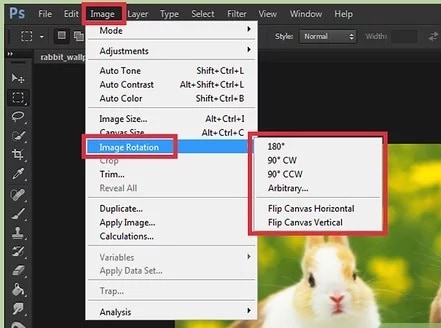
You can also go to its Menu Image and choose to rotate the image at any defined or arbitrary angle. There are also options to flip the image vertically or horizontally here.
Step 3: Reduce Noise in the Image
Once you have made all the minor changes in your image, you are all set to fix damaged photos in Photoshop. One of the major issues that people encounter is the presence of unwanted noise in their photos. To fix this, you can just go to Photoshops 'Menu Filter Noise' and click on 'Reduce Noise' button.
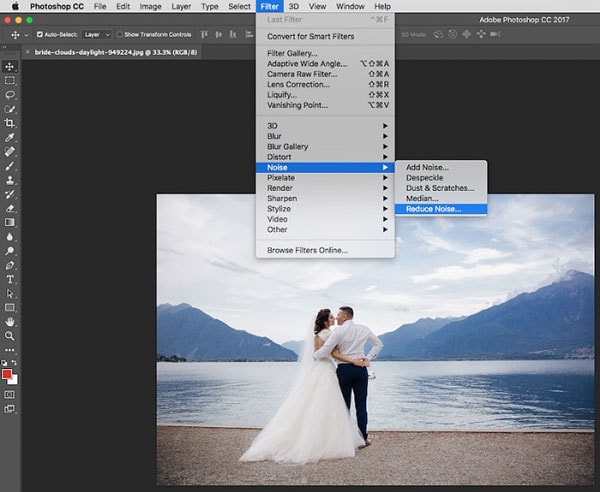
This will open a new pop-up option that you can use to regulate the amount of color and luminance noise in your photos. Photoshop will automatically reduce the noise from your photos for the selected level and will let you preview the results.
Step 4: Make Color Adjustments and Corrections
If you have scanned an old picture, then chances are that its overall coloring could be saturated. Thankfully, Adobe Photoshop lets us manually correct the coloring of the image or use its automatic color correction feature.
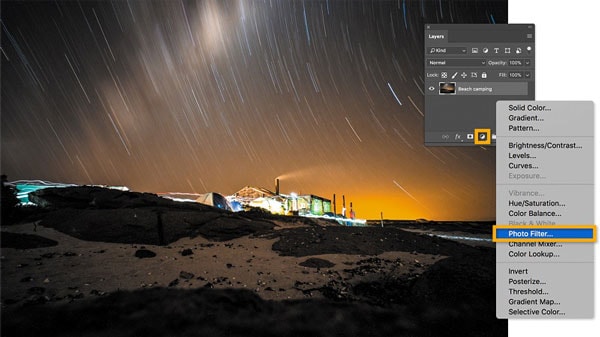
To do this, you just have to go to the 'Adjustment Layer' icon in the Layers panel and click on the 'Photos Filter' option. You can also find it under the Image Adjustments Photo Filter field.
Afterward, you can just click on the 'Filter' menu from the side and simply choose any dominant color to adjust. You can choose warming or cooling filters to adjust the overall tone of the image. If you want, you can also click on the color square to pick a color for the custom filter.
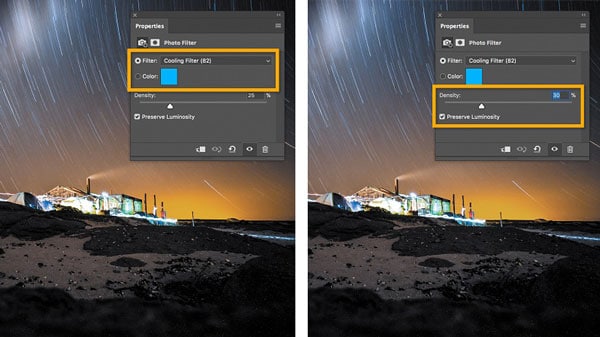
Now, you can just adjust the slider to change the coloring level for the image.
Step 5: Try to Heal the Damaged Spots in the Image
Your photos can also have different spots that could be damaged or pixelated due to numerous reasons. Thankfully, Adobe has come up with an inbuilt healing brush that can help you fix damaged photos in Photoshop without much effort.
Once the image is loaded on Photoshop, you can go to the sidebar and click on the healing icon. From here, you can pick either the spot healing brush tool or the standard healing brush tool.
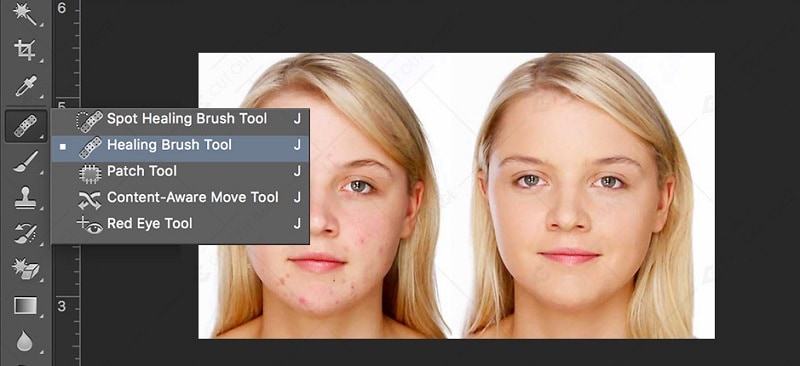
After selecting a healing tool, your cursor in Photoshop would be changed. You can now increase or decrease the size of the brush and gently move it on the damaged spots. Adobe Photoshop will now automatically heal the area by merging it with the surrounding pixels.
Step 6: Improve the Damaged Background and Other Elements
At times, the overall background of an image can also be damaged or have some unwanted spots. To fix this, you can simply use the 'Patch' tool in Adobe Photoshop.
You can just go to the sidebar options in Photoshop and click on the Patch Tool under the Healing option. Now, as the icon would be changed to a tassel, you can just select the area in the background (or any other element) to improve.
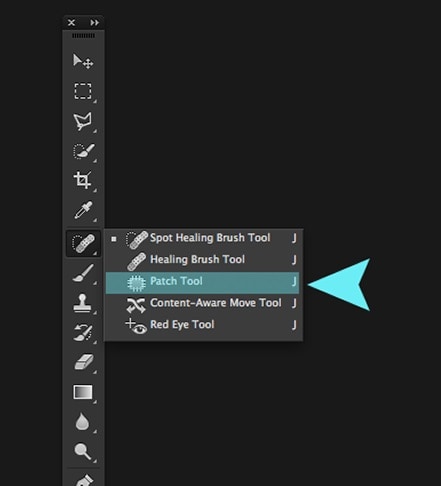
After selecting the area, you can choose to overlay it on any other element in the image. This would let you fix any damaged section in the image or even remove anything from the background.
Step 7: Work on its Tone and Vibrancy
Lastly, to fix damaged photos in Photoshop, you can alter the overall saturation, tone, hue, and other effects in the image. You can just go to its Menu Image Adjustments and click on options like Color balance, Hue, Saturation, Exposure, or Vibrancy.

This will open a dedicated pop-up feature that you can use to manually adjust the overall tone and vibrancy of the image.
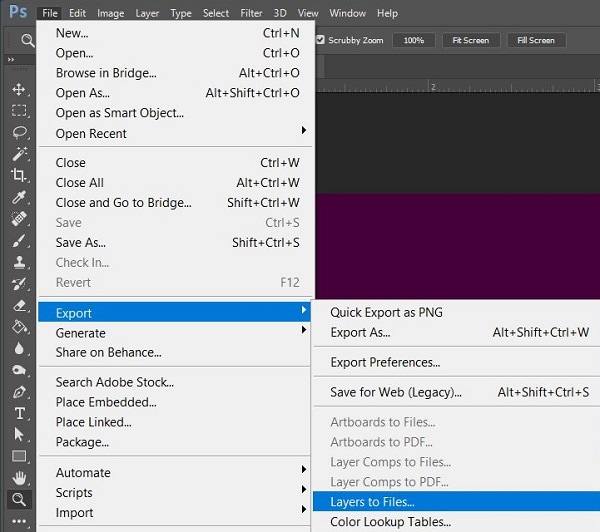
Step 8: Export the Restored Image from Photoshop
Thats it! Once you have worked on your image, you can export it from Photoshop in a preferred format. Just go to its Menu File Export option and choose to save the image to any desired location in the format of your choice. You can also choose to export an entire layer or save layers separately.
Part 3: Extra Solution: Repair Damaged Pictures in an Easier Way
As you can see, we have to go through so many steps to fix damaged photos in Photoshop. Though, if you are looking for a simple alternative and dont want to undergo so much technical hassle, then use Wondershare Repairit.
It is a popular video and photo repairing application that features two dedicated repairing modes (Quick and Advanced). The application is known to yield positive results in several situations like a corrupt photo, pixelated images, missing meta components, and so on. Heres how you can automatically fix your corrupt photos with Wondershare Repairit.
Step 1: Load the corrupt photos on Repairit
To start with, just launch Wondershare Repairit on your system, go to the Photo Repair section from "More Types Repair", and click on the 'Add' button to load your images.

After loading your images, you can check their details on the native interface of Repairit and can start the repairing process.

Step 2: Repair your corrupt photos
As you would click on the 'Repair' button, the application would perform a quick scan to fix all kinds of minor issues. After completing the scan, you will be notified.

You can now click on the thumbnail of any image or an eye icon to get a dedicated preview of the picture, then click the "Save" button to download the repaired photos locally.

Before saving the repaired photos, you can use the "AI Image Upscaler" to enlarge your photos to 2x, 4x, or 8x.
In case there is a serious issue with your images, then the quick repair scan might not yield positive results. Now, you can click on the Advanced Repair feature from the bottom panel.
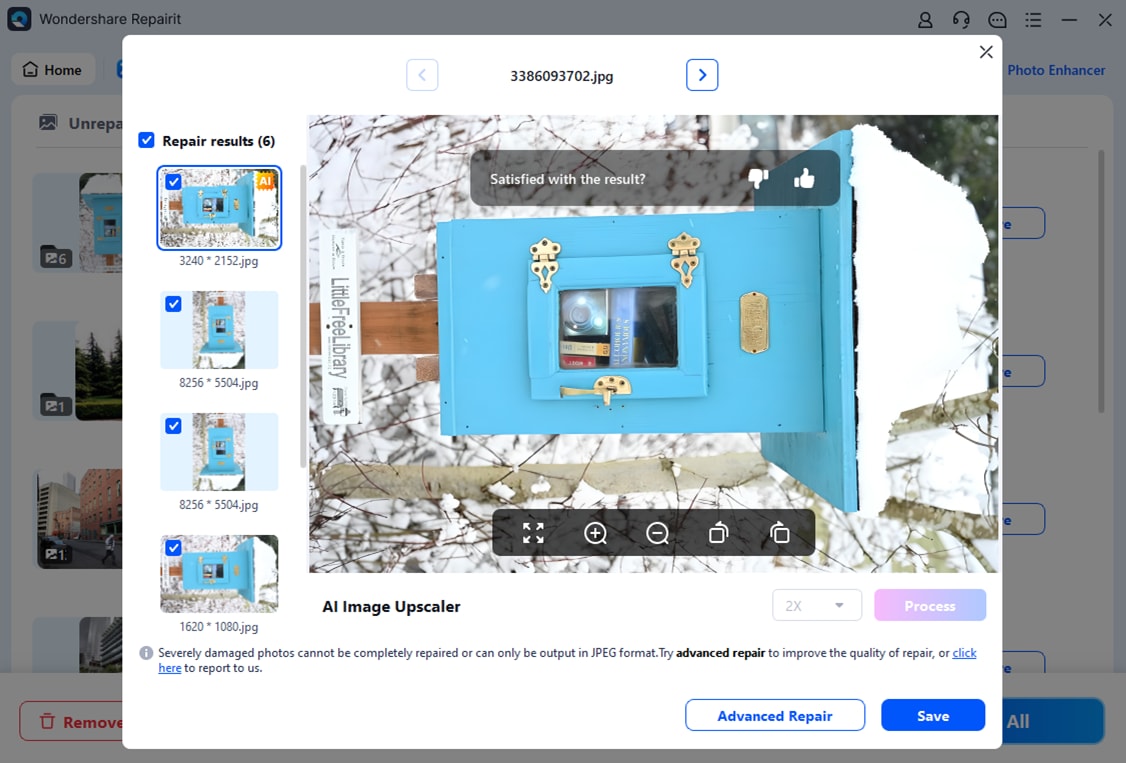
To perform an Advanced Repair, you are needed to load a sample image (picture of the same format as the corrupt file and shot on the same device). While it would take more time, the results of the Advanced Repair will be better.
After completing the Advanced Repair feature as well, you can get a preview of your images on Repairit.
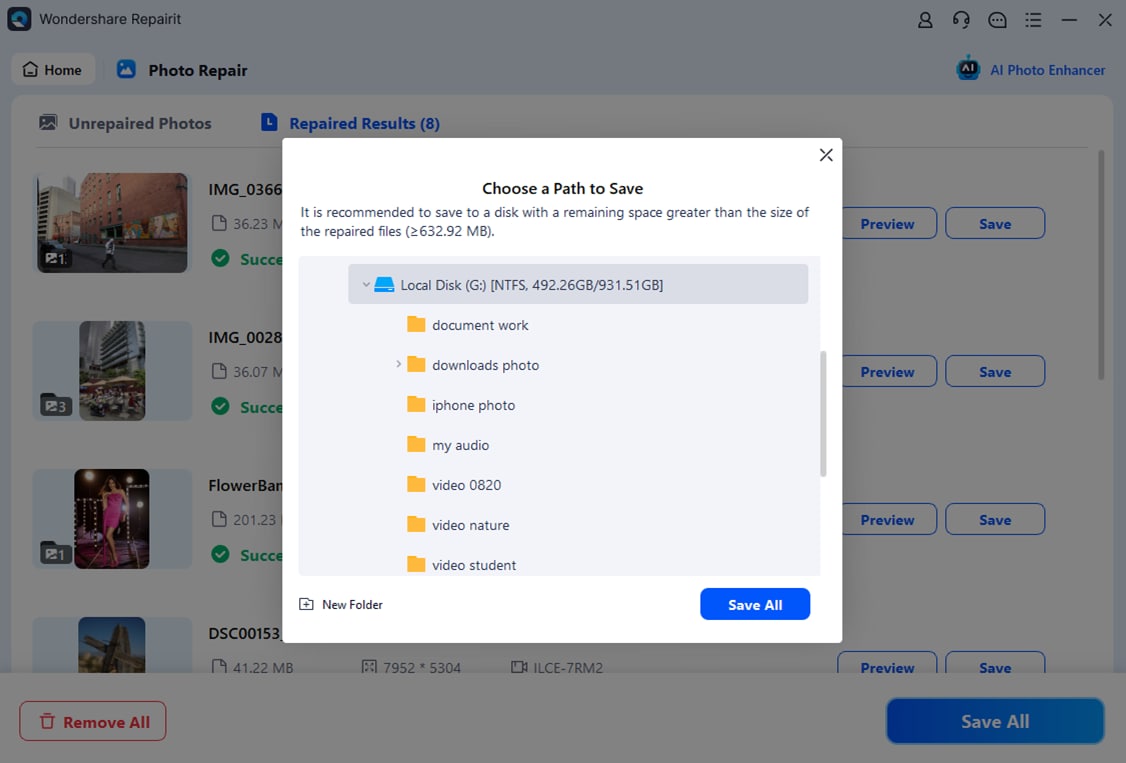
Step 3: Export your repaired images from Repairit
Lastly, you can just select the images of your choice and click on the Save button. Subsequently, Wondershare Repairit will let you export the selected images to any location of your choice.
Following this basic drill, you can fix multiple corrupt or damaged photos using Wondershare Repairit.
Attention:
If you want to repair photo online and your corrupted photo is no more than 300MB, you can try the online version of Repairit Photo Repair to get your photo repaired online with ease.
Now Its Your Turn!
Im sure that after following this guide, you would be able to fix damaged photos in Photoshop. I would recommend following the listed steps one by one on Photoshop to get the best results for image restoration. Though, if you cant seem to get the expected results with Photoshop or if there is a severe issue with your images, then you can try Wondershare Repairit. I have included its stepwise tutorial here as well that you can follow to repair all kinds of corrupt or damaged photos quite easily.