While opening images in Photoshop, a lot of people have encountered issues like the "Invalid JPEG Marker Type is Found" error, preventing them from opening or editing their images. This can cause distress in their minds as they will not be able to perform the task they intended to.
This can be caused due to a corrupt file, improper format while saving, or some other issues. Even if you can see the correct thumbnail of the image, there is still a chance that this error can occur and it is due to the issues that arise while saving the image. Luckily, an invalid jpeg marker found error can be easily resolved without any technical expertise. In this guide, we’ll explore the causes and provide effective solutions to resolve it.
In this article
Part 1. Overview of Photoshop Invalid JPEG Marker Error
Photoshop is one of the most widely used photo processing tools available in the market. The reason behind its popularity is the powerful image processing and editing features that it has.
Errors like invalid jpeg marker type can arise due to issues related to the format while the file was being saved. There are a lot of other similar errors related to Photoshop that can make anyone frustrated.
Adobe Photoshop Error List
Due to the problem with the file or issues in the system, there can be a variety of errors while using Photoshop. It is better to make sure that your files are in proper condition and correct format so that such problems can be avoided with ease. The following are some of the most commonly founds errors that people come across while using Photoshop:
- Could not complete your request because an unknown or invalid JPEG marker type is found.
- This is not a valid Portable Document File (PDF) document. It cannot be opened.
- Could not complete your request because it is not a valid Photoshop document.
- Could not complete your request because the file-format module cannot parse the file.
What's an unknown or invalid JPEG marker?
Even though you can see the correct preview and thumbnail of a certain JPEG, often the image will not be able to open in Photoshop so that it can be edited. This is a very common kind of error that is caused due to improper image format, error while renaming, corrupt file, etc.
This renders the JPEG file useless and you will not be able to complete the editing task that you initially wished to complete. However, there are a few tips and tricks that can be followed to resolve this issue without any problem.
Why an Unknown or Invalid JPEG Marker Type Is Found?
When you try to open a JPEG image in Photoshop, you might not be able to do so due to JPEG marker error. Although you might be able to see the thumbnail of the image, there will still be chances that you might not be able to access the file.
This can arise due to a variety of reasons, most popular being issues with formats while saving the file. For example, if you have saved a JPEG image with a TIFF format, you will be able to see the thumbnail but will not be able to open and export the file into Adobe Photoshop to edit it.
Bonus: Are you ready for photo shooting, editing, managing or sharing? Do you have a question about what makes your photo corrupted? If the answer is yes, let's check your intimate guard to photos with any corruption scenarios - Photo Corrupted? Let's Rescue Them Right Now!
Part 2. How to Solve "Invalid JPEG Marker Type Is Found"
Invalid JPEG marker type is found, which is a very common type of error that can error on any device. The following are some of the solutions that you can have a look at if you trying jpeg marker repair so that it can be used for editing purposes on Photoshop:
|
🛠️ Solution |
📌 Applicable Scenario |
🚀 Advantages |
|
Incorrect or multiple file extensions |
Simple and easy, no extra software needed |
|
|
Format recognition issues due to filename |
Quick fix, no additional tools required |
|
|
File format not compatible with Photoshop |
Supports most image formats, easy to use |
|
|
File is corrupted or other methods fail |
Advanced repair capabilities, batch processing available |
Solution 1. Change the image extensions
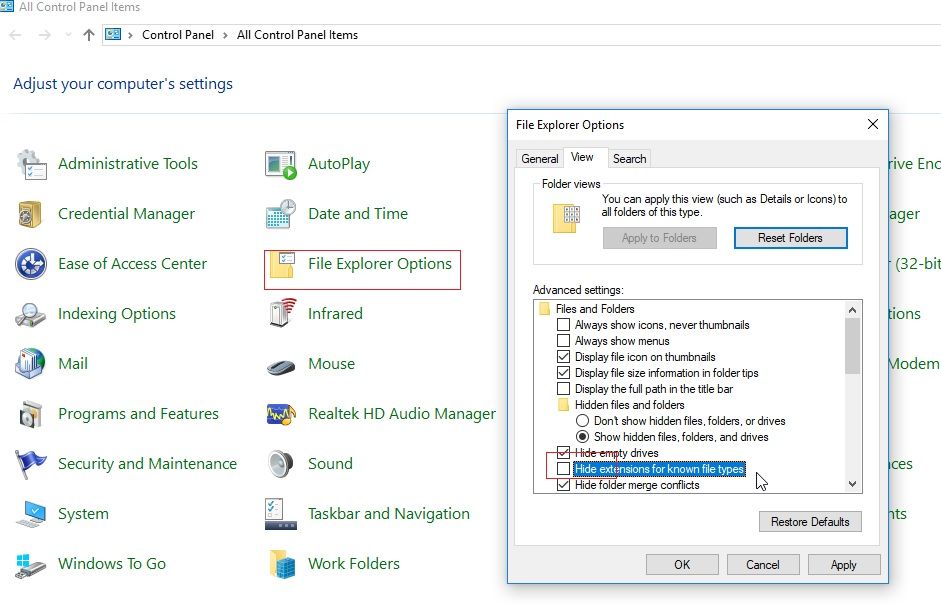
All the different operating systems that are commonly used, automatically apply the extension to the files. Hence if you add the extensions manually, you might end up with 2 extensions in the same image or with the wrong extensions. Due to this, you will not be able to use the file.
To resolve this issue, you can easily change the extension of the file. The following are the steps that will help you to resolve invalid jpeg marker type by changing the file extensions:
Step 1. Open the control panel of your device and switch to the file explorer option.
Step 2. Scroll the file explorer option and click on the view tab.
Step 3. Search for the Hide extensions for known file types and after finding it, uncheck it.
Step 4. Click on OK and your file will be ready to be used.
Solution 2. Rename the file
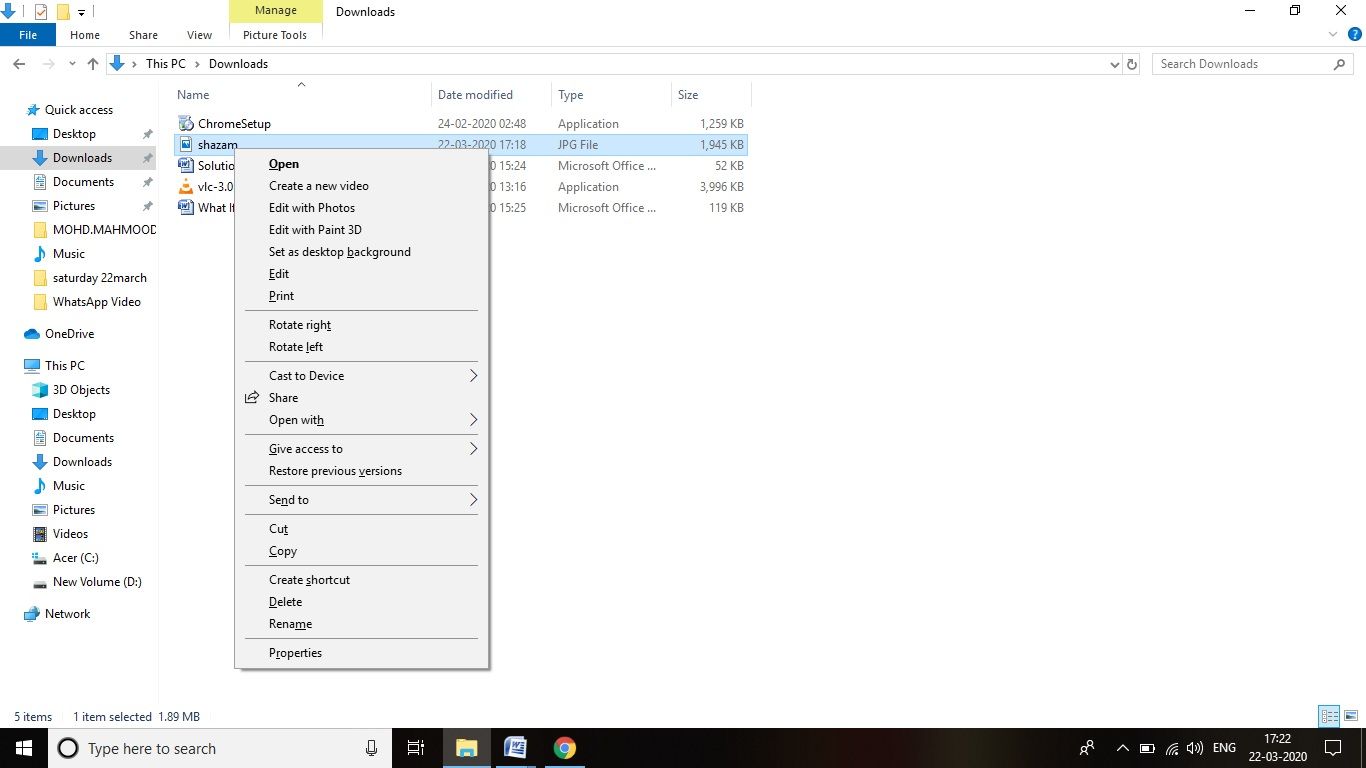
Renaming the file can help you to easily resolve, issues like invalid jpeg marker found. If you have manually entered the file extension while naming the file, you will face the invalid marker error.
Renaming is easy and there is no complex involved with this method and it will easily resolve all your problems so that you can use your JPEG image in Photoshop to perform the required edits. The following are the step that can help you to do so:
Step 1. Right-click on the file.
Step 2. Click on the rename option from the drop-down list.
Step 3. Type the right name without the extension press enter to rename the file.
Solution 3. Convert the file format with the help of paint
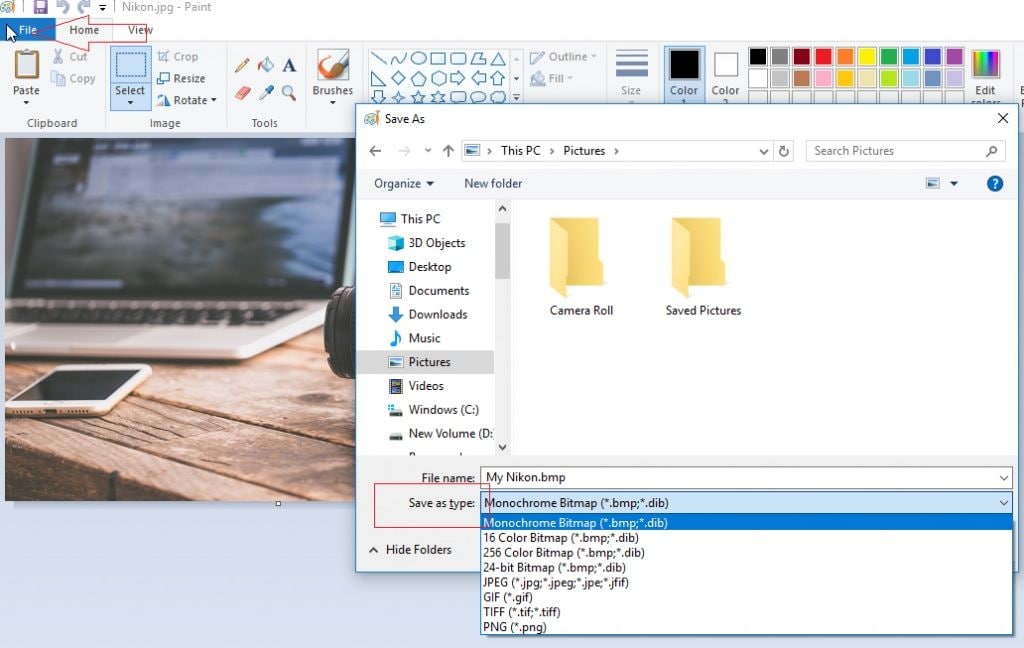
Converting the file that is giving you the invalid jpeg marker found error is one of the most reliable ways to solve this issue. Problematic files can be converted into different formats like TIFF, BMP, etc. to be used in Photoshop and other applications.
You can convert a file with a lot of different methods like using conversion tools or with the help of MS Paint. If you are looking for an easy way to convert file format, the following steps will help you:
Step 1. Open the paint application on your computer.
Step 2. Go to the File option and click on the 'Open' icon. Now scroll and search for the image that you are looking to convert, click on it to select it.
Step 3. Now click on the File option again and select the save as option. Give the file your desired title and save it, choose the right format, and save it by clicking on the save button.
Solution 4. Repair it with Repairit Photo Repair tool
If none of the above solutions have worked for you, it is better to make use of a third party image repair tool to make the file work again. One of the best tools that you can come across for getting this job done is Repairit JPEG repair software.
This is a great tool that is available to be downloaded and used for free. It is a powerful image repair tool that can get your job done in no time which will easily save a lot of time and money for you.

Wondershare Repairit - Photo Repair

-
Repair damaged photos with all levels of corruption, such as grainy photos, dark photos, pixelated photos, faded photos, etc.
-
Repair images of diverse formats, such as JPG, JPEG, PNG, CR3, CR2, NEF, NRW, etc.
-
Repair critically damaged or corrupted photos available on SD cards, phones, cameras, USB flash drives, and more.
-
Repairit has a quick and advanced repairing mode. You can use either depending on the level of corruption the photos has undergone.
-
The "AI Image Upscaler" feature can enlarge the repaired photos to 2X, 4X, and 8X.
-
Intelligently restore old/scatched photo and colorize black and white photos with various AI effects.
-
No limit to the number and size of the repairable photos compared with the online version of Repairit.
-
Support Windows 11/10/8/7/Vista, Windows Server 2003/2008/2012/2016/2019/2022, and macOS 10.12~macOS 14.
This is a reliable tool that offers a wide range of features and can be used for various image repairing processes. The following is a step by step guide that will allow you to understand how to use this tool to repair your problematic JPEG images so that you can use them on Adobe Photoshop:
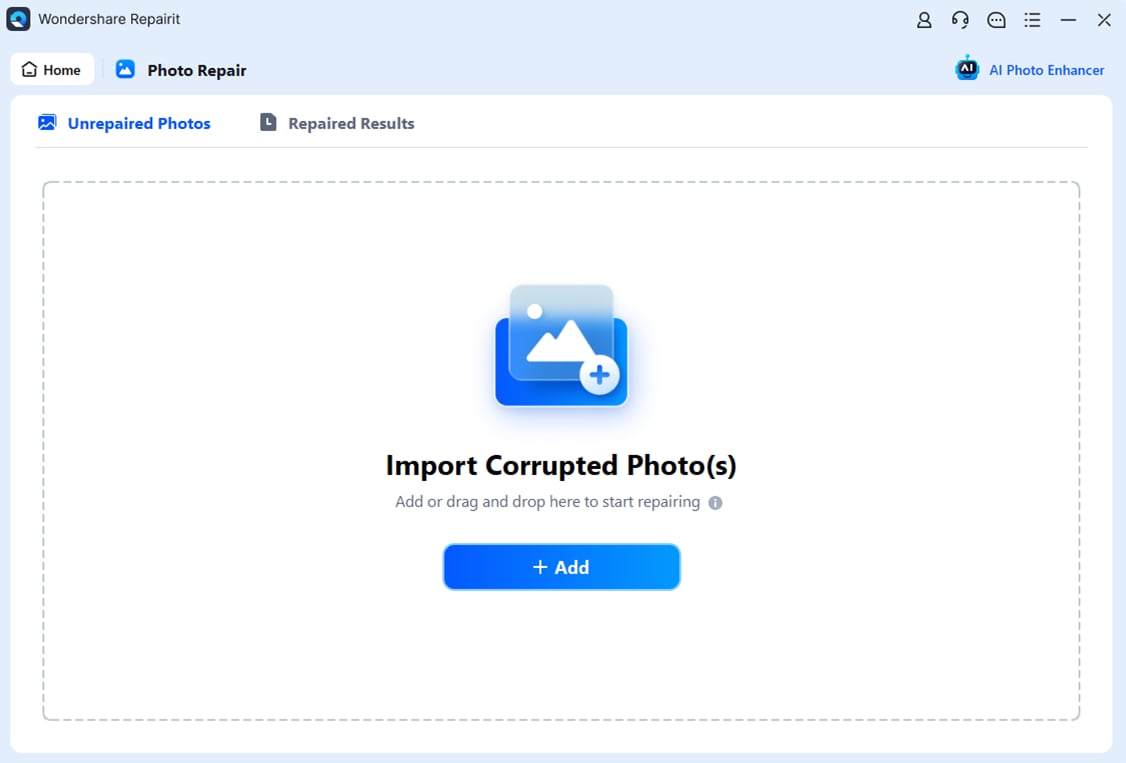
Step 1. Download and launch Repairit
Open the official website and download the Repairit JPEG repair software on your PC and install it. Launch it and click on the add file option present on the home screen.
Step 2. Select the damaged JPEG files
Now you will be on a browser screen. Select the file that you wish to repair. You can also select multiple files at once as this tool allows batch repairs. Once you have selected and added all the files, click on the repair option.
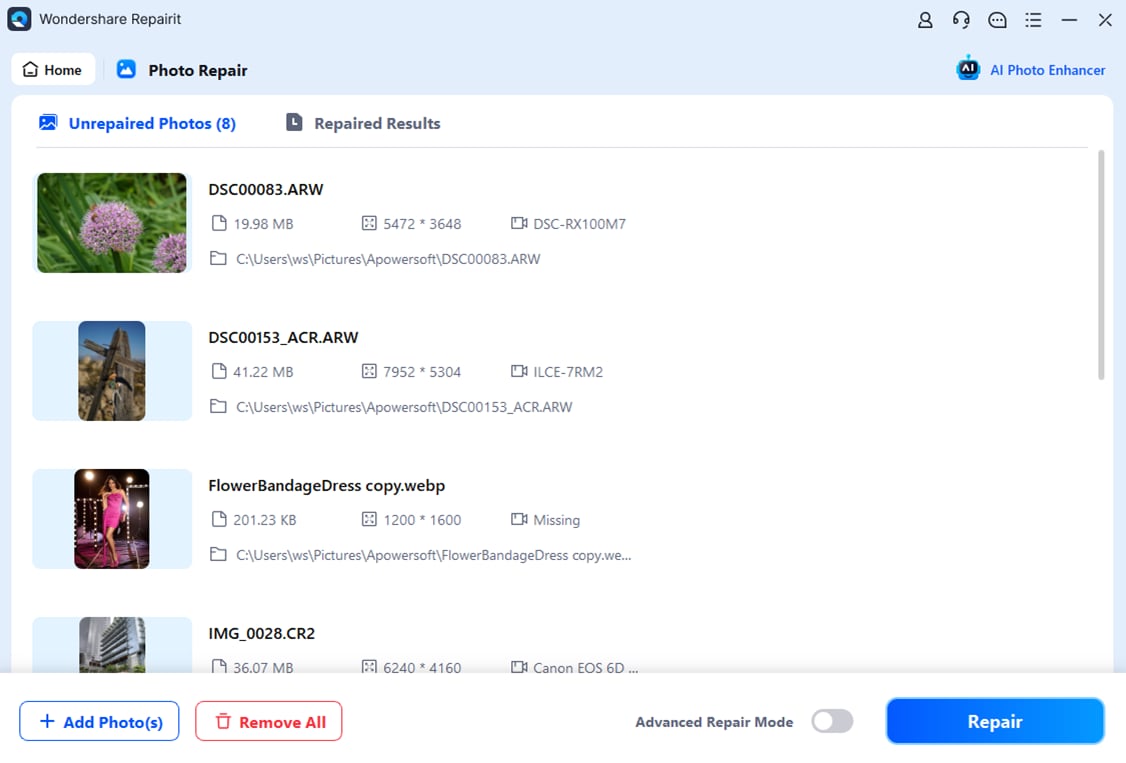
Step 3. Save the files properly
After a few minutes, the files that you have loaded on the tool will be properly repaired and will be ready to be used. A pop up will appear from where you will be able to easily save your files by clicking on the 'save repaired file' option.
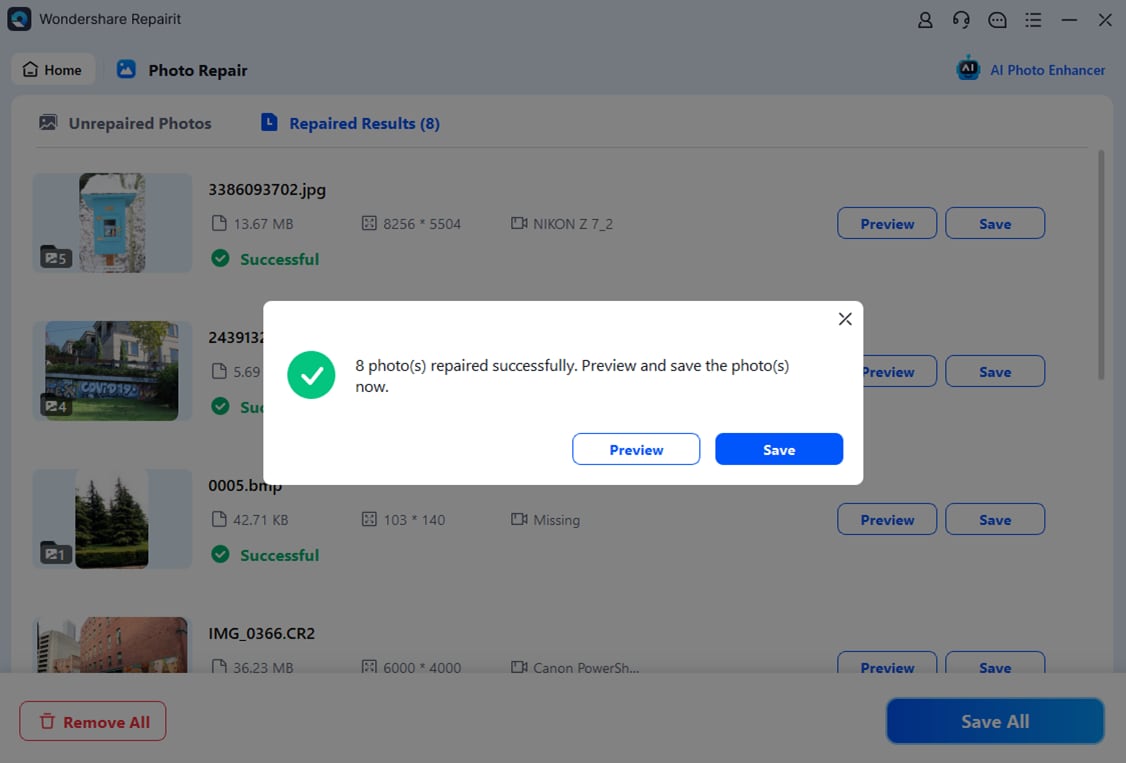
Before saving the repaired photos, you can also use the "AI Image Upscaler" feature to enlarge the repaired photos to 2x, 4x, or 8x.
Attention:
If you want to repair photo online and your corrupted photo is no more than 300MB, you can try the online version of Repairit Photo Repair to get your photo repaired online with ease.
Part 3. Common Tips for Photoshop JPEG Files
JPEG is one of the most widely used image formats that can be easily found all around the Internet. If you don't want your files to get damaged and turn unusable, it is important to make sure that you properly save it in the right format.
How to open and save JPEG images?
Opening and saving JPEG images is extremely easy and doesn't require you to be an expert in computers. For saving a jpeg file, you can do any one of the following things,
- Press CTRL+S on your keyboard, enter the name without extension, and click on save.
- You can also go to the file option, click on save as, and then save the file with the desired title.
Now that you understand how to save a JPEG file, it is time to understand how can you open the JPEG file without getting any errors. You can either double click on the image icon or you also open it by right-clicking on the icon and selecting the open option.
Tips for editing JPEG images
JPEG editing is something that you may need to do now and then. Since JPEG files are so widely used, everyone should understand the basic editing tips that are associated with the JPEG file. The following are some of the best tips for beginners that will help them to edit their JPEG files:
- Make sure that you properly crop out the unwanted area from your images to make the focus stay at the center. You can do this by using the crop feature that can be found on any editing app.
- Adjust the brightness properly so that you can lighten up photos to make them look better.
- Make clever use of effects. Also, try to adjust the settings of the effects as per your likings.
- If you are using Photoshop and are dealing with a lot of red-eye issues, make sure that you use the red-eye reduction tool so that it can be resolved.
- The contrast of the image plays a key role in determining its qualities. This is why make necessary adjustments to the contrast of the image so that the balance can be maintained.
Conclusion
If you are not careful enough, you might save the name of a file wrong. This can result in "Invalid JPEG Marker Type is Found" when you try to export those files in Photoshop to edit them. There are a lot of ways that can help you to resolve this issue without any issue. Third-party applications like Repairit JPEG repair can also be used to repair such damaged files so that they can be easily used again.
People Also Ask
-
Why can't I open my JPEG in Photoshop despite seeing the thumbnail?
This error typically occurs due to incorrect file formats, file corruption, or renaming issues, preventing Photoshop from properly reading the file. -
How do I fix a corrupted JPEG file in Photoshop?
Try changing the file extension, renaming the file, or using tools like Repairit JPEG Repair to fix the corrupted file for use in Photoshop. -
How can I avoid JPEG file errors in Photoshop?
Always save files in the correct format, use proper extensions, and back up your work regularly to avoid errors.


 ChatGPT
 Perplexity
 Google AI Mode
 Grok
Grok
