

 TL;DR:
To fix JPEG color distortion when exporting from Photoshop CC, you must convert your image profile to sRGB because default OS viewers lack the color management required to accurately display larger spaces like Adobe RGB or ProPhoto RGB.
● Go to Edit > Convert to Profile in Photoshop CC, choose sRGB (sRGB IEC61966-2.1) as the destination space, and check "embed color profile" in the Export dialog before saving.
● Set your camera's internal menu to shoot directly in the sRGB color profile to bypass post-processing color space mismatches entirely.
● If using Wondershare Repairit to fix severely color-distorted or corrupted files, the Advanced Photo Repair mode requires you to upload a healthy sample image shot on the exact same device and in the same format.
Ask AI for a summary
 ChatGPT
 Perplexity
 Gemini
 Claude
 Grok
Grok
After you are done editing and dealing with a picture on Photoshop, did you ever try to export it to another platform? Did you find this issue that the colors somehow look off than what you'd seen on Photoshop? This is a frequent problem on photoshop. When you change the format of an image to JPEG and open in a default OS viewer, the colours may look too dim, bright or just distorted. to fix jpeg colour change on export in Photoshop CC, these are a few methods that you can employ.
Part 1: Why Do My Photos Change Color after Export?
Several times exported images from Photoshop and the final JPG looks nothing like what you thought it would. They're not the wrong colours, you're presenting them in a different colour space.
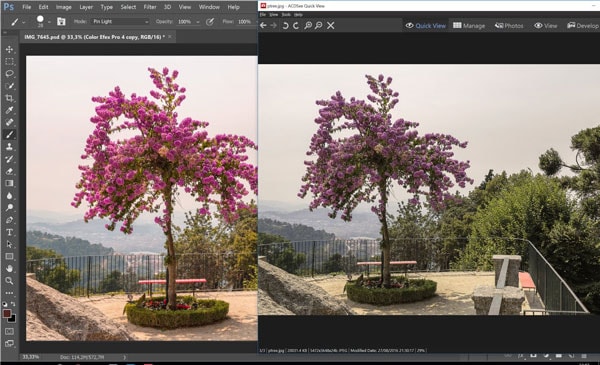
Colour spaces allow you to see the maximum number of colours on different devices and formats. For computers, this mostly means the sRGB colour space. This has seen a vast multitude of changes in recent years. Now, the monitors are capable of displaying 100% Adobe RGB or DCI-P3.
When the colours are depicted on Adobe RGB or ProPhoto RGB, then when that software attempts to display them back as sRGB, it maps the colours incorrectly. The real colours are still present. It is just that the software doesn't know how to present them correctly.
sRGB is a small colour space for editing purposes when compared to other alternatives. Often, photographers edit images in larger colour spaces like Adobe RGB and ProPhoto RGB in an attempt to retain the maximum amount of colour and detail possible. There are moments when you can't see all the colours in the wider profiles. Though the data is still there, and you can bring some of it back into a viewable form.
The problem arises when you don't convert the final edit, which was made in Adobe RGB or ProPhoto RGB to the appropriate profile (usually sRGB) when exporting. Colour spaces are the main reason why your prints look nothing like the photos on your monitor, too, even if your display is calibrated.
You can always import your raw files as sRGB, too, but then you will be at an editing disadvantage, depending on the imagery you're using.
Part 2: What Can I Do?
If you want to take matters into your own hands and do something about the anomalies, here are some of the tested ways that can give you positive results. They require you to spend some time with command prompts and settings so that your image file quality is not altered and you'll still be able to fix jpeg colour change export in Photoshop CC.
Set the camera menu to sRGB color profile before shooting.
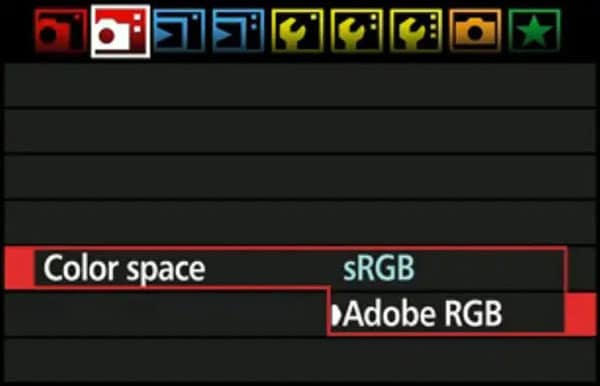
You can choose to shoot in sRGB by adjusting your camera's color space settings to sRGB (shown below) or you can choose to shoot images in Adobe RGB and convert the images to sRGB in post-processing.
Method 1: Get JPEG color profile to sRGB in editing software
Editing softwares is very helpful as they get the background work done and you are just supposed to tweak a few settings to get desired results.
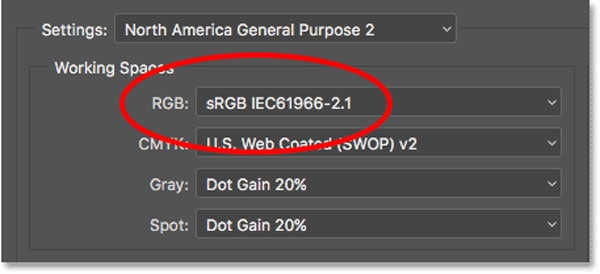
Step 1: Open Photoshop, click on edit and choose color settings as shown in the image below:
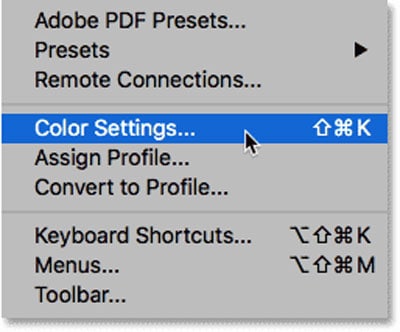
Step 2: Choose sRGB in RGB color profile and click on OK.
Method 2: Export JPEG in sRGB color profile
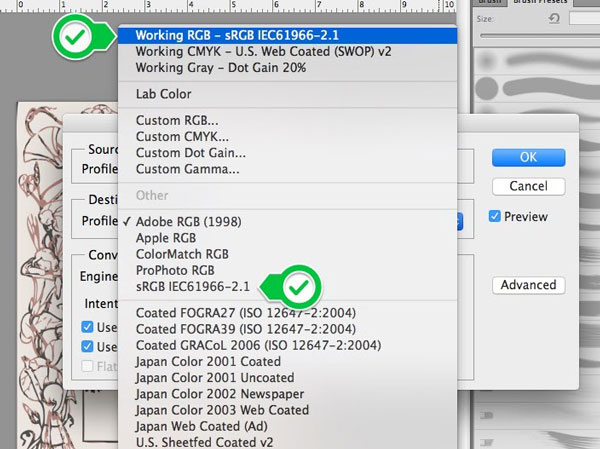
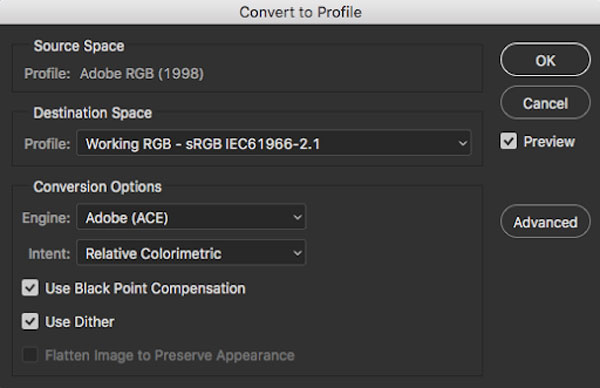
Step 1: Open your image in Photoshop, click on edit and select 'convert to profile'.

Step 2: Click on the destination space drop down box.
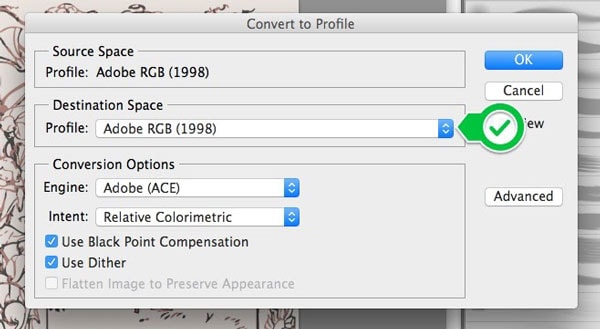
Step 3: Select the sRGB option. After you do that, check your progress and if satisfied, click on OK and Save your photo.
Method 3: Convert to sRGB via Edit command
You can convert to sRGB using the Edit command by following this path.
Step 1: Click on edit and then convert the profile to sRGB in the settings.
Step 2: Next, save the photo as JPEG using the path - File > Save As > Name .JPEG.
Part 3: How to Repair Corrupt Photos from Sony A9II?
Our Recommendations - Using Wondershare Repairit

-
Advanced Photo Repair: You can fix even critical issues with photos like missing fragments, blurry images, grey areas, and more.
-
Quick Photo Repair: As the name suggests, this tool yields instant results by following 3 simple steps. And one can load multiple images and repair them at the same time without any hassle.
-
User-friendly Interface: Being a DIY tool, its ease of use gives it an edge over the competition. All you need to do is make a few clicks to get your photo ready.
-
Compatible with all major image formats: JPG, PNG, TIFF, GIF, MOV, MP4, M4V, M2TS, MKV, MTS, 3GP, AVI, FLV and more.
If you don't want to fix jpeg colour change export in Photoshop CC, then you can opt for external tools that will help you with the job! Wondershare Repairit is a trusted software that repairs your colour disturbed files in a simple three step process. Here's how you can use it.
Stepwise Guide to Wondershare Repairit
Step 1: Load damaged or corrupt photos.
Launch Wondershare Repairit and select 'Photo Repair' from the "More Types Repair" section. Click on the "+Add" button.

Step 2: Repair damaged pictures
Once your photos are imported the details will be displayed as in the image below, simply click on the 'Repair' button and the process will start.

Step 3: Preview and save them
Wait a moment, there will be a pop-up window remind you to preview or save the repaired files. Easily click "Preview" button to preview the repaired video to check the videos/photos whether is satisfied. If the repaired items meets your expectation, then click the 'Save' button to choose a path to save them. But please do not save to the path where you lost them.
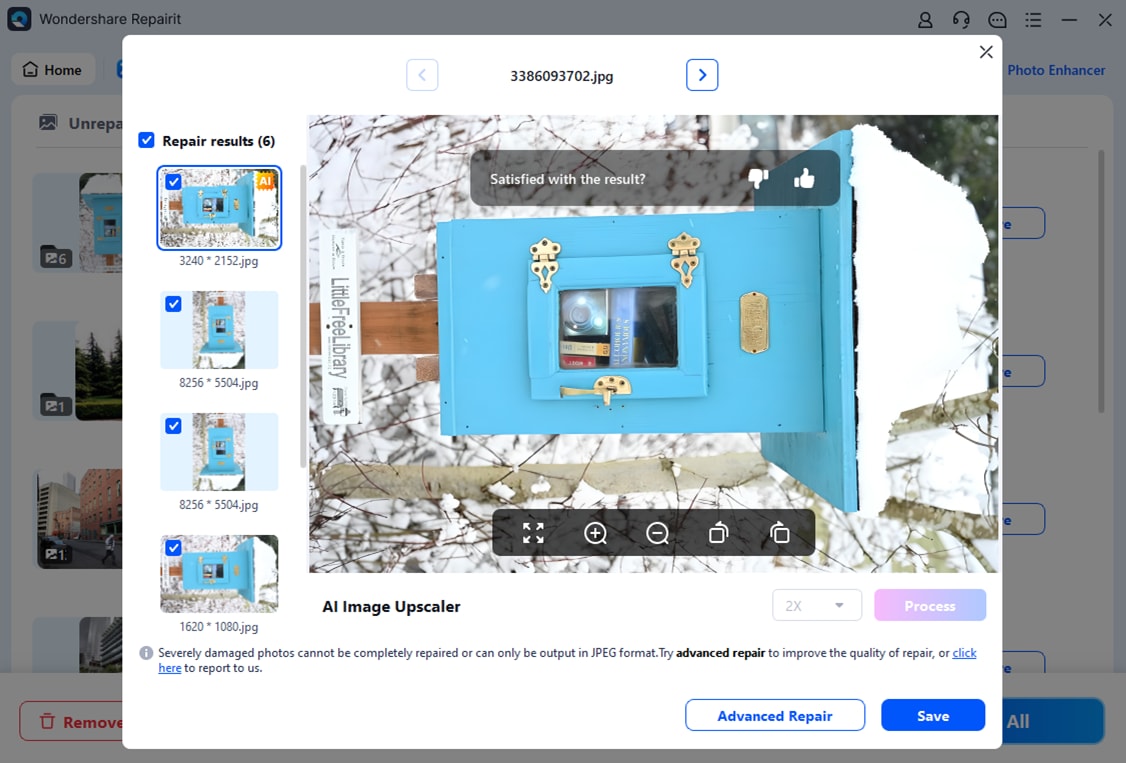
Note: You can also use the "AI Image Upscaler" feature to enlarge the repaired photos to 2x, 4x, or 8x.
Optional: Advanced repair
This option is used when the steps we just followed don't yield the expected result. You can either directly click on the advanced repair button like shown in the image below.
Or you can choose 'Advanced repair' in the preview window. There is also an option available to turn the Advanced Repair Mode in the very beginning.
Point to Note: A sample image shot on the same device as the corrupt photo should be loaded to run the Advanced Photo Repair. The format should be the same too.
From above we know that, no fancy settings required, no codes. Just a matter of clicks and you can get the colors of your photo repaired. This speaks volumes about the ease of use of Wondershare Repairit. This tool can fix numerous issues like pixelated photos, grey images, wrong coloring, and more. The best part is that even the corrupt photos can be repaired. The tool is free to download and offers a trial too. Get your free trial today!
Further Reading:
Here are the useful articles to help you.
1. Restore Old Photos in Photoshop.
2. Repair Low-resolution Photos.
3. Invalid JPEG Marker Type is Found.
To Conclude
This article addresses the most common beginner problems. The colour change on exporting JPEG pictures from Photoshop CC can be handled by several methods and you'll have to choose the one that best fits you. You can begin with quick and easy fixes like opening the image file in Paint or saving JPEG using 'Save as' command in Photoshop CC.
However, to minimise the chances of color distortion, make sure you shoot all your pictures in sRGB color space. One of the best methods to fix your images is via Wondershare Repairit. When you use it, you are just a few clicks away from getting that photo repaired. The software is free to download and boasts about repairing the photo within 3 minutes. Get your free trial today!
People Also Ask
-
1. Why does Photoshop export different colors?
You need to check "embed color profile" in the Export dialog.
With this checked, you see the color managed image. Unchecked, it displays without color management. -
2. How do I change the color I export in Photoshop?
The problem here is that the file is in ProPhoto RGB.
Windows "Photos" is not color managed and cannot represent a ProPhoto file correctly. Even other softwares can't do it without color management.
The correct answer is 'Convert your file to sRGB'. This is a very common beginner mistake. But can be fixed easily. In Adobe Photoshop, go to Edit > Convert to Profile > sRGB IEC61966-2.1. -
3. How do I convert a JPEG to sRGB in Photoshop?
Step 1: Open your image in Photoshop.
Step 2: Go to Edit and click Convert to Profile.
Step 3: Click on the destination space drop down box.
Step 4: Select the sRGB option.
Step 5: Click OK and Save your image.