
 TL;DR:
⚡ Quick Fix: Restore Old Photos with Photoshop or AI Tools
Restore in Photoshop: Import the scanned photo, crop it, use Neural Filters for photo restoration, then apply Healing Brush, Clone Stamp, Colorize, and Dust & Scratches to repair details.
Use AI Restoration: For a faster beginner-friendly workflow, upload the old photo to an AI restoration tool, enable old photo restoration, preview the result, and download the enhanced image.
Repair and Enhance Details: Fix fading, scratches, tears, stains, and washed-out faces while improving clarity, color, and overall photo quality.
Choose the Right Tool: Use Photoshop for manual control and detailed retouching, or use Repairit for one-click restoration, batch processing, and faster old photo enhancement.
Ask AI for a summary
 ChatGPT
 Perplexity
 Gemini
 Claude
 Grok
Grok
Photos are precious memories, milestones, and moments that would never be repeated. They degrade naturally with time due to exposure to light, humidity, or ineffective storage. The best option to make them look like they used to be is to use the restore old photo Photoshop method.
For personal needs or a creative project, this is a very potent photo editing software that you can use to easily restore your pictures. This article will help you understand how you can bring life to your old photos with a step-by-step guide.
Table of Contents
Part 1. Why You Need to Restore Old Photos with Photoshop
Old photographs aren't just pictures; they're part of your history, emotions, and cultural depth. With all this being noted, users aim to maintain these valuable memories with some other purposes to utilize Photoshop restoration:
Repair Damage: It is common for old photos to fade, discolor, and tear, which you can fix using the Healing Brush tool to keep their authenticity intact.
Digital Longevity: After you repair damaged old pictures through the Photoshop photo restoration feature, individuals can prevent them from degrading further.
Image Customizability: Along with restoration, users can enhance the image, adjust color, and refine the image for a polished appeal.
Photo Clarity: Users can bring old photos to their original glory by using the colorization feature that helps enhance contrast and make details pop.
Sharing and Printing Purposes: Restoring images can facilitate you to easily store, share, and print them, as a way to protect them.
Part 2. How to Restore Old Photos with Photoshop - Detailed Guide
Photoshop picture restoration gives users many editing and fixing tools that can make old photos look new again. If your old pictures have cracks, missing parts, or color changes, this software helps you improve clarity. Moreover, from correcting color and balancing exposure, the process and the result are outstanding, as demonstrated in the following steps:
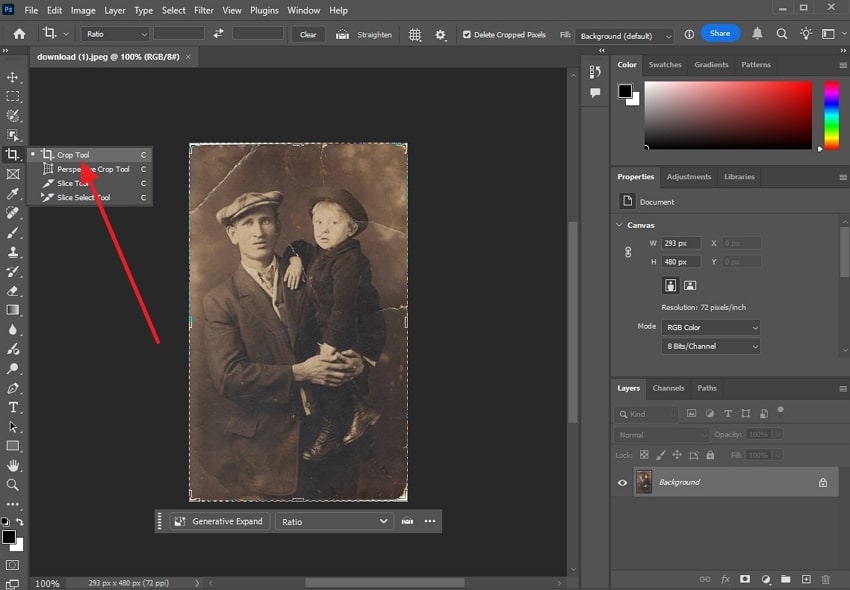
Step 1. Open Photoshop, and from the "New File" tab, press the "Select One" button to import the scanned, damaged, old image. Once the image appears on the main editing interface, right-click the "Crop Tool" option and choose "Crop Tool." Now, you can adjust the sides and press "OK" to confirm the crop.
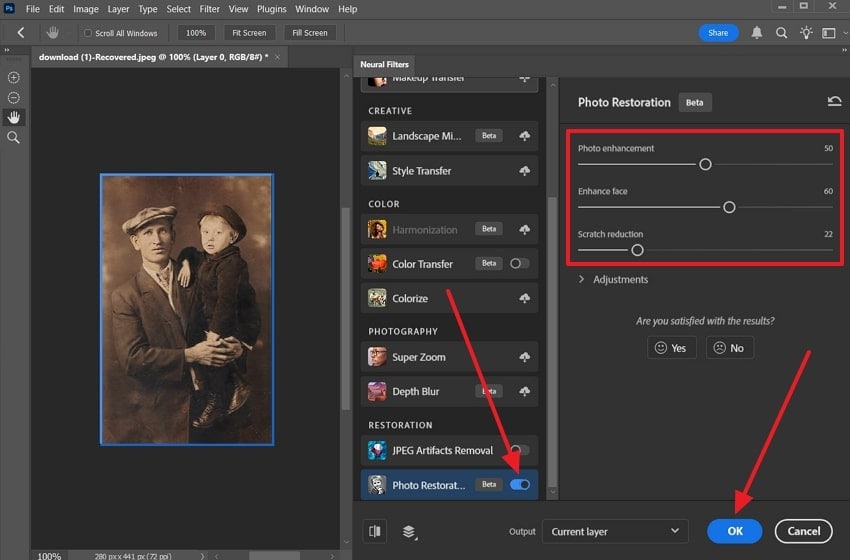
Step 2. After that, select the same image layer, head to the top, expand the "Filter" tab, and choose "Neural Filters."
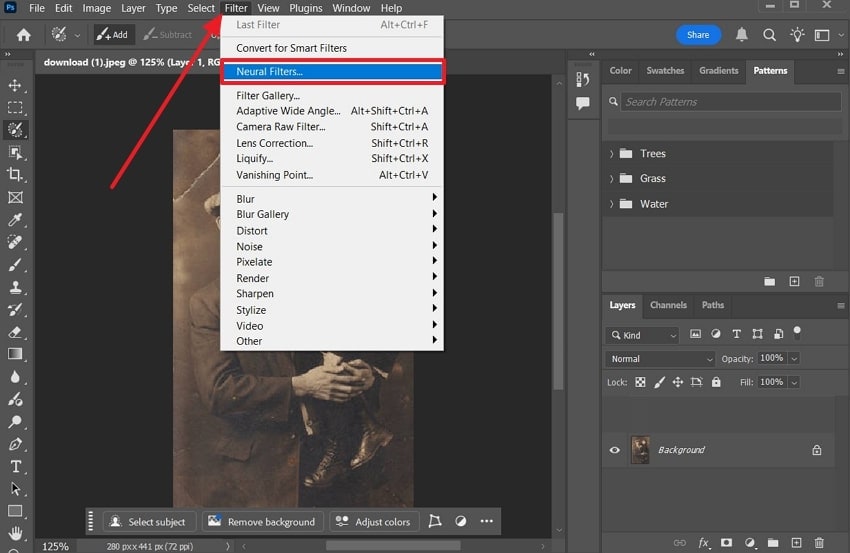
Step 3. When a right-side panel appears, scroll down, and "Download" the "Photo Restoration" option. When the settings appear, adjust the "Photo Enhancement," "Enhance Face," and "Scratch Reduction" scales. When the results are according to your liking, hit the "OK" button.
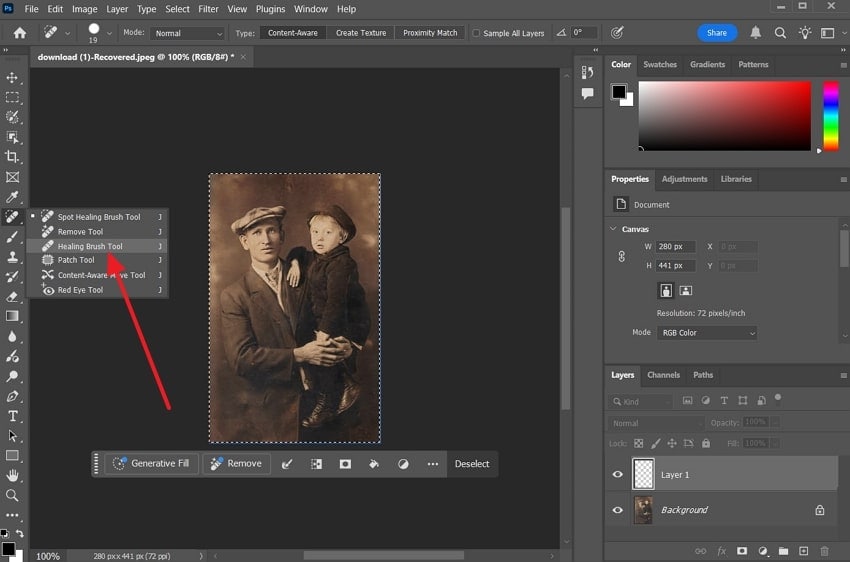
Step 4. Next, create a new layer over the original one, choose the "Healing Brush Tool" icon, and select or brush over the areas the Neural Filters missed.
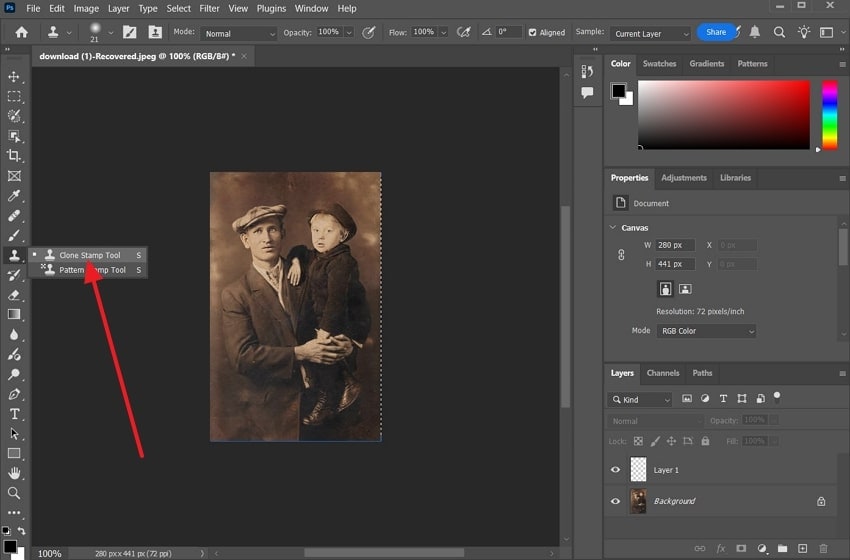
Step 5. Similarly, access the "Clone Stamp Tool," and select different areas of the image to make it look spotless.
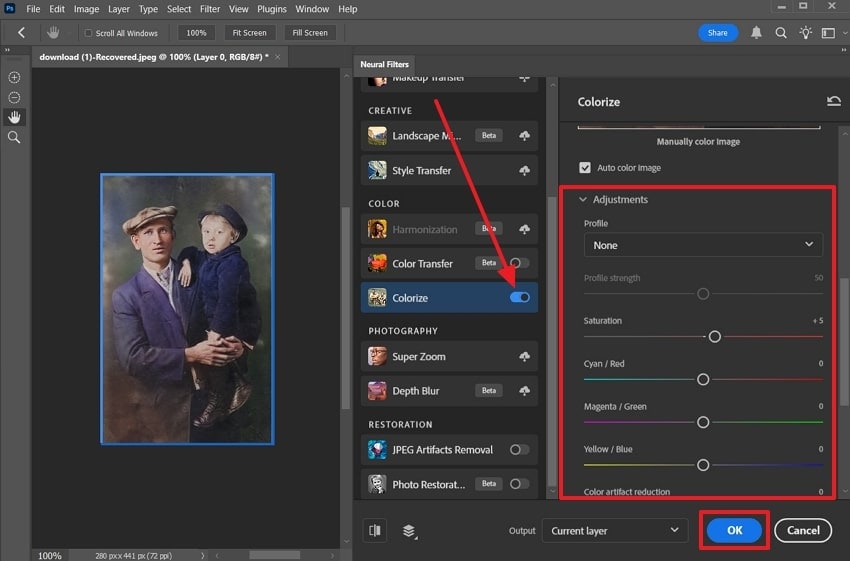
Step 6. Afterward, open the "Neural Filters" panel, enable the "Colorize" option, and make suitable adjustments after the auto color image process.
Step 7. If you feel unnecessary dust within the image, go to "Filter," expand the "Noise" option, and pick "Dust & Scratches." From the opened settings, adjust the "Radius" and "Threshold" options, and when happy, press "OK."
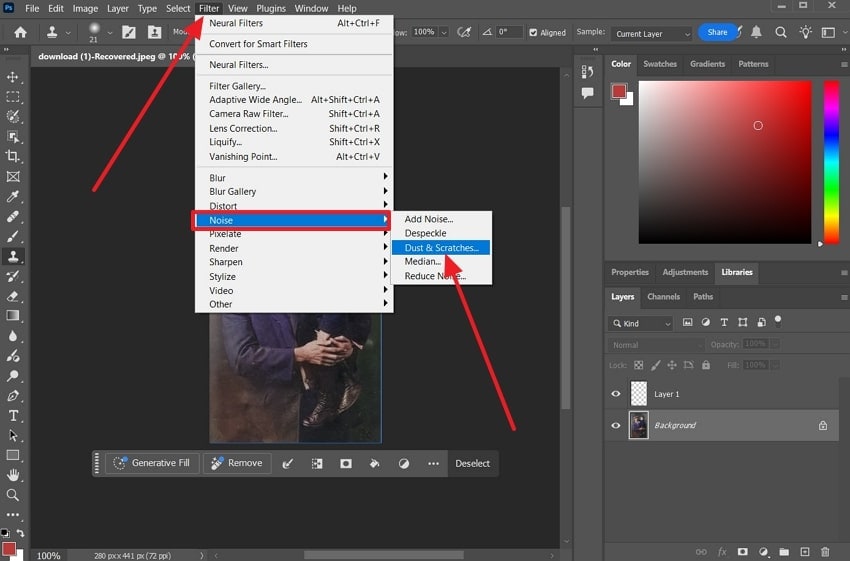
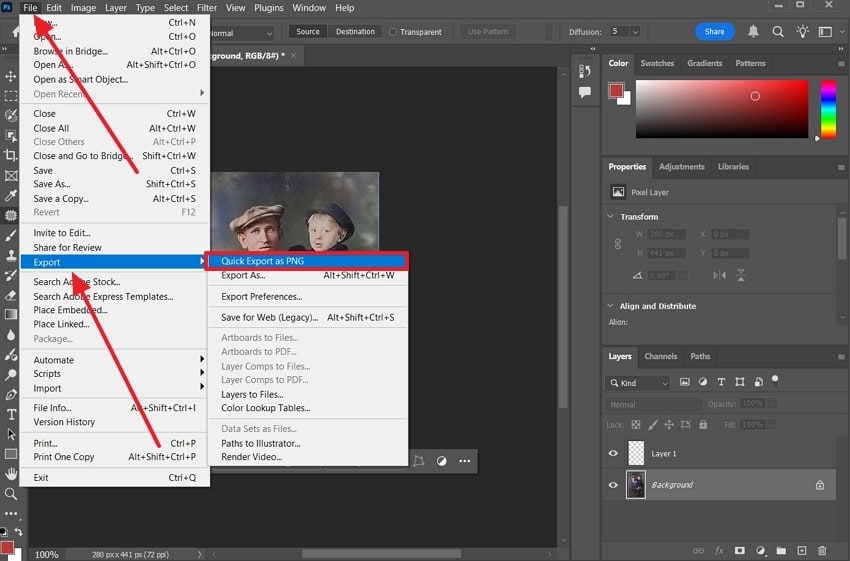
Step 8. Once satisfied with the final image, navigate to "File," hover the mouse over "Export," and choose the "Quick Export as PNG" option.
Part 3. A Better Way to Restore Old Photos with Photoshop - Breathing New Life
Although Photoshop photo restoration provides stunning and precise results, the process is time-consuming and complex. A beginner might find it hard to perform and would look for another simpler and user-friendly solution. That's why the following photo restoration software will help you repair faded and damaged images in 3 simple steps:
1. Repairit Old Photo Enhancer (Online Version)
If you want to bring your broken, old images to life with high quality and a precise outcome, try Repairit Old Photo Restoration. This tool works on AI restoration technology that can revive any damaged, stained, and decolorized image within seconds. Moreover, its AI goes beyond analyzing the image and detects scratches, tears, and spots with ease.
Once locked in, it restores all the details, even the tiniest ones, back to their original form. Not only that, but it also visually boosts and upscale the image, which makes it fit for sharing and storing. Repairing Online supports diverse types of image formats, like JPG, CR2, DNG, and more. Furthermore, you can even access your history files and make further changes to them.
Key Features
- Preview Mode: Before downloading the final restored image, go through the before and after of the image to ensure its integrity.
- Restoration Options: Along with photo restoration, you can choose the color correction option as well, which restores all the image colors.
- Advanced Editing: Aside from old photo restoration, users can access image enhancement, denoising, and debanding.
Comprehensive Guide to Perform Old Photo Restoration Online
The simple steps on how Repairit Online can handle old photos and restore their charm are given below:
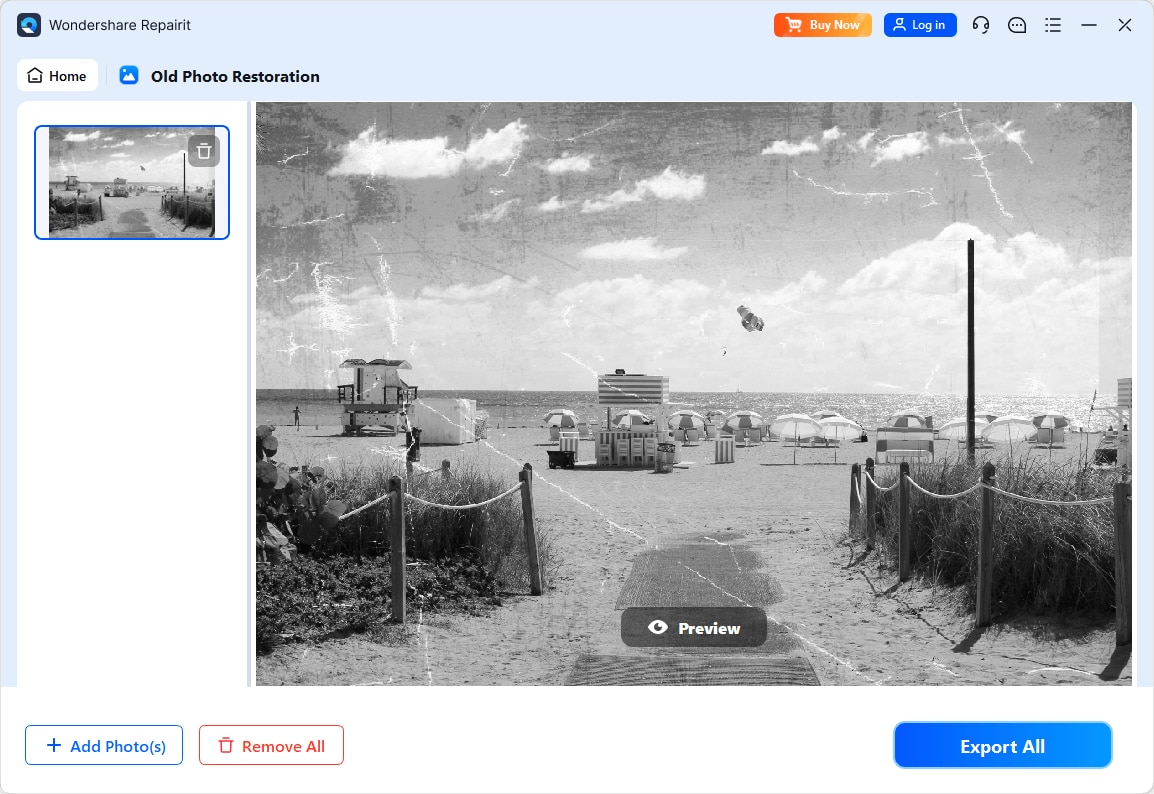
Step 1. Open the Old Photo Restoration Tool
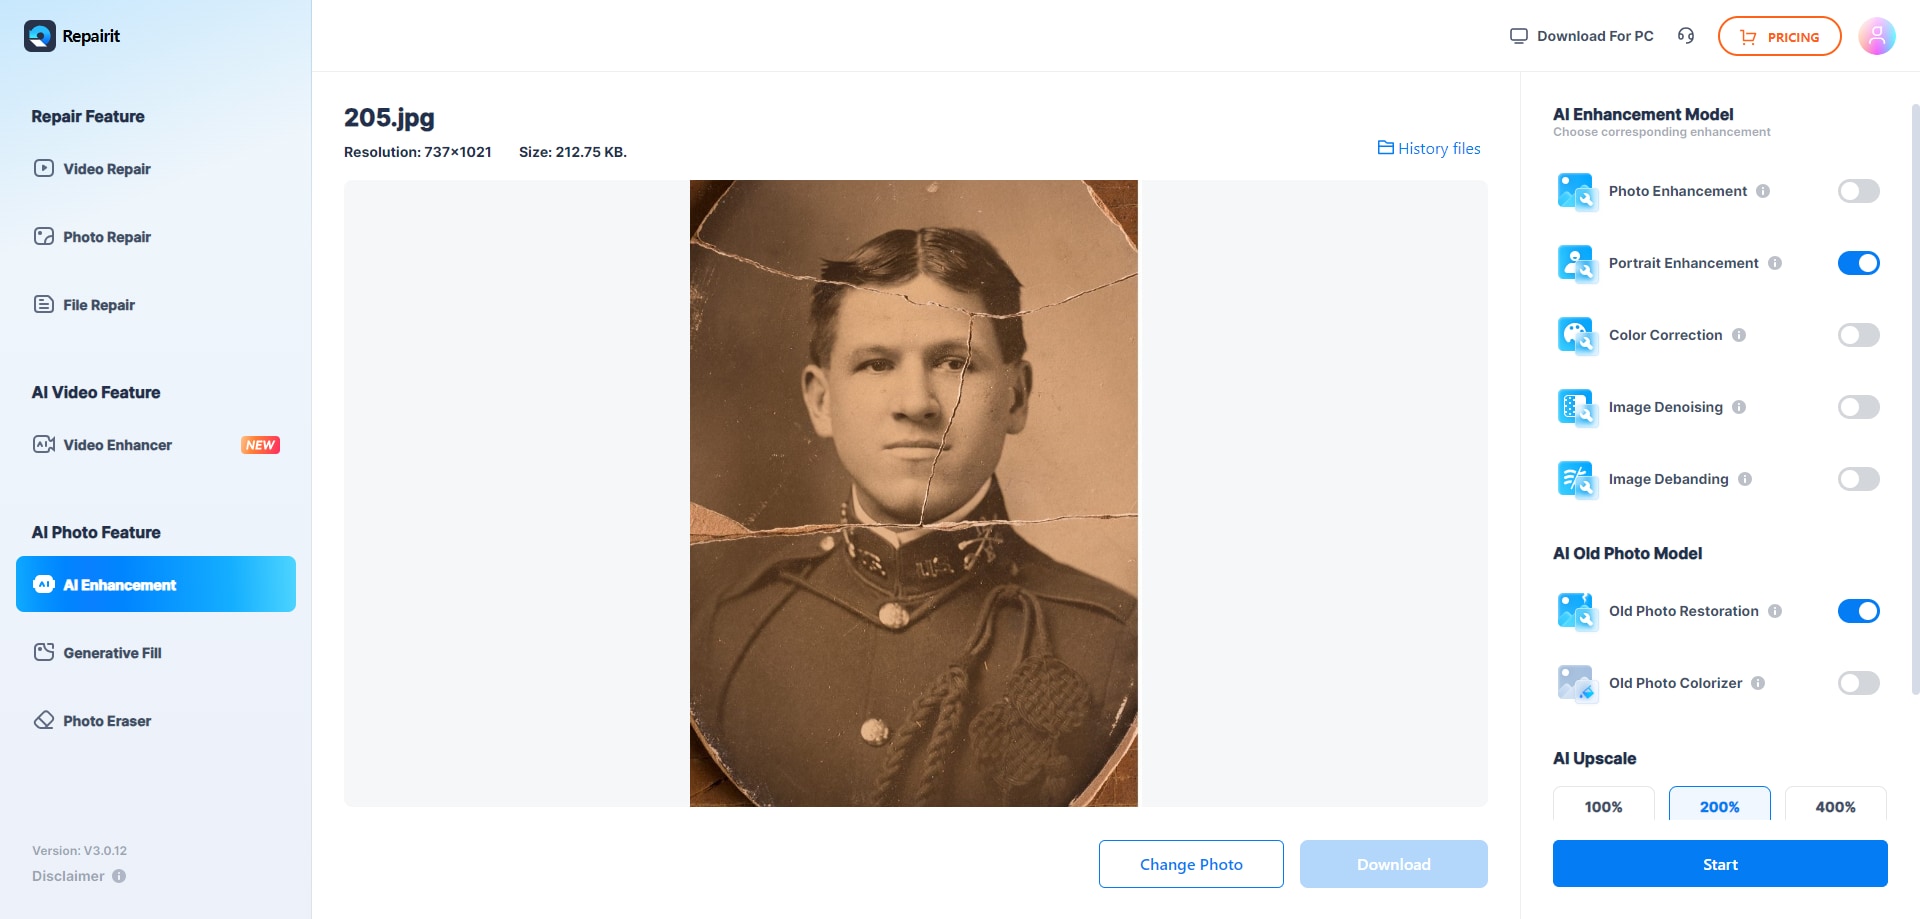
Click the "Upload Image" button, and head to the main window. From here, open the "AI Enhancement" tab under the "AI Photo Feature" section, and press "Add Photo."

Step 2. Enable the Old Photo Restoration Feature
On the right panel, under the "AI Old Photo Model" section, toggle the "Old Photo Restoration" option, and hit "Start.’
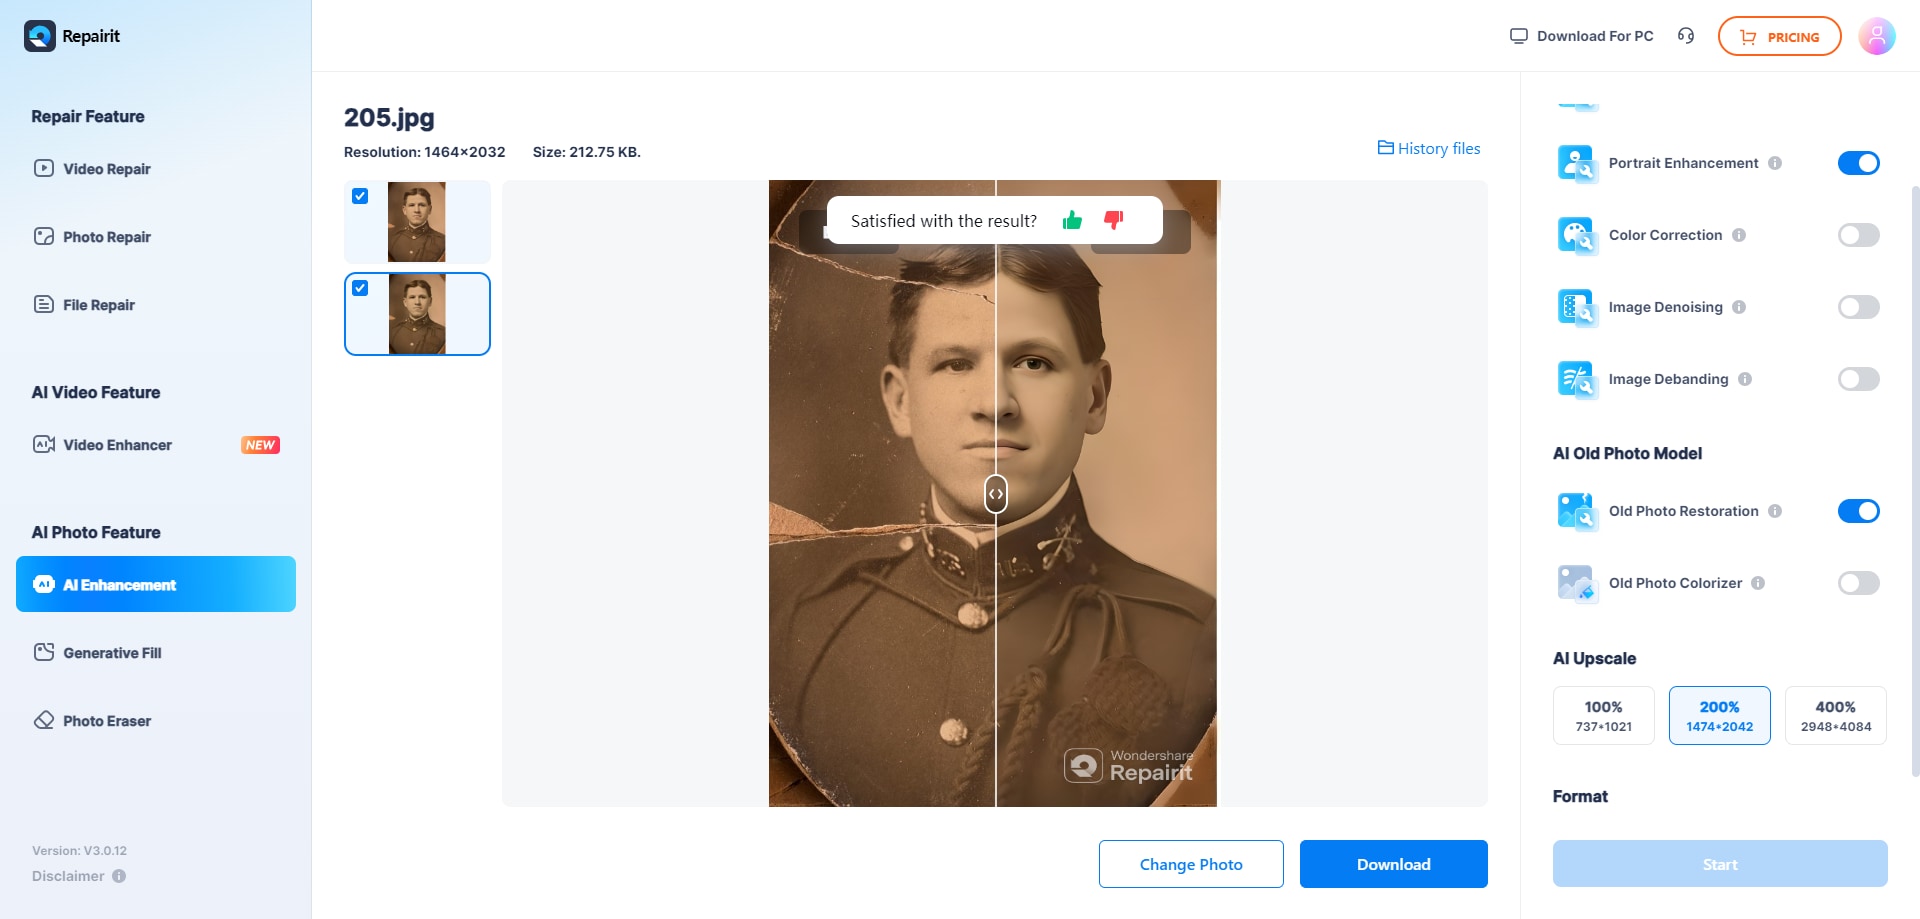
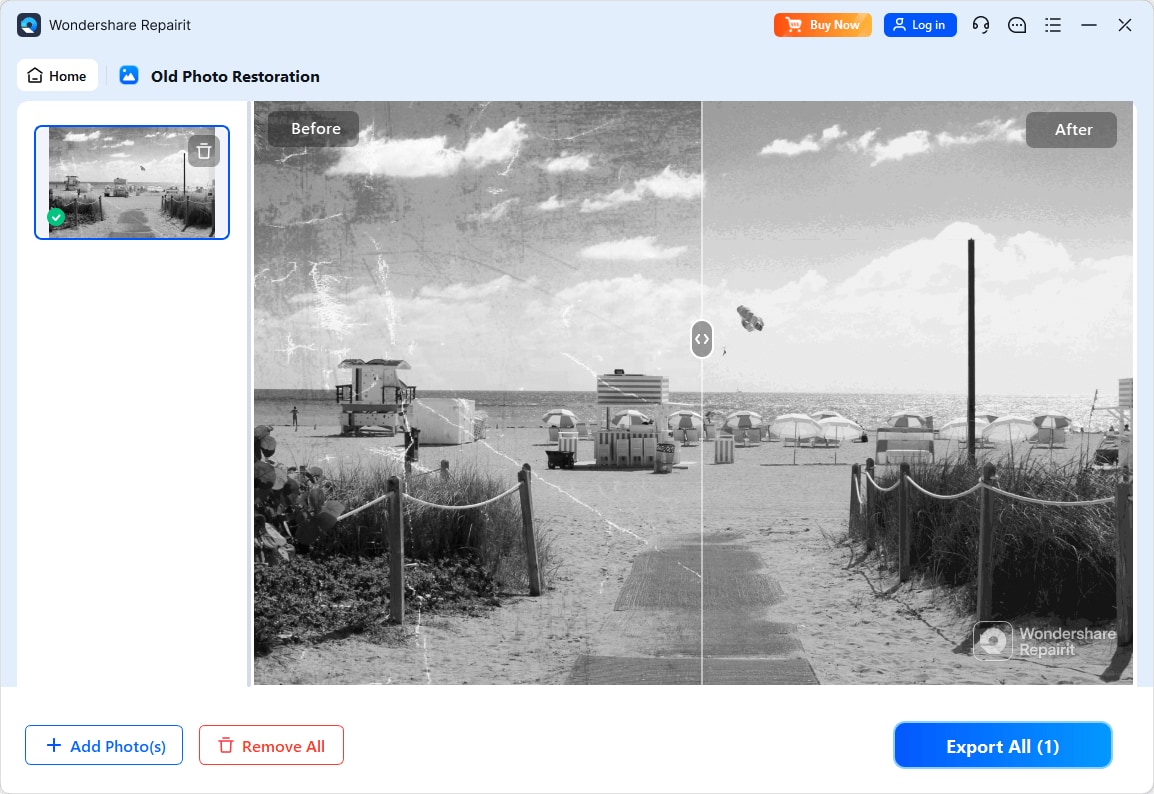
Step 3. Preview Final Image and Download
When the restoration is completed, review the finished image by dragging the "Preview" panel, and click "Download" when satisfied.
Restore Old Photos Now
 Security Verified. Over 7,302,189 people have downloaded it.
2. Repairit Desktop Old Photo Enhancer
When it comes to being able to access and restore multiple old, precious memories without relying on the internet, use Repairit software. With this tool, users can repair several images in more than 1000+ formats, taken from 6000+ devices. The AI image repair technology is significantly superior to its online version and can easily manage highly damaged images.
It also clarifies fuzzy or washed-out areas, enhances facial information, and can convert black-and-white pictures to color. The user doesn't need to make further adjustments and can anticipate a 99.5% success rate when restoring pictures. Its other flexible editing features also help you enhance, upscale, and repair corrupted photos.
Key Features
- Batch Restoration: You can add any file size and format of multiple images in this software and restore them.
- Repairing Algorithm: This is an advanced tool that can be used to restore skin textures, remove grain, and produce a cleaner image with AI.
- Supported Image Formats: It supports over 20+ image formats, making it a reliable choice for repairing old images.
Simplified Guide to Restore Old Photos Using Repairit
Now, let’s read the following steps and learn how to revive an old image using restoration features:
Step 1. Access Restoration Feature and Import an Old Image
Open the "AI Media Enhancer" tab, access the "AI Photo Enhancer" section, and click the "Old Photo Restoration" option. On the next screen, hit the "+ Add" button to import the distorted image.

Step 2. Begin the AI Photo Restoration Procedure
Next, when the image is added, press the "Preview" button to begin the restoration process.
Step 3. Export the Image After Successful Restoration
Once the image is restored to its enhanced version, preview the before and after, and click the "Export All" button to save it.
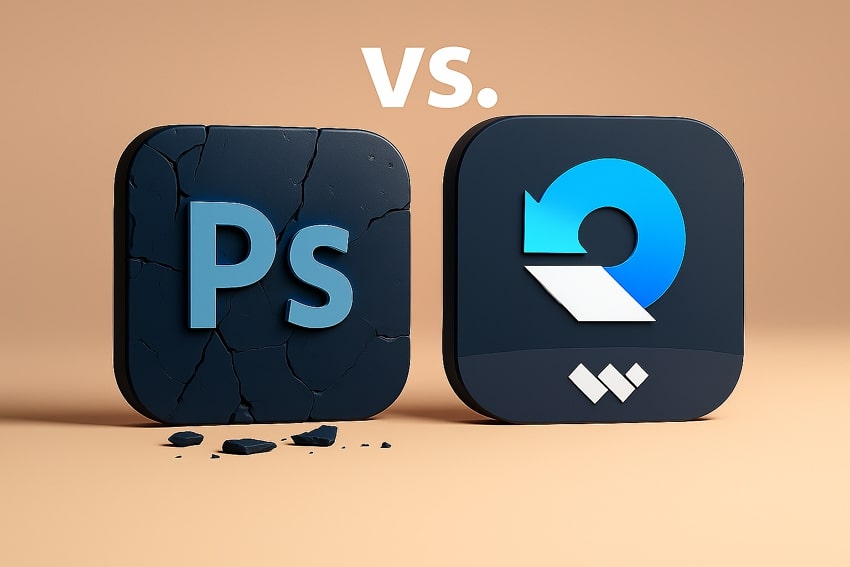
Part 4. Photoshop vs Repairit: Choosing the Right Tool for Old Photo Restoration
After learning about these two tools for restoring old photos, you might feel a little conflicted about which one to choose. The following comparison will help you understand if restoring old photographs in Photoshop is worth it more than Repairit or not:
| Features | Repairit | Photoshop |
| Easy to Use | User-friendly | Complicated |
| Colorization | Built-in AI colorization | AI and manual colorization |
| Repair Precision | 99.5% | Good |
| Supported Image Formats | JPG, JPEG, PNG, BMP, WEBP | JPEG, PNG, GIF, TIFF, and WebP |
| Suitable for Beginners | ✓ | X |
| Batch Processing | ✓ | X |
| Automatic 1-click Restoration | ✓ | X |
| Faster Restoration Speed | ✓ | X |
Conclusion
In summary, this article provided users with a detailed yet comprehensive guide on how to restore old photos in Photoshop, with reasons why this can help you achieve it. After learning about the steps, it was clear that this software is not beginner-friendly and requires complicated steps to get a spotless image. Therefore, in alternation, you can use Repairit, which offers a 3-click old photo restoration process.
FAQs
-
1. Can Photoshop repair water-damaged photos?
Yes, editors can clear out water-damaged photos and repair them using the Clone Stamp Tool to blend the area on the adjustment layer. With this process, you are basically replicating the damaged area with non-stained image parts. -
2. Does Photoshop have automated restoration filters or plugins?
While it offers no dedicated restoration filter, it has powerful manual tools and an AI old photo restoration feature. This tool fixes scratches and even tears with extreme precision, while also providing the option to manually adjust and retouch the image. -
3. What resolution should I use when scanning old photos for restoration in Photoshop?
If you want to restore an old photo in Photoshop, 300-600 dpi is the most suitable resolution option. This way, you'll be sure to pick up all the information and can zoom and touch up the photograph without loss of definition.
