
 TL;DR:
To fix frequent system crashes, DLL errors, or the Blue Screen of Death in Windows 10 and 11, run the System File Checker by opening an administrative Command Prompt and executing the sfc /scannow command to automatically replace corrupted system files with cached backup copies.
● If the standard online scan fails or displays an operation failure error, you must bypass this limitation by configuring MSConfig for a minimal safe boot and running the scan via the Advanced Startup command prompt.
● Choose SFC to restore missing local system files, CHKDSK to fix bad physical drive sectors, or DISM to repair faulty Windows images by downloading replacements from online servers.
● When the utility identifies corrupt files but cannot fix them, review the unpatched file details and timestamps in the sfcdetails.txt log or utilize a third-party application like Wondershare Repairit to bypass built-in repair limitations.
Ask AI for a summary
 ChatGPT
 Perplexity
 Gemini
 Claude
 Grok
Grok
This section will let our readers get assurance of landing on a correct page to help them solve the heart of this problem. Apart from stating the error, ensure to come out the many instances when users may expect this error.
Sometimes, your Windows system might experience complete crashes, malfunctioning, or errors at any moment. Out of many reasons why your system might not be functioning properly is because your system files are corrupt or missing for reasons you’re not aware of. Sometimes, this happens after you install an update or driver.
Whatever the reason might be, you’re in luck. Windows has its troubleshooting tool called the System File Checker (SFC). This tool checks for corruption and other issues related to your system files. It also repairs the file if any is found. This article will explain how you use the SFC scan in Windows 10/11.
Basic Knowledge of SFC
What’s it?
System file checker comprises a command-line tool that efficiently checks all the files covered by the system file protection. It also tries to repair the files that are not covered. It is an inbuilt troubleshooting tool. When you run the SFC command, it scans the integrity of the system files.
If it finds any issue, it replaces the damaged, incorrect or corrupt file with the correct one. If you think there’s anything wrong with your system files, it’s always a good idea to use SFC to confirm. However, using this troubleshooting utility requires administrative privileges.
The System File Checker has been with the Windows OS since Windows 98. However, when it was first released, it served a different purpose. Over the years, it has evolved from just protecting typical data to registries and system files. Today, you can use it to scan, detect and repair damages to system files.
When to use?
System file checker scans and repairs windows system files specifically. If this troubleshooting utility detects that a file is modified or corrupt, it immediately replaces the file with the correct version free of errors. Knowing when to use the SFC scan is relatively easy. Once your Windows programs start crashing and you’re getting error messages about DLL files, then it’s time to use the System File Checker. If you also find yourself experiencing the dreaded blue screen of death, you should run the system file checker.
If the SFC scan finds a corrupt system file, it replaces the damaged file with a cached copy. These copies are placed in a compressed folder in Windows itself. If you experience any of the errors above, the SFC will replace the corrupt or damaged files with a copy from the cache.
The Windows OS saves a cached copy in a vault folder when your files get modified in Windows as a backup. When these files get damaged, the SFC scanner utilizes these files effectively. Because of this, you can also use the System File Checker whenever you experience any form of data loss. It is recommended that you use System File Checker before performing an actual system restore on your computer.
SFC also comes in handy when repairing registry data. It uses the same concept to replace damaged system files with cached copies. Therefore, the best times to use the System file checker is when your computer crashes frequently, or the blue screen of death pops up often.
How to Run System File Checker in Windows 7/8/10/11
There are two ways you could run the system file checker. There’s the online mode, and there’s also the offline mode. In this section, we’ll provide you with instructions to help you successfully run the System File Checker and fix the modified and damaged versions of your system files. Without further ado, let’s dive right in.
1. Online
The SFC with the Scannow command can help users fix multiple system errors, including common ones like the blue screen of death. To fix this Windows issue, follow the steps below to learn how to run a system file checker on Windows 10/11:
-
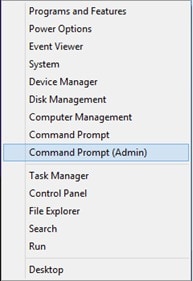
Firstly, press the Windows key + X simultaneously to open the start menu.
-
Next, click on the option’ command prompt (Admin)’ to open it. Another option you might find here is the Windows PowerShell (Admin).
-
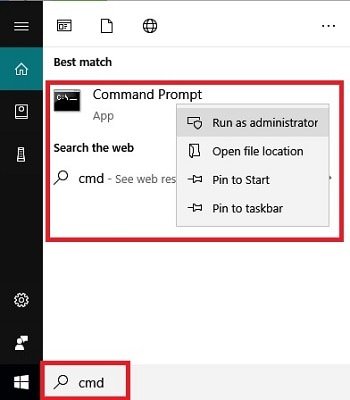
Another way you could get to the command prompt is by simply typing cmd in the Windows Search Box, and you can run the command prompt as administrator.
-
Click yes if it requires your permission to run the tool.
-
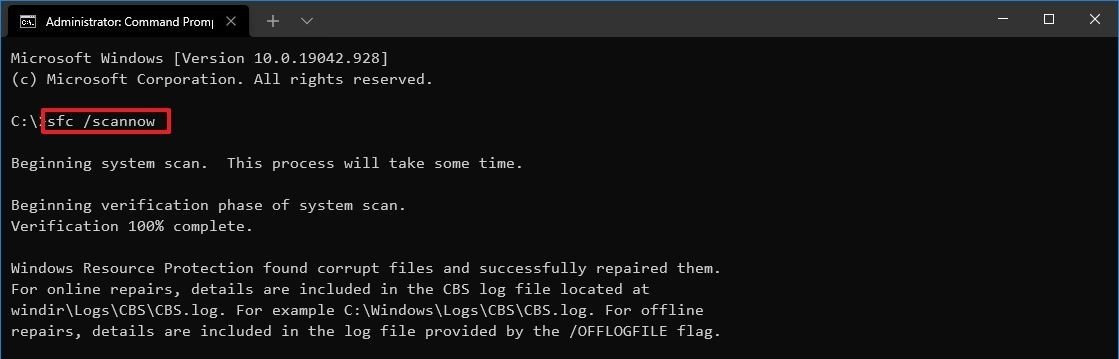
The command will check for the damaged version of the system files. This process might take a while; ensure you don’t interrupt it while it scans.
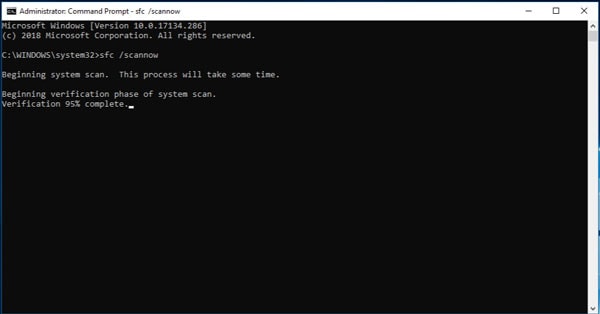
Once the System File checker is done scanning, a message will pop up. The message determines the problem with the system files. Some of the common messages that could pop up include:
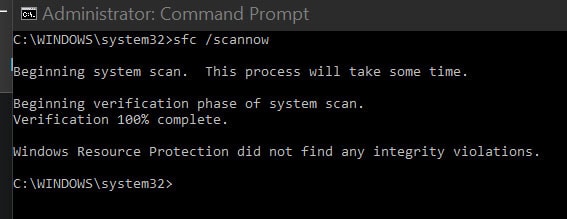
Windows Resource Protection didn’t find any integrity violations: This message usually means that there are no corrupt system files and none are missing either.
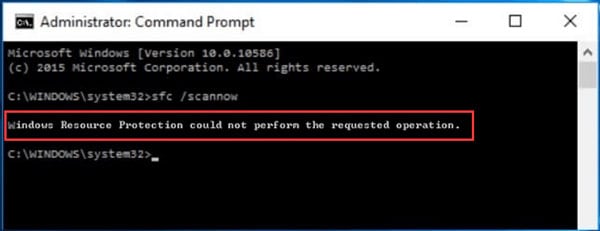
Windows Resource Protection couldn’t perform the requested operation: This shows issues with your system files. You might need to run SFC in safe mode on such occasions to fix this.
Windows Resource Protection found corrupt files and fixed them: This message indicates that SFC found the corrupt or modified files and has been able to fix the files. It also allows you to view details of the SFC process.
Windows Resource Protection found corrupt files but could not fix some of them: This system message indicates that while some of them are back to their original state, you will need to repair the rest files manually. This message also allows you to view the System File Checker process for the repaired files.

2. Offline
If you start facing problems while running the System File Checker in online mode, then another option is to run it in offline mode. Some of the messages after the scan take place requires running the SFC in safe mode. An example is when the SFC cannot complete the repair process. The offline mode is also the safe mode and is easy to run in Windows 10/11. Below are the steps to achieve this.
-
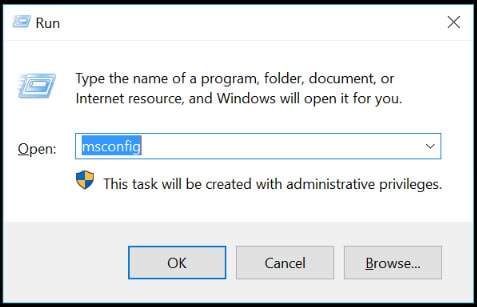
Firstly, press Windows key + R to open the Run dialog box on your computer
-
In the dialog box, type ‘MSConfig’ to open the system configuration.
-
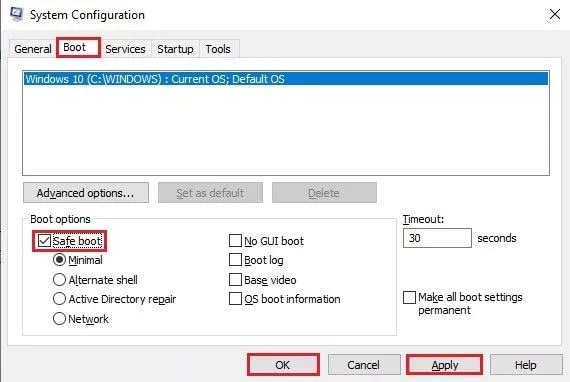
Next, locate the boot tab and choose safe mode from the available options.
-
Select minimal from the displayed options under the safe boot.
-
Finally, click ‘apply’ and choose ok.
This action will lead you to enter the safe mode on your computer, where you can run the SFC scan. Now that you’re in safe mode, follow the steps below to run an SFC scan and fix your system files.
-
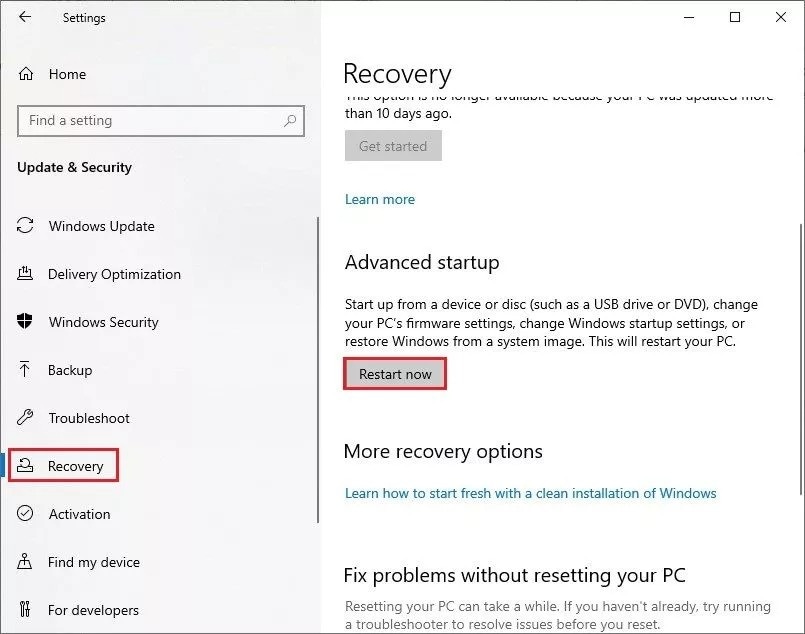
Open your System setting and then navigate to ‘update and security.’
-
Next, navigate to ‘recovery’ and under the option’ advanced startup,’ choose ‘restart now.
-
This will cause the system to reboot, taking you to the troubleshoot screen.
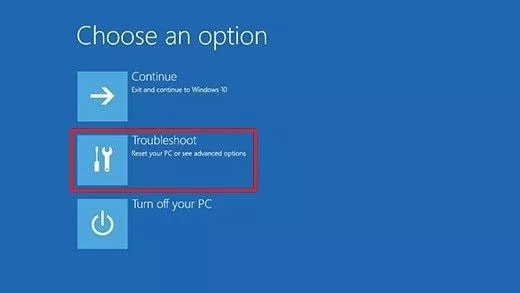
-
The next step is to select ‘advanced options’ and then choose ‘command prompt.’
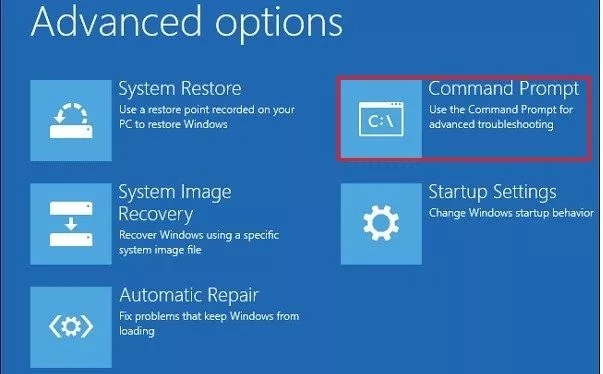
-
Enter the DISM command and run the SFC scan command in the command prompt that pops up.
-
Wait for the scan to be complete; it could take a while.
-
Once the System informs you the process is complete, you can restart your system normally.
Once your system restarts, your system files should be back to their original state without corruption or modifications. You can try to run the safe mode first, and if it doesn’t fix the system files, you can opt to run the System File Checker in online mode.
What If SFC /SCANNOW Cannot Fix My Corrupted Files?
- Try Wondershare Repairit
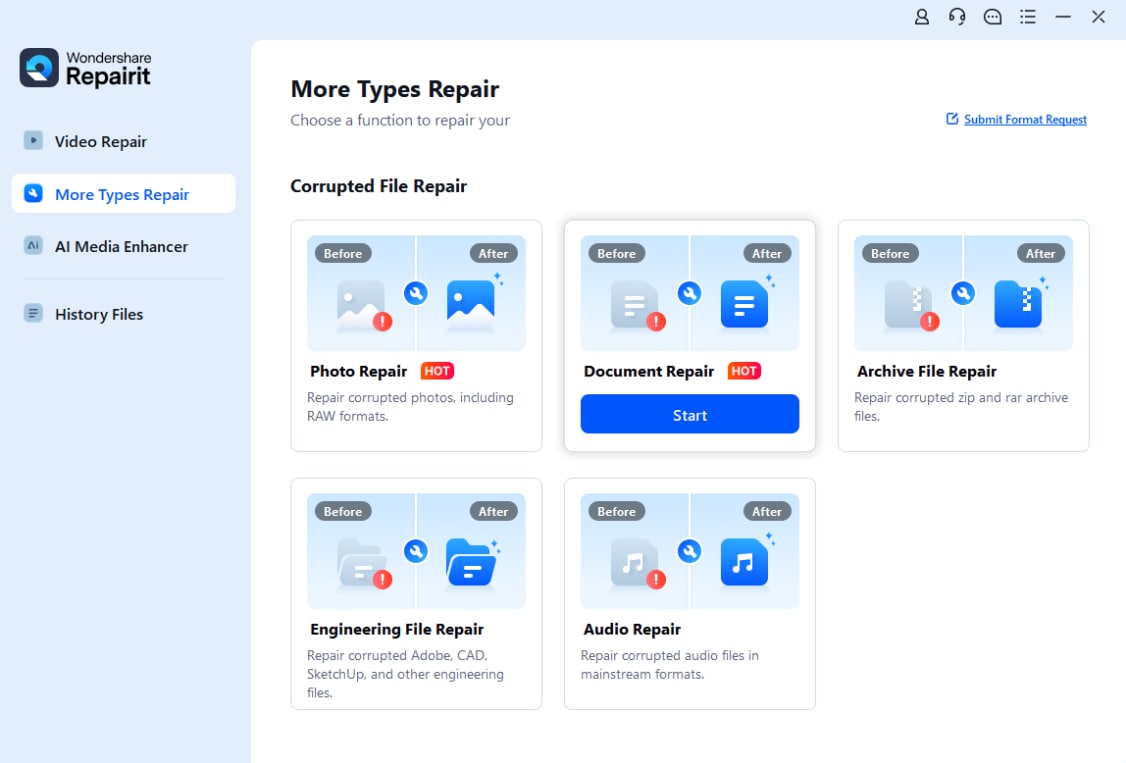
Sometimes, running the SFC online and offline doesn’t fix the files. In such cases, you must try a third-party repair tool. That’s where Wondershare Repairit comes into play. This repair tool is designed to tackle these issues, and it provides a quick and effective solution to repair corrupt files on Windows.
There are many advantages to using Wondershare Repairit, and one of them is that there is no limitation on the corrupt file size you can repair. It also features a user-friendly interface to make the repair process relatively simple. With Repairit, you’re never at risk of losing your files because of data corruption issues.

-
Repair damaged files with all levels of corruption, including blank files, files not opening, unrecognizable format, unreadable content, files layout changed, etc.
-
Support to repair all formats of PDF, Word, Excel, PowerPoint, and Adobe files.
-
Perfectly repair corrupted files with a very high success rate, without modifying the original file.
-
Support Windows 11/10/8/7/Vista, Windows Server 2003/2008/2012/2016/2019/2022, and macOS 10.10~macOS 14.
Using Wondershare Repairit requires an easy three-step process. Below is a breakdown of the process.
Step 1. Launch Wondershare Repairit
The first step is launching the repair tool on your Windows 10/11. To do this, you have to visit the official Repairit website. After launching Wondershare Repairit, navigate to ‘add files’ at the center of the page and click on it. It will pop up a new windows tab where you can navigate to the location of the corrupt system files and select them.
Step 2. Start Repair Process

Once you select the files, you can then start the repair process on the files. Simply select the ‘repair files’ option at the end of the page to begin fixing corrupt or modified files.
Step 3. Save Repaired Files
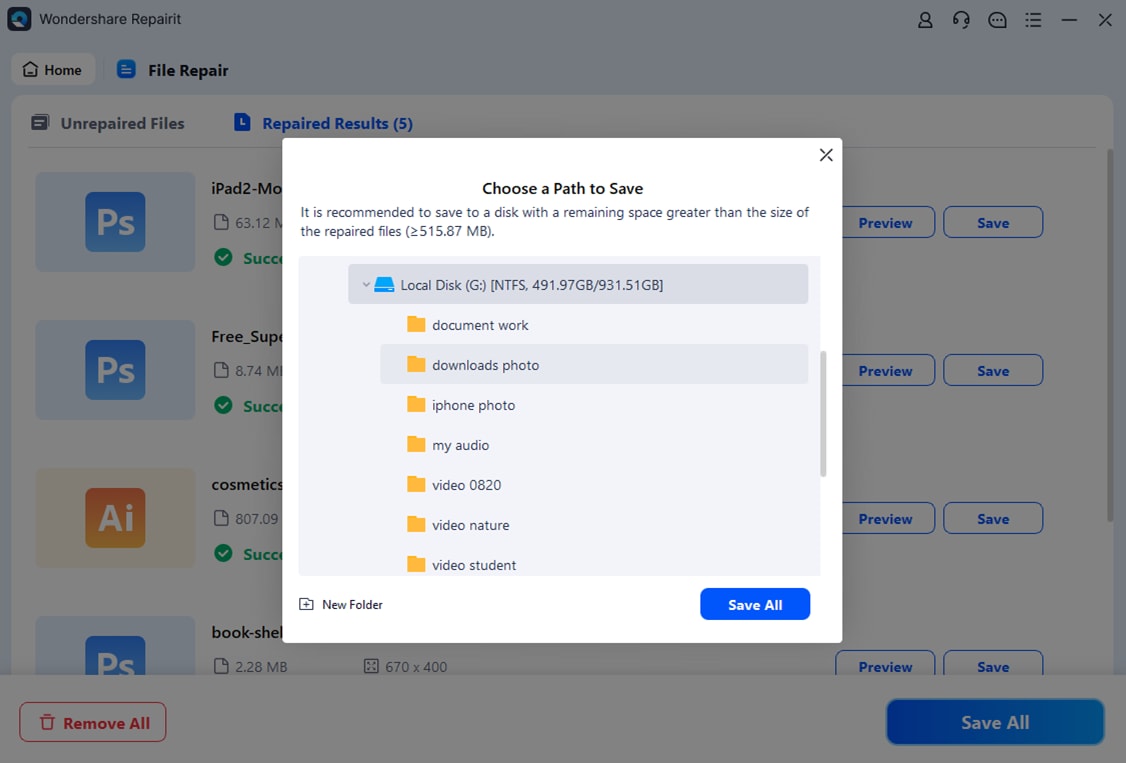
After completing the repair process, save the files by clicking on ‘save file’ and choosing the preferred location you would like to save them.
You can then run a system file checker scan to see if the files are back to the original. If you get the resulting message ‘Windows Resource Protection did not find any integrity violations,’ then your files are in excellent condition and free from any damage.
In addition, if the corrupted file size is relatively small, you can use the Repairit online file repair tool to fix it anytime, anywhere, without installing any software.
Related Reading:
1. Manually Fix Error Code 0x80070057.
2. Fix Error 0x800ccc1a in Outlook
3. How to Repair a Damaged Word File.
Time to Conclude
Sometimes, it is crucial to run SFC snannow command on your Windows 10/11 to fix malfunctioning system files. If you don’t know how to achieve this effectively, this guide covers the various methods to run System File Checker online and offline.
Note that you’ll have to modify the system files, so ensure you have a backup available for the repair process. Alternatively, you can also use powerful repair software like Wondershare Repairit. This repair tool repairs all types of files from Windows PC and external storage devices.
FAQs
-
1. What is the Difference Between CHKDSK, SFC, and DISM in Windows 10/11?
These are all repair tools, but they work differently. The SFC checks for missing crucial system files and then restores them from the backup data. CHKDSK scans your drive to locate bad sectors and then fixes them in the system files. Finally, DISM deals with faulty Windows images and repairs them by downloading a replacement from Windows online server. -
2. How to view details of the System File Checker process?
If you want to view the system file checker process details, you have to open the sfcdetails.txt file. It contains details of every occasion where the SFC tool ran on the computer. It also offers you information about the files that the SFC did not repair and the date and time entries.