A TNPSC photo editor helps applicants prepare photographs and signatures for TNPSC application uploads. It adjusts images to the required pixel dimensions and file-size range while maintaining acceptable clarity. The editor focuses on practical formatting tasks, including cropping, resizing, compression, name and date placement, and JPG or JPEG output.
Photo and signature requirements can vary between TNPSC examinations and recruitment notifications, so applicants should always confirm the applicable specifications first. This guide explains the requirements to check, how to use the TNPSC photo editor, and the correct upload process. It also explores Repairit’s AI photo features and their separate editing purposes.
In this article
Part 1. TNPSC Photo Editor: What Applicants Actually Need
A TNPSC photo editor helps applicants prepare photographs and signatures according to Tamil Nadu Public Service Commission upload requirements. Its purpose is application compliance rather than cosmetic enhancement. TNPSC instructions require a recent color passport-size photograph taken in a studio against a white background. The candidate should face the camera directly, with both ears and part of the neck clearly visible.
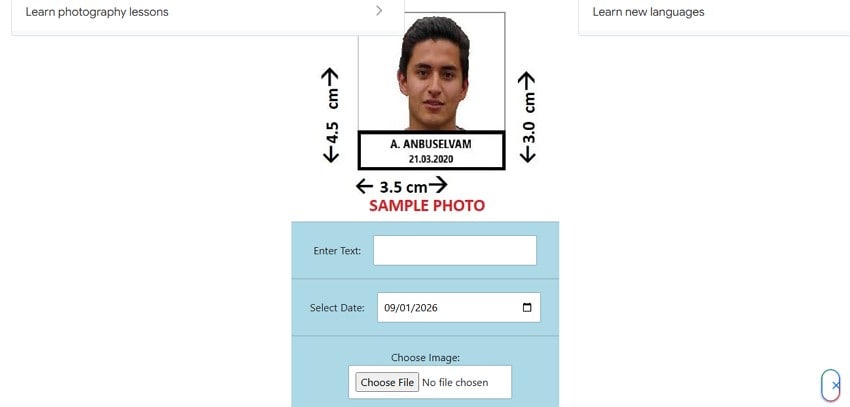
The candidate’s name and photo date must be printed clearly at the bottom. Once these requirements are met, a TNPSC photo editor can help with the following tasks:
| Task | Why It Matters |
| Crop the Photograph | Keeps the candidate properly framed within the required passport-size layout. |
| Resize the Image | Matches the pixel dimensions specified by TNPSC or the relevant recruitment notification. |
| Control File Size | Keeps the uploaded JPG within the specified minimum and maximum KB range. |
| Add or Preserve Name and Photo Date | Ensures the required name and photography date remain clearly visible at the bottom. |
| Export as JPG/JPEG | Produces the photograph and signature in the JPG or JPEG format required for upload. |
| Prepare the Signature Separately | Meets the signature’s separate dimension and file-size requirements for the application. |
Part 2. TNPSC Photo and Signature Requirements to Check First
Published specifications for the TNPSC photo editor can differ across sources because TNPSC issues separate instructions for different examinations and recruitment cycles. Requirements listed for one examination may not apply to another, making the relevant official notification the most reliable reference.
This also explains why third-party compressor sites may show different dimensions and file-size limits. Some use figures from specific examination notifications, while others follow One Time Registration guidance. The official instructions for Half Yearly Examinations and Language Tests, published on tnpsc.gov.in, specify the following:
| Requirement | Photograph | Signature |
| Dimensions | 165 × 125 pixels | 80 × 125 pixels |
| File Size | 30 KB to 40 KB | 20 KB to 30 KB |
| Format | JPG or JPEG | JPG or JPEG |
| Background | Blue or white | Plain paper |
| Age | Taken within the last three months | Recent and legible |
| Clarity | Good clarity required | Reasonably good quality |
Selfie and Polaroid photographs are not accepted under these TNPSC instructions. Applications submitted without a clear photograph may also be rejected.
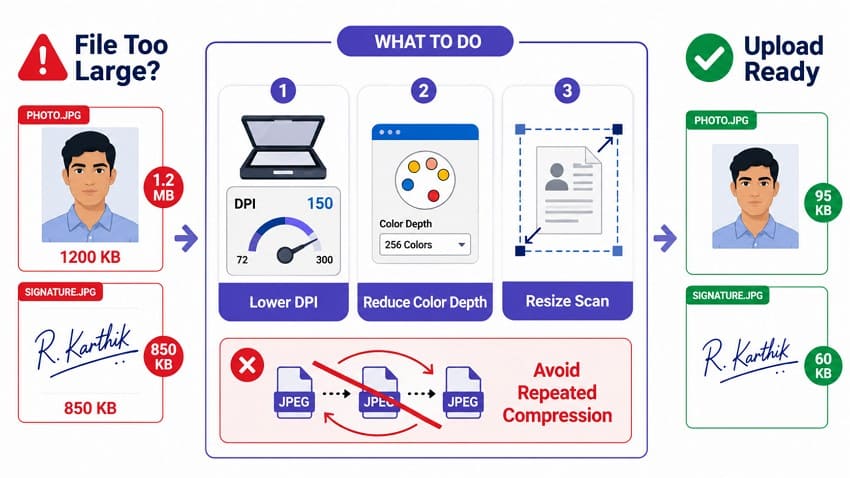
What If the Photo or Signature File Is Too Large?
When a file exceeds the size limit for the TNPSC photo editor, TNPSC recommends adjusting scanner settings instead of repeatedly compressing the image. Candidates can reduce the DPI resolution or color depth during scanning to create a smaller file. Resizing the scanned image before upload can also help meet the required limit. These methods can reduce file size while avoiding the additional quality loss caused by repeated JPEG compression.
Why Do TNPSC Photo Size Requirements Differ Online?
Several current TNPSC notifications require the candidate’s name and photography date to appear at the bottom of the photograph. However, pixel dimensions and file-size limits can vary between notifications. Always follow the specifications provided in the notification for your examination rather than relying solely on third-party tools or general TNPSC guidelines.
Check 5 Details Before Editing Your TNPSC Photo
Before resizing or compressing your files, confirm these details in the official TNPSC instructions for your examination:
- Verify the exact photograph dimensions required in pixels or centimeters.
- Check the minimum and maximum file-size limits specified for the photograph.
- Confirm the separate dimensions and file-size requirements specified for the signature.
- Check whether your name and photography date must appear at the bottom of the photograph.
- Verify the permitted background color, as requirements may differ between TNPSC examinations and notifications.
Part 3. How to Use a TNPSC Photo Editor for Application Upload?
After confirming the correct requirements, you can prepare the files using the TNPSC photo editor. Follow these steps to format your photograph for application upload while maintaining its clarity:
Step 1. Go to the TNPSC Photo Editor and press the “Choose File” button to add the image.
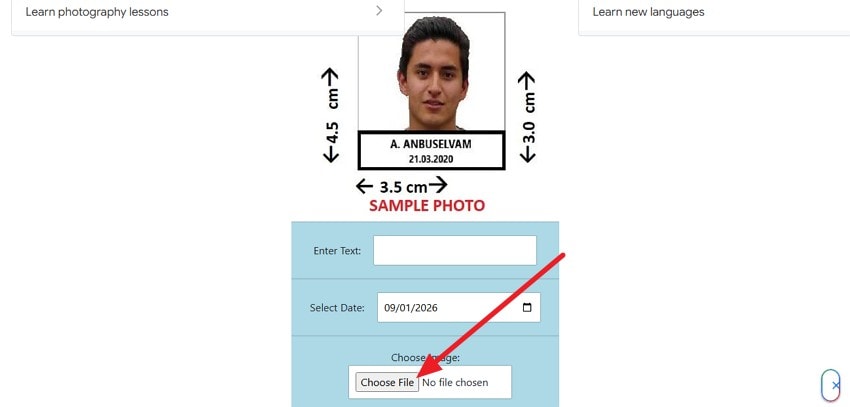
Step 2. After that, enter the details in the “Enter Text” field box, choose the date, and tap on the “Convert” button.
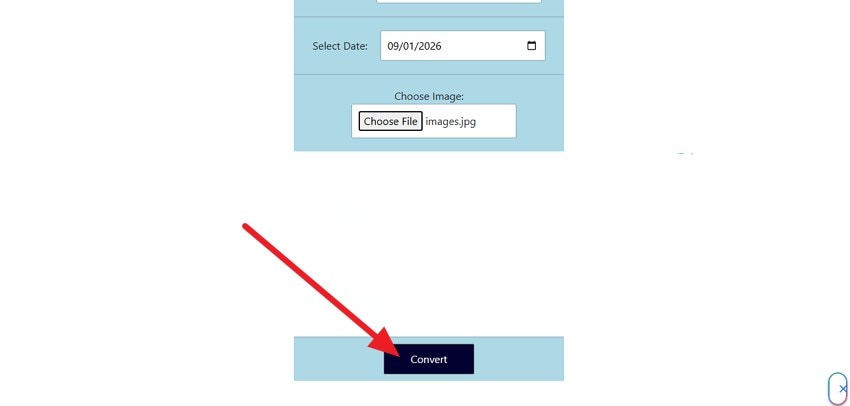
Step 3. Select the “Download Your Image” option and save the final JPEG image to upload it to the TNPSC OTR portal.
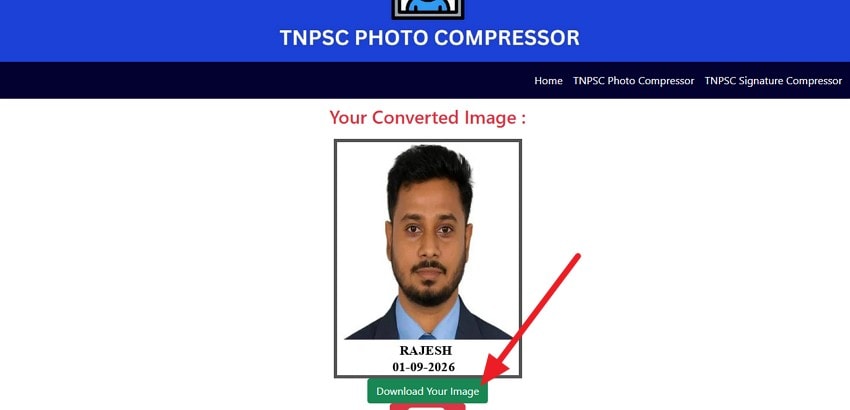
Tip: Before submitting, review both files carefully. Confirm that the dimensions and file sizes match your TNPSC notification and that both use JPG or JPEG format. Also, check that the photograph remains clear and easily identifiable.
Part 4. Repairit AI Photo Editor Features: Complete Overview
Repairit is not a TNPSC-specific formatting tool, so it does not replace the TNPSC photo editor. However, 3 of its AI photo features can support image preparation in specific situations. The remaining features are better suited to personal, creative, or archival photography. The table below explains where each feature fits:
| Repairit Feature | What It Does | Role in TNPSC Work |
| Image Upscaler | Enlarges images by 2x, 4x, or 8x while improving resolution | Can enlarge an undersized source before final TNPSC formatting |
| Blurry Photo Enhancer | Improves sharpness and clarity in blurry or soft images | Limited role. A new clear photo is preferable for TNPSC applications |
| Photo Eraser | Removes selected objects, marks, or distracting elements | Limited role. Cropping or rescanning is preferable for application files |
| Facial Detail Enhancer | Refines facial details such as eyes, hair, and skin | Not recommended for TNPSC photos. Better suited to personal portraits |
| Old Photo Restoration | Repairs scratches, fading, and other visible damage | No TNPSC role. Designed for restoring old and damaged photographs |
| Photo Colorizer | Adds realistic color to black-and-white photographs | No TNPSC role. Designed for personal and archival photographs |
| Background Remover | Separates the subject from the existing background | Not recommended. Use the background specified in the TNPSC notification |
| Watermark Remover | Removes unwanted watermarks, text, or overlays from images | No TNPSC role. Suitable for authorized editing of other images |
| One-Prompt Edit | Applies image edits using natural-language instructions | No TNPSC role. Designed for general and creative image editing |
| AI Scene Reconstruction | Recreates or modifies scenes, lighting, and surrounding details | No TNPSC role. Designed for creative image transformations |
| Image to Video | Turns a still photograph into an animated video | No TNPSC role. Designed for creative content creation |
Three Repairit Features That Can Help Before TNPSC Formatting
Some Repairit features can support image preparation before final formatting with the TNPSC photo editor. Here is where each feature can help:
Image Upscaler: Useful for Low-Resolution Source Images
The Image Upscaler can help when a source photograph is smaller than the required dimensions. Simply enlarging a low-resolution image with a basic TNPSC photo editor may make it look soft or pixelated. Repairit can upscale the image at 2x or 4x to improve its resolution before final formatting.
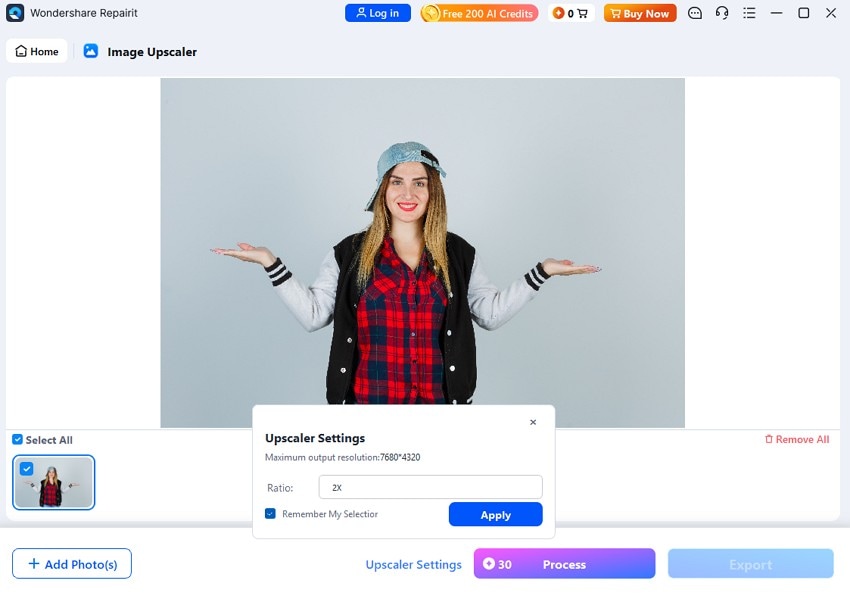
Use upscaling before resizing or compressing the image for TNPSC upload. Repairit does not provide TNPSC-specific dimensions or guaranteed KB-range output. The upscaled image still needs final resizing and compression with the TNPSC photo editor to meet the required upload specifications.
Photo Enhancer and Face Enhancer: Use Caution with Application Photos
Repairit includes tools for improving blur, noise, sharpness, lighting, and facial details. Its Face Enhancer focuses on areas such as the eyes, skin texture, and facial clarity. For TNPSC preparation, these features can improve image quality before the TNPSC photo editor handles the required dimensions, format, and file size.
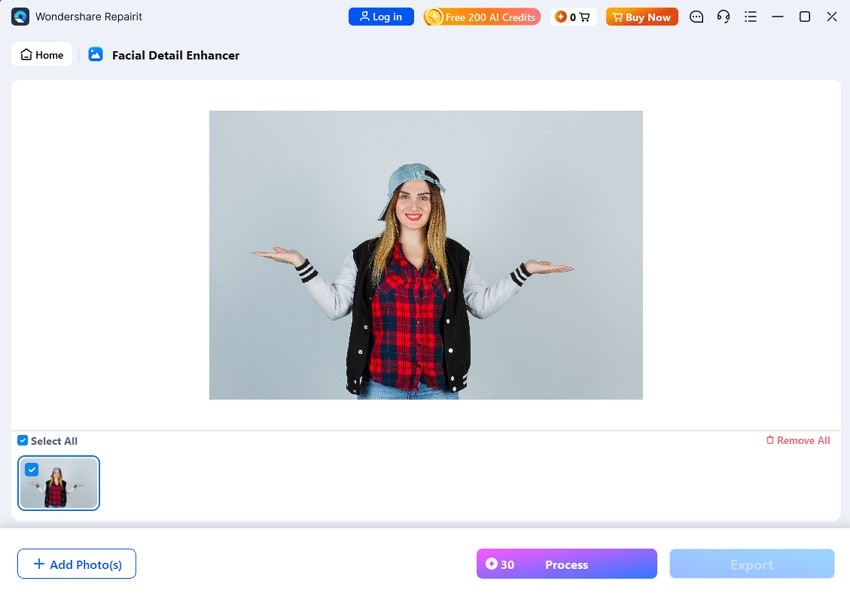
For TNPSC preparation, the TNPSC photo editor handles the final formatting after any image-quality improvements. It adjusts the photograph and signature to the required dimensions, file format, and KB range. Repairit supports the enhancement stage, while the TNPSC photo editor prepares the files for upload.
Photo Eraser: Better for General Cleanup Than TNPSC Photo Editing
Repairit’s Photo Eraser removes unwanted objects or distractions by brushing over the selected area. AI then fills the removed section to blend it with the surrounding image. It can clear clutter, signs, wires, labels, and other unwanted elements from photos.
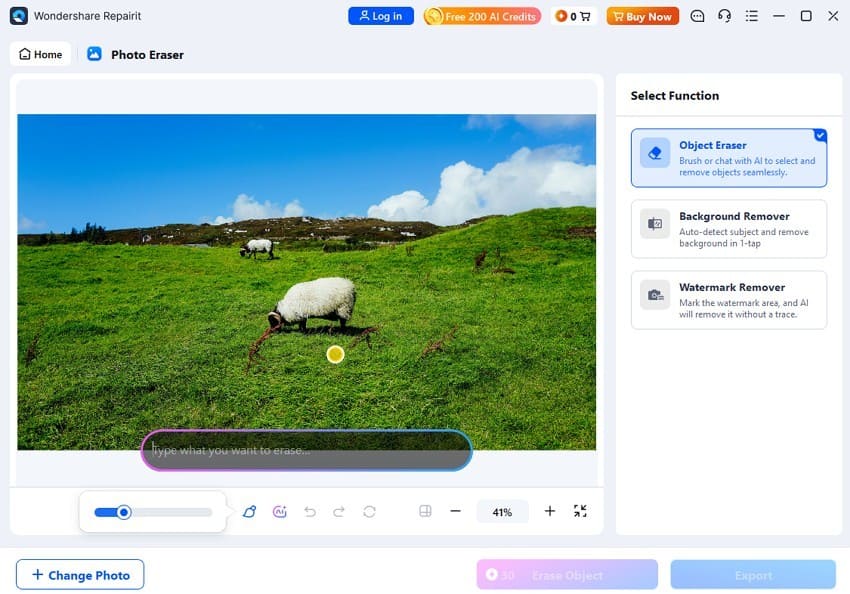
For TNPSC preparation, Photo Eraser can support basic cleanup before final formatting. The TNPSC photo editor then handles the required dimensions, file format, KB range, and other application-specific requirements.
Part 5. TNPSC Photo Editor vs Repairit: Different Jobs
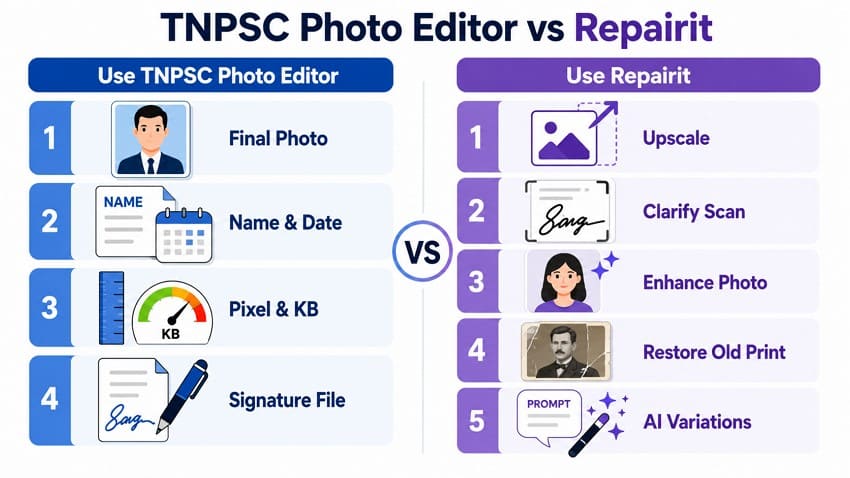
A TNPSC photo editor and Repairit serve different purposes. The TNPSC photo editor prepares files for specific application requirements, while Repairit focuses on AI-powered image enhancement and editing. The table below shows where each tool fits and helps you choose the right one for each task.
| Requirement | TNPSC Photo Editor | Repairit |
| TNPSC-Specific Dimensions | Yes, using preset dimensions | No |
| KB Compression to a Range | Yes | No |
| Name and Date Placement | Yes | No |
| Signature Preparation | Yes | No |
| Blurry Photo Improvement | No | Yes |
| Image Upscaling | No | Yes |
| Facial Enhancement | No | Yes |
| Old Photo Restoration | No | Yes |
| Object and Background Cleanup | No | Yes |
| Creative AI Editing | No | Yes |
Use a TNPSC Photo Editor When
- Preparing the Final Application Photograph: Format the photograph according to the dimensions, file size, and format specified by TNPSC.
- Adding the Name and Photography Date: Place the required candidate name and photo date clearly at the bottom of the photograph.
- Matching Pixel Dimensions and KB Range: Adjust the photograph to meet the minimum and maximum limits stated in the relevant notification.
- Preparing the Signature File: Format the signature according to its separate dimensions, file-size limits, and other specified requirements.
Use Repairit When
- Enlarging an Undersized Source: Upscale a low-resolution image at 2X or 4X before resizing it to the required dimensions.
- Correcting Image Quality Issues: Reduce blur, noise, poor lighting, and other visible problems using Repairit’s enhancement features.
- Refining Personal Photographs: Improve overall appearance and facial details in portraits intended for personal use.
- Restoring Old Prints: Repair fading, scratches, tears, and other visible damage in old or scanned photographs.
- Creating AI Variations: Use prompt-based editing and scene reconstruction to make broader creative changes to personal images.
Conclusion
Always follow the specifications in your relevant TNPSC notification, as photo and signature requirements can vary between examinations and recruitment cycles. Use the required background, dimensions, file format, and KB range when preparing your files.
A TNPSC photo editor focuses on formatting files for application upload, while Repairit serves broader image-editing needs. Repairit can upscale low-resolution images, enhance personal photos, restore old photographs, and support creative AI editing. For the final TNPSC application photo, prioritize accurate formatting and a clear, recent photograph rather than AI-based facial changes.
FAQ
-
Can I use an AI-enhanced photo for a TNPSC application?
Yes. Repairit can improve image clarity before TNPSC formatting. Keep enhancements limited to quality issues without changing facial appearance. After enhancement, use the TNPSC photo editor to meet the required dimensions, file size, format, and other upload specifications. -
Why does my TNPSC photo look blurry after compression?
Excessive or repeated JPEG compression can reduce image clarity and introduce visible artifacts. Start with the original photo and compress it only as needed to meet the specified KB range. For scanned images, adjusting the DPI can also help reduce file size. -
Can Repairit resize a photo to TNPSC's exact upload requirements?
No. Repairit does not provide TNPSC-specific presets or compression to an exact KB range. Its Image Upscaler can enlarge a low-resolution source, but you still need the TNPSC photo editor to meet the required dimensions and file-size limits. -
Should I remove the background from my TNPSC photo with AI?
It is better to take photographs against the background specified in your TNPSC notification. AI background removal can sometimes introduce unnatural edges or other artifacts. Using a correctly photographed original helps preserve clarity and avoids unnecessary digital changes.