 TL;DR:
Choose Repairit for specialized AI reconstruction of severe blur, targeted facial details, and old photo damage, but opt for Canva Image Enhancer if you need quick automated upscaling alongside manual lighting controls within an existing design project.
● Canva automatically applies a 4x or 16x upscale to JPG and PNG files sized between 10 pixels and 25 megapixels, whereas Repairit allows manual selection of 2x, 4x, or 8x enlargement factors and supports batch processing.
● Repairit features dedicated AI models that differentiate between motion and lens blur while specifically targeting eyes, hair, and skin texture, whereas Canva applies uniform slider-based sharpening that can amplify background image grain.
● Old photo restoration in Repairit addresses scratches, creases, and colorization simultaneously in one built-in workflow, while Canva relies on the localized Magic Eraser tool and premium third-party marketplace apps for deep structural repair.
Ask AI for a summary
 ChatGPT
 Perplexity
 Gemini
 Claude
 Grok
Grok
Ever look at an old family snapshot or a quick smartphone picture and wish it looked clearer, sharper, or less faded? Bringing those photos back to life often requires the right enhancement tool. Canva Image Enhancer keeps the process automatic by selecting the enlargement level itself, so users do not manually choose an upscale factor.
Repairit takes a more controlled approach by letting you choose 2x, 4x, or 8x upscaling and process the image according to your needs. Beyond enlargement, the two tools also differ in how they handle blur, portraits, and old photo restoration. This guide compares Canva and Repairit across these areas to help you determine which photo enhancer better fits your needs.
In this article
Part 1. Canva Image Enhancer vs Repairit: Quick Comparison
The difference in control reflects how the two tools approach photo enhancement. Canva integrates enhancement features into its broader design editor, available through the web and mobile apps. Repairit focuses more directly on photo enhancement through dedicated AI models, with both desktop and online options. The table below compares the key capabilities of Canva Photo Enhancer and Repairit AI Photo Enhancer:
| Feature | Canva Image Enhancer | Repairit AI Photo Enhancer | Better For |
| General Enhancement | Auto-adjust improves lighting and color | General model improves clarity and detail | Canva |
| Blurry Photo Enhancement | Sharpness controls improve mild blur | AI Image Sharpener handles different blur types | Repairit |
| Image Upscaling | AI automatically determines the upscale level | Lets users select the upscale level | Repairit for control |
| Facial Detail Enhancement | No dedicated portrait enhancement mode | Portrait Enhancer targets facial details | Repairit |
| Old Photo Restoration | Uses separate editing and restoration tools | Dedicated Old Photo Restoration model | Repairit |
| Scratch and Damage Repair | Magic Eraser removes individual marks | Restoration model repairs photo damage | Repairit |
| Faded Photo Enhancement | Manual color and warmth adjustments | AI restores faded photo appearance | Depends on preference |
| Manual Adjustments | Multiple controls for lighting and color | Primarily AI model-driven enhancement | Canva |
| Maximum Upscaling | 4x or 16x, selected automatically | 2x, 4x, or 8x, selected manually | Repairit for control |
| Ease of Use | Simple for existing Canva users | Dedicated models simplify specific repairs | Tie |
Part 2. What Can Canva Image Enhancer Do?
With the basics covered, this section explores 4 key aspects of Canva Image Enhancer and how they improve different areas of a photo:
Canva Image Upscaler
Canva Photo Enhancer uses smart technology to sharpen blurry pictures and improve image quality. The system automatically selects 4x or 16x enhancement based on the uploaded file, without offering manual selection. Supported formats include JPG and PNG, while vector graphics are not supported. Images must be at least 10 pixels and no more than 25 megapixels, and the enhanced output can reach up to 50 megapixels.
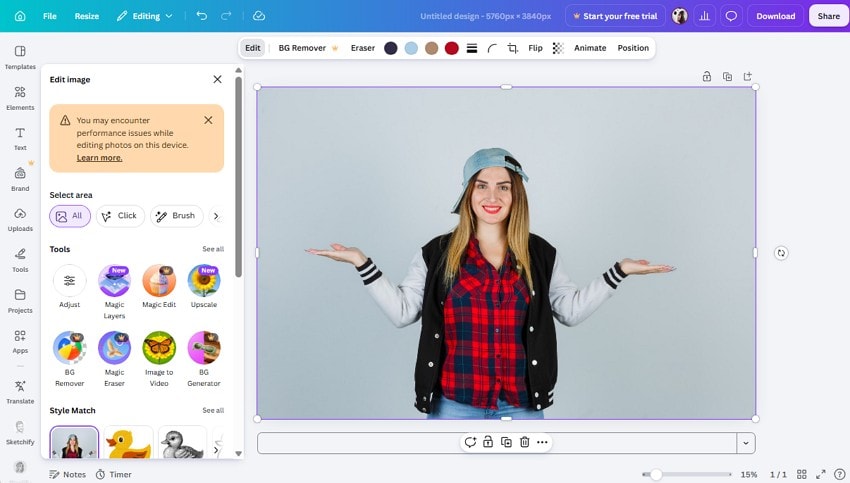
Usage limits restrict the app to one instance per picture, and results vary for portraits or text. Access requires subscription tiers like Pro, Teams, Business, or Nonprofit, and every application consumes monthly artificial intelligence credits.
Canva Auto-Adjust
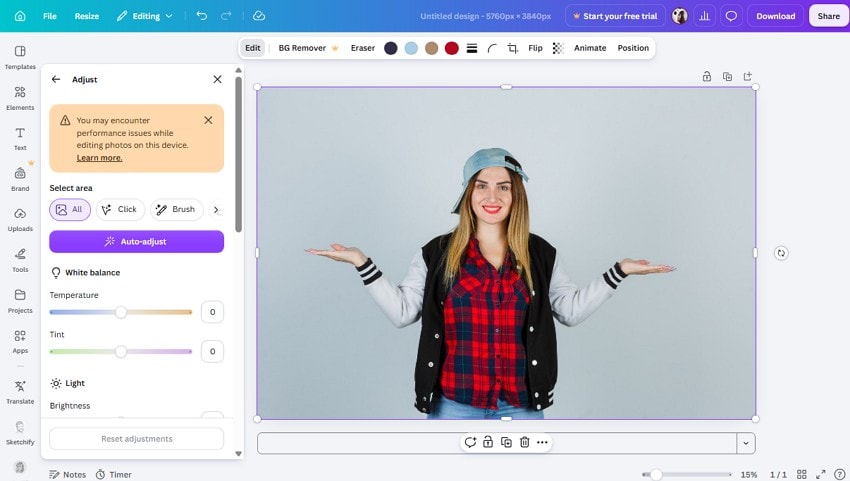
Auto-adjust reads the image and corrects exposure, contrast, and color balance in a single click. It suits photos that are broadly correct but flat, such as an underexposed indoor shot. The changes are immediate, which makes it the fastest route when a photo needs polish rather than repair. Auto-adjust does not add resolution or remove blur, so a soft image stays soft after the pass.
Canva Manual Photo Adjustments
In addition to the Canva Image Enhancer, Canva also provides manual controls for users who want influence over the final image. The photo editor includes adjustments like brightness, contrast, saturation, warmth, tint, clarity, highlights, shadows, and vignette. It also offers sharpness and clarity controls to improve mildly soft or blurry images.
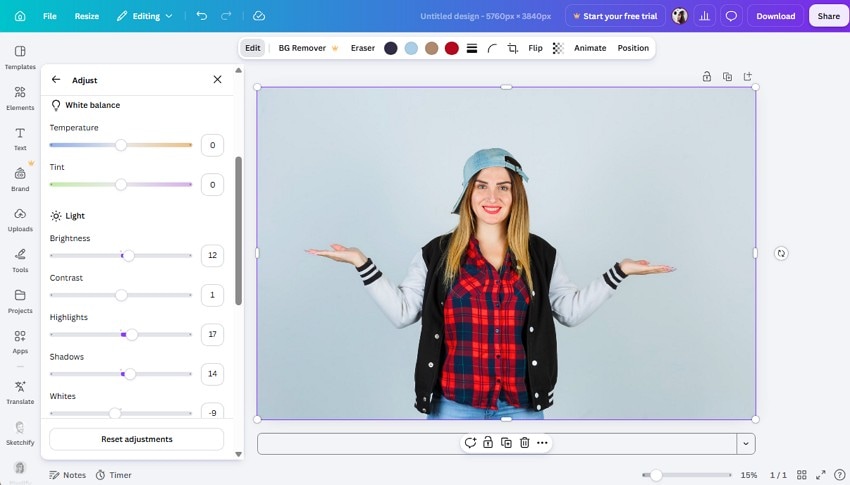
These controls work well when automatic enhancement produces results that are too bright, saturated, warm, or sharp. However, aggressive sharpening makes existing grain, compression artifacts, and edge halos more noticeable, so smaller adjustments work better on noisy photos.
Canva Photo Restoration
Restoration works differently from the other three. Canva's photo restoration page points users to the standard photo editor plus Magic Studio tools. Magic Eraser clears spots and marks one area at a time.
Dedicated restoration comes from the Apps Marketplace instead, through third-party apps such as Restore Old Photos and Revive Photo. Colorify, which adds color to black-and-white images, is documented as a premium third-party app limited to paid plans. Restoration is therefore assembled from several tools rather than run as a single process.
Part 3. Which Repairit Features Compete with Canva Photo Enhancer?
While Canva groups its enhancement tools by function, Repairit uses dedicated AI models for specific photo problems. Several of these capabilities overlap with what Canva Photo Enhancer offers but provide more specialized processing for different enhancement needs. Review the following Repairit features to understand how they compare with Canva:
Blurry Photo Enhancer
The AI Image Sharpener distinguishes static blur, motion blur, and lens blur, then applies different handling to each. It analyzes motion blur by direction rather than sharpening it uniformly. A denoise stage runs in the same pass, which matters because sharpening otherwise makes existing grain more visible.
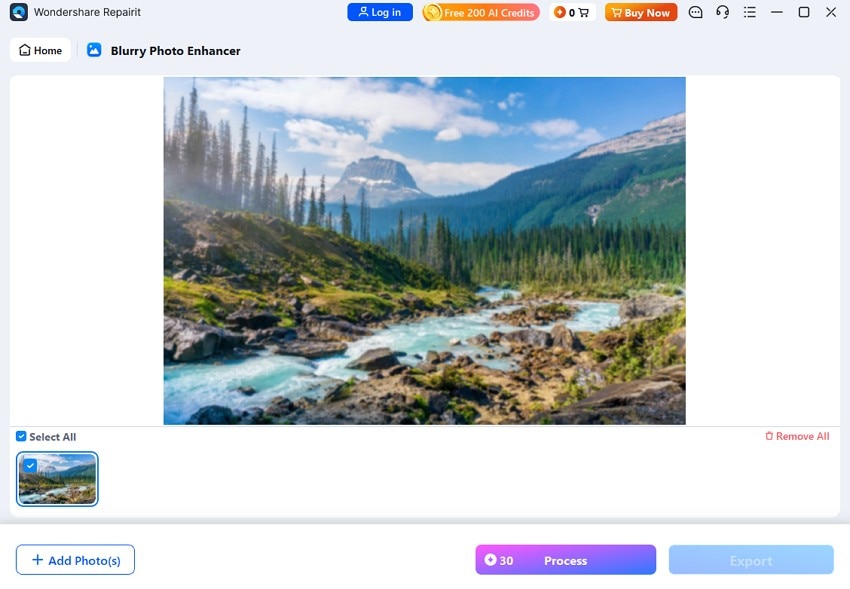
Image Upscaler
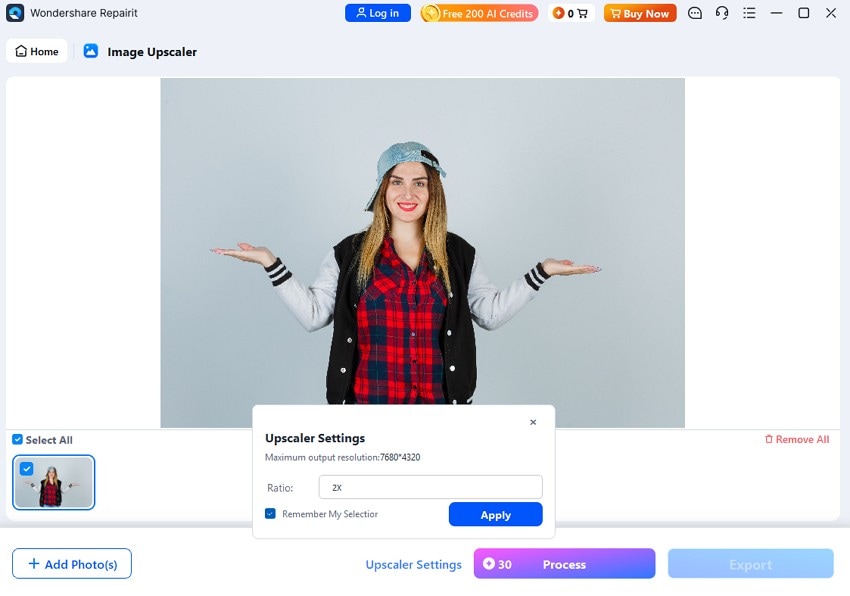
Repairit Photo Enhancer supports batch processing, making it convenient to enhance multiple images in one workflow. Users can also access History Files to review previously processed photos. For image upscaling, Repairit provides selectable 2x, 4x, and 8x factors, giving users direct control over the enlargement level based on their desired output.
AI Photo & Portrait Enhancement Online
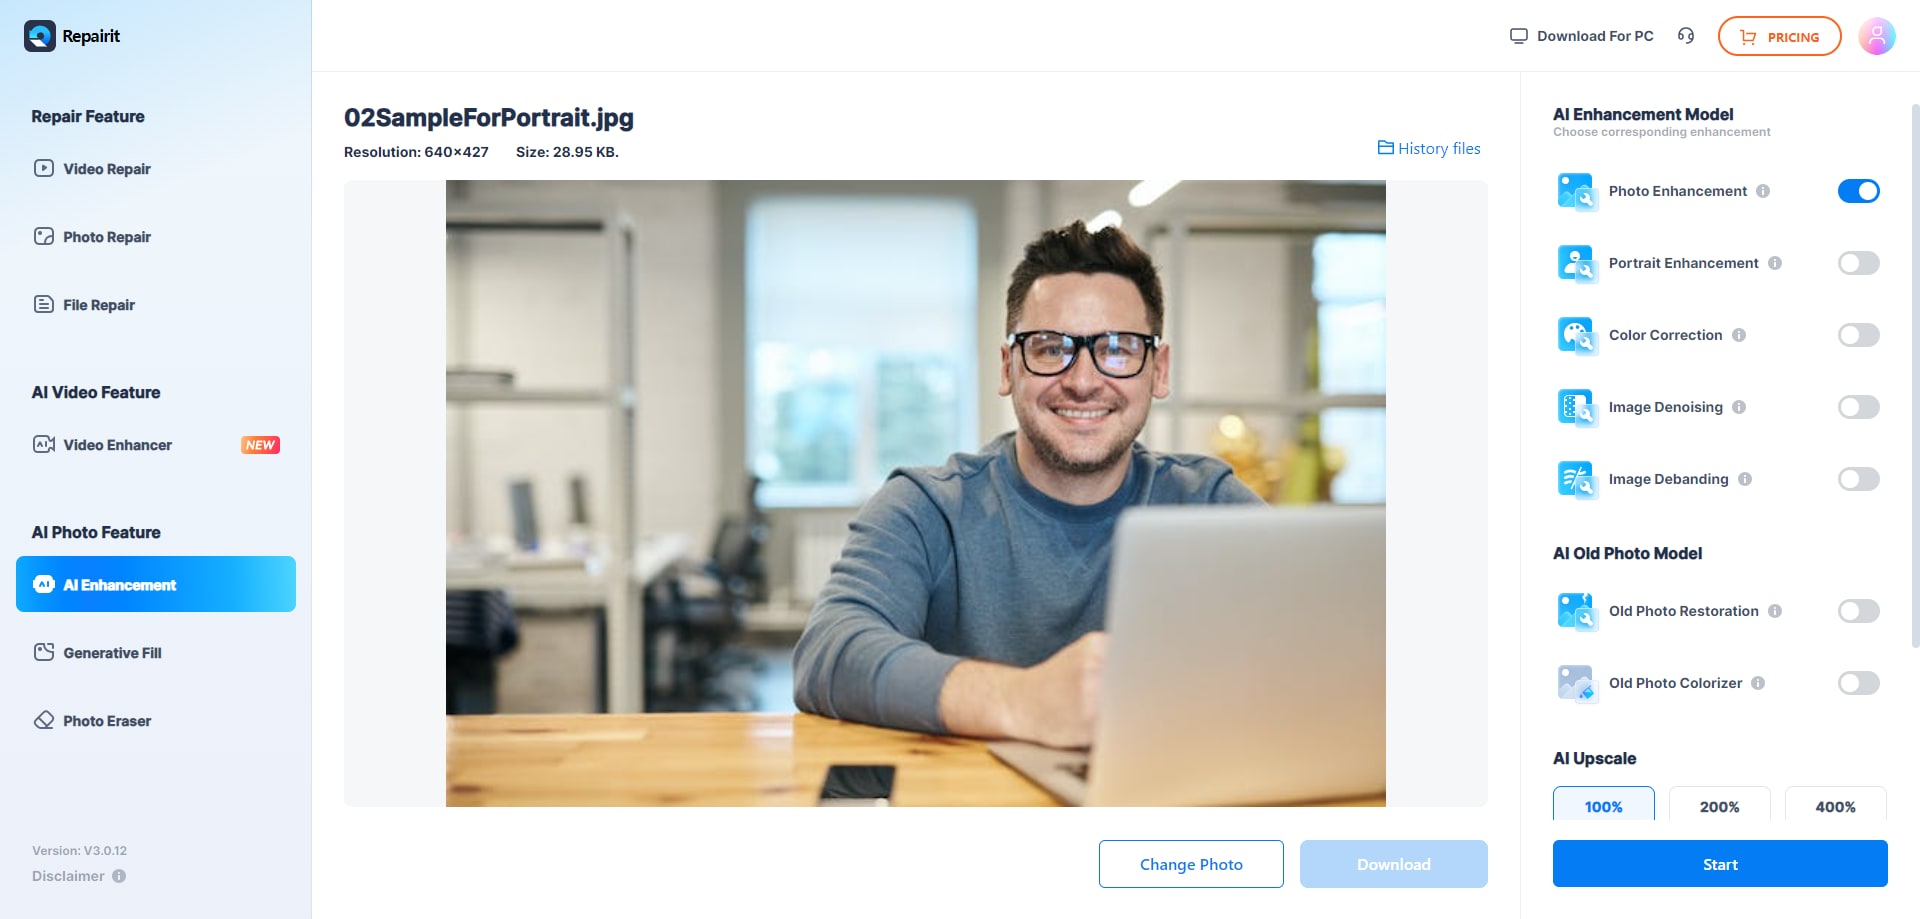
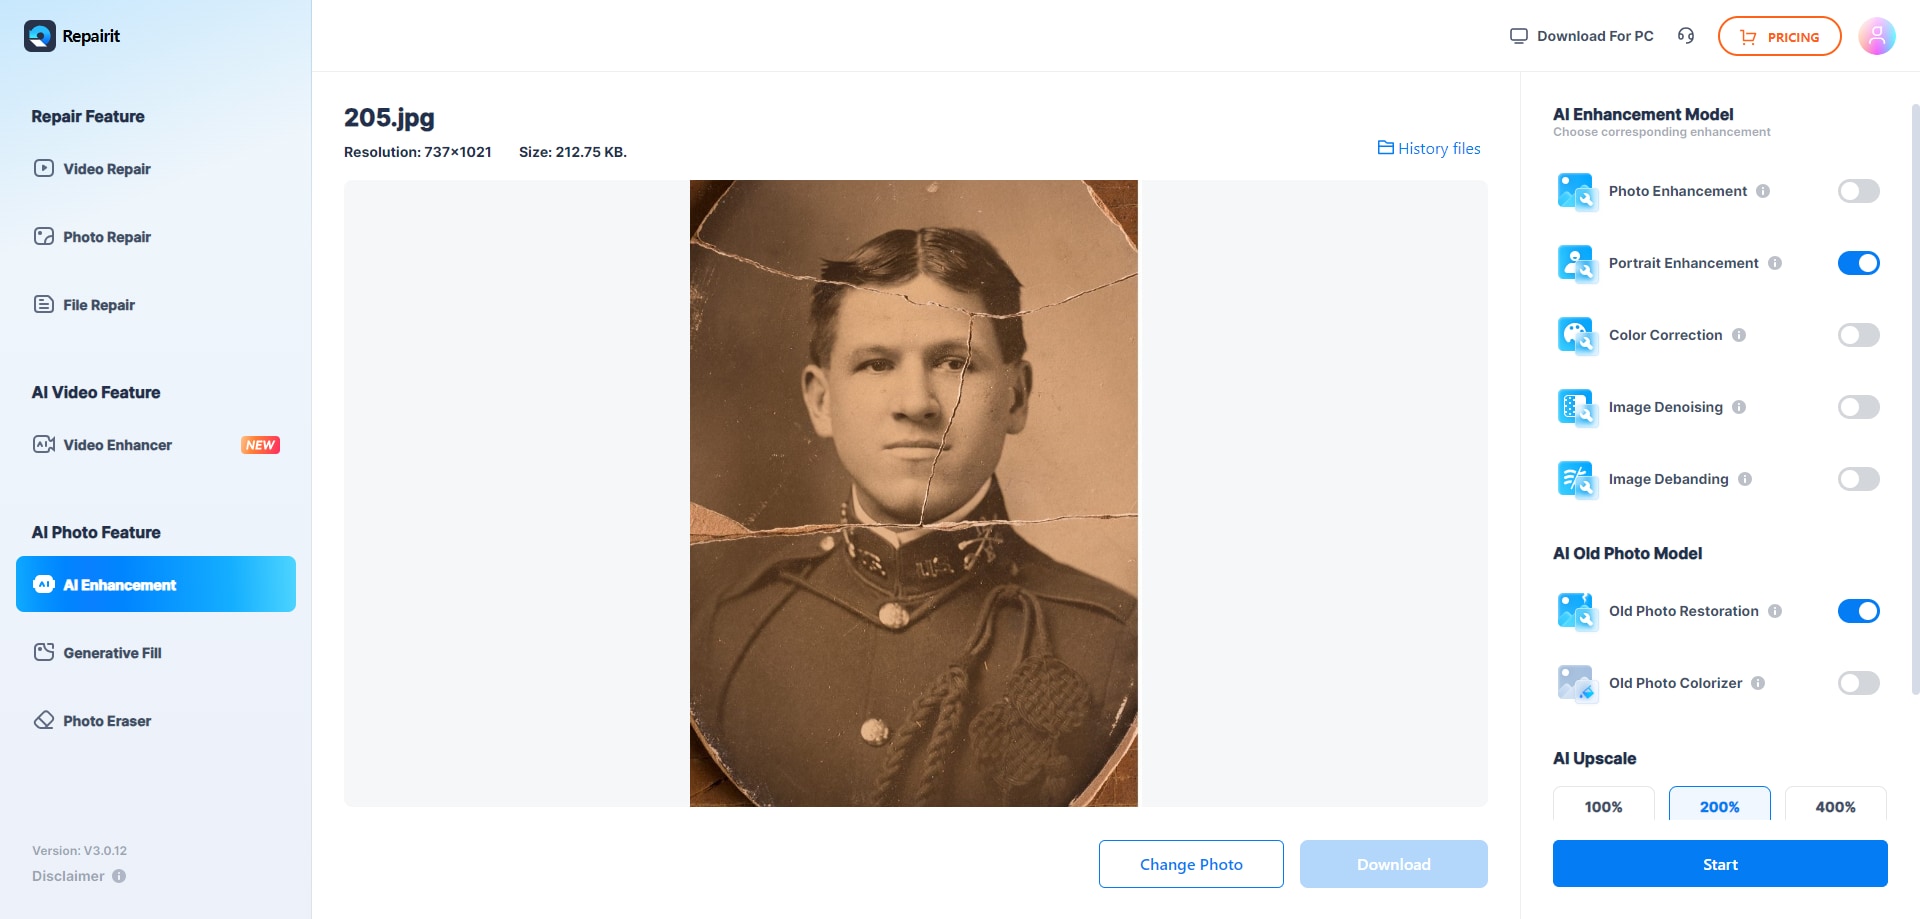
The online tool provides model options specifically for photo enhancement and restoration tasks. It offers AI Enhancement Model and AI Old Photo Model options, with AI Enhancements further divided into Photo Enhancement and Portrait Enhancement. For AI upscaling, users can choose options from 100% to 400%, which Canva Image Enhancer lacks.
Facial Detail Enhancer
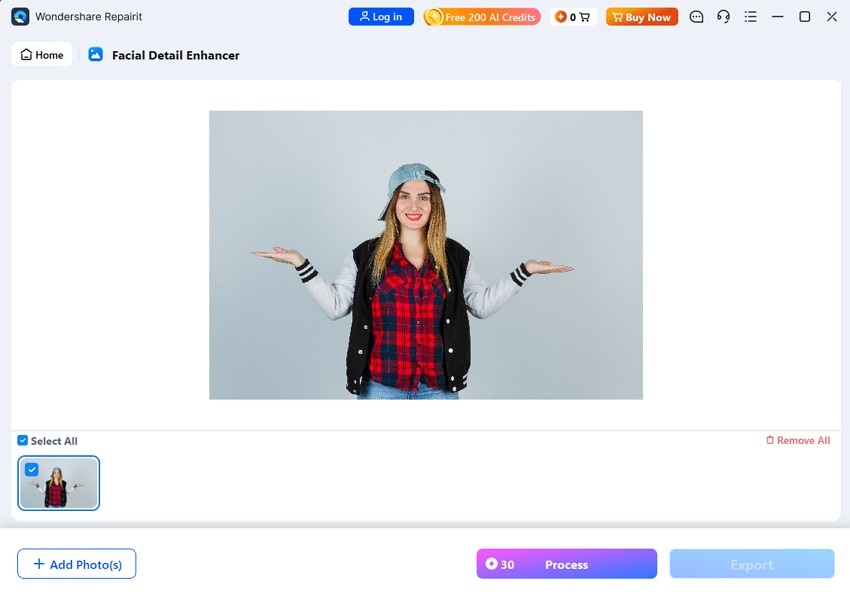
Desktop Portrait Enhancer uses facial feature recognition to identify and sharpen the eyes, hair, and skin texture individually. It also rebalances lighting across faces to brighten them without flattening natural skin tones. Since portraits can reveal enhancement errors more easily than other subjects, this face-specific model provides more targeted results than applying general sharpening across the entire image.
Old Photo Restoration
Unlike Canva Image Enhancer, the Old Photo Restoration model targets scratched, creased, faded, and discolored prints in one operation. Repairit recommends the online tool for minor scratches and the desktop version for missing sections or complex damage. Scratch removal and color recovery run together instead of as separate manual steps, keeping the repaired area consistent with the surrounding tone.
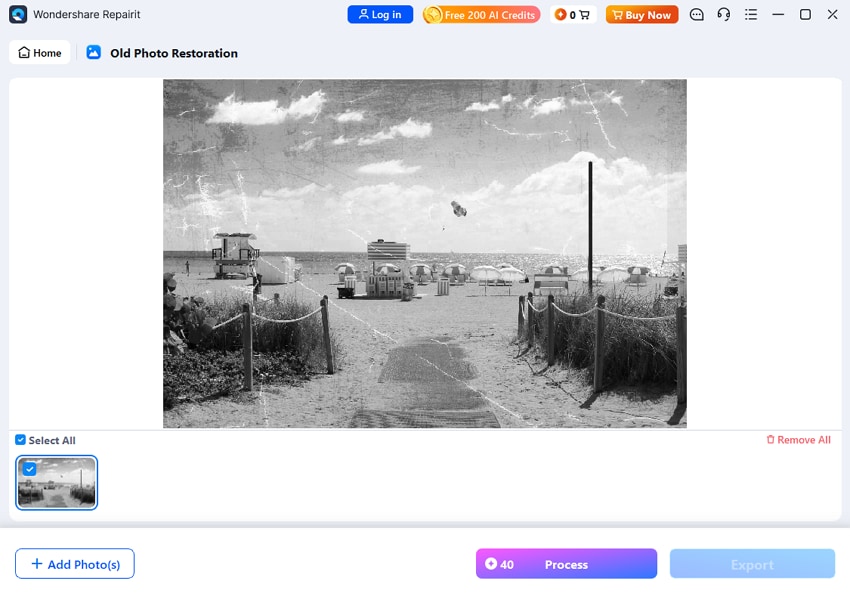
In the online tool, users can select the Old Photo model after uploading, which splits into 2 choices: Old Photo Restore and Old Photo Colorize. Users can select both choices simultaneously to repair and colorize pictures during the same process. The system supports formats like JPG, JPEG, PNG, BMP, and WEBP.
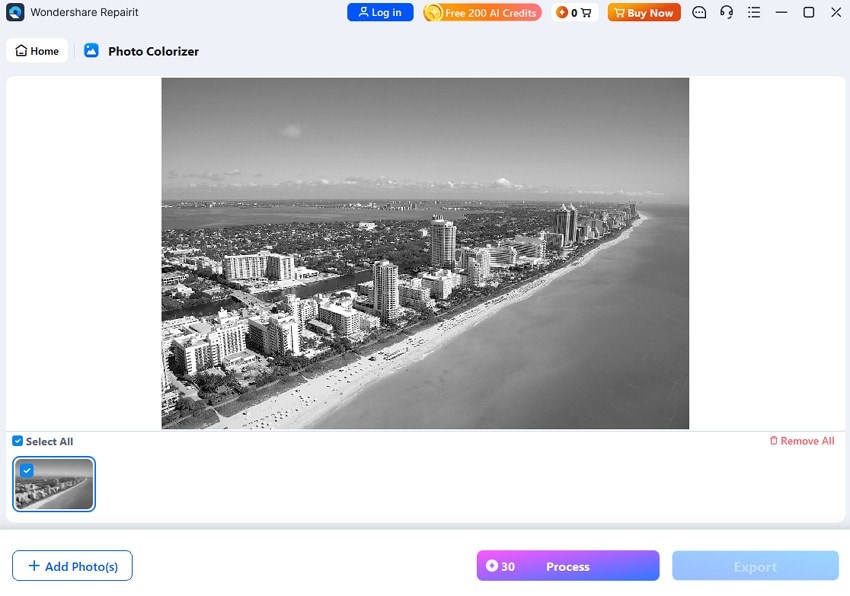
AI Photo Colorizer
Repairit also offers a dedicated AI Photo Colorizer to convert black-and-white images to color. This feature matters when comparing restoration workflows because old family photos may need both physical-damage repair and colorization. Compared with Canva Photo Enhancer's manual adjustments, Repairit provides automated colorization alongside structural damage repair.
Part 4. Canva Photo Enhancer vs Repairit for Different Photo Problems
Once you know the key features, it’s important to understand which photo issues Canva Photo Enhancer and Repairit can address. The table below provides a quick comparison, followed by detailed tests to evaluate how both tools perform across different photo problems:
| Photo Problem | Canva Approach | Repairit Approach | Better Fit |
| Blurry Smartphone Photo | Manual sharpness adjustment | AI Image Sharpener handles blur types | Repairit |
| Low-Resolution Image | Automatic 4x or 16x upscaling | Selectable 2x, 4x, or 8x upscaling | Repairit for control |
| Pixelated Photo | Upscaling with manual sharpening | Upscaling with AI detail reconstruction | Repairit |
| Portrait With Soft Details | General sharpening across the image | Portrait Enhancer targets facial features | Repairit |
| Faded Family Photo | Manual warmth and saturation adjustments | Automatic color recovery | Canva for control |
| Scratched or Damaged Print | Magic Eraser removes individual marks | Old Photo Restoration repairs damage together | Repairit |
Test 1. Fixing a Blurry Photo
Judge sharpness around the subject’s edges, where over-sharpening often appears as bright halos. Check flat areas like skies or walls for amplified noise, since slider-based sharpening can increase grain along with detail. Inspect fine textures such as fabric weaves for artificial or repeating patterns. Repairit wins this test because its dedicated AI Image Sharpener delivers more targeted blur correction than Canva’s manual sharpening controls.
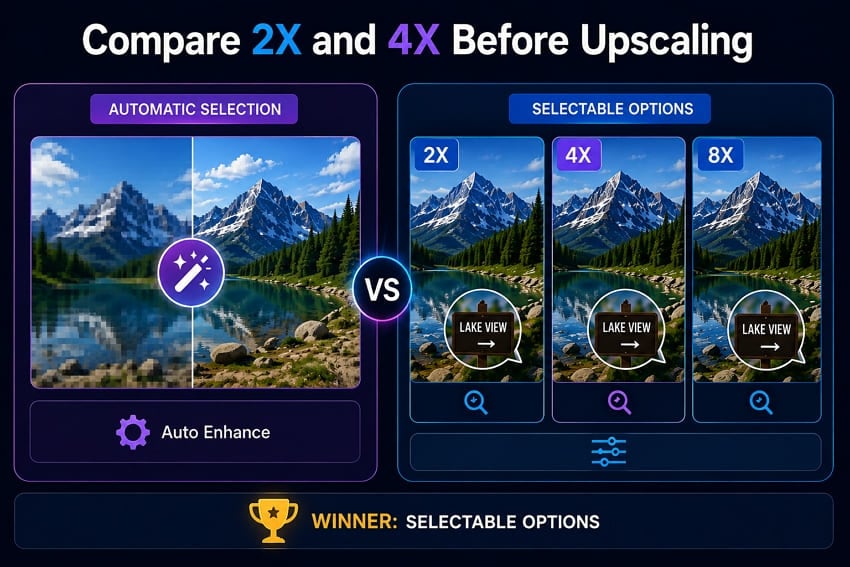
Test 2. Upscaling a Low-Resolution Image
Compare 2x and 4x on the same file before choosing a higher upscale factor. Inspect hard edges for smearing and check whether small text remains legible, as lettering can lose clarity quickly. Canva image enhancer selects the enhancement level automatically, removing direct factor comparison. Repairit has the advantage here, as its selectable 2x, 4x, and 8x options give users greater control over the final resolution.
Test 3. Enhancing Portrait Details
Open faces at 100% zoom and inspect the eyes first, as they can quickly reveal reconstruction errors. Check whether hair retains individual strands instead of merging into blocks and whether skin preserves natural texture. Any noticeable change in facial proportions may indicate artificially reconstructed details. Group photos provide a tougher test because multiple faces appear at different sizes. Repairit performs better here because its Portrait Enhancer specifically targets facial details.
Test 4. Restoring an Old or Damaged Photo
Trace scratches crossing a face and check whether repaired areas match the surrounding skin tone, as facial inconsistencies can expose reconstruction errors quickly. Examine damaged backgrounds for repeating patterns that suggest unnatural texture rebuilding. Faded areas should also regain color without abrupt saturation shifts or overcorrection. Repairit stands out in this test because its Old Photo Restoration model handles scratches, fading, and other damage in a dedicated restoration process.
Part 5. Which Photo Enhancer Is Easier to Use?
Output quality is only part of the comparison, as the effort required to achieve it also matters. When accessed through its specific feature page, Canva automatically applies the enhancement after you upload the image, while Repairit organizes its workflow around specific photo problems. This section compares the Canva Photo Enhancer and Repairit workflows to determine which offers a simpler enhancement experience.
Canva Image Enhancer workflow
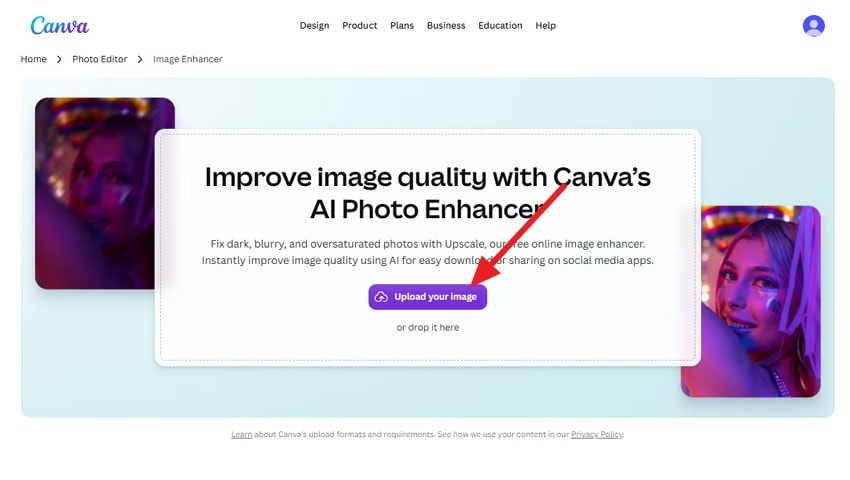
Step 1. Tap on the “Upload Your Image” option or drag and drop it from the File Explorer.
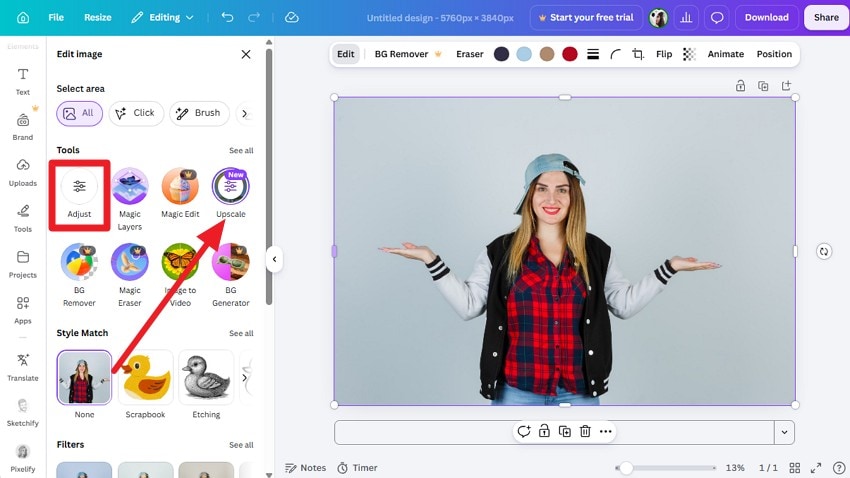
Step 2. After Canva automatically applies Upscale, select “Adjust” to access the manual enhancement controls.
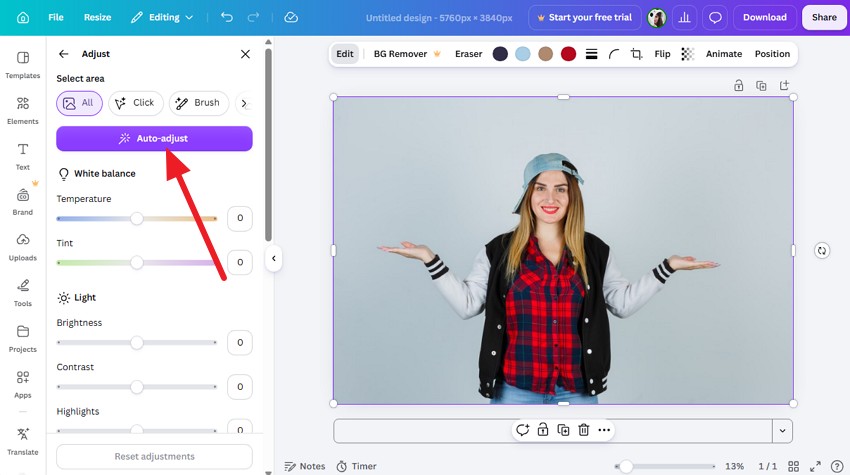
Step 3. Click “Auto Adjust” or adjust brightness, contrast, or warmth with the sliders.
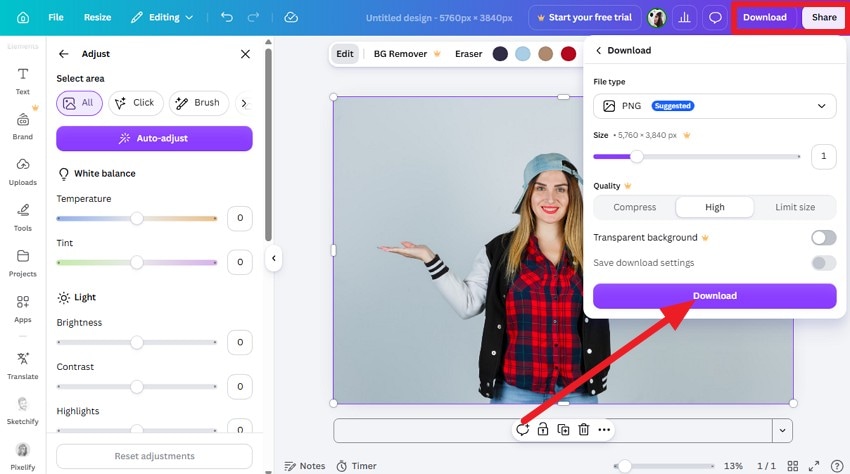
Step 4. Tap on the “Share” or “Download” button, choose the format and size, and press “Download” to export.
Repairit AI Enhancement Workflow
To compare the Repairit outcomes with Canva Image Enhancer, here is the detailed guide for you:
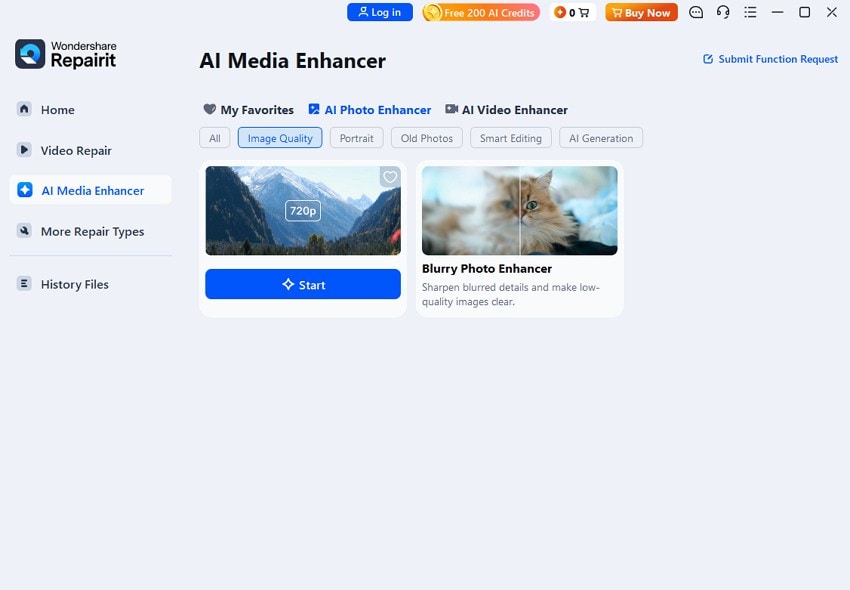
Step 1. Go to AI Media Enhancer
In the “AI Media Enhancer” tab under “Image Quality,” hover over Image Upscaler and tap the “Start” button to import the image.
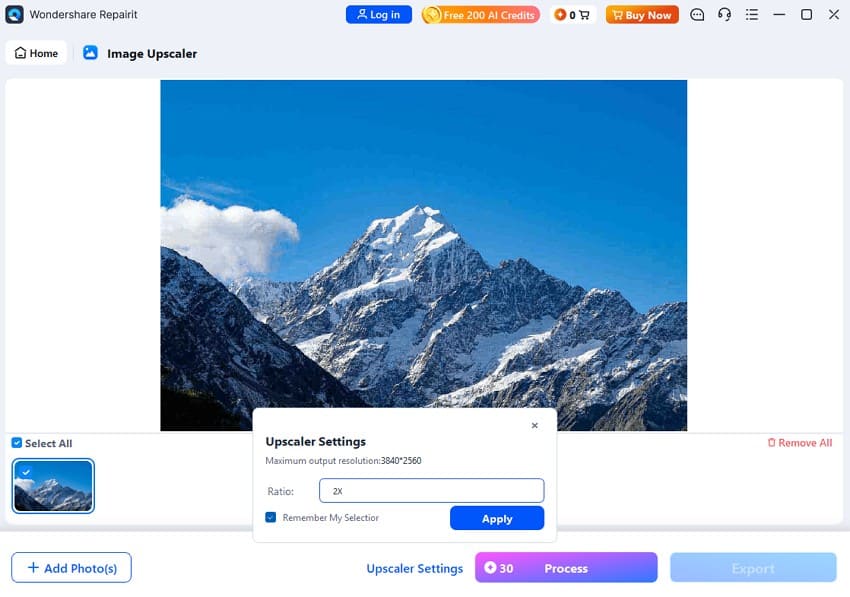
Step 2. Choose the Upscaler Settings
Select the “Upscaler Settings” option, choose the “Ratio” as 2x, 4x, or 8x, and click “Process” to continue.
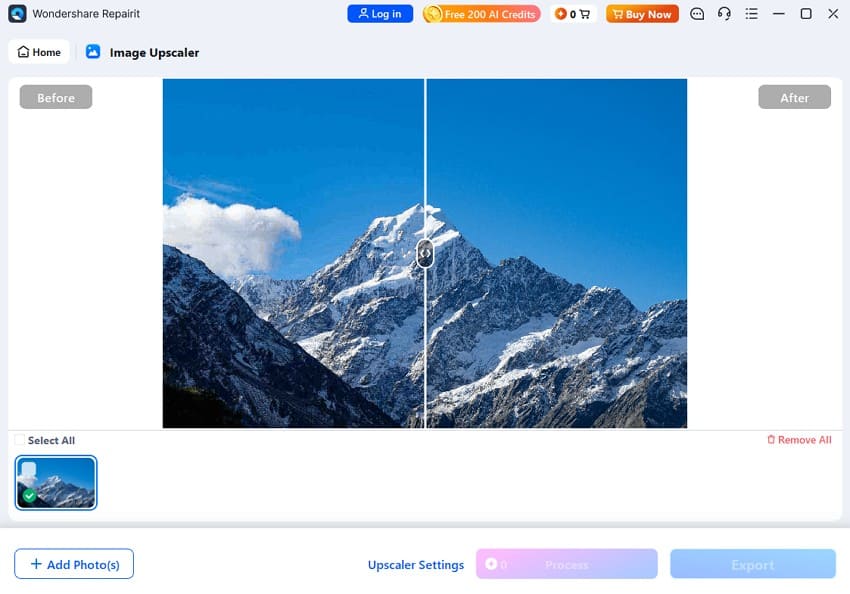
Step 3. Export the Enhanced Image
After the image is upscaled, compare the results and select the “Export” option.
Workflow Verdict: Canva vs Repairit
Based on these workflows, the table below compares how Canva Photo Enhancer and Repairit differ in automation, specialized enhancement, control, and overall usability:
| Workflow Factor | Canva | Repairit |
| One-Click Enhancement | Yes, automatic enhancement | Yes, AI-powered processing |
| Dedicated Blur Mode | No | Yes |
| Dedicated Face Mode | No | Yes |
| Dedicated Old Photo Mode | Through marketplace apps | Yes, built-in |
| Upscaling Options | Automatic only | 2x, 4x, or 8x |
| Manual Controls | Extensive adjustment controls | Minimal |
| Learning Curve | Low with automatic enhancement | Low with dedicated AI models |
Part 6. Canva Photo Enhancer vs Repairit: Which Should You Choose?
This choice between Canva Image Enhancer and Repairit depends on your needs. Manual control works best when you want to decide specific changes yourself. Automated models work best when specific damage requires automated repair. Nonetheless, review the following factors and know when to use each tool:
Choose Canva If You Need
- Quick general enhancement on photos that are already usable.
- Manual control over lighting, color, and warmth through sliders.
- Enhancement inside a design you are already building.
- AI upscaling without deciding the factor yourself.
- Restoration alongside continued editing in the same file.
Choose Repairit If You Need
- Address motion blur and lens blur with dedicated AI processing.
- Choose between 2x, 4x, and 8x upscaling for greater output control.
- Enhance facial features individually instead of applying general sharpening.
- Repair scratches, creases, fading, and other age-related damage in one workflow.
- Process multiple photos together through batch enhancement.
- Use specialized AI models for different photo problems instead of relying on a single enhancement process.
Part 7. Pro Tips for Better AI Photo Enhancement Results
Whether you use Canva Photo Enhancer or Repairit, the source file and your review process shape the result as much as the model does. So, follow these 7 tips for better AI enhancement results since they cost nothing:
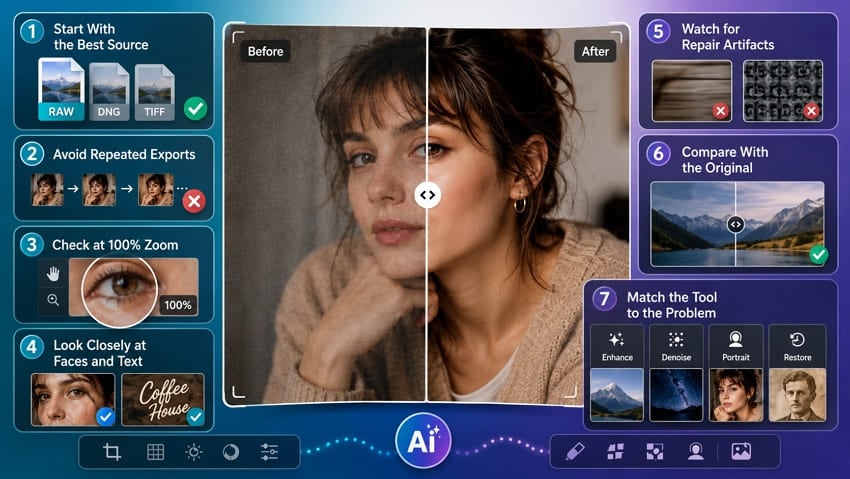
- Start With the Best Source: Use the original camera file, scan, or export instead of a compressed copy. A better source gives AI more detail to work with.
- Avoid Repeated Exports: Return to the original image when trying another enhancement. Repeatedly enhancing and saving compressed files can introduce artifacts and reduce quality.
- Check at 100% Zoom: Inspect faces, edges, and detailed areas at actual-pixel size. This makes excessive sharpening, noise, smearing, and other processing artifacts easier to notice.
- Look Closely at Faces and Text: Check faces, text, hair, and fine textures carefully. Recognizable details can make unnatural AI reconstruction easier to spot.
- Watch for Repair Artifacts: Examine restored areas for repeating patterns, smearing, mismatched edges, or unnatural textures that indicate inaccurate AI reconstruction.
- Compare With the Original: Check the enhanced result against the source. Make sure colors, facial details, textures, and shapes remain natural instead of appearing overprocessed.
- Match the Tool to the Problem: Use general enhancement for clarity, Portrait mode for faces, Denoise for grain, and Old Photo Restoration for aging damage to achieve more targeted results.
Conclusion
Both tools serve different photo enhancement needs. Canva Image Enhancer works well for quick enhancements and projects that also require manual color adjustments. Repairit is better suited to deeper photo repair, with selectable upscaling factors and dedicated tools for blur, portraits, and old photo restoration. Overall, Canva favors convenient design-based editing, while Repairit provides more specialized AI enhancement and restoration capabilities.
FAQ
-
Is Canva image enhancer the same as Canva image upscaler?
They overlap but serve different purposes. Image Upscaler focuses on increasing image resolution, while Canva Image Enhancer covers broader improvements through Auto-adjust and manual controls for brightness, contrast, color, and other visual settings. -
Can Canva restore scratched and faded old photos?
Partly. Magic Eraser can remove individual scratches and marks, while manual color controls help improve faded areas. More dedicated old photo restoration is available through third-party apps in the Canva Apps Marketplace. -
Is Repairit better than Canva for facial detail enhancement?
Yes. Repairit’s Portrait Enhancer identifies facial features and enhances them individually, while Canva relies more on general sharpening controls. This makes Repairit better suited to improving facial details in portraits. -
Which tool is better for restoring old family photos?
Repairit is better suited to old family photos because its restoration model handles scratches, fading, and detail recovery together. Canva remains useful for additional cropping, color adjustments, and final editing after restoration.