
 TL;DR:
⚡ Quick Fix: Fix MP4 Video Stopped Playing in the Middle
Try Another Player: Open the MP4 file with VLC or another compatible media player to rule out player format limitations.
Fix Codec or Format Issues: Install missing codecs, check the file extension, or convert the video format if the MP4 cannot be decoded correctly.
Move the Video Locally: Copy the MP4 from an external drive, USB, DVD, or SD card to your computer’s internal storage and try playing it again.
Repair Corrupted MP4: If the video still freezes, stops, or refuses to play, use a video repair tool to fix damaged MP4 files and preview the repaired result before saving.
Ask AI for a summary
 ChatGPT
 Perplexity
 Gemini
 Claude
 Grok
Grok
You have recently downloaded an MP4 file to watch later. You try to play it, and now you have ended up looking for MP4 repair solutions. There are many users who come across errors with their MP4 files. This guide will tell you about some of the common reasons why you may see an error, along with some robust repair MP4 file solutions such as using the video corruption repair tool. Keep reading, and by the end, you will get to know what you need to do quickly. Sometimes the MP4 video may stop working when you install a new operating system. However, there could be many other reasons, as well.
Part 1. Why MP4 Video Stopped Playing in Middle?
Why do my videos stop playing in the middle? As we said, there could be tons of reasons why you may not be able to play an MP4 file. Let's check out some of the common reasons.
Reason 1: The media player you are using is not compatible with the format.
Reason 2: There could be a codec issue.
Reason 3: The MP4 file that you have downloaded could be corrupted.
Reason 4: The device drivers are outdated.
These are the most common reasons why you may end up looking for how to fix corrupt video files MP4 solutions.
Part 2: 5 Useful Solutions to Fix MP4 Video Stopped Playing in Middle Error
Now that you know about the common reason why the MP4 file might have stopped playing in between, you may consider going for any one of the solutions we will share below. These solutions are easy to follow and will fix MP4 video stopped playing in middle error. Go on and fix your MP4 file today.
Solution 1: Consider Using Different Media Players
Sometimes, you may come across non-working MP4 file when the media player you are using doesn't support the format. You may use the VLC Media Player to fix this issue. Copy the original MP4 video file and start the steps what you need to do.
Step 1: If you don't have a VLC Media Player, download it and wait for a few seconds to get it installed. Once done, double click on the VLC icon that you see.
Step 2: Now, right-click on the MP4 file that you wish to play, and choose VLC to play the video.

VLC plays almost all kinds of video formats. If you still can't play the video, you should try other options.
Solution 2: Video File Extension Needs to Be Changed
If you are unable to play the video using a VLC Media Player, you might want to change the video file extension. In most cases, this should solve the issue, and you should be able to run the file easily. The best way to change the video file extension is by using a reliable tool; we will talk about which tool to use to fix the MP4 file towards the end. Right now, we will tell you how to change video file type in Windows 10 without getting any software. Here's how you can go ahead with MP4 video repair.
Step 1: You need to open File Explorer. Go to the Windows search box to look for the same, or you can look for the File Explorer tab on your desktop.
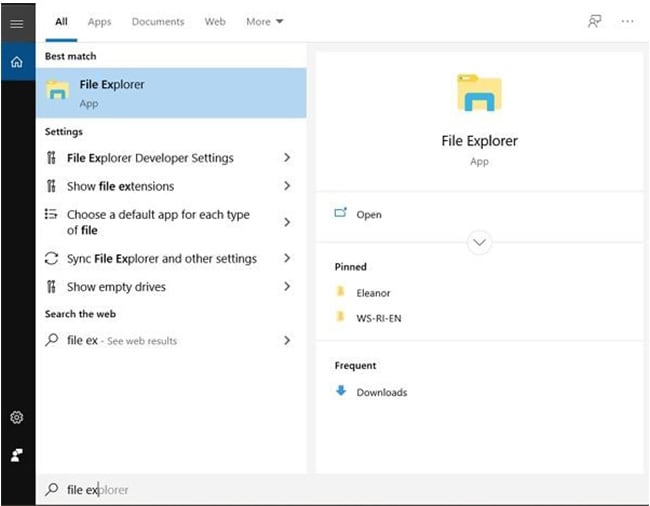
Step 2: Once open, check for filename extensions. If you fail to see the video file extension, you can check this feature, which you will find under the View tab. Still can't? Click on the Options tab and follow the next steps.
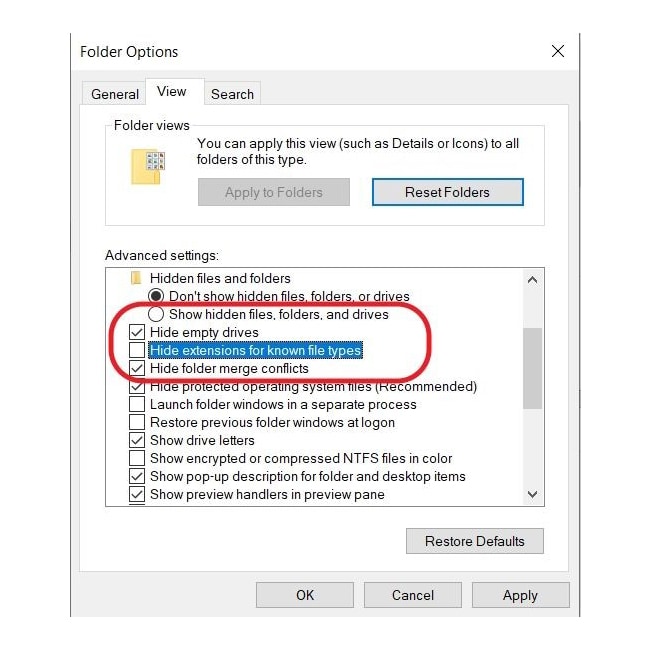
Step 3: Click on the Options tab; you will come across some options; you need to uncheck Hide extensions for known file types.
This is how you will get to know about the file extension of the MP4 file, which is corrupt. After that, you will have to take the help of a tool, which will allow you to complete the video format conversion process.
Solution 3: Try Installing Missing Codecs
If you end up trying to run an MP4 video, which has a missing codec, you are bound to face troubles and issues. The default Windows Media Player will usually show you the error code: 0xc00d36c4.
If this is what is happening, you need to download as well as install codecs for the right player. Follow the following steps, which will enable you to install the missing codes.
Step 1: On the player, you will have to look for the tools tab. After that, locate option, then player.
Step 2: You will see a checkbox that highlights Download codecs automatically. All you need to do here is click on the OK option.
Step 3: If you have followed the steps correctly, then your MP4 file should be playing by now properly. If you see a prompt asking you to install the codecs, you need to agree to install it manually.
Solution 4: Try Moving The Video Files
Another simple arrangement is to move the unplayable media documents from the external storage like a DVD or a USB driver to the internal hard drive of your computer. This technique is quick and safe.
As we know, Windows or Mac PCs give numerous methods or functions to understand the transfer work. Like the alternate route keys: Ctrl + C and Ctrl + V.
You have to choose the files on the external drive. After that, you need to copy them. Use Ctrl + C command. After that, you will have to paste them into internal storage. The command is Ctrl + V. Once done; you should be able to open the file easily.
Even after trying this, if you fail to play the file or open it, this might mean that the file is severely corrupt.
Solution 5: Try Turning Off Copy Protection
The Windows Media Player always keeps the media files protected that it burns. This is how the default setting works. This alone actually makes it nearly impossible for the MP4 file to get played in other players. If you turn off this feature, you should be able to get rid of the problem too. Here are the steps that you need to follow.
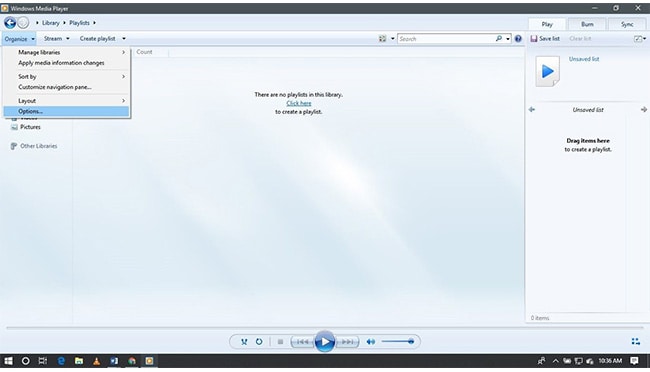
Step 1: Launch the Windows Media Player. Click on the Organize tab that you see on the top left. Click on Organize, and after that you will have to select options.
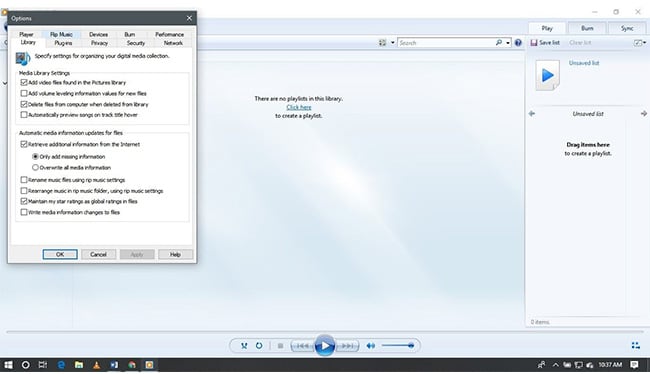
Step 2: Once you click on the Options tab, you will see a lot of tabs. You need to click on the Rip Music tab. From the list, uncheck Copy Protect Music. After that, click on the OK option to save the changes.
Part 3. Fix MP4 Video Stopped Playing in Middle Caused by Video Corruption
If nothing seems to work, it means that your MP4 file is corrupt. If this is the case, you need to go through the mp4 file repair process. The professional video repair tool that you should use is Wondershare Repairit Video Repair. This is an advanced and easy to use software, which will fix corrupt MP4 files without any issue.

Wondershare Repairit - Video Repair
Over 7,302,189 people have downloaded it.
-
Repair damaged videos with all levels of corruption, such as video not playing, video no sound, out-of-sync video or audio, playback errors, header corruption, flickering video, missing video codec, etc.
-
Repair videos of diverse formats, including MOV, MP4, M2TS, MKV, MTS, 3GP, AVI, FLV, MXF, KLV, INSV, M4V, WMV, MPEG, ASF, etc.
-
Repair damaged or corrupted videos caused by video compression, system crash, video format change, etc.
-
Repair critically damaged or corrupted videos available on SD cards, mobile phones, cameras, USB flash drives, etc.
-
Repairit has a quick and advanced scanning mode. You can use either depending on the level of corruption the video file has undergone.
-
No limit to the number and size of the repairable videos.
-
Support Windows 11/10/8/7/Vista, Windows Server 2003/2008/2012/2016/2019/2022, and macOS 10.10~macOS 14.
If you are new to Wondershare Repairit Video Repair software, here are the step-by-step instructions that you need to follow. The instructions that we will discuss will remain the same both for Windows and Mac.
Step 1: Wondershare Repairit Video Repair Free Download
The first thing you need to do is download Wondershare Repairit Video Repair software and get it installed on your Mac or Windows. Once the software is downloaded and installed, you need to double click on the icon to launch it.
Step 2: Click on the Add file
Once Wondershare Repairit Video Repair tool is launched, you will see the Add File option. Click on that to start adding the MP4 files that you need to repair. Apart from MP4, you can use Repairit to fix all kinds of corrupt files. You can repair AVI, 3GP, MTS, MKV, M2TS, M4V, and much more. If you want, you can drag and drop the files; else, click on the Add files option and select the files manually to add them here.

Step 3: Click on Repair
Once the MP4 file gets uploaded, click on the repair option that you see. This will start the repairing process. It won't take a lot of time. Just wait for a few moments, and the MP4 file will be ready to be played. Click on the OK option to save the file that you just repaired.

Step 4: Preview and Save
After you have repaired the file, you will get an option to preview it. Click on that to take a preview of the MP4 file that you have repaired to see whether it is working fine or not. If everything seems OK, click on the save option.

For those who still can't seem to fix their files, you will have to click on the advanced repair option. The tool will give you an option for advanced repair if it finds it necessary. Clicking on the Advanced Repair will begin the repairing process.
Attention:
If you do not want to download software on your computer and your corrupted video is no more than 3GB, you can try the Wondershare Repairit Online Free Version to get your video repaired online with ease.
This video can help you fix your corrupted video files with a step-by-step guide.
The Bottom Line
If you cannot play an MP4 file on your computer, follow the six easy steps that we have shared here. Do remember that if you can't play the MP4 file even after trying the top five solutions, it means that the file is corrupt. And you need to look for the best MP4 repair tool free, Wondershare Repairit Video Repair software. This MP4 video repair software will allow you to repair corrupt video file quickly. Always choose the professional and right video file repair tool to repair corrupt MP4 files easily.
Further Reading:
Digital Video Repair for Windows and Mac
How to Convert MP4 to Different File Format Effectively
4 Tested Ways to Fix Corrupted Video Files on Android
Related Content You Might Want to Know
-
1. How do I play an MP4 file?
You can play MP4 on any media player that supports the media format.Step 1: Right click on the MP4 file.
Step 2: From the options of media player that you see, select the one that you wish to use.
Step 3: Once the file gets uploaded on the media player, click on the play option.
-
2. Are there different types of MP4 files?
Video: MPEG-4 Part 2, MPEG-4 Part 10
Audio: ALAC, MP3, TTSI, SLS, ALS, and AAC
Subtitles: MPEG-4 Timed Text.
* Some of the above codec formats may need to be supported by system.