

“VLC has stopped playing any files, I've tried everything I can think of. Help?”
Are you frustrated because your VLC Media Player suddenly stopped playing videos, leaving you staring blankly? Many users encounter this issue. VLC plays almost any media format, including MP4, MOV, and many more files. So, when it stops functioning properly, it can be quite troubling. But don't worry anymore. We've got you covered.
In this guide, we'll explore 5 effective solutions to help you resolve the VLC media player not showing video issues. Let’s start and fix them easily.
In this article
Part 1. Why My VLC Is Not Showing Video?
Here are some common reasons why VLC Media Player might not be showing video:
- The video file you are trying to play may be damaged or corrupted.
- Employing an outdated version of VLC Media Player may cause compatibility issues with certain video formats.
- Enabling hardware acceleration can sometimes cause video playback problems, especially on older hardware.
- Missing or incompatible codecs can prevent VLC from displaying video properly.
- VLC's video output settings might be incorrectly configured, leading to a black screen.
- Outdated or faulty display drivers can interfere with video playback.
- Other applications running in the background might conflict with VLC's ability to display video.
Part 2. 5 Ways to Fix VLC Player Not Showing Video Issue
As mentioned, there are various reasons for the VLC player not showing video. But the good news is that you can use the following methods to fix it. Let’s get started.
Way #1: Enable the Automatic Repair Feature
VLC Media Player can automatically fix minor video issues. When VLC detects an issue during playback, it automatically prompts the user to repair the file. Thus, helping the video play smoothly without needing extra software. However, this feature mainly works with AVI video files and may not help other formats.
To enable this feature:
Step 1: Open VLC Media Player.
Step 2: Press Tools in the menu bar and select Preferences.
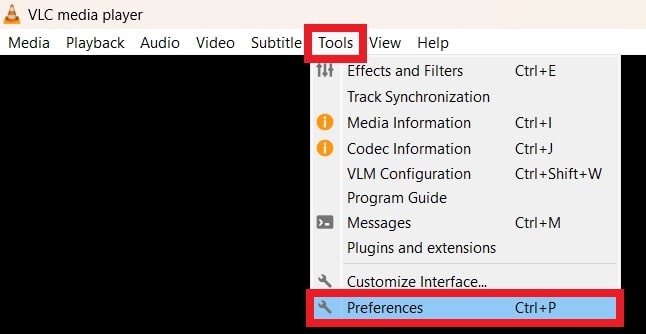
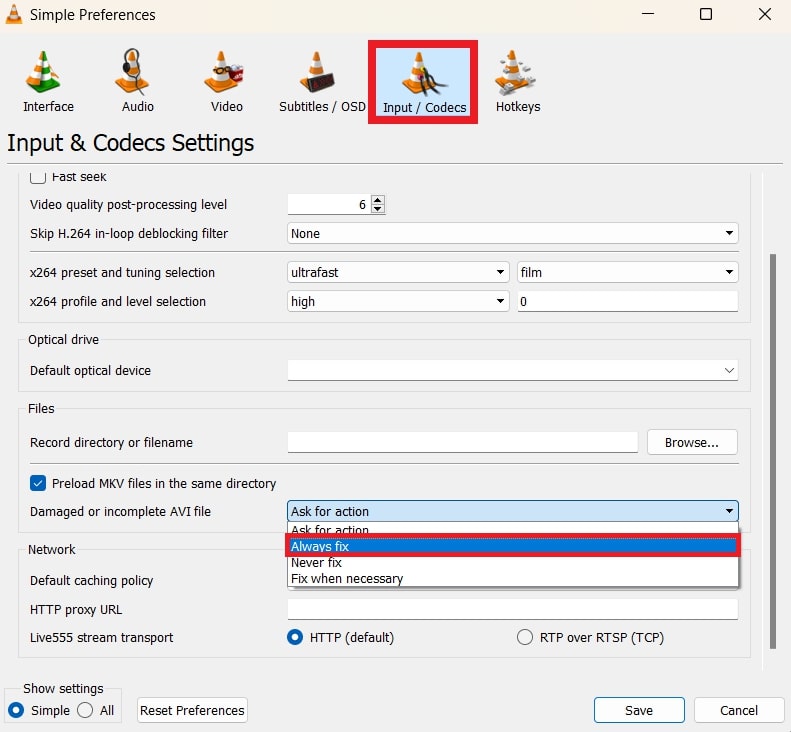
Step 3: In the Preferences window, go to Input & Codecs.
Step 4: Under the Damaged or incomplete AVI file, choose Always Fix.
If the video still doesn't play, try other solutions.
Way #2: Setup the Video Output Mode
Setting the video output mode in VLC can resolve playback issues by adjusting how VLC handles video rendering. Different output modes, like DirectX or OpenGL, can improve compatibility and performance with various video files and graphics hardware. Users can then address problems like video stuttering, display errors, or incomplete playback.
To configure the video output mode and potentially fix playback issues:
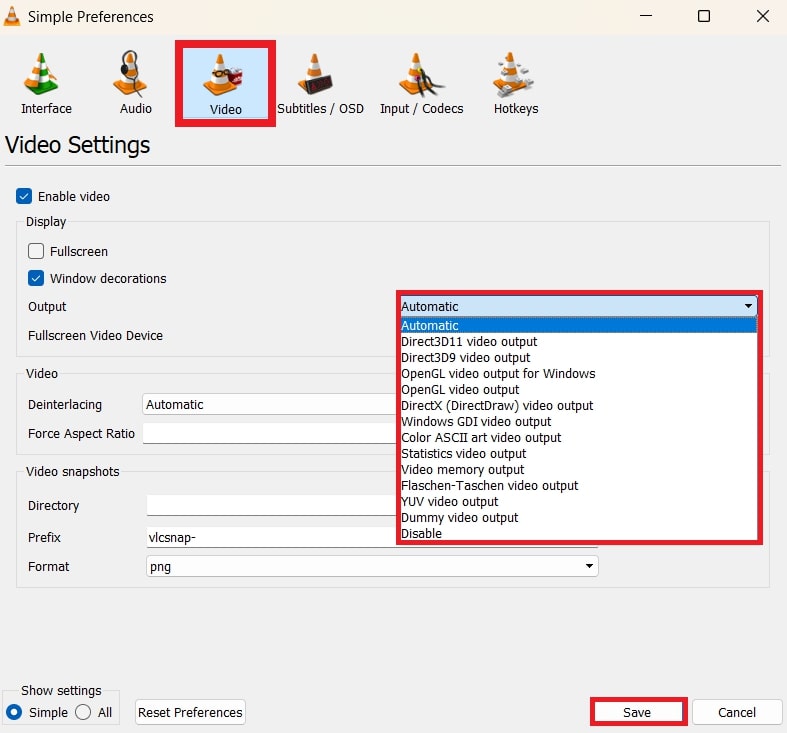
Step 1: Open VLC Media Player and go to Tools and Preferences.
Step 2: Click the Video tab.
Step 3: Select an option from the Output drop-down menu. Choose from OpenGL, DirectX or Automatic for VLC to select the best mode. Then, click Save.
Step 4: Try playing your video again to see if the issue is resolved.
Way #3: Turn off the Hardware Acceleration on VLC
Hardware acceleration speeds up video processing by using your computer’s GPU to handle decoding and encoding. This reduces CPU usage, leads to smoother playback, and better handles high-resolution videos. However, this can cause issues if your hardware is outdated.
To disable it and potentially fix video playback problems:
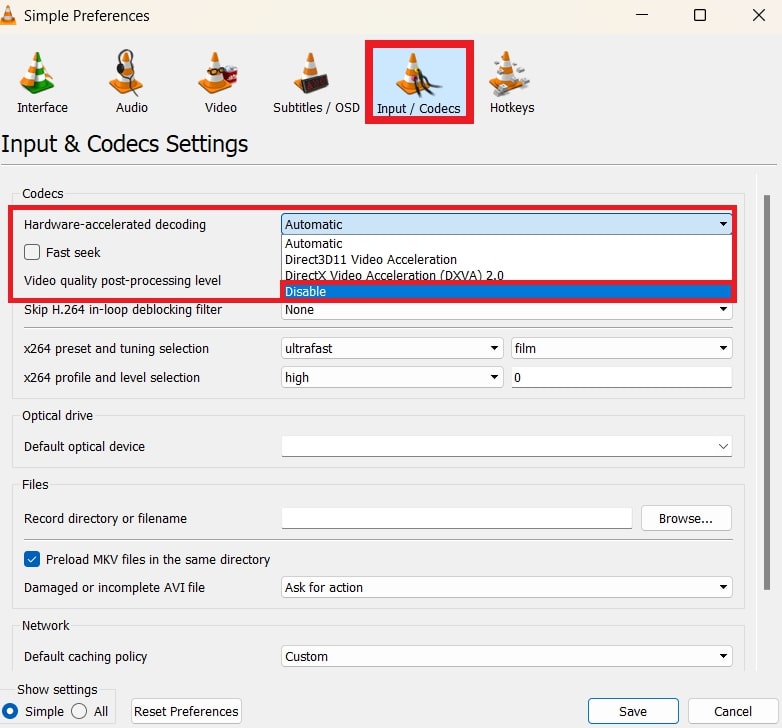
Step 1: Open VLC Media Player. Go to Tools and select Preferences.
Step 2: Click the Input/Codecs tab.
Step 3: Find Hardware-accelerated decoding and set it to Disable.
Step 4: Click Save and restart VLC.
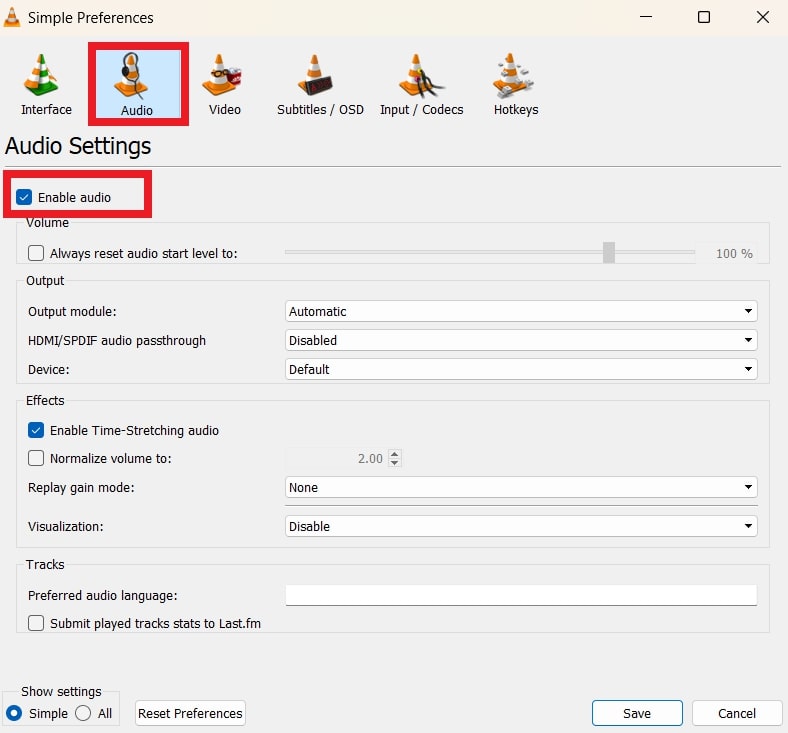
Way #4: Change the Audio-video Settings
If VLC isn't playing video, it might be due to missing components. This can be due to audio or video issues.
To fix this, you need to adjust the settings. Follow these steps to do so:
Step 1: Open VLC Media Player and go to Preferences.
Step 2: Ensure both Audio and Video components are enabled.

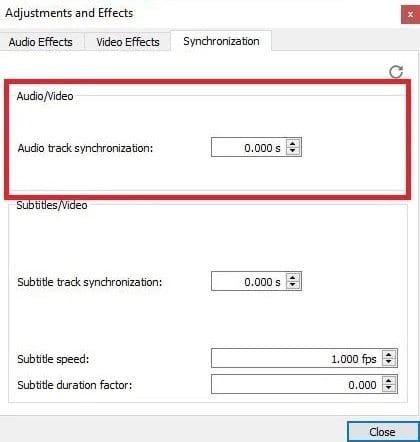
Step 3: For syncing issues, go to Settings. Next, click Adjustment and Effects and Synchronization. Adjust the audio track synchronization value. Positive values delay audio, and negative values speed it up.
Way #5: Use a Third-party Repair Software
If other methods fail and your video is likely corrupted, a professional repair software like Repairit is the best option. Repairit Video Repair fixes damaged headers, missing audio, and dropped frames, restoring your videos for smooth playback in VLC. This is easy to use and handles video corruption effectively, making it a great choice for resolving playback issues.
Here are some of Repairit’s key features:
- Repairit can fix videos without sound, sync problems, playback errors, header corruption, and more.
- It supports HD, 4, and 8K videos and handles 20 popular formats, including MOV, MP4, and WMV.
- It repairs videos damaged by compression, system crashes, or format changes from devices like SD cards, phones, and USB drives. With both quick and advanced scanning modes, Repairit handles any level of corruption with no limits on file number or size.
- It functions with Windows and Mac operating systems.
Follow the below steps to fix the VLC media player not showing videos with Repairit.
Step 1: Open Repairit Video Repair. Click Add to add corrupted videos. The tool supports multiple formats like MOV, MP4, MKV, and more.

Step 2: After adding the videos, click Repair to start the process.

If the video is severely corrupted, use the Advanced Repair option by adding a sample video created with the same device and format.
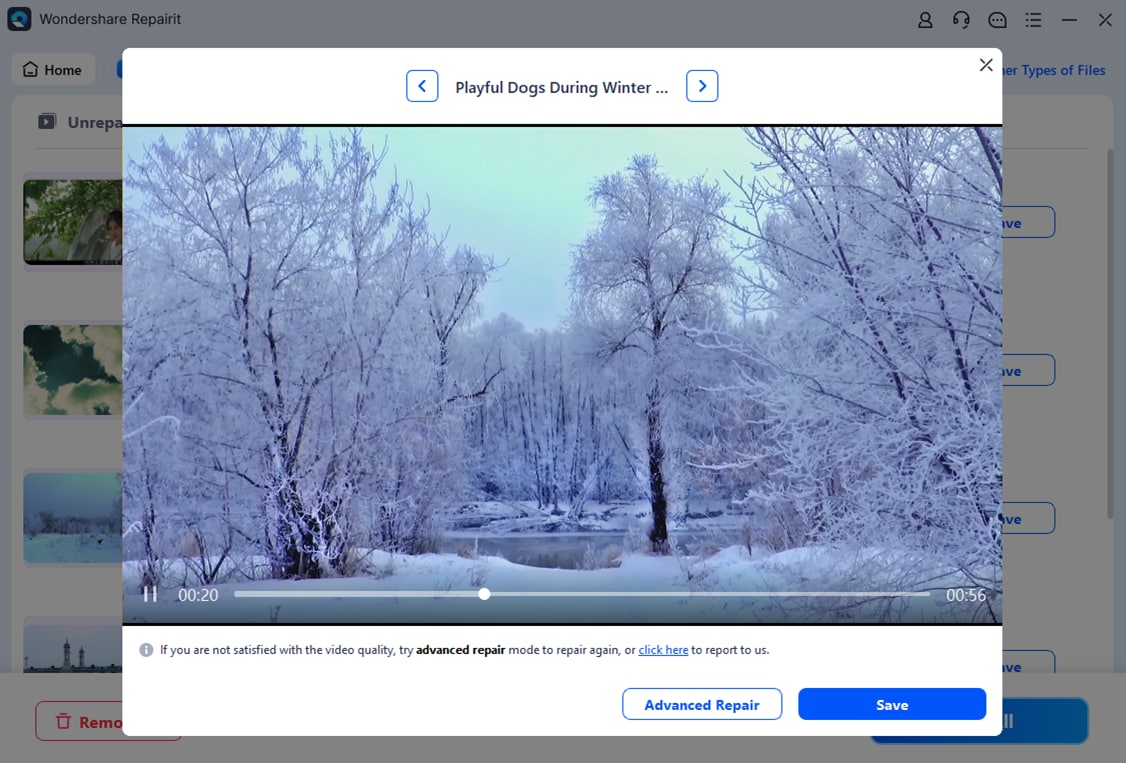
Step 3: Preview the repaired video files, click Save or Save all to keep them all. Choose a different path from the original location to store them.

Fix VLC Player Not Showing Video Issue
 Security Verified. Over 7,302,189 people have downloaded it.
Conclusion
Dealing with VLC Media Player not showing video can be frustrating. But there are many effective solutions you can try. Start by enabling VLC’s Automatic Repair feature or adjusting video output settings to address common playback issues. If these don’t resolve the problem, consider disabling hardware acceleration or modifying audio-video settings.
FAQ
-
Why does VLC Media Player crash or freeze when playing videos?
Crashes or freezes can result from outdated software, conflicting plugins, or corrupted files. Update VLC, disable unnecessary plugins, and check if the video file plays smoothly in other media players. -
What can I do if my VLC Media Player shows a video but it's very choppy or laggy?
Choppy or laggy playback can be due to insufficient system resources or high video resolution. Try lowering the video resolution or bitrate. You can also close other applications using system resources and make sure your hardware meets VLC’s requirements. -
What should I do if VLC Media Player shows a white screen instead of a video?
Graphics driver issues or VLC settings can cause a white screen. Try updating your graphics drivers, adjusting the video output settings in VLC, or resetting VLC’s preferences.
