Skype is an important application for connecting with family and hosting virtual meetings from afar. Especially in the post-COVID era, the app has made it easy to stay connected and manage workload effectively. When it is used as the primary medium for virtual connections, any problem with the app can disrupt the whole workflow. A common problem users face is that their camera is not working in Skype.
This article will discuss the key solutions to this error in Skype to ensure a steady workflow. You will find everything here, from managing hardware connections to solving software issues. Besides that, we'll also share a useful tool to fix corrupted Skype videos easily.
In this article
-
- Solution 1. Check If the Webcam is Plugged-in Properly
- Solution 2. Give the Camera Permission to Skype
- Solution 3. Update the Skype App
- Solution 4. Update the Windows Version
- Solution 5. Update the Webcam Drivers
- Solution 6. Disable and Enable Your Webcam Drivers
- Solution 7. Close Other Apps Having Webcam Permissions
Part 1. Top 7 Solutions to Fix Camera Not Working in Skype
Before jumping on to solutions, it is essential to identify the root causes of the error. Usually, the video calling app faces this issue due to software errors or problems on the hardware side. When the reasons are simple, you can implement straightforward solutions. However, if you might need advanced solutions to the “camera not working in Skype” error, explore the discussion ahead.
Solution 1. Check If the Webcam is Plugged-in Properly
For those using an external camera with their devices, the problem could be related to hardware. You might have a faulty port that does not recognize the camera. In another case, some dust might have accumulated in the USB port, preventing the connection. Therefore, you should try to check whether the webcam is properly plugged in or not.
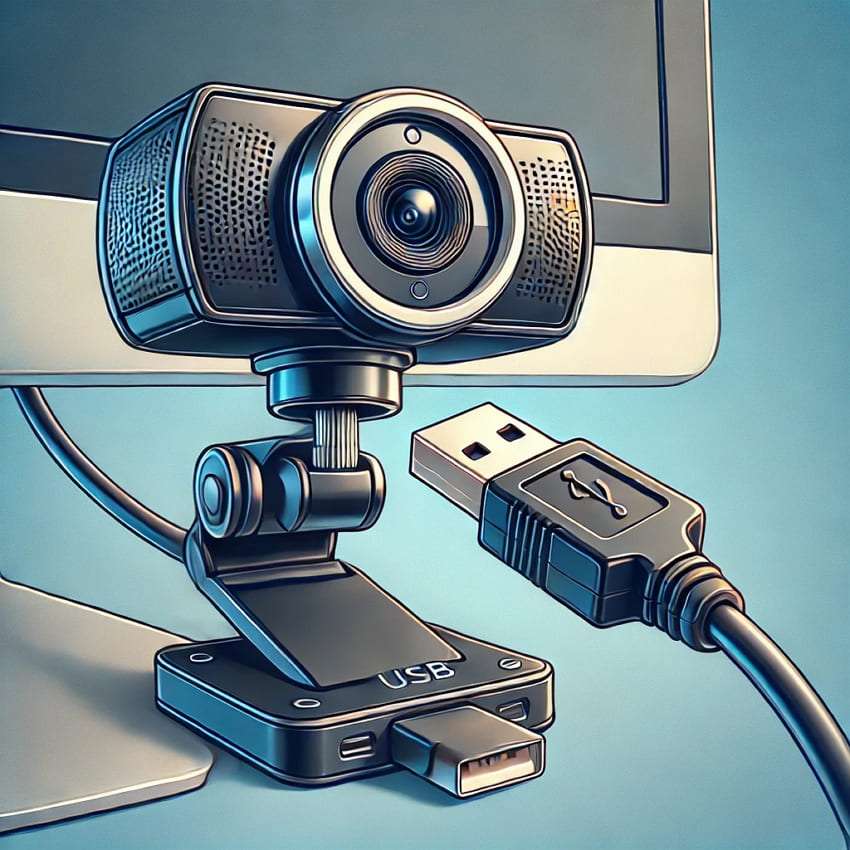
In case the problem is due to the faulty port, plug the camera into another port and check again. Additionally, you can check the port's functionality by plugging in something other than the webcam. When the ports work fine, the issue is with the external camera's hardware.
Solution 2. Give the Camera Permission to Skype
When the issue is not with the ports or the webcam, you should check whether the app has the appropriate permissions or not. Usually, your camera is not working on Skype because you haven't given it the necessary camera permissions. In such a case, you have to follow the given steps and allow camera access to the app:
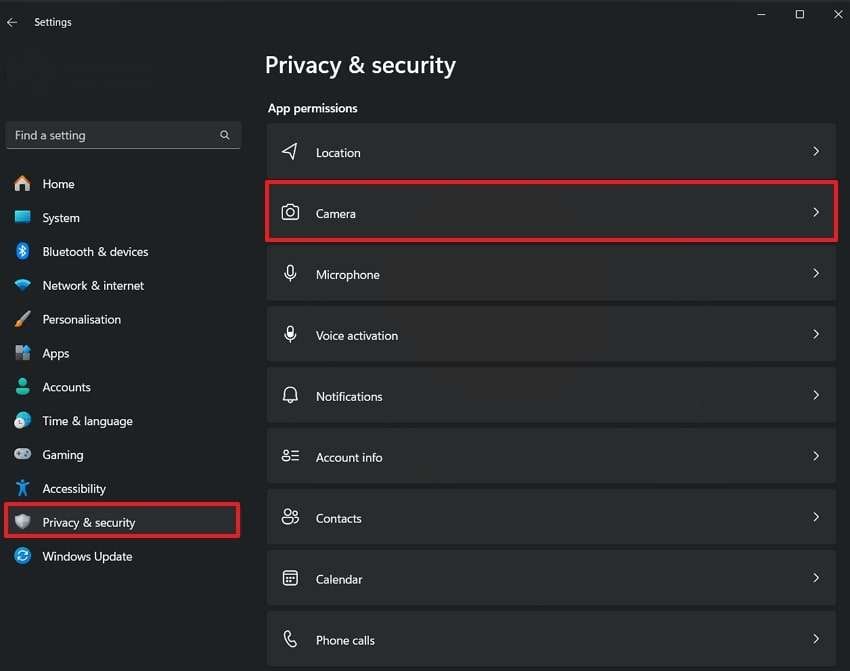
Step 1. Firstly, go to your PC’s settings’ “Privacy and Security” tab. From here, navigate to the “App Permissions” section and click the “Camera” option.
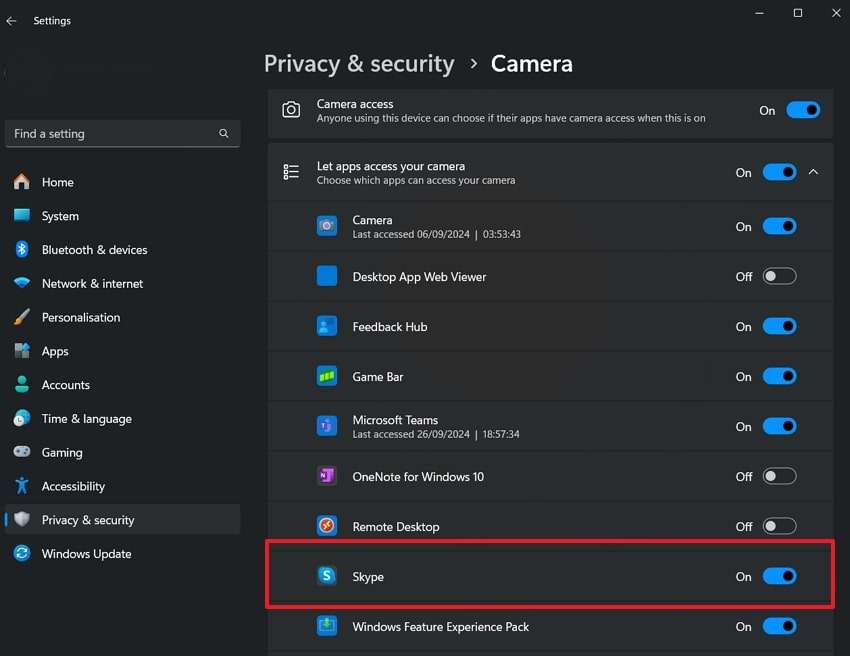
Step 2. Once it takes you to the new window, scroll down to locate the Skype app and ensure the permission is toggled on.
Solution 3. Update the Skype App
In many cases, outdated versions of Skype contain bugs that lead to functionality issues, including problems with the camera. Therefore, you should always check whether a new update for the video calling app is available or not. It ensures you’re using the most stable version, optimized for your device’s software.
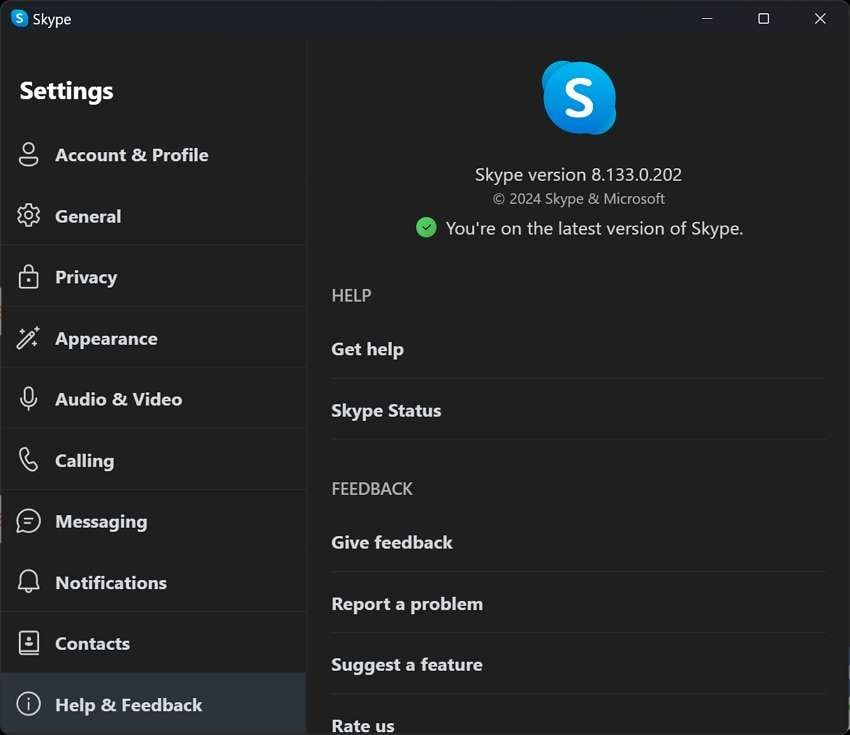
When your camera is not working on Skype, go to the Microsoft Store and see if a new update is available. Many times, when a new update is available, the app itself sends a pop-up notification to prompt users to update the app.
Solution 4. Update the Windows Version
You can also face this issue when your Skype app is incompatible with your older Windows version. When that happens, your software starts malfunctioning, and the app crashes. Therefore, you should always keep your system updated, as such updates often include bug fixes and driver compatibility improvements.
You should follow the instructions outlined below to update your Windows when your camera is not working on Skype:
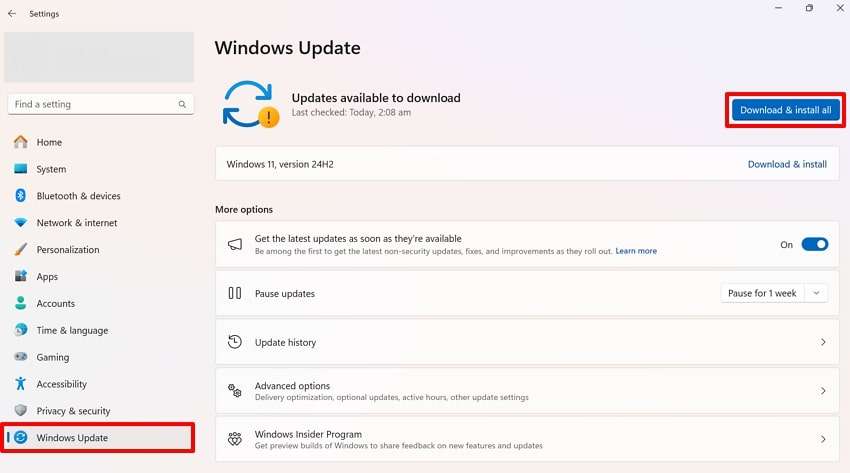
Instructions: Scroll down to the “Windows Update” section in your computer settings. You will see a notification telling you a system update is available for installation. To install it and update your system, simply click “Download & Install All.”
Solution 5. Update the Webcam Drivers
Another reason for this webcam error in the calling app could be the outdated driver's version of your webcam. These drivers ensure that there is smooth communication between the operating system and the webcam.
When they can’t function properly, communication is disrupted, which results in your camera not working on Skype. To ensure your webcam drivers are updated to the latest version, you need to follow the given steps in detail:
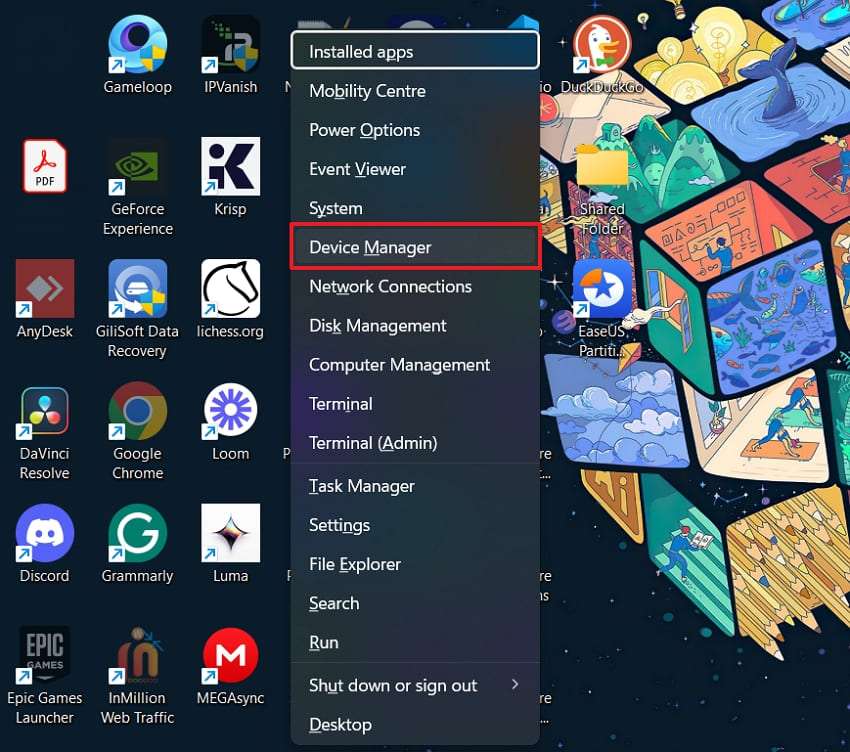
Step 1. To start, press the “Windows + X” keys simultaneously on your keyboard to open the pop-up menu. From the available options, select “Device Manager” to access all drivers on your PC.
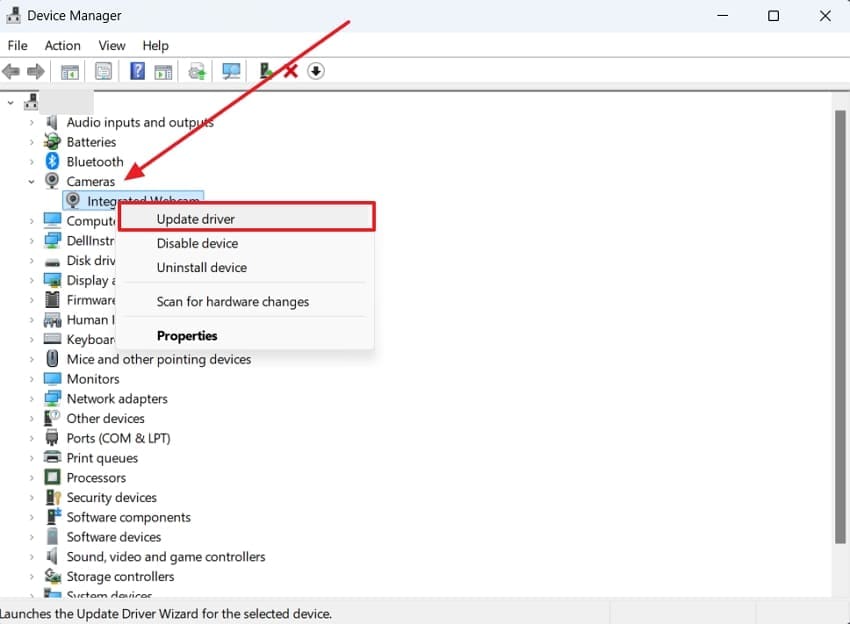
Step 2. From the new window, expand the “Cameras” section and then right-click on the “Integrated Webcam” option. Once the drop-down menu appears, select the “Update Driver” option to check for newer versions. Finally, use the “Search Automatically for Drivers” option from the next screen, and the system will detect the available update.
Solution 6. Disable and Enable Your Webcam Drivers
After updating the drivers, if your camera not working in Skype, you can try disabling and enabling them again. It gives the webcam drivers a fresh restart and may even eliminate any unnecessary glitches. This method is particularly helpful when you suspect a temporary conflict or software bug prevents proper driver functionality. To try this solution on your drivers, you can follow the steps outlined below:
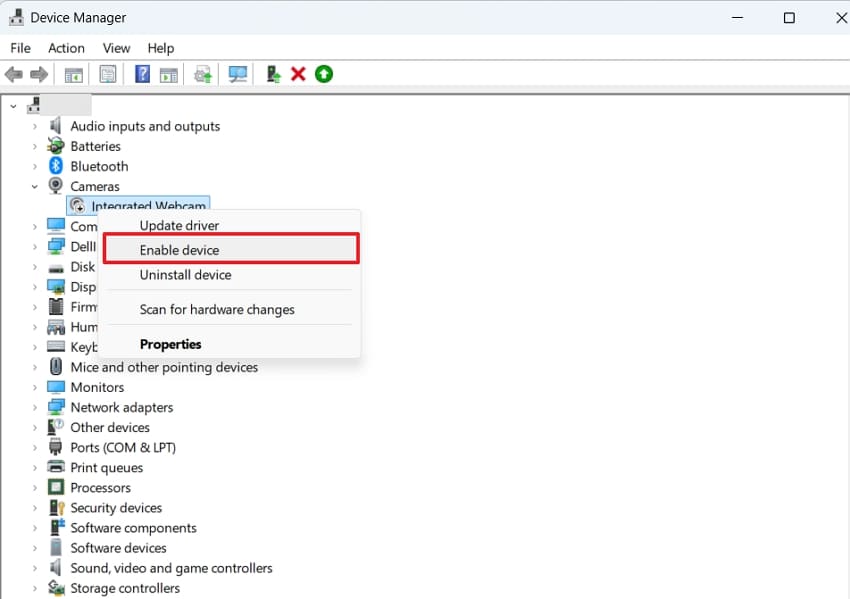
Step 1. Once again, right-click the “Integrated Webcam” option in the Device Manager app. From its drop-down menu, select the “Disable Device” option and confirm your selection.
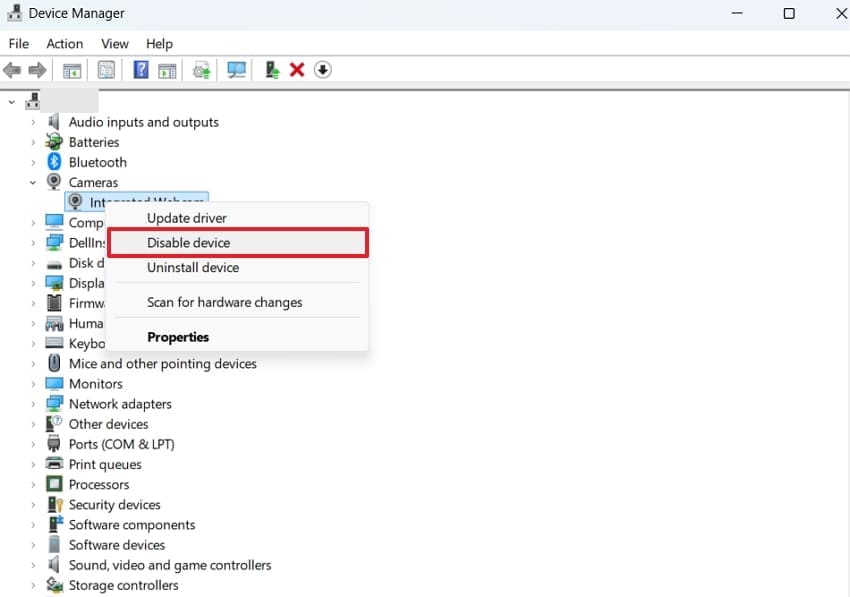
Step 2. Repeat the same process, and this time, select the “Enable Device” option from its relevant menu.
Solution 7. Close Other Apps Having Webcam Permissions
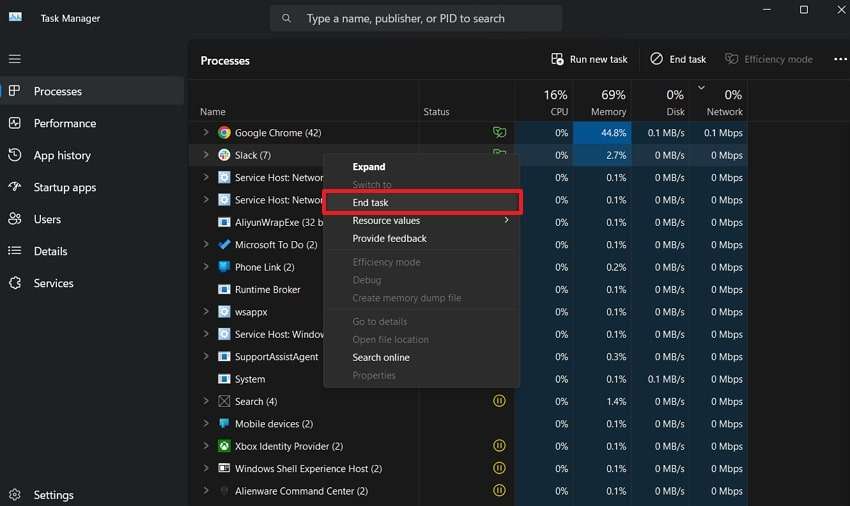
When many apps access your webcam simultaneously, it can disturb Skype’s access to the camera. Additionally, these apps are often set to run in the background automatically. So, you should close them from the background when your camera is not working on Skype. The following steps explain how you can close such applications using Task Manager:
Instructions. Access Task Manager by simultaneously pressing the “CTRL + SHIFT + ESC” keys on your keyboard. From the main screen, right-click any program with webcam access and then “End Task” to stop it from running its processes.
Part 2. How to Fix Damaged or Corrupted Skype Videos or Recordings Efficiently?
The methods you read above are straightforward solutions to the “camera not working on Skype" problem. However, there is a chance that some other glitch in the app can corrupt your video recordings. In such a case, we recommend using Repairit for its AI-powered data repair solutions. The tool repairs damaged videos and other media files to make them playable on your device.
For users whose drone shots get blurry due to inconsistent gyroscopes, the tool allows easy adjustments to stabilize such videos. Similarly, it uses the sample polling algorithm to identify broken parts and resolve them in videos. This video repair toolkit also supports over 20 different video formats for repairing purposes. You can use its features for videos of any size or length without compromising quality.
Key Features of Repairit Video Repair:
- Batch Video Repair: In this video repair software, you can repair multiple videos of different formats simultaneously.
- Preview Videos: After the repairing process is done, you can preview those media files to ensure they are properly corrected.
- Repair HD & 8K: This toolbox supports recovery on videos of the highest quality without compromising results.

-
Repair damaged videos with all levels of corruption, such as video not playing, video no sound, out-of-sync video or audio, playback errors, header corruption, flickering video, missing video codec, etc.
-
Repair full HD, 4K, and 8K videos and support 18 popular formats, including MOV, MP4, M2TS, INSV, M4V, WMV, MPEG, ASF, etc.
-
Repair damaged or corrupted videos caused by video compression, system crash, video format change, etc.
-
Repair critically damaged or corrupted videos available on SD cards, mobile phones, cameras, USB flash drives, etc.
-
Repairit has a quick and advanced scanning mode. You can use either depending on the level of corruption the video file has undergone.
-
No limit to the number and size of the repairable videos.
-
Support Windows 11/10/8/7/Vista, Windows Server 2003/2008/2012/2016/2019/2022, and macOS 10.10~macOS 13.
A Quick Tutorial to Repair Corrupted or Damaged Skype Videos/Recordings in Repairit
After solving the “camera not working on Skype" problem and knowing the tool's effectiveness in resolving file corruption issues, let's see how you can use it for your videos. By following the steps below, you can recover your corrupted Skype videos within seconds:
Step 1. Add Corrupted Skye Videos/Recordings to the Tool
After you have installed this video repair toolbox on your system, launch it and click the “+ Add” button.

Step 2. Start the Repairing Process on Skype Videos
Once the corrupted Skype videos load into the tool, hit the “Repair” button at the bottom and let the process begin.

Step 3. Save the Corrupted Skype Videos on Your PC
If satisfied with the final result, click the “Save” button at the bottom and store it on your device.

Repair Corrupted Skype Videos

Conclusion
In short, when your camera is not working on Skype, the problem could be related to hardware or software issues. While it may seem frustrating, methods like updating the app or drivers will help you resolve it quickly. When Skype faces errors, your important video recordings can also get corrupted. In such cases, tools like Repairit provide quick assistance in repairing the videos and making them playable.
FAQ
-
Q1. How does the data repair software address camera issues?
The software performs a comprehensive scan to identify corrupted or missing system files that may be causing the camera to malfunction. It then repairs or replaces these files to restore your camera's functionality. -
Q2. Is there a risk of losing data when using the data repair software?
Our software is designed with a safe, read-only scanning process and a separate repair process to minimize the risk of further data loss. It is always recommended to back up your data before running any repair software. -
Q3. How do I know if the repair was successful?
After running the data repair software, you can check if your camera is working in Skype by initiating a video call or accessing the camera settings within the application. If the camera functions as expected, the repair was successful.


 ChatGPT
 Perplexity
 Google AI Mode
 Grok
Grok

