All users of Google Slides and Google Drive allow you to embed videos into their presentation to use the built-in player seamlessly. Even though this is a very convenient feature, it’s not foolproof and can cause issues. Many people think they did something wrong and repeat the same steps, only to realize their videos aren’t working. A typical example is the “Unable to Play Video Error 5” message, which happens when trying to play embedded videos in Google Slides. Simply put, the problem isn’t in how you embed your videos. The issue is somewhere else.
If you want to create your presentations freely without worrying about this error showing up here, here are some of the fixes you can use.
In this article
About the "Unable to Play Video Error 5" Issue
The "Unable to Play Video Error 5" message shows up when users try integrating Google Drive videos into presentations. Various web browsers display the same message when playing embedded Google Slide videos from Google Drive.
In other words, the problem isn’t the browser itself, and even though switching browsers might sometimes help, you should be able to use your favorite browser at its fullest capacity. However, others who receive the link for your video won’t be able to play it successfully.
If someone has sent a video to you and you’re having this issue, try to create an embedded video of your own and play it. If it works, you’re not the one with the issue, but if you get this message for all videos, you want to try fixing it as soon as possible.
Common Reasons for Google Slides Display the "Unable to Play Video Error 5" Message
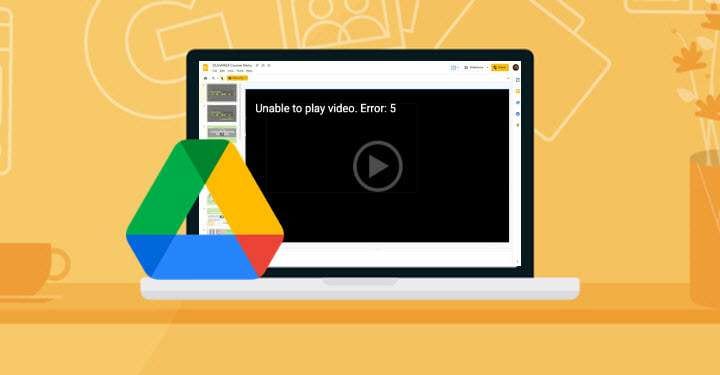
In most cases, Google Slides won’t play the video and display the error 5 message when the file is inaccessible or corrupt. You might get the same error message because of slow internet or no internet access. Here’s a list of all possible causes of this error:
- You have a malicious browser extension;
- You have a damaged, malicious, or interfering browser plugin;
- Your internet connection isn’t working properly;
- The video file is corrupted. (storage drive errors, bad sector drives, operating system crashes, malware, or viruses).
6 Ways to Fix "Unable to Play Video Error 5" (for Normal Video)
Fix 1: Clear Cache and Cookies
Cookies and cached files pile up over time, and encrypting and decrypting them requires coding. In other words, the more they accumulate, the more resources it needs from the browser. That’s why you should start by clearing the cache and deleting cookies.
Clearing cache and cookies on Mozilla Firefox:
Step 1: Start Mozilla Firefox, click on the menu icon>Options.
Step 2: Click the Privacy & Security option on the left panel and open the Cookies and Site Data option.

Step 3: Select Cookies and Site Data and Cached Web Content and click Clear.
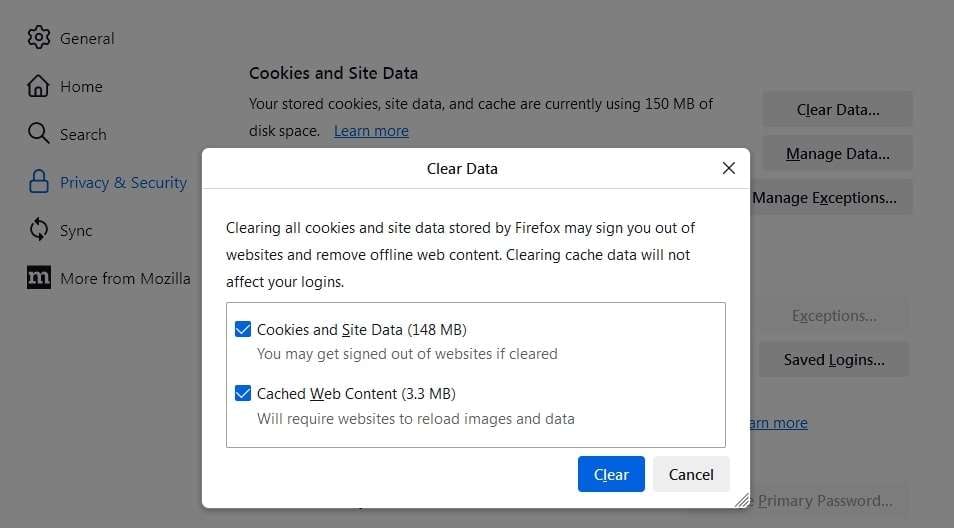
Step 4: Wait until the process is complete.
Clearing cache and cookies on Google Chrome:
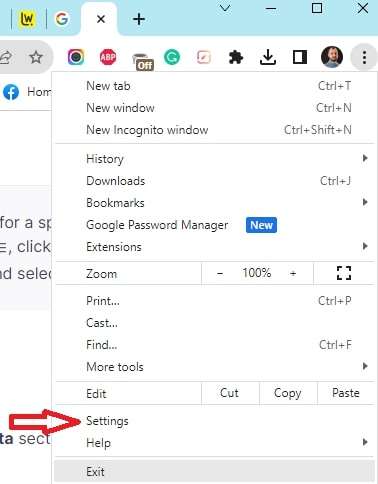
Step 1: Start Google Chrome and click Settings within the drop-down panel.
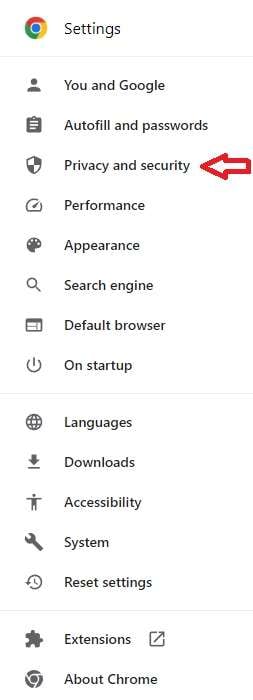
Step 2: Click Advanced and then Privacy and Security.
Step 3: Click Clear browsing data.
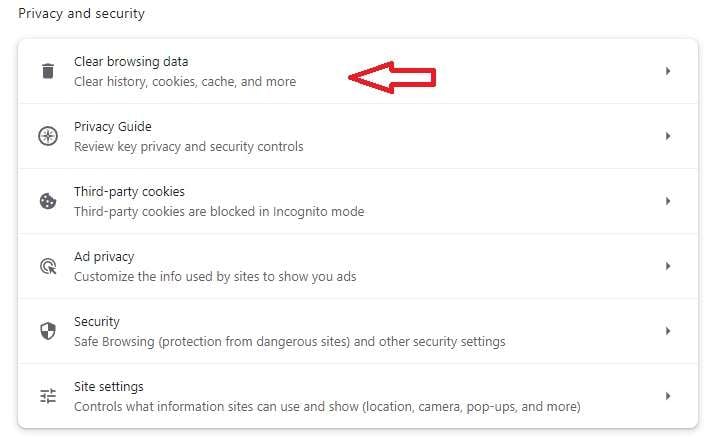
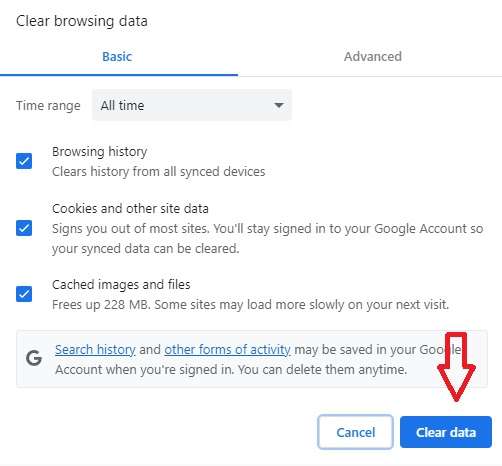
Step 4: Select All Time at the top to delete the cache and cookies.
Step 5: Check the Cookies and site data and Cached images and files options.
Step 6: Click Clear data and wait until the process is complete.
Fix 2: Use Incognito Mode
Incognito mode is an additional browsing feature most web browsers have. It lets you access the web without any temporary data, cookies, or search history. That helps start your videos by putting all the obstacles on hold, but it isn’t a long-term solution.
How to start incognito mode on Google Chrome:
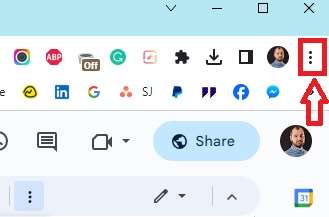
Step 1: Start Google Chrome and click the three dots located on the right of your Google Chrome profile.
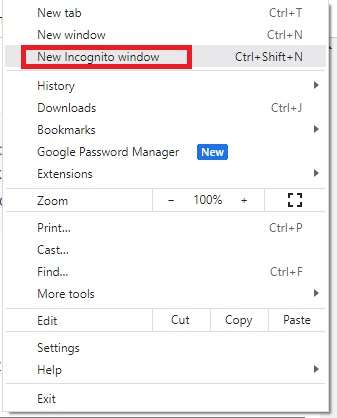
Step 2: Click on New Incognito window in the drop-down menu.
How to start incognito mode on Mozilla Firefox:
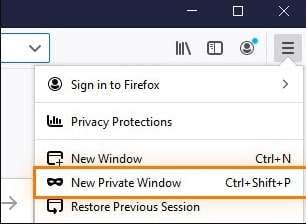
Step 3: Start Mozilla Firefox and click the menu icon in the upper right corner.

Step 4: Click New Private Window in the drop-down menu.
Fix 3: Update Your OS
Operating systems usually update automatically, but many people often postpone or forget about updates. Sometimes, your computer might glitch and skip updates without even notifying you. An outdated OS might cause the problem, so you should check if an update is available.
How to update Windows OS:
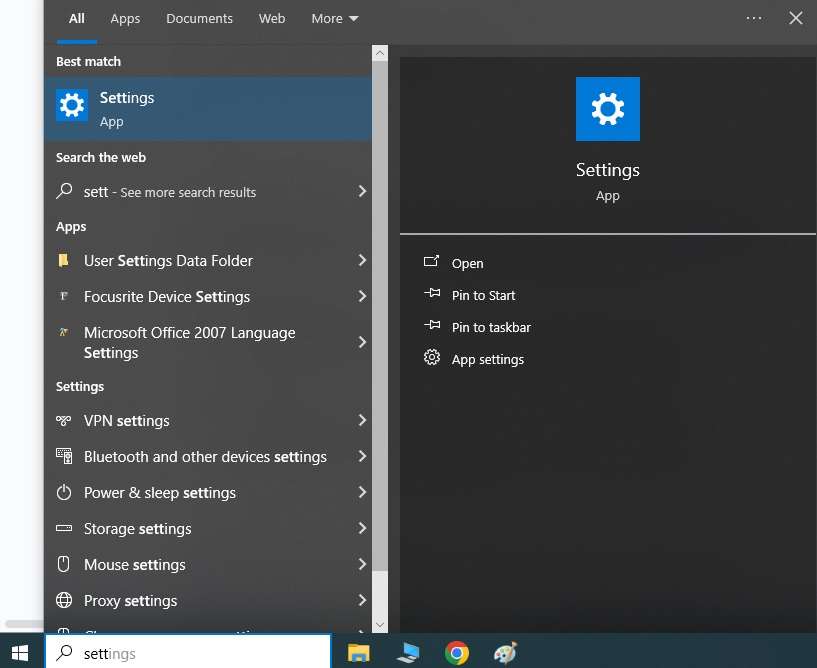
Step 1: Click Start and search Settings.
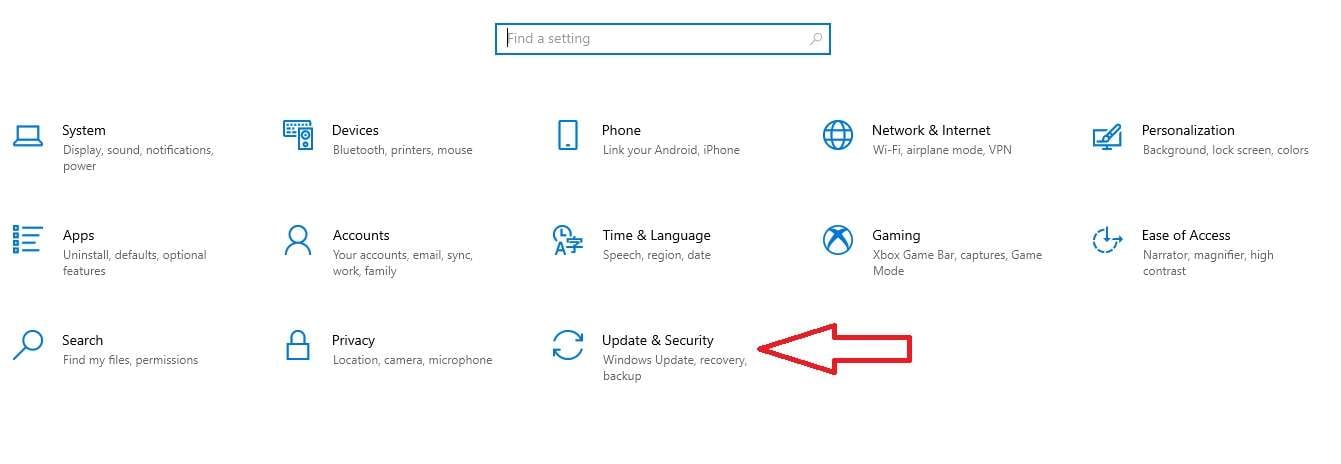
Step 2: Click Update & Security in the settings window and then Windows Update.
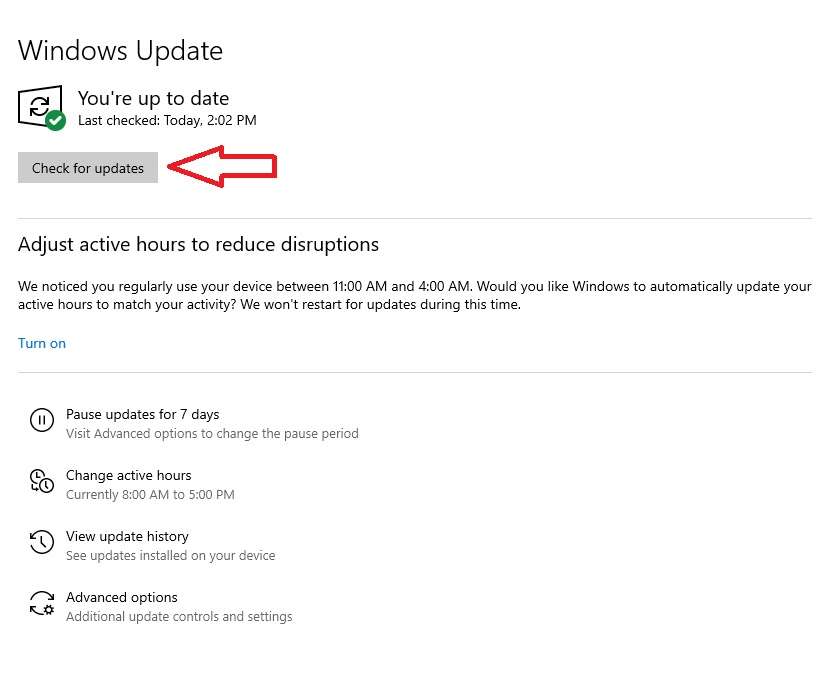
Step 3: When you get to the update screen, click Check for updates and install if there are any.
How to update MacOS:
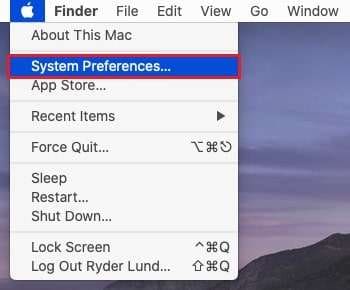
Step 1: Click on the Apple menu in the corner of the screen and then System Settings/System Preferences.
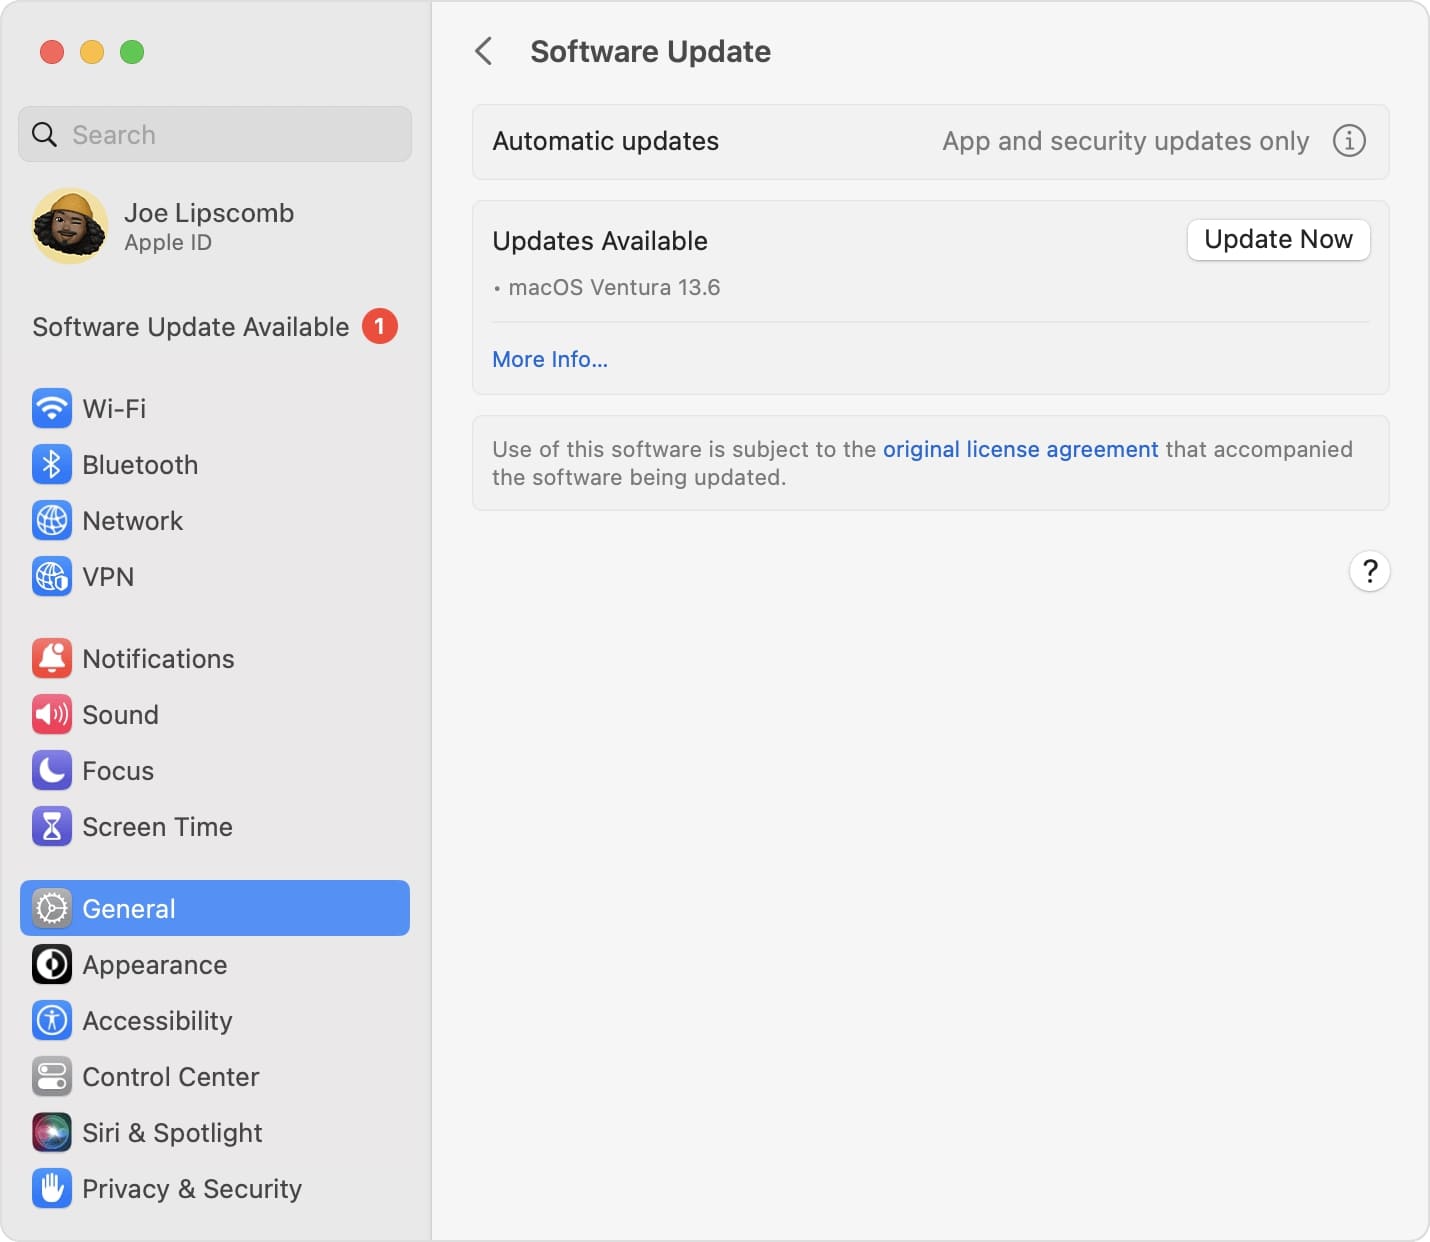
Step 2: Click General and then Software Update.
Step 3: If the Mac finds any updates, click Update Now, and they’ll be installed immediately.
Fix 4: Reinstall Your Browser
One of the simplest but most effective solutions you can try is to reinstall your browser. Whether you’re using Google Chrome, Mozilla, or any other browser, the process is similar and equally effective. You should follow the steps:
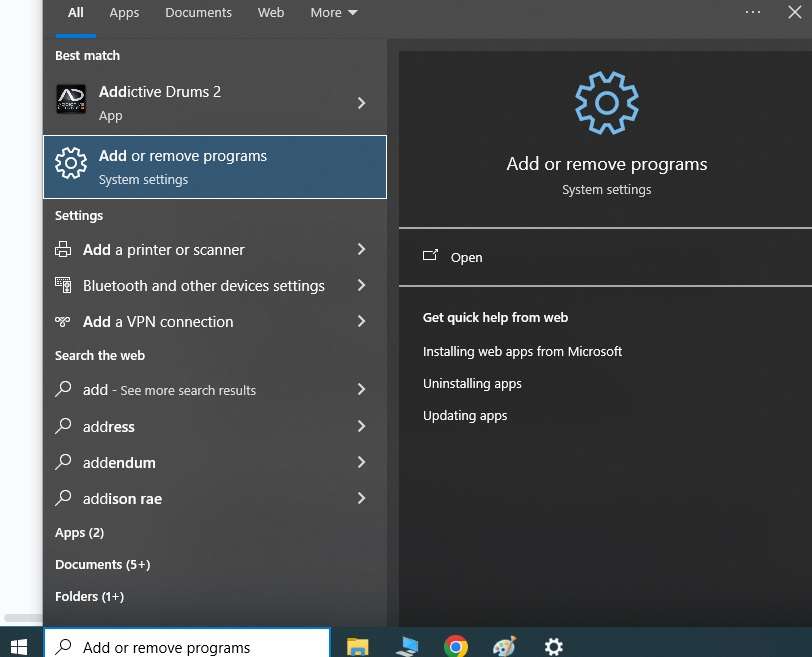
Step 1: Click Start, type “add,” and click Add or remove programs.
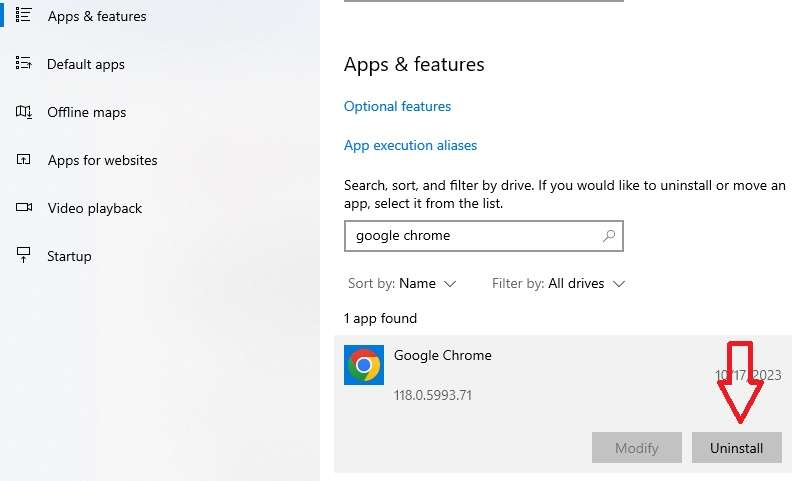
Step 2: Search for your browser in the Apps & features window.
Step 3: Click on the browser icon and click uninstall to remove the program.
Step 4: Once the browser is uninstalled, go online, download the browser installation, and install it again.
Fix 5: Disable Hardware Acceleration
Hardware acceleration is an exclusive Google Chrome feature that helps the browser access graphics hardware and speeds up various graphics-related processes designed to improve the experience. However, your device configuration and hardware acceleration can get confused, disrupt visual performance, and create difficulties when playing videos.
That’s why you should try disabling hardware acceleration:
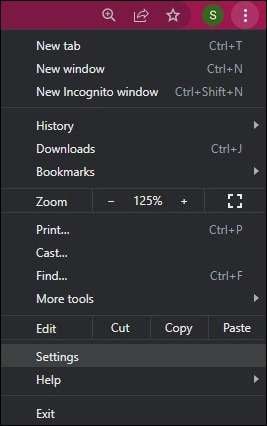
Step 1: Start Google Chrome, click on the three dots in the upper right corner, and click Settings in the drop-down menu.
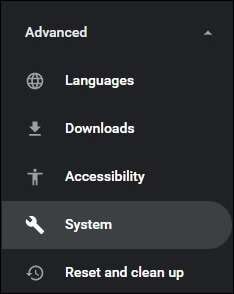
Step 2: Click System in the settings windows and toggle the “Use hardware acceleration when available” switch off.
Step 3: After turning it off, click the Relaunch button next to the toggle switch.

Fix 6: Disable Extensions and Plugins
Plugins and extensions can give you trouble when playing videos and cause different errors. That’s why you should consider disabling them.
How to disable extensions on Google Chrome:
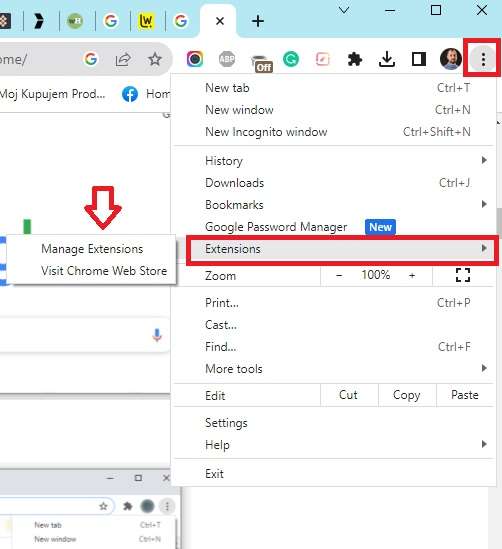
Step 1: Start Google Chrome and click the three dots next to your profile.
Step 2: Go to Extensions in the drop-down menu and click Manage Extensions.
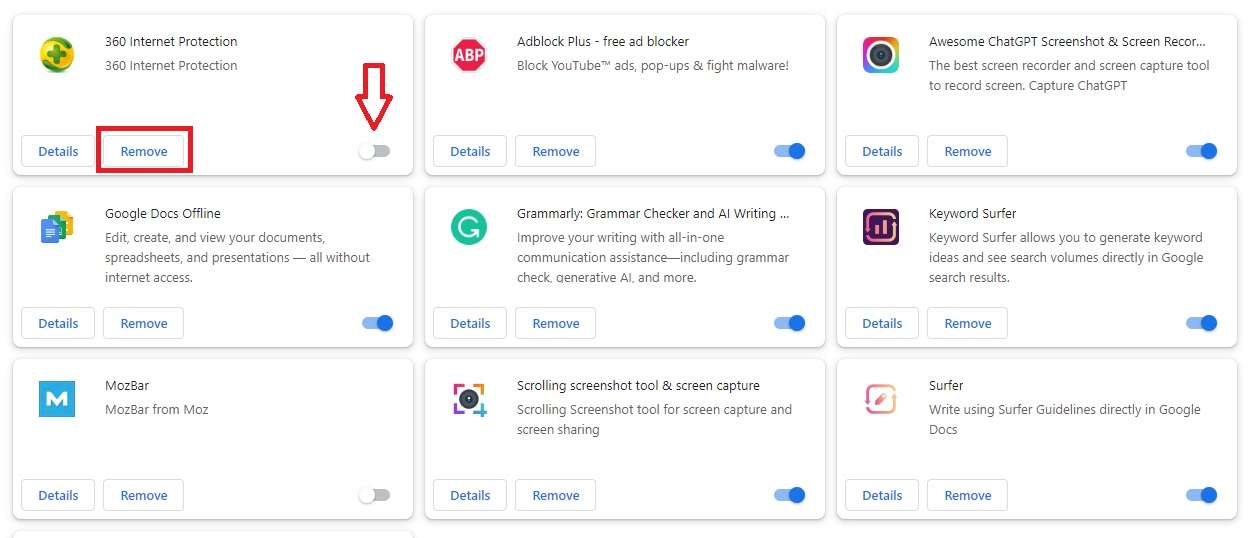
Step 3: When the extensions window starts, you can disable them using the toggle switch on the right or uninstall by clicking Remove.
How to disable plugins on Google Chrome:
Step 1: Start Google Chrome and click the three dots next to your profile.
Step 2: Click Settings in the drop-down menu.
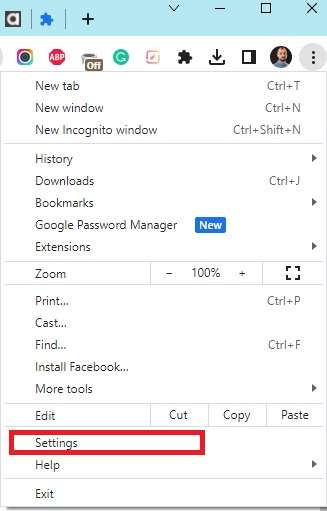
Step 3: Click Privacy and Security in the left panel and click Site Settings at the bottom of the screen.
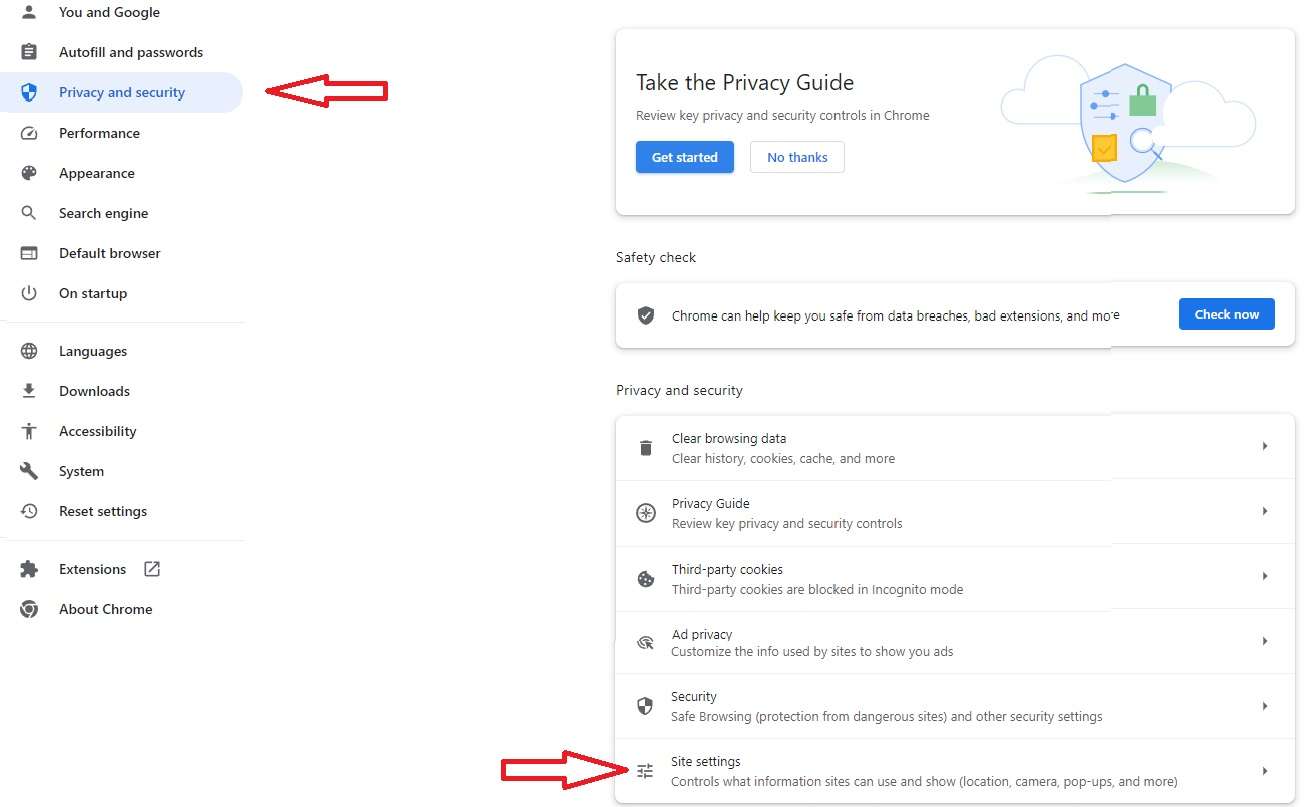
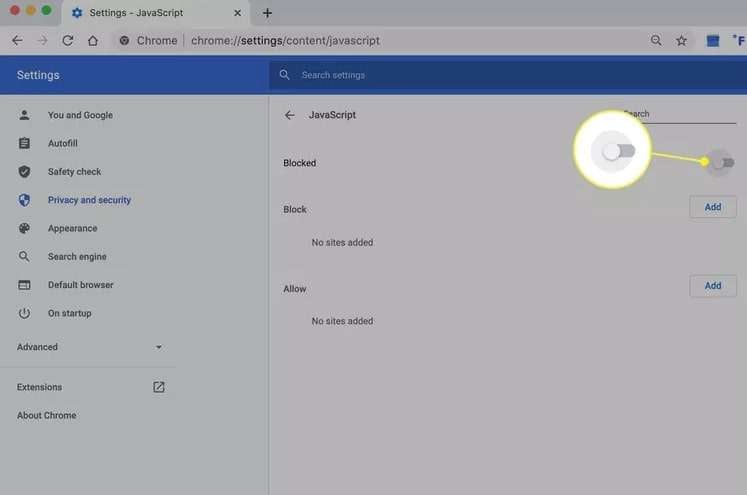
Step 4: Scroll down until you find the plugin you want to disable.
Step 5: Use the switch to toggle plugins on or off. You can also use the Allow and Block sections to adjust which website plugins will work.
Fix "Unable to Play Video Error 5" in Google Slides (for Corrupt Video)
When working with Google Slides, the "Unable to Play Video Error 5" issue typically arises due to corrupted video files that you've tried to embed in your presentation, Google Slides cannot recognize or properly interpret the video's format and data, leading to the Unable to Play Video Error 5. In this guide, we'll provide you with straightforward, actionable steps to fix the "Unable to Play Video Error 5" by addressing the issue of corrupted video files.
If this case, you first have to download the video to your computer. Once you’ve done that, download and install professional video repair software like Wondershare Repairit. Here’s how to repair videos using Wondershare Repairit:

-
Repair damaged videos with all levels of corruption, such as video not playing, video no sound, out-of-sync video or audio, playback errors, header corruption, flickering video, missing video codec, etc.
-
Repair full HD, 4K, and 8K videos and support 18 popular formats, including MOV, MP4, M2TS, INSV, M4V, WMV, MPEG, ASF, etc.
-
Repair damaged or corrupted videos caused by video compression, system crash, video format change, etc.
-
Repair critically damaged or corrupted videos available on SD cards, mobile phones, cameras, USB flash drives, etc.
-
Repairit has a quick and advanced scanning mode. You can use either depending on the level of corruption the video file has undergone.
-
No limit to the number and size of the repairable videos.
-
Support Windows 11/10/8/7/Vista, Windows Server 2003/2008/2012/2016/2019/2022, and macOS 10.10~macOS 13.
Step 1: Run Wondershare Repairit and click + Add to add your damaged or corrupted video.

Step 2: The program will load the video and display its key information. When you’re ready, select the video you want to repair and click Repair to start the process.

Step 3: Click Preview to see if the videos have been repaired after the process is complete.
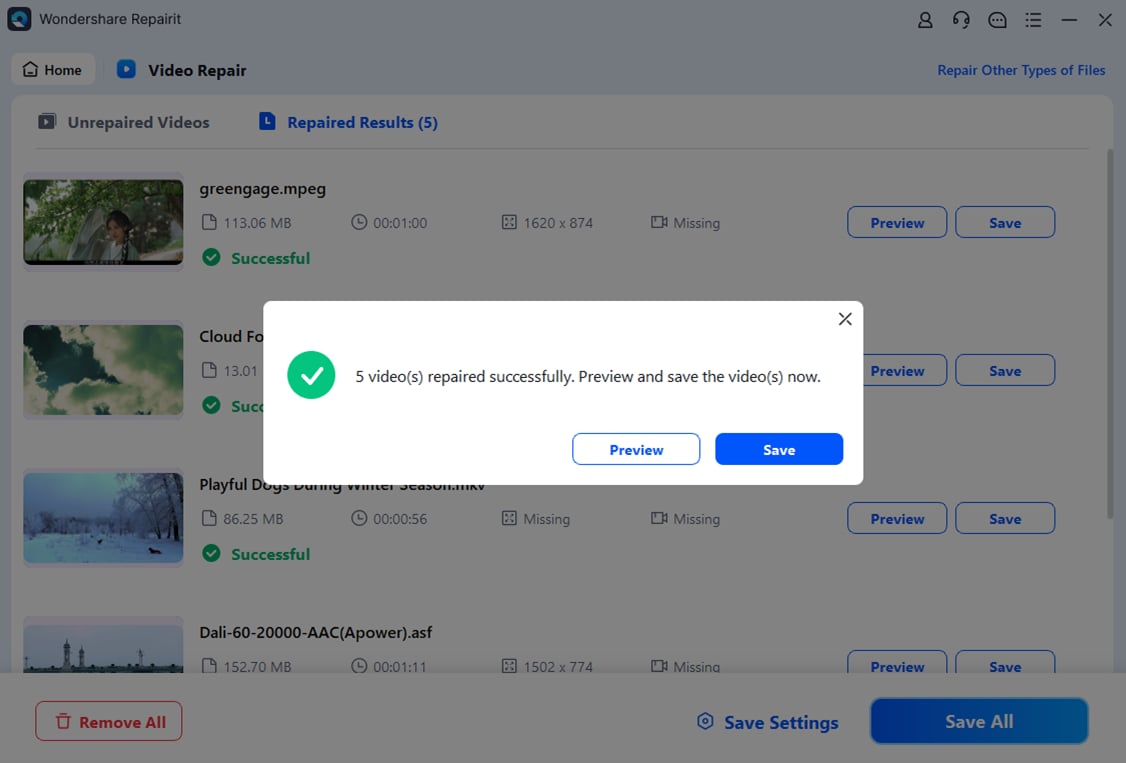
Step 4: If you’re satisfied with the results, click Save and select where your videos will be stored.

This video can help you fix the error with a step-by-step guide.
Conclusion
The best methods for fixing the “unable to play video error 5” issue are to clear cache and cookies, repair corrupted videos with professional software, disable hardware acceleration, disable plugins, and reinstall your browser.
We guarantee you that one of these methods will work. Carefully follow the steps we’ve provided for each method, and you’ll be able to use your video presentations again with no issues. You can also try using these methods for other video playback problems.


 ChatGPT
 Perplexity
 Google AI Mode
 Grok
Grok
