

Caught that perfect moment, only to find your photo blurry? Don't hit the delete button just yet! No worries, whether you're a seasoned photographer chasing that perfect shot or a social media influencer. You can remove blur from images in Photoshop using its powerful tools.
Photoshop filters like Unsharp Mask and Smart Sharpen can breathe new life into soft details. With the right techniques, you can elevate your work from good to great, ensuring your photos impress your audience.
So, if you are ready to learn how to fix a blurry image in Photoshop, keep reading. This article will discuss why you get a blurred image, using Photoshop to fix it, and some expert tips to make it easier.
In this article
Part 1: What Are Some Reasons for Blurry Images?
Getting blurry images can be a photographer's worst nightmare. But there are also ways to restore parts of blurred images in Photoshop. Here are some of the most common causes of blurry photos:
Camera Shake
This common issue results in blurry photos when the camera moves during exposure, particularly at slow shutter speeds. To improve blurry images, use Photoshop and try the Unsharp Mask filter to sharpen edges without amplifying noise.
Subject Movement
If your subject moves, freeze the motion with a faster shutter speed. Otherwise, the subject will appear blurred. Your specific shutter speed will depend on how fast your subject moves.
Missed Focus
An out-of-focus image will appear blurry throughout. If autofocus malfunctions or manual focusing isn't precise, there's still another way. You can attempt to fix blurry images in Photoshop using tools like Smart Sharpen. It can selectively enhance edges and details, improving clarity in areas slightly out of focus.
Low Light
Low light conditions often need slower shutter speeds. This increases the risk of camera shake or subject movement, both of which can contribute to blur. Luckily, blurry image fixes are possible with Photoshop features like noise reduction filters. It can help lessen the grainy appearance caused by high ISO settings, making the image clearer.

Lens Issues
Fingerprint smudges or scratches on your lens can lead to blurry photos. Give it a good wipe-down and inspect for any damage. If you're using a zoom lens, avoid using it at the extreme ends of its zoom range. The extreme ends are often the softest.
Diffraction
Diffraction is a physical phenomenon that can cause images to be soft, especially at small apertures. If you're using a very small aperture (e.g., f/16 or smaller), try opening it up a bit to see if the image improves.
High ISO
Think of ISO as a camera's light sensitivity. When you set it to a high level, the camera might create unwanted noise, making your picture blurry.
Digital Zoom
Digital zoom lets you zoom in on a picture after taking it, but it doesn't make the image clearer. It might actually make it blurry. To fix this, use sharpening filters in Photoshop, such as Unsharp Mask.
Part 2: How Does Image Sharpening Improve Blur Images?
Unwanted blur robs images of their crispness and detail. Whether it's from shaky hands, out-of-focus shots, or compression issues, you can fix blurry pictures in Photoshop. Use methods like the Unsharp Mask filter to amplify edges and contrasts.

When it comes to sharpening images, it really comes down to what you want. If you're going for super clear and realistic pictures, any bit of blurriness can be a real problem. That's when you might need to get into some detailed fixes with Photoshop.
On the flip side, if you're into that dreamy vibe with vintage or bokeh-filled shots, you've got to be careful not to go overboard with sharpening. Just a touch can bring out the cool textures and details without messing up the dreamy look. So, if you want your photos to be clear, knowing how to fix blurry images in Photoshop is a handy skill for anyone.
Part 3: How To Fix a Blurry Image in Photoshop?
Unsharp Mask in Photoshop makes your pictures sharper. It looks at the edges, where light and dark meet, and boosts them. You have control to enhance specific areas without adding noise or artifacts. It's a tool to fine-tune your image sharpness. Here's how to use the Unsharp Mask to fix a blurry image in Photoshop:
Step 1: Duplicate your image layer. It creates a safety net if you over-sharpen and need to go back.
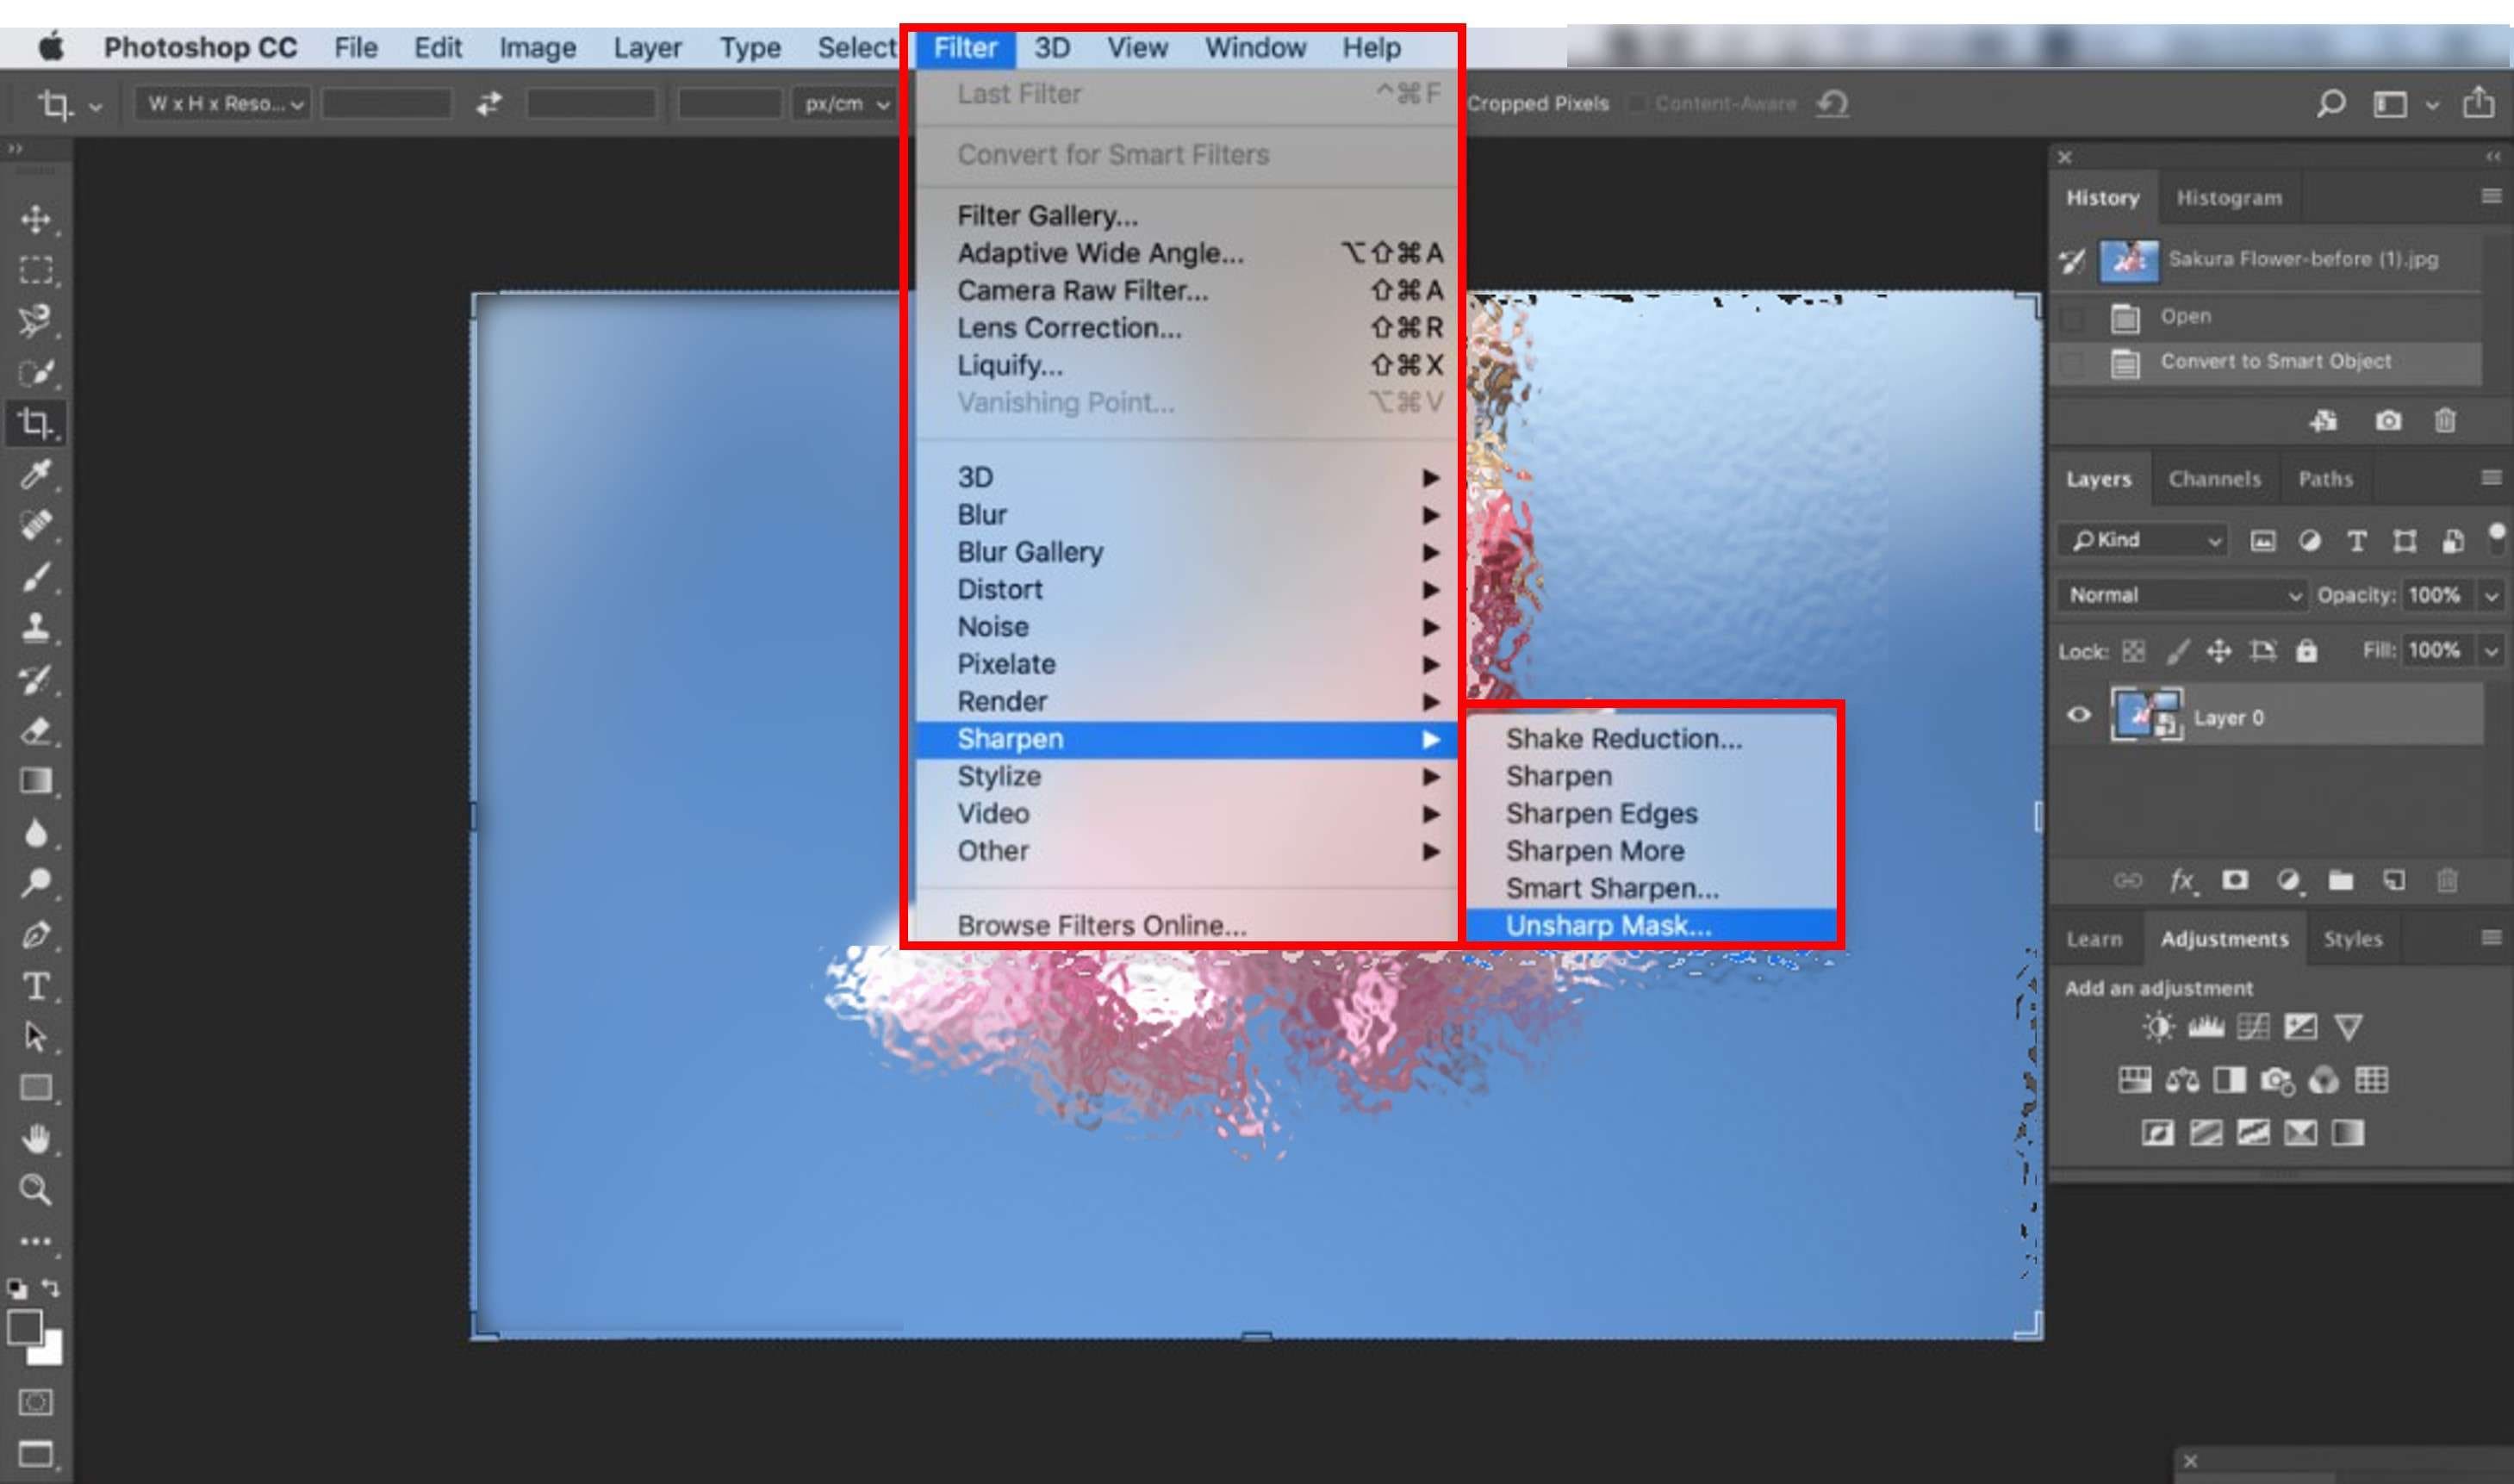
Step 2: Go to Filter > Sharpen > Unsharp Mask to open the Unsharp Mask dialogue box.
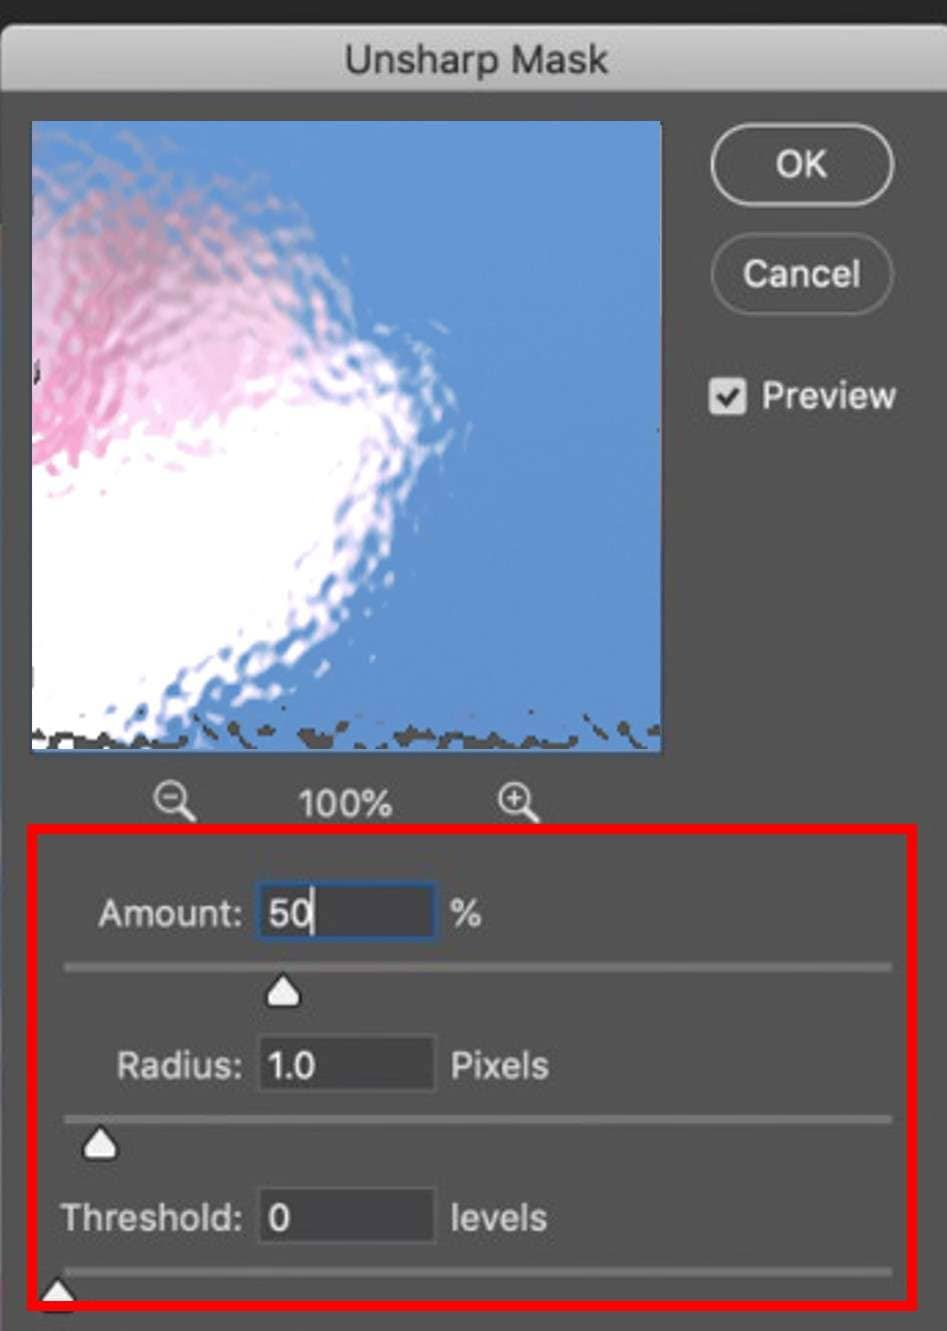
Step 3: Adjust the sliders:
- Amount: This controls the intensity of the sharpening effect. Start at around 150% and adjust based on your image.
- Radius: This determines the width of the edge that will be sharpened. A higher radius affects a wider area around the edge. Start at 1 pixel and increase if needed.
- Threshold: It decides how much contrast difference counts as an edge. Higher values ignore subtle edges, while lower values sharpen everything, potentially creating noise. Start at 0 and adjust for best results.
Step 4: Use the Preview to see the live effect of your adjustments. If the image looks overly sharpened, reduce the amount or radius. You can also use an edge mask to paint specific areas where you want to apply or exclude the sharpening effect.
Step 5: Once you're happy with the sharpening, adjust the layer opacity to control its impact on the image. Lower opacity blends the sharpened layer with the original. This creates a more natural look.
Remember: Experiment with different settings to find what works best for your image. Avoid oversharpening, which can create unnatural-looking halos or artifacts.
Part 4: Expert Tips for Fixing Blurry Images
Now that you know how to remove blur from images in Photoshop, let's explore some tips when editing photos. If you want to know more ways to fix blurry photos in Photoshop or have trouble making your pictures sharper, these expert tips are here to help you out.
Use Smart Sharpen
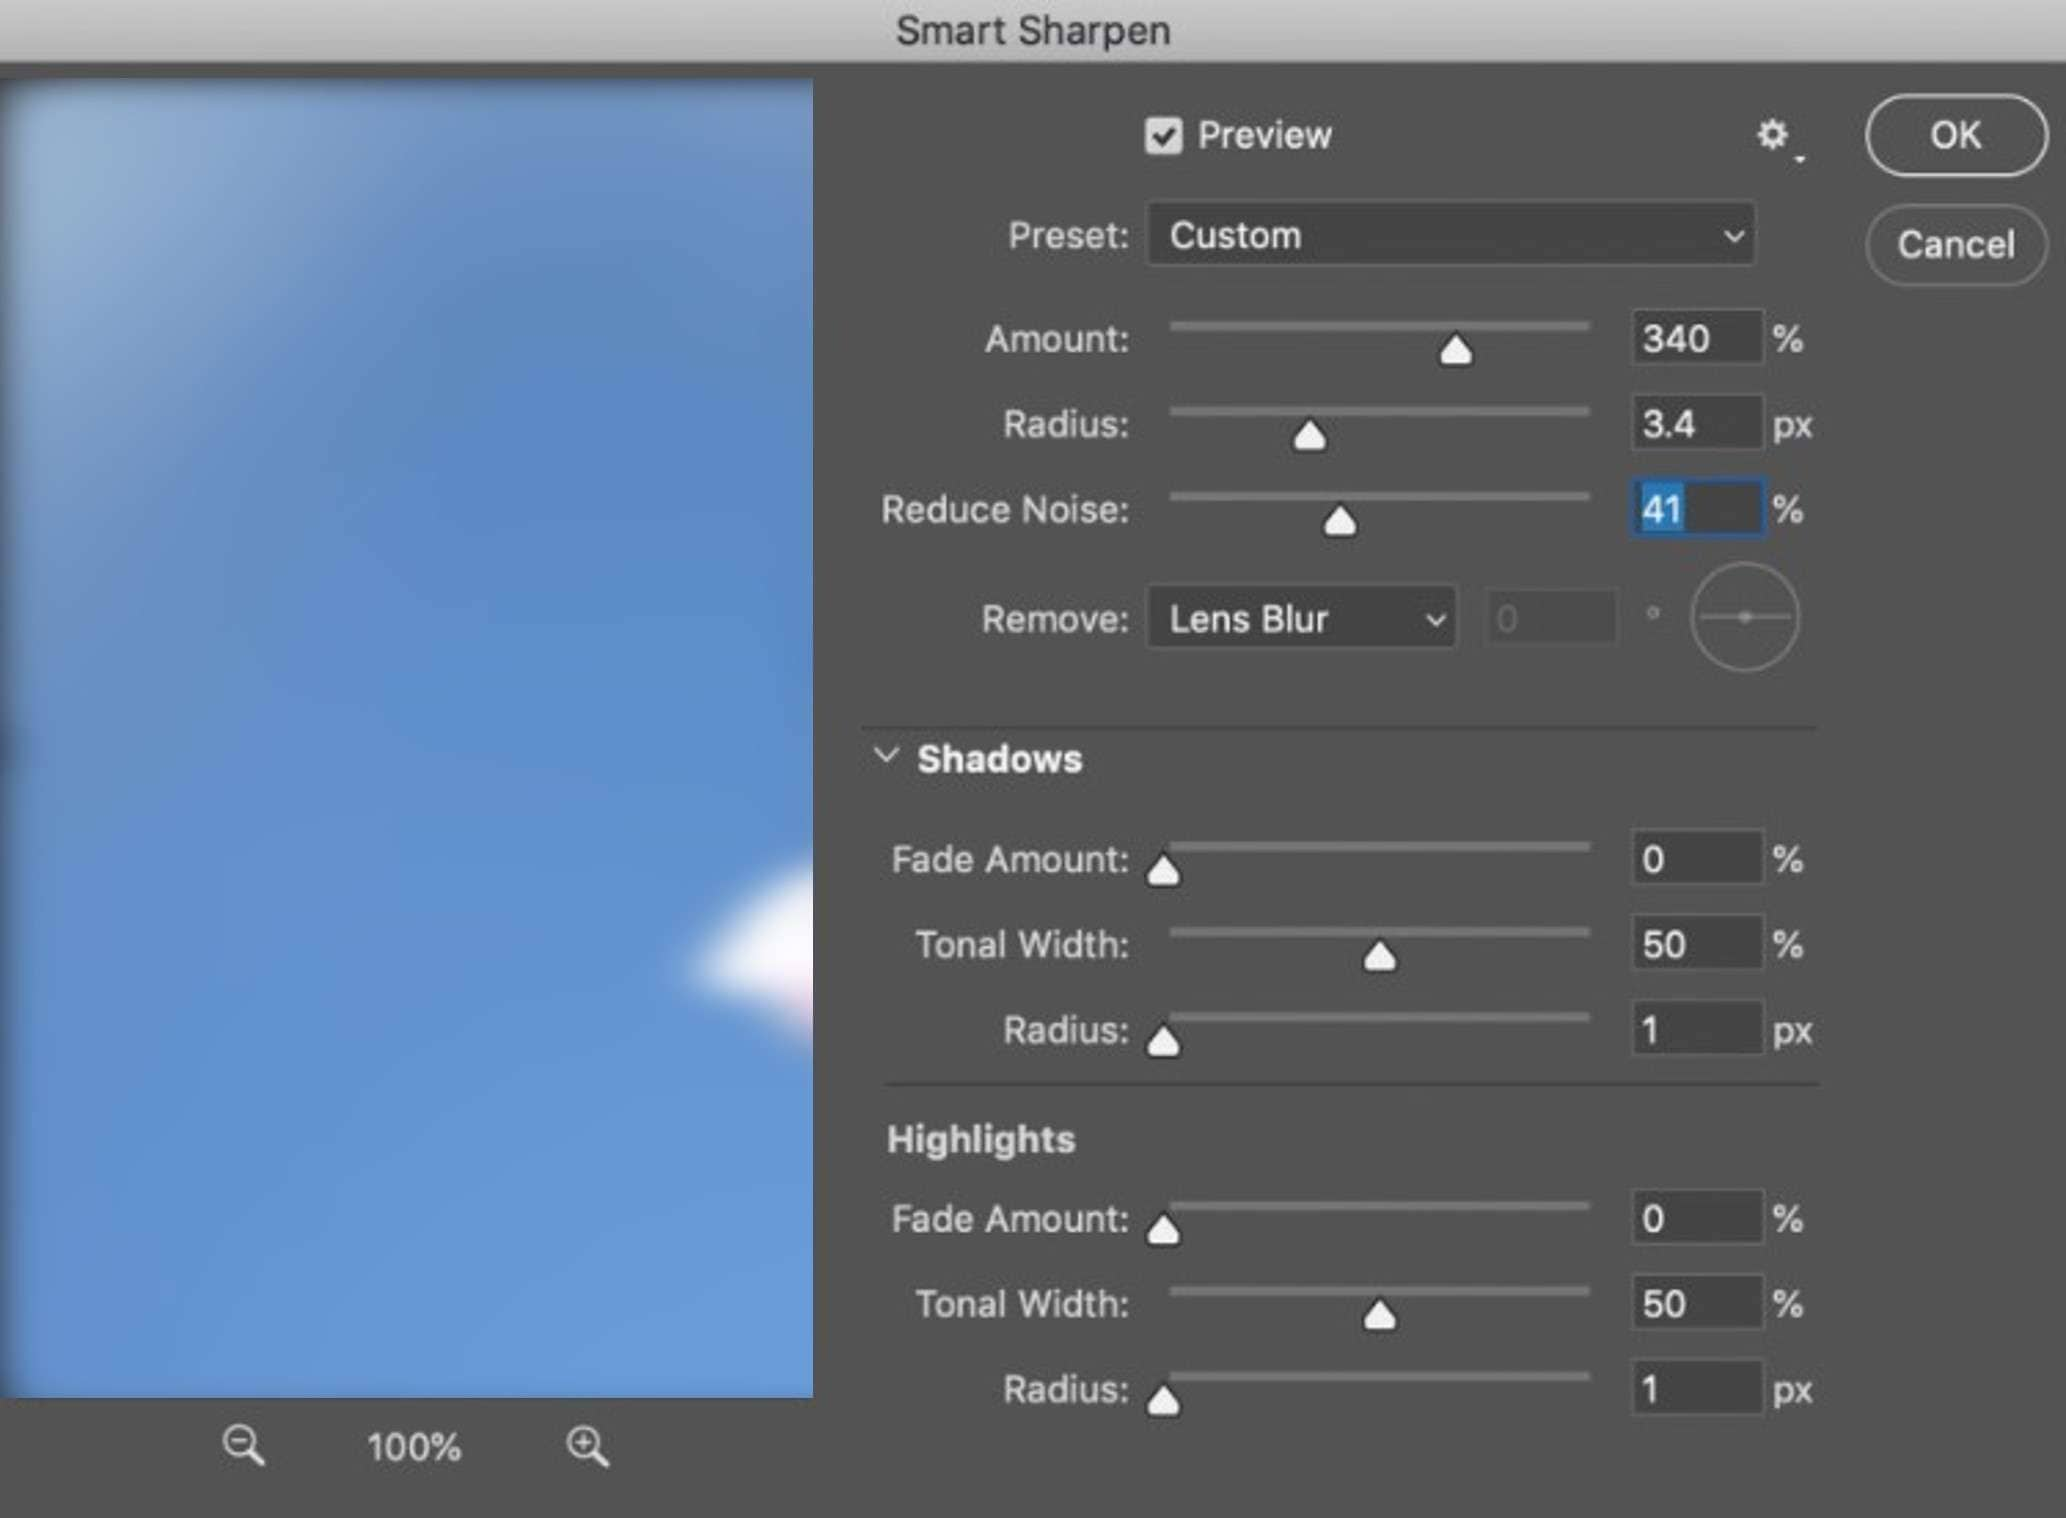
An alternative to fixing blurry images in Photoshop is using Smart Sharpen. It is a filter used to enhance the definition and clarity of edges in your images. But Smart Sharpen is not the same as Unsharp Mask. It looks at the picture and sharpens only the edges, adapting to them. This way, it avoids creating those bright edges or extra noise in the image.
Smart Sharpen offers various blur modes like Gaussian, Lens Blur, and Motion Blur. It allows you to tailor the sharpening effect to the specific type of blur present in your image. You can refine the sharpening for specific tonal areas like shadows and highlights.
High Pass Sharpening
Just tweak the radius setting to control how strong the high-pass effect is. Keep it low because higher values blur the image more. Also, try blend modes like Overlay or Soft Light to bring parts of the original image back. This way, you can improve details while keeping the brightness and color intact.
Use the Highest Resolution Image Available
Higher-resolution images contain more pixels, representing more detail and information about the scene. This gives algorithms and editing tools more to work with, making it easier to fix missing or messed-up details causing blur. With a low-resolution image, there's simply insufficient data to fill the gaps effectively.
Try an Efficient Alternative to Photoshop for Blurry Image Repair
Photoshop can't do much with seriously blurred images. It's a powerful tool, but it might be a bit too complicated for those looking for simpler ways to fix blurry photos. If you want an easy way to improve your photos, try using an AI-powered tool like Wondershare Repairit.
Why Choose Repairit To Fix Blurry Images?
Repairit Photo Repair tool is easy to use, even for beginners, and offers the following features:
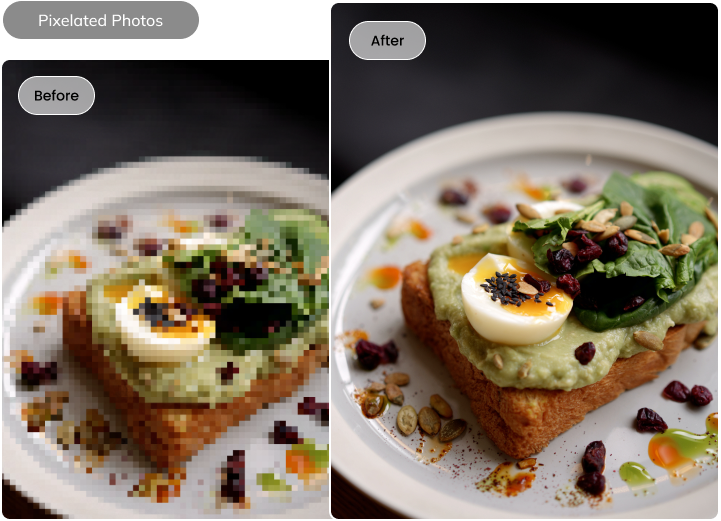
- AI-powered Precision: Repairit uses smart technology to fix blurry photos accurately. It does the work for you, bringing back clarity automatically.
- Unlimited Repair Power: Forget file size or number limitations. Repairit tackles even massive photo libraries, breathing new life into countless memories.
- Enhance Beyond Repair: Repairit goes beyond simple blur fix. Its intelligent AI algorithms sharpen blurred images and enhance quality.
- Cross-platform Compatibility: Mac or Windows? Repairit works seamlessly across both platforms, even online. It ensures your precious moments are always accessible.
- Repaired File Preview: Repairit offers a full preview of the repaired image before committing. This lets you fine-tune the results to your satisfaction, ensuring you get the perfect fix every time.
- Support Multiple File Format: Repairit isn't picky. It supports a wide range of image formats, from popular JPEGs and PNGs to RAW files from your DSLR.
- Device Diversity: Repairit isn't just for your computer. It fixes blurry photos on different devices. That includes USB drives, memory sticks, SD cards, cameras, and smartphones.
- Batch Processing: Got a pile of blurry photos? Repairit lets you batch-process them, saving you time and effort.
Part 5: How To Fix Blurry Images in Wondershare Repairit?
Now that you've grasped some expert tips for restoring a blurred photo on Photoshop, let's see how you can use Wondershare Repairit instead. Follow these steps below to learn how to fix a blurry image and enhance its quality easily:
Step 1: Download the software for your desktop. Once installed, launch the program on your computer.
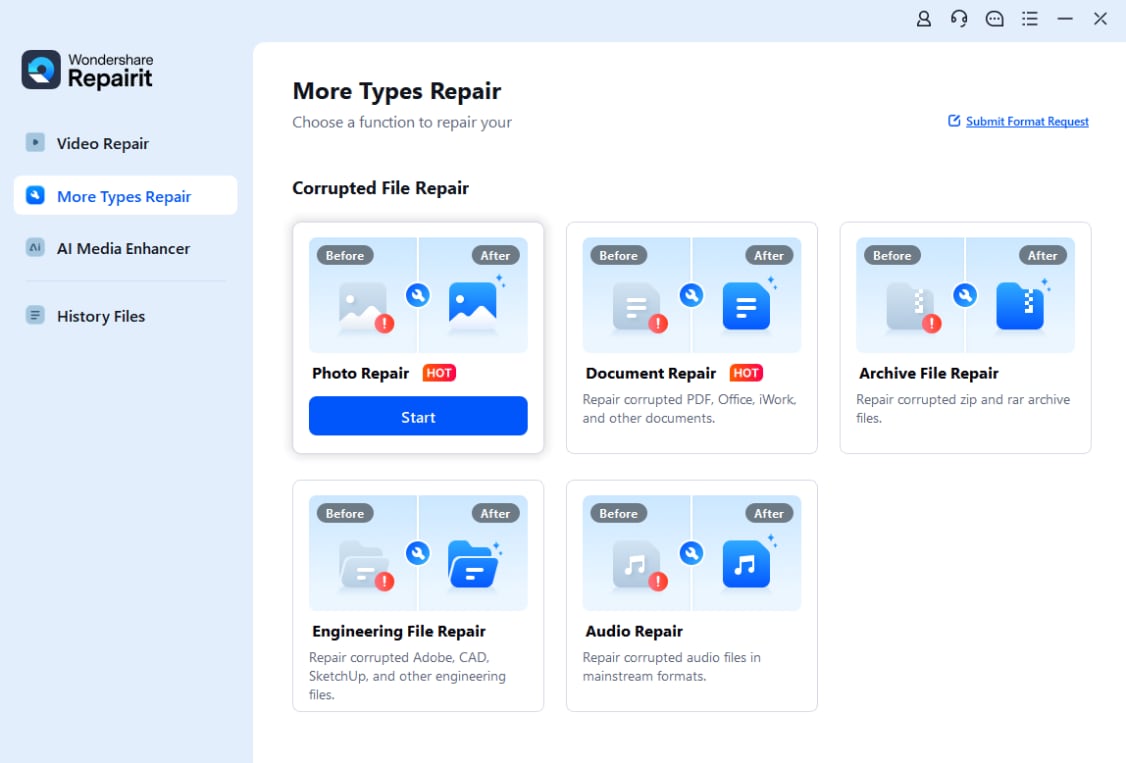
Step 2: Go to More Types Repair in the left-side navigation pane, then select Photo Repair.
Step 3: Click + Add or drag and drop your blurry image into the Repairit interface. You can upload multiple images for batch processing, saving you precious time.

Step 4: After uploading the blurry photos, you'll see thumbnails and details like file size and resolution. Click Repair to start enhancing the quality of the images.

Step 5: Click OK in the dialogue box to preview and save the photos once repaired.

Step 6: Go to the Repaired section in the left-side navigation pane. Then, click Preview or click the image thumbnail to open the preview pop-up window.

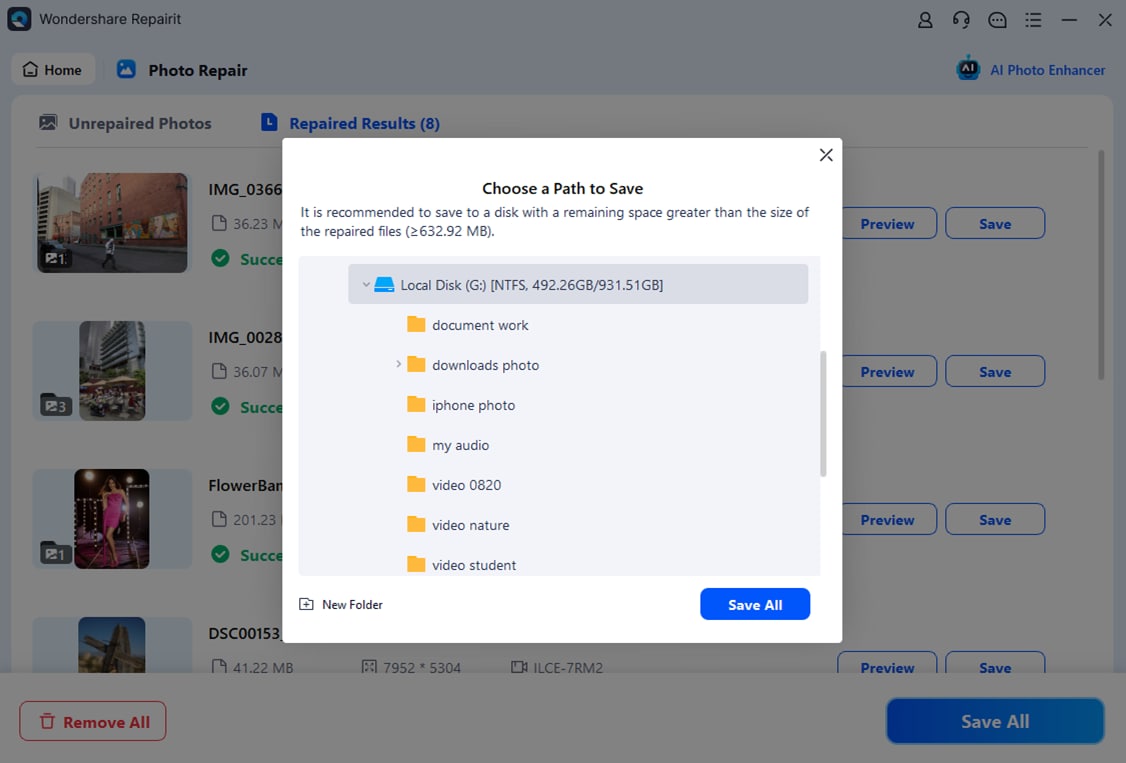
Step 7: Click Advanced Repair for further fine-tuning, or click Save if you're content. Then, select a save location and click Save All to finish.
That's it! Within a few clicks, Repairit makes fixing blurry images faster and easier than other tools.
And do you know how to make photo less blurry in lightroom? Explore the magic methods to fix blurry photos in lightroom.
Conclusion
Ensuring your photos are clear and of good quality is key to leaving a lasting impression. Whether you're an advanced Photoshop user seeking precision or a simpler fix, options are available.
Remove blur from images in Photoshop if you're adept at photo editing. Or, go the easy way with Repairit, an AI tool made for simplicity. These choices let you pick what works best for your skills and what you like.
The choice between fixing blurry photos in Photoshop or using Repairit is yours. Embrace the positive potential each tool offers. Your pictures deserve to be of good quality, and now, achieving that clarity is just a click away.
[a]Original comment:
Unwanted blur robs images of their crispness and detail. Whether it's from shaky hands, out-of-focus shots, or compression issues, you can fix blurry pictures in Photoshop. Use methods like the Unsharp Mask filter to amplify edges and contrasts.
