Best Methods for Fixing Bad-Quality Videos
Get to know about how to fix bad quality videos easily in this article.
Do you need to improve the quality of your video fast? In today’s day and age, that request is as reasonable as it is common. Nobody likes a shaky, distorted, or pixelated video. You’ve come to the right place. Let’s define what kind of video-related problem you’re experiencing. Then, we’ll find the best methods for how to fix bad-quality videos quickly and effectively. From improving resolution to repairing corrupted files, we've got you covered with practical solutions for every issue. Let’s dive in and find the best way to fix your video problems now.
Bad-Quality Videos Can Be Annoying

Bad-quality videos are frustrating for everyone. Whether you’re a brand owner who depends on professional-looking videos or a casual consumer of video clips, bad-quality videos can be annoying. Poor resolution, jerky pictures, or out-of-sync audio can ruin the experience and render the video unwatchable.
Imagine showing the video from your wedding to your kids for the first time and finding out that the entire recording is ruined. Disappointing, right? But it could be worse.
YouTube and social media influencers rely heavily on video content to boost online brand. If you are an influencer, you fully grasp the importance of quality videos for online branding. If your posts looked as if they were amateur-made, nobody would ever watch them.
You might relate to one of these scenarios more than the other or have an entirely different story. What’s important is that you have an unplayable or average-looking video on your screen that needs to be fixed ASAP. Don’t worry. We have just the solution for that.
Video Issues That Lead to Bad Quality

What causes bad video quality? Is there a quick fix for your video? Should you try a free online video editor, or will you need a professional repair service? Well, it depends. To answer these questions and recommend the best solution for your problem, we need to define what you’re dealing with.
Chances are, you’re looking at one of these common video issues:
Issue 1: Poor Video Resolution
The higher the resolution, the more realistic the picture. And vice versa. Poor resolution can completely spoil a good video, so you must learn how to set it up while shooting. If you already have a pixelated video and there’s no way back, you can “fix it in post.”
Issue 2: Wrong Camera Settings
If you’ve ever tried to make a professional-looking video, you know that it involves more than just resolution. Manual camera settings also include things like shutter speed and frame rate. Blurry videos usually happen when the shutter speed is less than the frame rate.
Issue 3: Bad Compression Ratio
Has your video become distorted and shaky after you’ve uploaded it to a streaming platform? That’s usually not the platform’s fault. Usually, this happens because we forget to apply the right compression algorithm that makes the video playable online.
Issue 4: Incompatible Video Codecs
When media players refuse to play your video, that’s usually due to incompatible video codecs. If the video has jerks, disturbed frames, and strange dots, that’s for the same reason. Below, we’ll talk more about different video codecs and media players that support them.

Issue 5: Wrong Encoding System
What is an encoding system, and why should you care? The encoding system is critical when compressing videos or changing video formats to make them work across different players. Choosing the wrong encoding system will significantly lower video quality.
Issue 6: Poor Audio or No Sound
Your video looks great, but it’s giving you sound-related headaches? There are several reasons for that, often connected to poor compression or formatting. Sometimes, the problem is way simpler than that. The most common cause of audio-sync problems is – poor connection.
Issue 7: Bad Connection or Corruption
In fact, connectivity issues and device corruption cause video-related issues as often as poor camera settings and post-production decisions. If your video is choppy or jerky, that might have nothing to do with how it was filmed and formatted. The problem might be on your end.
How to Fix Bad-Quality Videos
Now that you have a general idea of what could be wrong with your video, let’s move on to the brass tacks. The following are the most effective methods for fixing video disturbances and improving the overall quality of your video. Let’s go through each of them step by step.
Fix 1: Repair Videos Using a Professional Tool (Wondershare Repairit Desktop)
The number of elements that affect video quality is tremendous – resolution, sharpness, contrast, saturation, color, video noise, and sound are just some of them. You’d need highly capable video editing software and weeks of practice to get each of them right.
Professional video repair tools, such as Wondershare Repairit, can replace weeks of manual editing with a single click. The only thing you need to do after you download and install the software is upload the video and click the Repair button. Here’s how easy and intuitive it is:

Wondershare Repairit - Video Repair
Security Verified. Over 7,302,189 people have downloaded it.
-
Repair damaged videos with all levels of corruption, such as video not playing, video no sound, out-of-sync video or audio, playback errors, header corruption, flickering video, missing video codec, etc.
-
Repair full HD, 4K, and 8K videos and support 20 popular formats, including MOV, MP4, M2TS, INSV, M4V, WMV, MPEG, ASF, etc.
-
Repair damaged or corrupted videos caused by video compression, system crash, video format change, etc.
-
Repair critically damaged or corrupted videos available on SD cards, mobile phones, cameras, USB flash drives, etc.
-
Repairit has a quick and advanced scanning mode. You can use either depending on the level of corruption the video file has undergone.
-
No limit to the number and size of the repairable videos.
-
Support Windows 11/10/8/7/Vista, Windows Server 2003/2008/2012/2016/2019/2022, and macOS 10.12~macOS 15.
Here are step-by-step guide for how to repair corrupted videos with Repairit:
Step 1: First, download Wondershare Repairit from the official website and install it on your PC.
Step 2: You can upload your video right after you launch Repairit. Just click the Add button.

Step 3: Select the video that needs repairing or quality correction and hit the Repair button.

Step 4: When Wondershare Repairit is done repairing your video, click to preview it and hit Save to keep it.

Wondershare Repairit can help eliminate frame disturbances, dots, jerks, and more. It’s successful in fixing all common video-related issues we discussed before. It even repairs full HD, 4K, and 8K videos, no matter where they came from. It works with all cameras and brands.
The tool also includes a special Advanced Repair feature, which helps repair severely damaged videos using sample files. Plus, you can use it to fix videos from a formatted camera and move them to safe external storage or repair videos infected with a virus.
Fix 2: Download the Videos Again
Are you experiencing problems with a video file you downloaded from the internet or an external storage device? If so, you’re getting poor video quality because the file failed to download properly due to poor network quality or a faulty USB connection.
In this case, the first thing you should try is to download the video again.
This time, make sure that you’re doing it right. If you’re downloading the video from the internet, use a LAN cable connection rather than a wireless network to eliminate possible interruptions. Of course, check internet connection to make sure your LAN cable must be without any damage and plugged in correctly.
If you’re transferring the video from an external storage device, ensure the USB cable isn’t faulty. Too many USB devices plugged in simultaneously can cause conflict issues, so try unplugging a few. Also, ensure that the device is receiving enough power.

Fix 3: Update Video Drivers
Most of us spend hours looking at our computer screens, and we never stop to think about how our computers turn digital signals into images. When the quality of these images gets compromised, it’s essential to know what happens backstage in the graphic driver.
The graphic driver and graphic card (GPU or graphic processing unit) deliver crisp pictures to your screen. If they don’t work correctly, the image quality might be insufficient. If your PC can’t play high-res videos in full HD, that is what’s happening.
It’s usually solved by updating the video drivers on your computer.
This process differs depending on the operating systems, but only to some degree. On most Windows computers (7, 8, 10, and 11), you can update a video driver from the Device Manager. There are other ways to do this, but they vary from OS to OS. Here’s how to do it:
Step 1: Go to Windows Start and type Device Manager. Open it.

Step 2: In the sidebar on the left, click on the Display Adapters option. The menu will show your graphic card. Right-click on it and select Properties.

Step 3: Go to the Driver tab on the top of the window and click on Update Driver.

Step 4: Click on Search automatically for drivers and follow the instructions on the screen to complete the update.

Fix 4: Update Your OS
While GPU directly affects the quality of screen image on your computer, your OS affects your PC’s overall performance – including the graphic card and driver. It, too, can be responsible for poor image quality. If the previous method didn’t work out, it’s time to update the OS.
Step 1: In the Windows Start, go to Settings. Select Update and Security.

Step 2: If you have any updates that you need to run, it will be shown under Windows Update.

Step 3: If no updates are available at the moment, click Check for updates.
Fix 5: Configure Resolution Settings
As we mentioned before, you can significantly improve the quality of your granulated or pixelized video by increasing resolution. There are two ways of doing this – while shooting the video or in post production. To “fix it in post,” you need a quality video editor, such as Filmora.
Here’s how to increase poor video resolution with Wondershare Filmora:
Step 1: Download Filmora from the official website and install it on your PC.
Step 2: After you launch Filmora, upload the video file with drag-and-drop.
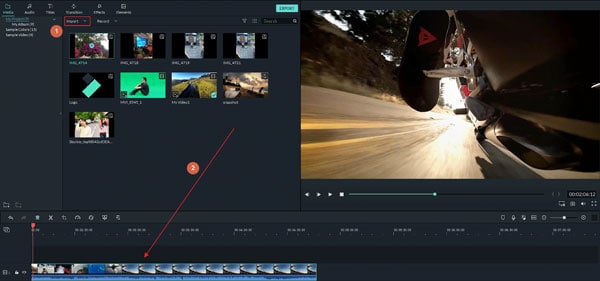
Step 3: Select the desired format and use settings to increase resolution. (If you’re making a video for a specific device, such as an iPhone, go to Devices and choose the right type. Filmora will automatically adjust video format and resolution.)
Step 4: Finally, confirm the conversion and save the improved video to your PC.
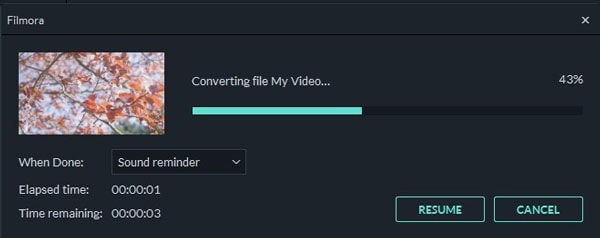
Wondershare Filmora is a simple-to-use tool for professional and casual content creators. It packs features for manual editing as well as automatic AI-enhanced adjustments.
Fix 6: Install the Latest Codecs

Without video codecs, streaming and playing videos across different devices wouldn’t be possible. A codec is an acronym for compression and decompression because a video codec first compresses the video file to make it fit into a tiny storage space and then decompresses it.
As you can guess, there are many different types of codecs. So-called lossy codecs change the format and resolution of the video while compressing it, which diminishes its quality.
Common video codecs include H.264/AVC, H.265/HEVC, VP9, AV1, and LCEVC. All video players have preferred codecs, but popular choices like Windows Media Player and VLC Player have extended – and ever-growing – lists of supported codecs that sometimes need updating.
If your video player refuses to play a particular video file, that’s almost always because it doesn’t have the correct codec. To fix this, you can update supported codecs, download the K-Lite codec pack, or simply use a different video player with the correct codec for your video file.
Fix 7: Use a Different Media Player

When video and player simply won’t match despite all the necessary codecs and updates, trying a different video player is the most viable option. There are many great alternatives to Windows Media Player and VLC. Many people use them in turn to open various video formats.
Some of the best multi-codec video players available today are:
- 5KPlayer
- ACG Player
- GOM Media Player
- Kodi
- Parma Video Player
- Plex
- PotPlayer
- KMPlayer
Fix 8: Use a Video Editing Tool

There are many different types of video-related issues. One is technical, and it can be fixed only with professional repair tools. That includes file corruption, incorrect format, compression, and codec, as well as video damage. Another type is caused by OS and GPU problems.
However, in many cases, a poor-quality video is simply a poorly made video. There’s nothing wrong with the file, format, or compression. It looks terrible because it was made that way.
In this situation, the only way to enhance video quality is with a video editing tool.
We’ve already mentioned one of the best video editing tools on the market – Wondershare Filmora. It offers features like trimming, transitions, and overlays and advanced functionalities such as keyframing, motion tracking, and speech-to-text. Many features are AI-powered.
It’s worth mentioning that Filmora is made for video enthusiasts but with professional-grade tools. That makes it accessible to users without editing experience, which isn’t the case with most of these tools. Editing and rendering videos with Filmora is as simple as it is quick.
Bonus Tip: How to Repair Corrupt Videos Online
If you’re short on time or you simply don’t want to download and install new software on your PC, you can fix video quality using Wondershare Repairit Online – right now:
Step 1: Go to Wondershare Repairit Online.
Step 2: Drag and drop a video or click Add.
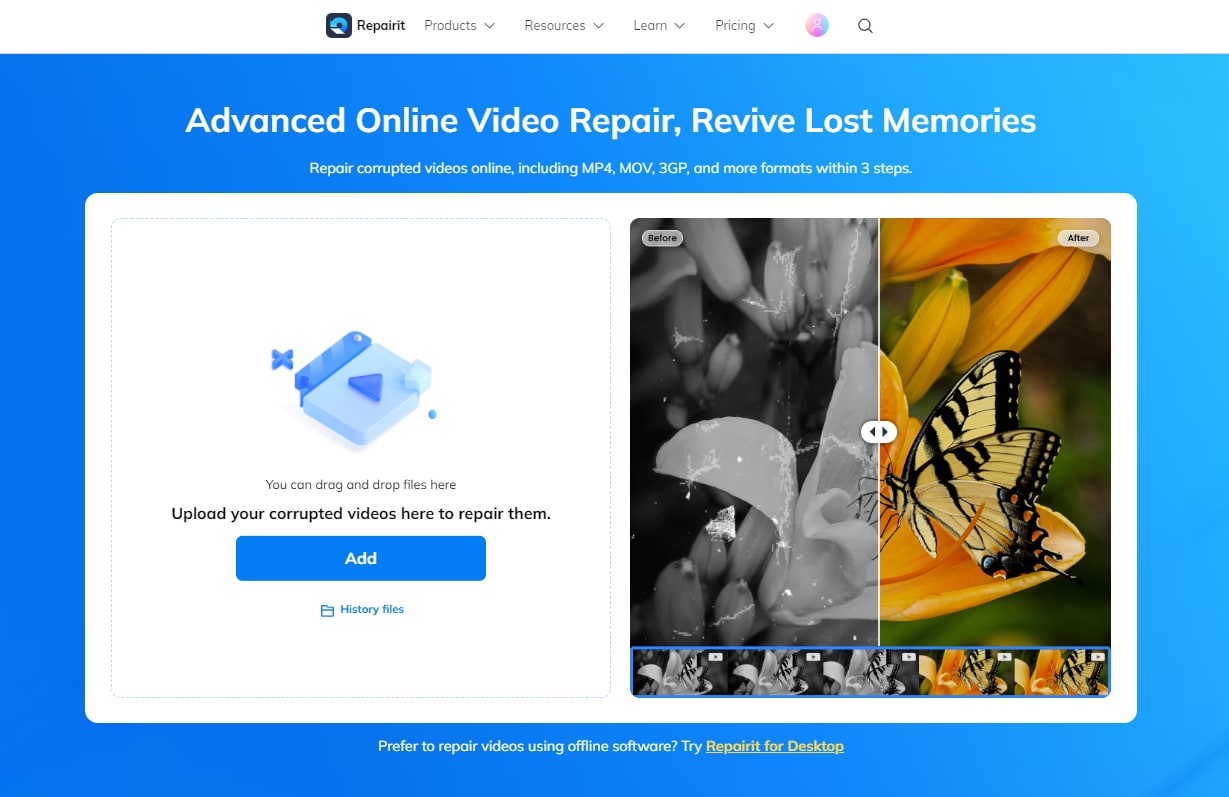
Step 3: Choose a Repair Strategy – CCTV, Screen Recording, Sports Camera, Drone, or Default – and click Repair.
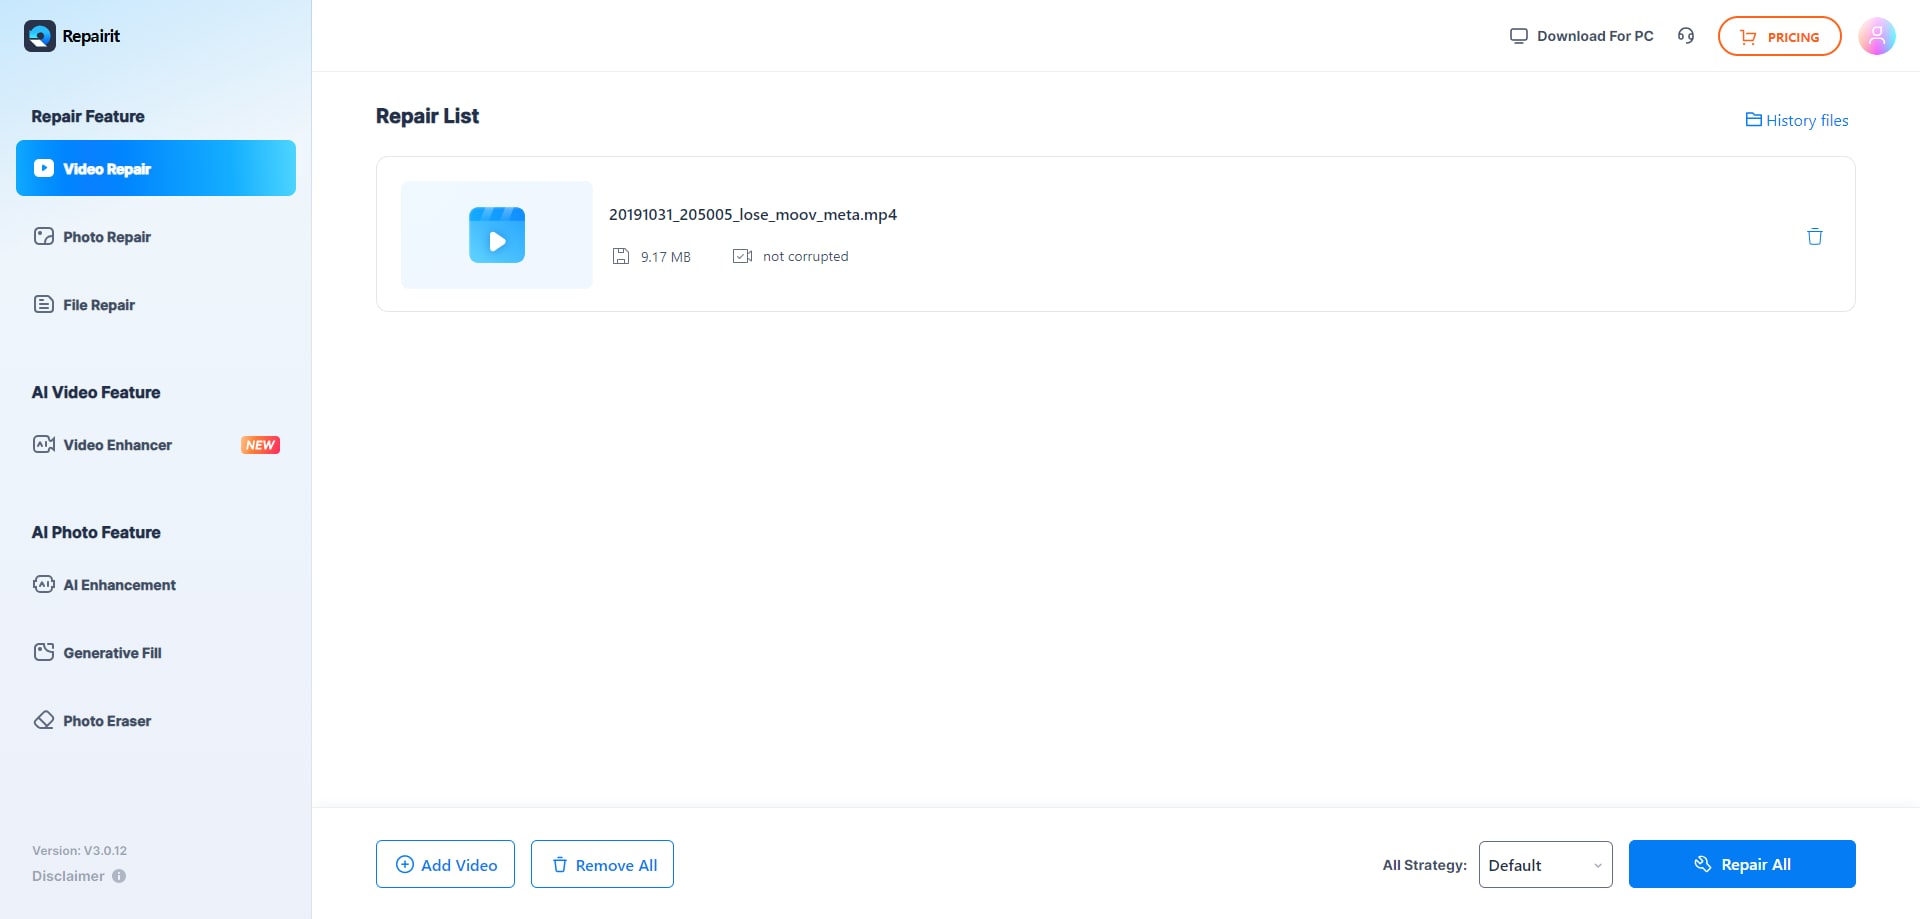
Step 4: When the repair process is complete, you can click on the video and preview it for 10 seconds or click Download to save the full video to your device.
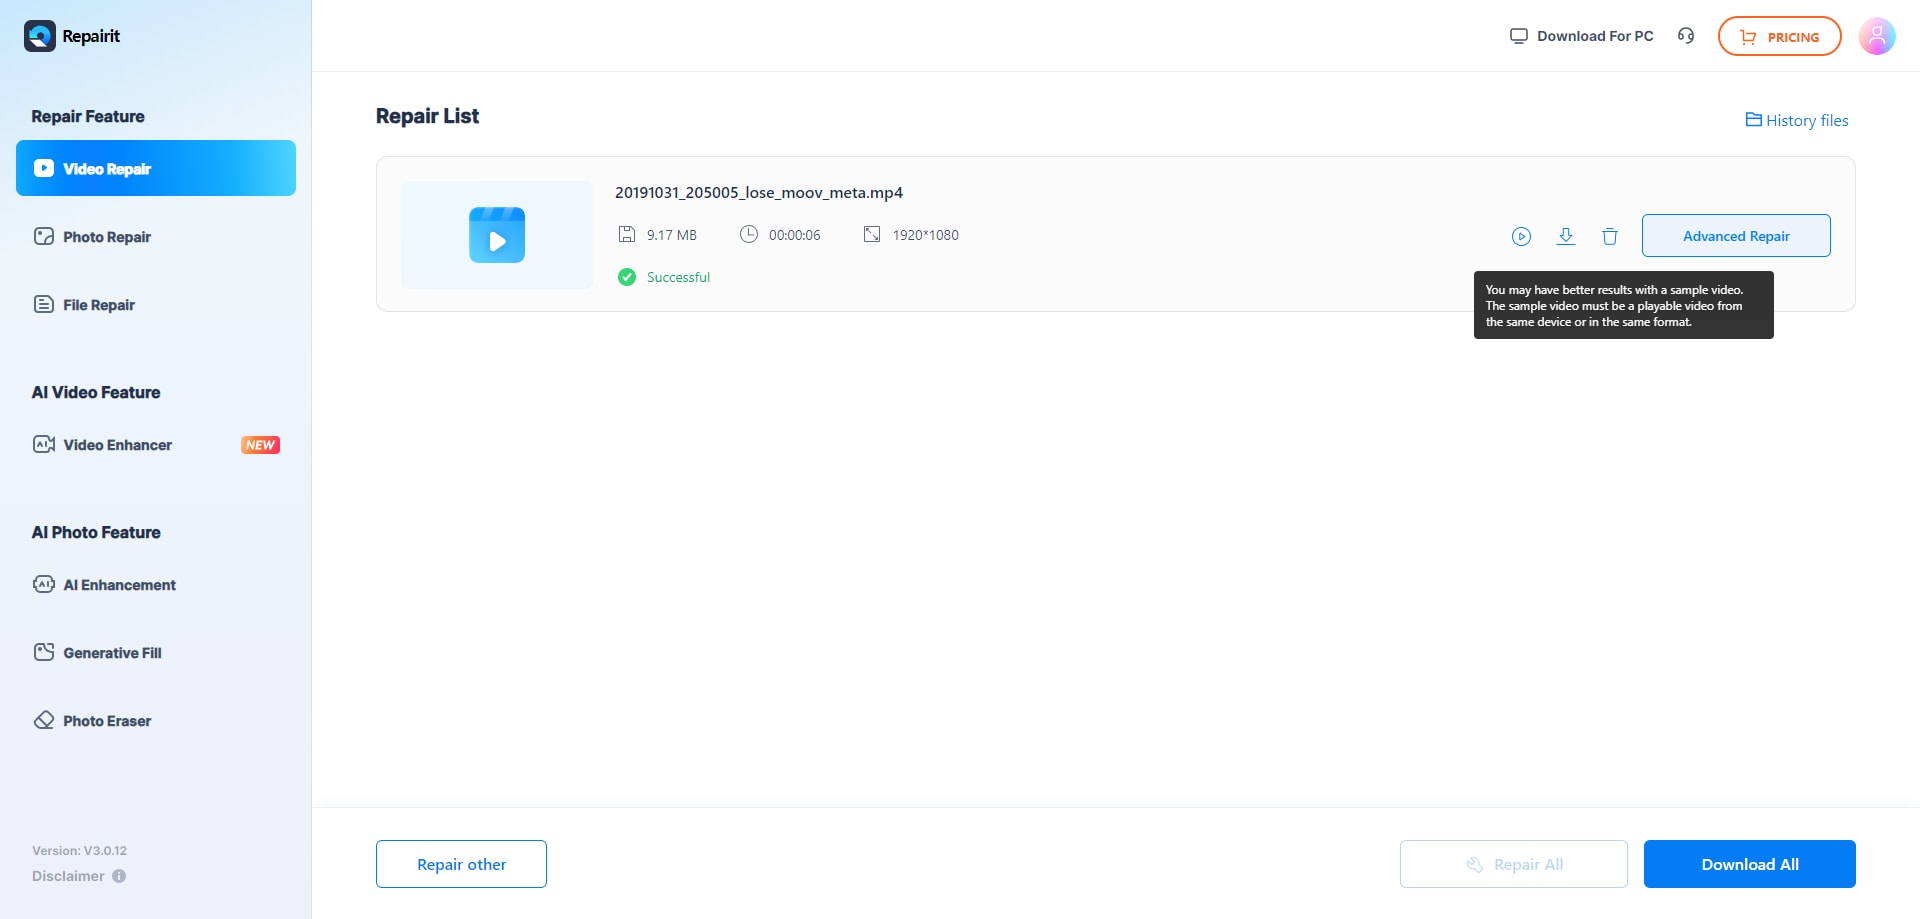
You can add a video sample from your device and start the Advanced Repair if needed.
Wondershare Repairit Online is an excellent option for short clips that require a quick fix. It supports video sizes up to 3GB and 10 video formats – with up to 150 videos monthly.If your video exceeds the 3GB limit, you can consider using the desktop version of Wondershare Repairit for more extensive file size support.
Conclusion
Even with all the right equipment, creating high-quality videos isn’t easy, but it’s different when it comes to editing. Having the right tool in your arsenal, such as Wondershare Repairit, can help you enhance video quality in post-production or years after it’s been made.
People Also Ask
-
How can I improve video quality?
You can improve video quality by using editing tools like Wondershare Filmora to adjust resolution, brightness, and remove noise. For damaged videos, online repair tools like Wondershare Repairit can fix issues like pixelation and audio sync problems. Also, make sure to use the right video format and settings during editing to maintain quality. -
Why is my video still low-quality after repairing it?
If your video is still low-quality after repair, it might be due to incomplete repair, heavy compression, or the video format being incompatible with your player. Try using advanced repair features, re-editing the video with better settings, or using a different player like VLC to ensure proper playback.

 ChatGPT
 Perplexity
 Google AI Mode
 Grok
Grok
