Do you have precious photos that are corrupted or damaged? It can be heartbreaking to lose memories due to corrupted files. But don't worry, Kernel Photo Repair is here to help. This tool can fix damaged photos and bring your memories back to life.
In this guide, we'll walk you through the steps of using Kernel Photo Repair. We'll explain what photo corruption is and how it happens. You'll also learn about the key features of Kernel Photo Repair and why it might be the best choice for you.
Plus, we'll introduce you to a great alternative: Repairit Photo Repair Tool.
In this article
Part 1: Understanding Photo Corruption and Loss
Photo corruption happens when something goes wrong with the file, causing it to be unreadable or look distorted. This can happen for several reasons. Such as incomplete downloads, virus infections, or issues during the saving process. When a photo file is corrupted, it can be very stressful, especially if it holds important memories or information.
Corrupted photos often show errors, refuse to open, or display strange lines and colors. Understanding the causes of photo corruption can help you prevent it in the future. But when corruption does happen, having a reliable tool like Kernel Photo Repair is essential.
Common Reasons for Photo Corruption and Loss
- Virus and Malware Attacks: Your computer or storage device can get infected by viruses or malware. This can damage your photo files and make them corrupt.
- Improper Handling: If you remove your memory card or USB drive from the computer without safely ejecting it, the files can get corrupted.
- Incomplete Transfers: Poor connectivity or shutting down the computer can damage the files.
- Physical Damage: Dropping or damaging your storage devices like memory cards, hard drives, or cameras.
- Power Failures: Sudden power outages or battery failures while saving or transferring photos.
- Software Crashes: If your photo software crashes while you're working, it can damage the files.
- Faulty Storage Devices: Using cheap or old storage devices can increase the chances of your photos getting corrupted or lost.
- File System Errors: Problems within the file system of your storage device can also lead to corruption of your photo files.
By understanding these common reasons, you can take steps to prevent photo corruption and keep your memories safe.
Part 2: What is Kernel Photo Repair?
The Kernel Photo Repair software is crafted to fix corrupted or damaged photo files effortlessly. Its user-friendly design ensures that anyone can repair their photos without needing technical know-how. This versatile tool supports a variety of image formats, including JPEG, PNG, BMP, and TIFF.
The process of repairing photos with Kernel Photo Repair is straightforward. The tool scans the corrupted files, identifies the issues, and fixes them to restore the photos to their original quality. This ensures that your precious memories are saved and can be enjoyed again.
Part 3: Key Features of Kernel Photo Repair
Kernel Photo Repair boasts several important features:
- User-Friendly Interface: Easy for anyone to use, regardless of technical skill level.
- Supports Multiple Formats: Works with various image formats like JPG, JPEG, PNG, GIF, BMP, TIFF, PCX, GIFF, RIFF, RAF, TIF, NEF, and more.
- Batch Repair: Allows you to repair multiple photos at once, saving time.
- High-Quality Repair: Restores photos to their original quality without losing any details.
- Supports External Devices: Offers support for all external storage devices, including memory cards, pen drives, USB flash drives, and cameras from various brands.
These features make Kernel Photo Repair a reliable choice for fixing corrupted photos.
Part 4: Step-by-Step Guide to Using Kernel Photo Repair
Got damaged or corrupted photos? Don't worry, Kernel Photo Repair can help you fix them easily. This step-by-step guide will show you how to use the tool to restore your photos to their original quality.
Step 1. Start by downloading Kernel Photo Repair and installing it on your computer. Open the software and select the corrupted photo files you want to repair.
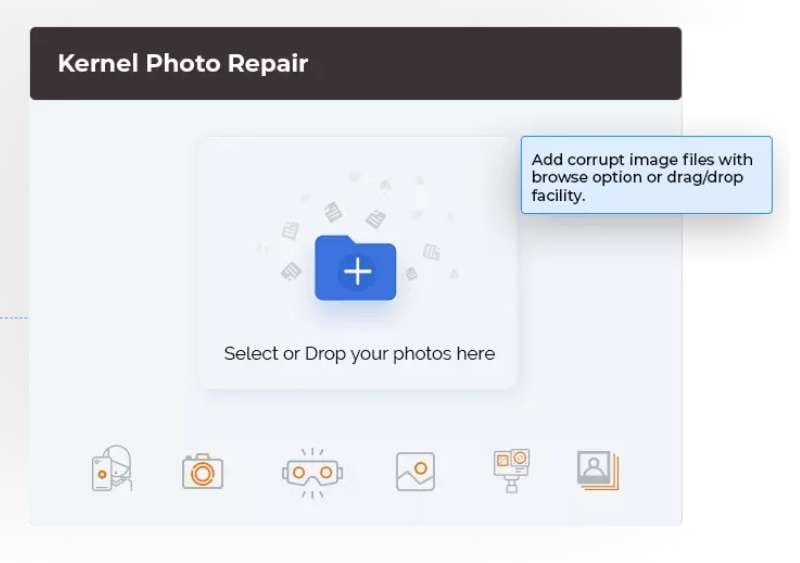
Step 2. Review the images. Let the tool analyze the corrupted photos.
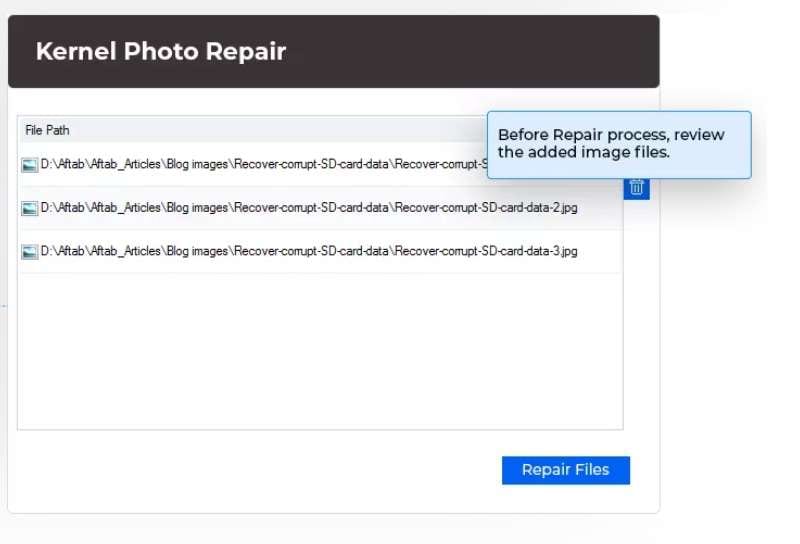
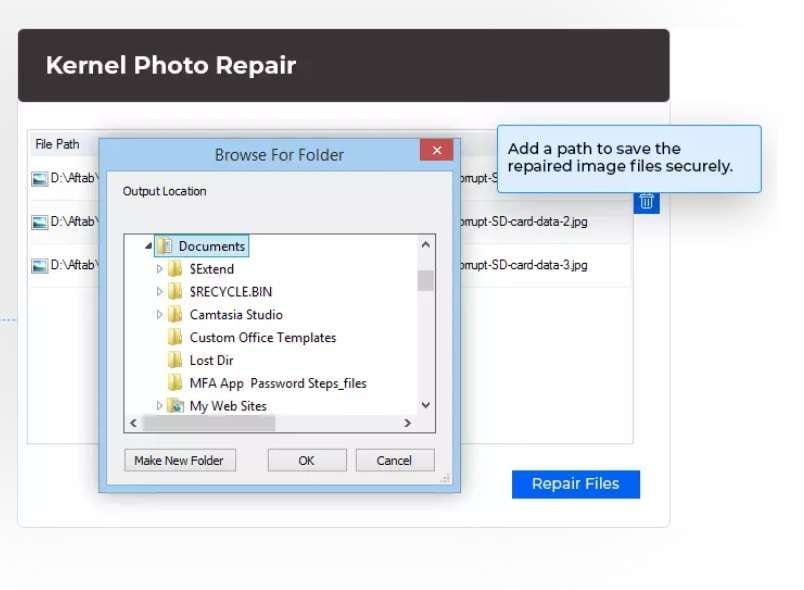
Step 3. Once the scan is complete, click on the repair button. After the repair process, save the fixed photos to your desired location.
Part 5: Best Alternative to Kernel Photo Repair: Repairit Photo Repair Tool
While Kernel Photo Repair is a great choice, Repairit Photo Repair Tool is another excellent option that many users prefer. One of the main reasons people choose Repairit over Kernel is because it processes repairs faster, which means you don't have to wait as long to get your photos fixed.
Additionally, Repairit supports more file formats, so it can handle a wider variety of photos. Users also love its modern, easy-to-use interface, which makes it simple to navigate without getting confused by technical details.
Furthermore, Repairit offers 24/7 customer support, so you can get help anytime you need it. These features make Repairit a fantastic alternative for fixing your photos quickly and efficiently.
Steps to use Repairit Photo Repair Tool:
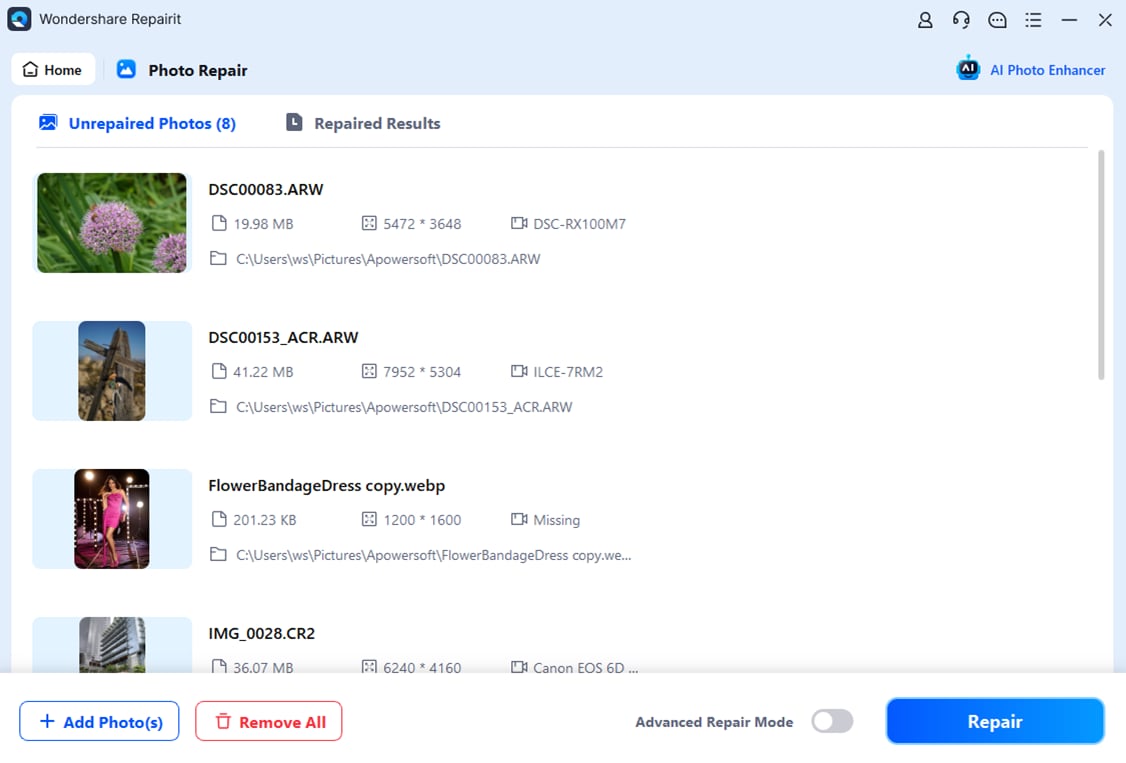
Step 1. Get Repairit from the official website and install it. Open the tool and add the photos you need to repair.
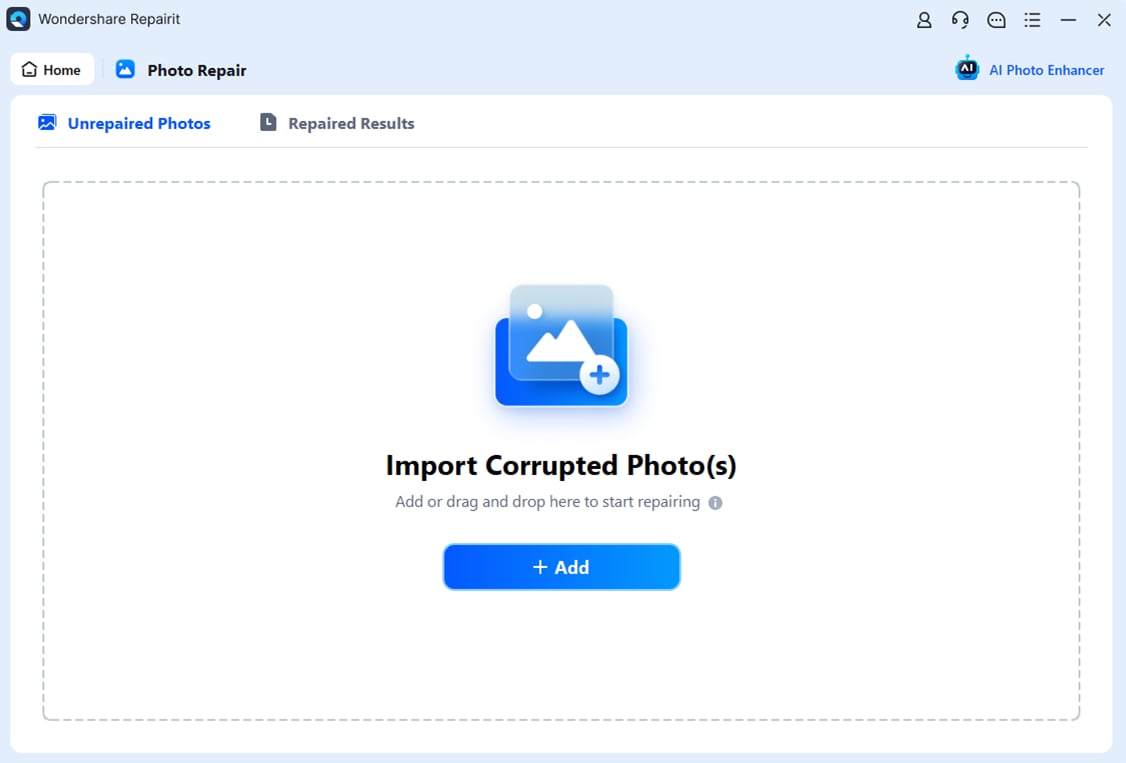
Step 2. Click the “Repair” button.
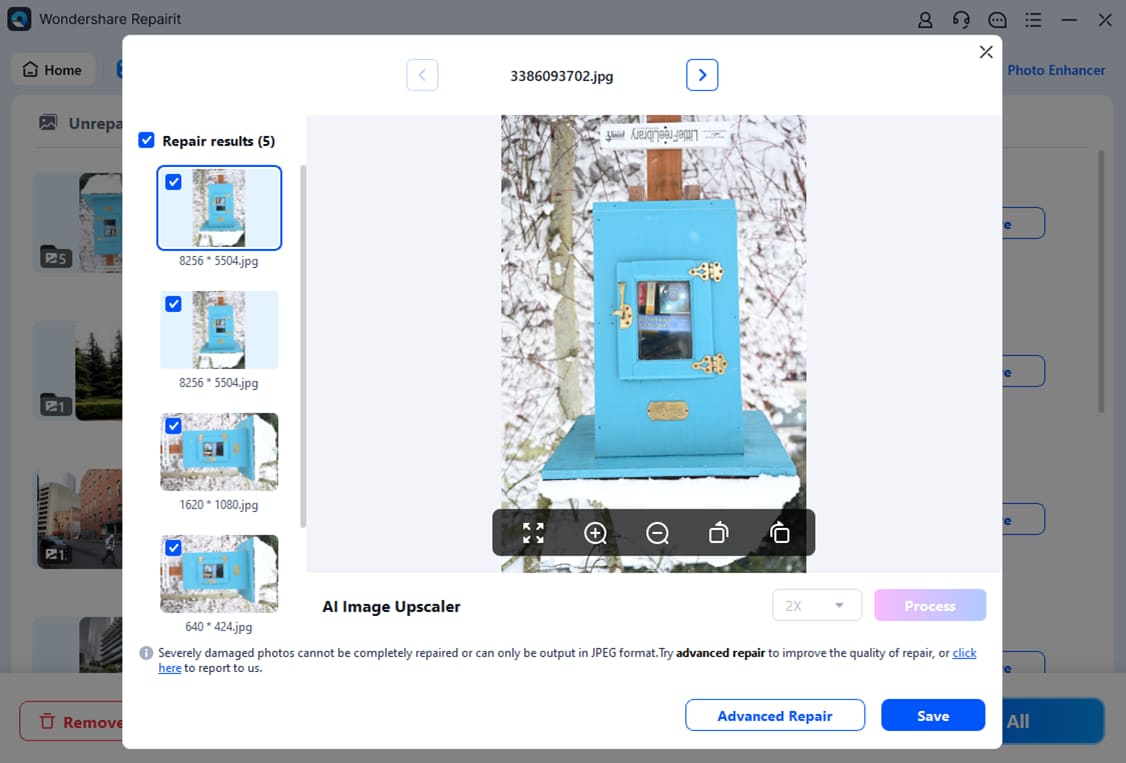
Step 3. Once the repair is done, save the fixed photos to your computer.
Part 6: Tips to Protecting Your Photos in the Future
Photos are precious memories that we want to keep safe and cherish forever. However, losing or damaging photos can be devastating. To help you avoid such heartbreak, here are some practical tips for protecting your photos in the future.
- Use Reliable Storage Devices: Invest in high-quality storage devices for your photos. Avoid using cheap or unreliable storage options as they are more likely to fail and cause data loss.
- Organize Your Photos: Keep your photos organized in folders with clear names and dates.
This makes it easier to find specific photos and ensures you don’t lose track of your files.
- Update Your Storage Devices: Replace old storage devices with new ones periodically. Over time, storage devices can become less reliable, increasing the risk of data corruption or loss.
- Protect Against Viruses and Malware: Use reputable antivirus software to protect your computer and storage devices from viruses and malware that can corrupt your photo files.
- Avoid Interrupting Transfers: When transferring photos to and from your computer or storage device, avoid interrupting the process. Always safely eject storage devices to prevent corruption.
- Store Devices Properly: Keep your storage devices in a cool, dry place to prevent damage from moisture or extreme temperatures.
- Use Reliable Photo Editing Software: Use well-known, reliable photo editing software to avoid any accidental corruption of your photos during the editing process.
- Consider Digital Photo Frames: Display your favorite photos in digital photo frames. This way, you can enjoy them without repeatedly opening the files and risking corruption.
- Stay Updated: Keep your photo storage and editing software updated to benefit from the latest features and security improvements.
By following these tips, you can better protect your photos and ensure they remain safe and accessible for years to come.
Conclusion
Photo corruption can be a real headache, but with tools like Kernel Photo Repair, you can easily fix damaged photos. This guide has walked you through understanding photo corruption, using Kernel Photo Repair, and even introduced you to an alternative tool, Repairit Photo Repair Tool.
By following the steps and tips provided, you can restore your precious memories and prevent future photo loss. Remember, regular backups and careful handling of your photo files can go a long way in protecting them.
FAQ
-
1. Is Kernel Photo Repair free?
Kernel Photo Repair offers a free trial version that lets you experience its features without any cost. However, to unlock its full capabilities and use all features without limitations, you will need to purchase the full version of the software. -
2. Can Kernel Photo Repair fix all types of photo corruption?
While Kernel Photo Repair is highly effective and can handle many types of photo corruption, it's important to note that no tool can guarantee to fix every single corrupted file. The success of the repair depends on the extent and type of damage. For very severe corruption, some files might not be fully recoverable. -
3. How long does it take to repair a photo?
The time it takes to repair a photo with Kernel Photo Repair can vary depending on the size of the photo and the extent of the damage. Typically, the repair process is quite fast, taking only a few minutes per photo. However, larger files or more severely corrupted images might take a bit longer.

 ChatGPT
 Perplexity
 Google AI Mode
 Grok
Grok

