

 TL;DR:
To import an OST file into Outlook 365, you must first convert it into a PST file using Outlook's native features, and then migrate the resulting file via Azure AzCopy network upload or Microsoft's physical drive shipping service.
● You can convert the OST file to a PST format by exporting it via the Import/Export wizard, copying the mailbox items into a newly created Outlook Data File, or utilizing the built-in Archive cleanup tool.
● Migrating the PST file over a network using Azure AzCopy requires Exchange Admin center access with Mailbox Import/Export permissions, an SAS URL, and a properly configured CSV mapping file to validate the data.
● The Drive Shipping method costs $2 USD per GB and strictly requires individual PST files to be under 20GB, which must be sent on a 2.5-inch SSD or 2.5-3.5-inch SATA II/III internal hard drive up to 10TB in size.
Ask AI for a summary
 ChatGPT
 Perplexity
 Gemini
 Claude
 Grok
Grok
Do you have an OST file from another Outlook email client address that you need to access? It is preferred that you should import the specific OST file across Outlook 365 to find the mailbox items that may have something important for you to see.
This, however, is not as simple as it sounds. To figure out how to import OST file in Outlook, you need to go through the provided guide and methods for executing it successfully.

Part 1: Why Should You Import Your OST to Outlook 365
There are many problems in being an Exchange user. Being a user from the professional fraternity, people recommend keeping their records across Office 365 under unconventional circumstances. These are also some important reasons why you should shift from Exchange to Outlook 365. Go through these reasons to know the significance of importing OST to Outlook 365:
- Users who encounter some Exchange crashes require a reliable platform to keep their data secure.
- OST files are smaller in size compared to the file size offered by Outlook 365.
- Exchange maintenance downtime can prevent the user from working across it, making them lose a lot of time.
- Outlook 365 has been reportedly mentioned as a better platform with impressive UI compared to Exchange.
- There are better security features across Office 365 which preferably makes it better to shift OST to Outlook 365.
Part 2: 3 Effective Methods to Import OST File In Outlook
Importing OST files across Outlook 365 goes around a long line. If you wish to import OST file into Outlook 365, it is necessary to convert your OST file into PST, which can then be migrated into Outlook 365 easily. This, however, can be executed through multiple techniques. This part discusses three different approaches that can be considered to convert OST files to PST.
Method 1: Creating a New File and Copying OST File Items
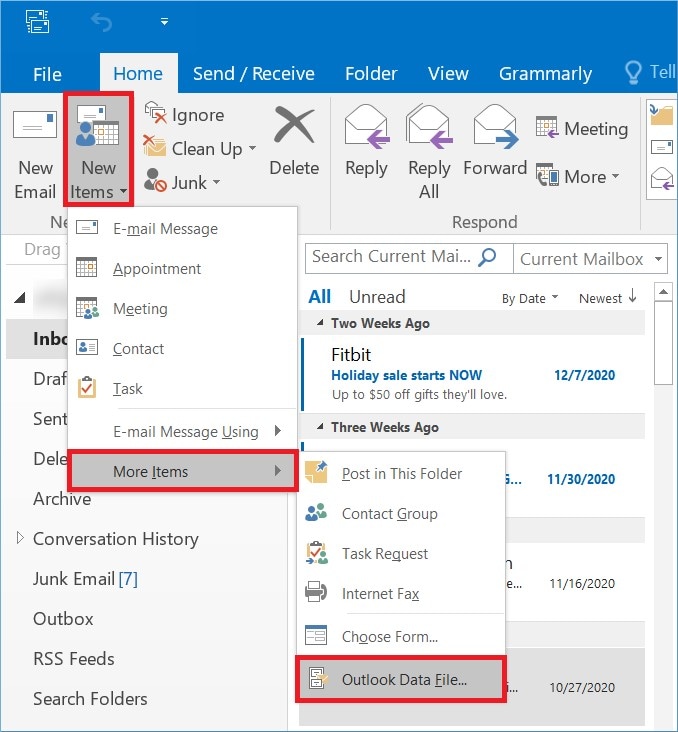
Step 1: Open Outlook for Windows on your computer and click "New Items" from the Home menu. Select "More Items" in the drop-down menu and choose "Outlook Data File" in the protruding menu.
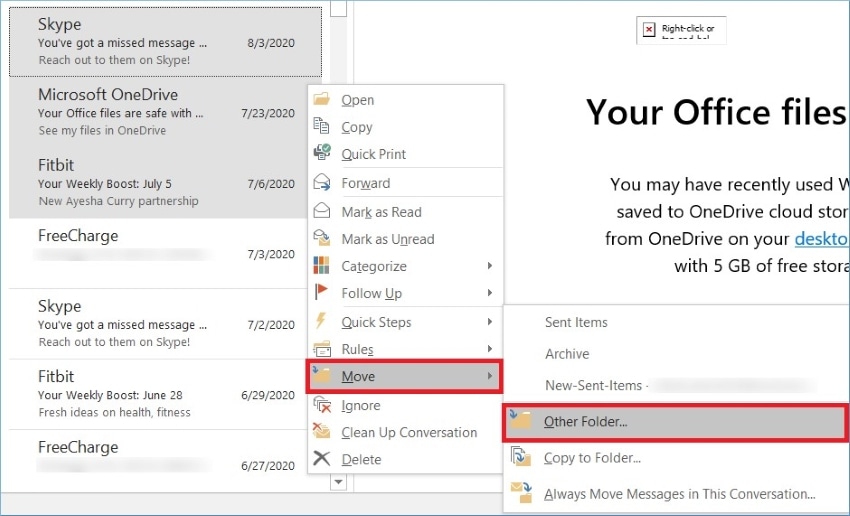
Step 2: Once you’ve created a PST file, select the emails across the platform and right-click on them to select the option of “Move.” Click the option of “Other Folder” in the menu appearing next.
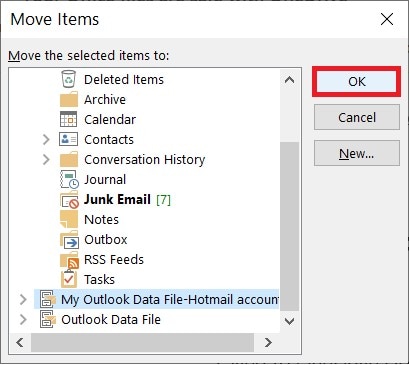
Step 3: Select the PST data file you've recently created in the next pop-up window and click "OK." You've successfully copied OST file items within the new PST file.
Method 2: Utilizing the Archive Feature
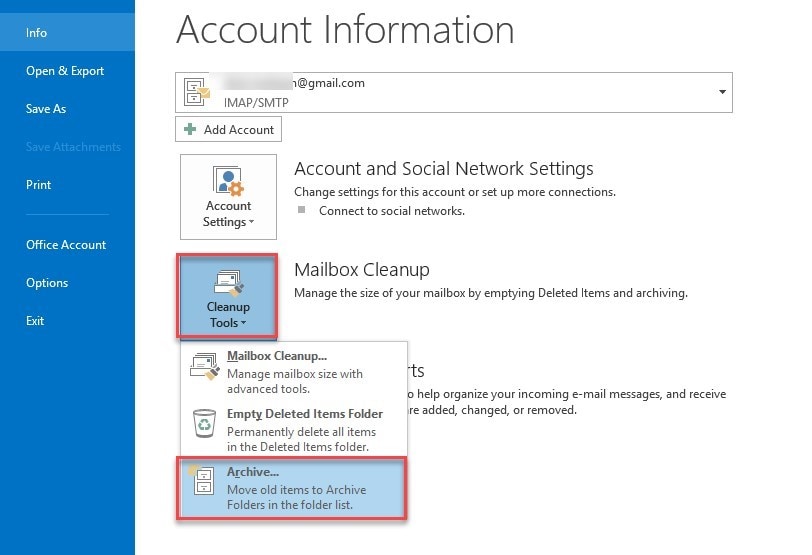
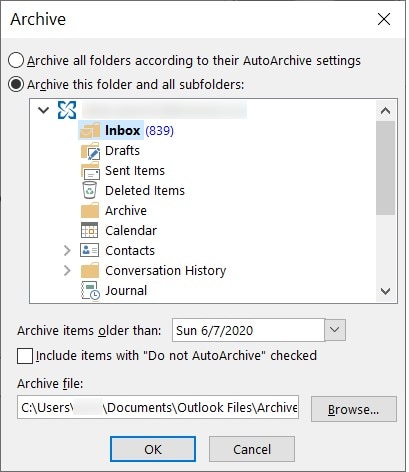
Step 1: The second method involves users going into the “File” tab from the top-most menu. Proceed to the “Info” section and discover the “Cleanup Tools” option in the list. Select “Archive” from the drop-down menu.
Step 2: On the next screen, you need to select all the files and folders to be archived in the process. Outlook offers you to select the files based on their dates too across the "Archive items older than:"
Step 3: Set a location for the archive file and click "OK" to execute the process of converting the OST file to PST.
Method 3: Exporting PST File from Outlook
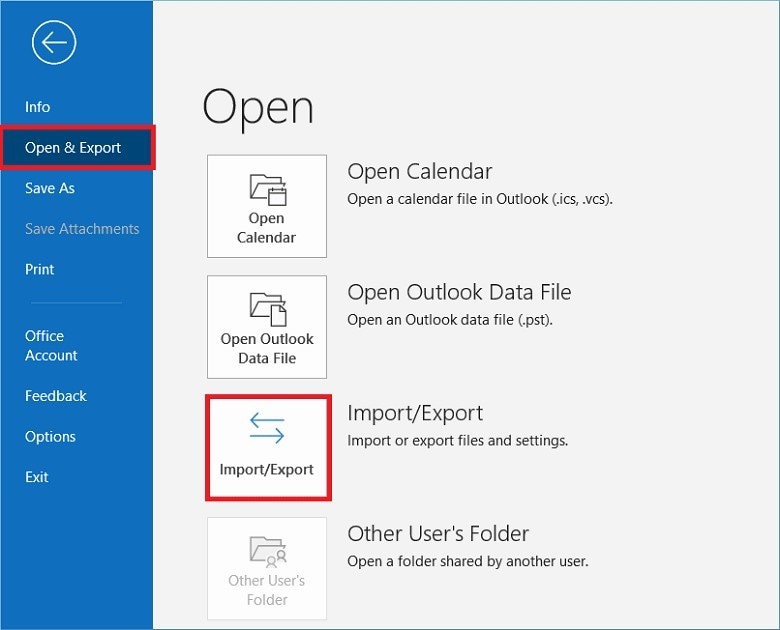
Step 1: Access the "File" tab after turning on Outlook on your computer. Proceed to the "Open & Export" option on the left-hand column. Click on the "Import/Export" option on the adjacent window.
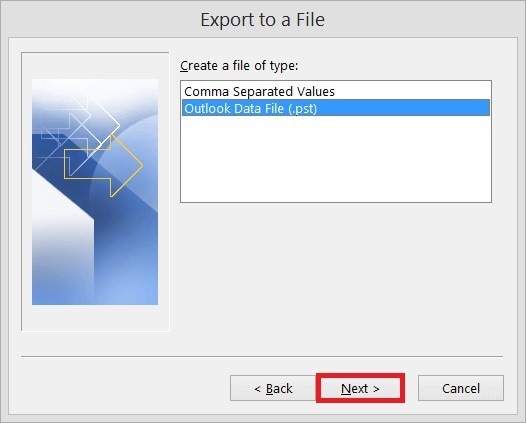
Step 2: For the next window, select “Export to a file” and click “Next.” You will have to select “Outlook Data File (.pst)” on the next screen to specify the file format. Click “Next.”
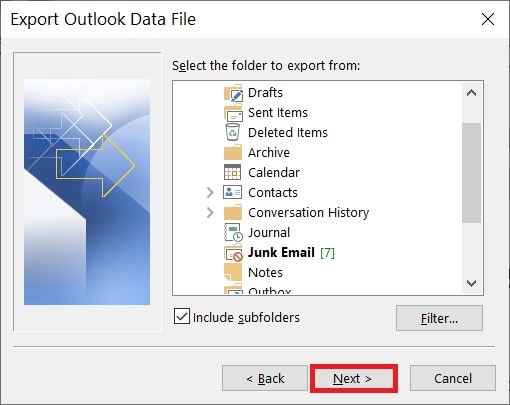
Step 3: Select the folders and files to be exported as PST files. Once done, click on "Next."
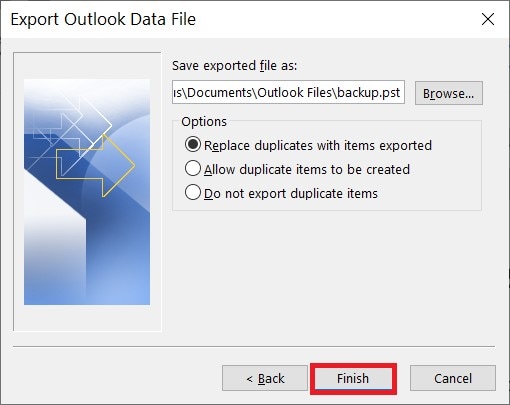
Step 4: Set the location of the PST file and figure out an appropriate option for duplicate items on the PST file. Tap "Finish" to export the PST file from Outlook.
Here is a video guide to tell you how to import OST file in Outlook.
Part 3: 2 Methods to Migrate PST File into Outlook 365
Once you have converted your OST file to PST, it is now time to migrate it into Outlook 365. This is how you will be able to understand how to import OST File in Outlook 365 successfully. For this part, we shall be focusing on two unique methods that essentially migrate the PST file into Outlook 365.
Method 1: Uploading using Azure AzCopy
Step 1: You need to log in with your Microsoft Office 365 account and proceed into the Exchange Admin center. Lead into the “Permissions” section and click on “Organization Management.”
Step 2: Click on the “+” sign and select “Mailbox Import/Export.” You need to continue this process by clicking “Add,” followed by “OK.” To save the settings, select “Mailbox Import/Export” again and hit “Save.”
Step 3: Lead into the "Admin Center," click on "Setup," find the option of "Data Migration." Press the "Upload File" button to proceed into the "New Import Job" option on the screen. Enter the Job Name and click "Next."
Step 4: You will need to mark the checkbox of “Upload your Data” and click on “Next.” This will open a new window on the screen. Click on “Show Network Upload SAS URL” to copy the URL that appears on the window.
Step 5: Download the latest version of Azure AzCopy software and launch it on your computer. Type the following code and press the "Enter" key for importing the PST file to Office 365.
AzCopy.exe /Source: \Network Path or File location /Dest:”Enter SAS URL”/V: location path where you want to save log file /AzCopy.log /Y
Step 6: Once you’ve uploaded the PST File, you need to create the PST import mapping CSV file. Open the imported data to select both offered options and click “Next.” Select the “Select Mapping File” option for highlighting the newly created CSV file and press the "Validate" button. Click on "Save" to successfully apply all steps to import the PST file in Outlook 365.
Method 2: Drive Shipping PST Files to Office 365
Another impressive option to understand how to open OST file in Outlook 365 is through Drive Shipping to Microsoft. This can easily help users import their PST files to Outlook 365. The process simply involves copying the files to a hard disk drive which is sent to Microsoft. The data sent to Microsoft will be copied and pasted across the cloud that can then be accessed across Outlook 365.
To understand more about the process, there are a few things involving Drive Shipping. Users owning large PST files should divide them according to their needs. The files copied across the hard drive should not extend the size from 20GB as this hinders the overall performance. Along with that, 2.5-inch SSDs or 2.5-3.5 inch SATA II/III internal hard drives are supported for the import service. The hard drives can go beyond 10TB in size.
While understanding the limitations of the Drive Shipping service, you should also take into notice that the cost to import PST files s $2 USD per GB of data. You should consider opting for this method after looking through these guidelines for drive shipping.
Bonus Part: Repair Your Corrupted PST/OST Files with Outlook Repair Tool
While going through the process as explained above, you might face issues with corrupting your PST/OST file. To prevent it from becoming tedious, it is advised that you should consider trying a third-party tool that essentially repairs the file from scratch. Wondershare Repairit for Email is a tool preferred in the market for repairing PST Files easily.
The platform is known for its simple, easy, and effective process of repairing files. Along with that, the tool is known for providing batch processing services to users for repairing multiple PST/OST Files, if required. Building a very strong compatibility system for the supported platforms, the tool is preferred by many users in the market for its accessibility.

-
Repair damaged PST & OST Files in Outlook in all Email corruption scenarios, such as hard disk crashes & bad sectors, virus attacks & tojan horse, outlook corruption & malfunctions, improper shutdown procedure, etc.
-
Restore Outlook Emails deleted for a long time and extract the Email messages, folders, calendars, etc. within seconds.
-
Repair corrupted Emails and restore deleted Emails with a very high success rate.
-
Repair Emails in bathes without size limits and support to preview all of them before saving.
-
Compatible with Windows 7/8/8.1/10/11, Windows Server 2012/2016/2019, and MacOS X 10.11~ MacOS 12 (Monterey).
Conclusion
This article exclusively provides some essential methods that explain how to import OST file in Outlook. Users who are looking forward to shifting their email client to Outlook 365 can definitely figure out the process after going through the provided methods.
These methods, if utilized properly, will help you shift to the platform of your choice. If the PST files get corrupted during the process, you always have the option of going to Repairit for Email for a successful repair.