“How to Convert HEIC to JPG on iPhone”? Apple chose HEIC for its advanced compression, offering smaller file sizes without compromising image quality, often outperforming JPEG/JPG. It provides more visual quality for your storage space.
So, why convert HEIC to JPG? Despite HEIC's efficiency, practical reasons exist to use the universally recognized JPG format. This guide will help you understand HEIC's advantages and the best ways to convert it to JPG.
In this article
Part 1. Why Change iPhone HEIC to JPG?
HEIC stands for High-Efficiency Image File format, developed by Apple. This format supports 16-bit color. Hence making images clearer and brighter even after multiple edits.
Since iOS 11 (2017), Apple has adopted HEIC to help users manage storage more efficiently. HEIC's modern compression technology reduces file size, preventing your device's memory from filling up quickly.
Here is its comparison between JPG formats:
| Feature | HEIC | JPG |
| Compression | Efficient, modern compression; retains quality | Lossy compression; quality degrades with edits |
| Storage Space | Takes up less space; uses up to 50% less storage | Larger file size |
| Image Quality | Higher quality with transparency and dynamic range | Lower quality; no transparency |
| Compatibility | Less compatible; mainly used on Apple devices | Highly compatible; works on most devices and software |
| Editing Support | Limited, not all editors support HEIC | Broad support, widely accepted by editing tools |
| Sharing | May require conversion for compatibility | Easily shareable without conversion |
Despite its advantages, HEIC is not always compatible with Windows, Mac, and other devices. So many users convert HEIC to JPG for broader accessibility and editing.
Fix corrupted photos across various formats, including HEIC, JPEG, PNG, JPG, CR3, CR2, NEF, and more. It allows users to restore damaged photos while maintaining their quality, offering a quick and efficient solution for photo recovery.

Part 2. How to Change HEIC to JPG on iPhone Using iPhone’s Files App?
Using the Files app, you can easily convert HEIC to JPG on your iPhone. This built-in iOS feature lets you easily change your photos from HEIC to JPG. It’s a convenient and effective solution without needing third-party software.
Here's how:
Step 1: Access the Files app on your iPhone or iPad.
Step 2: Select On My iPhone or cloud storage under the Locations tab.
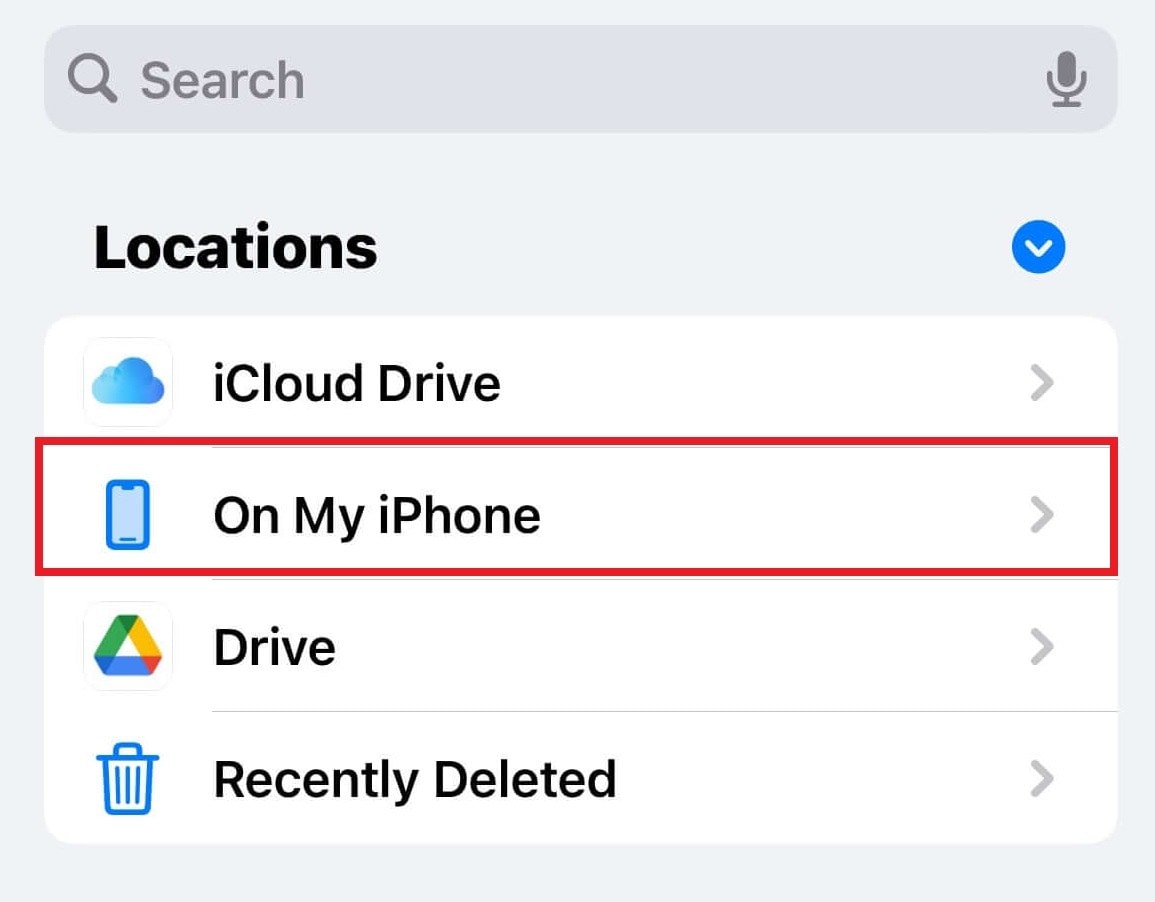
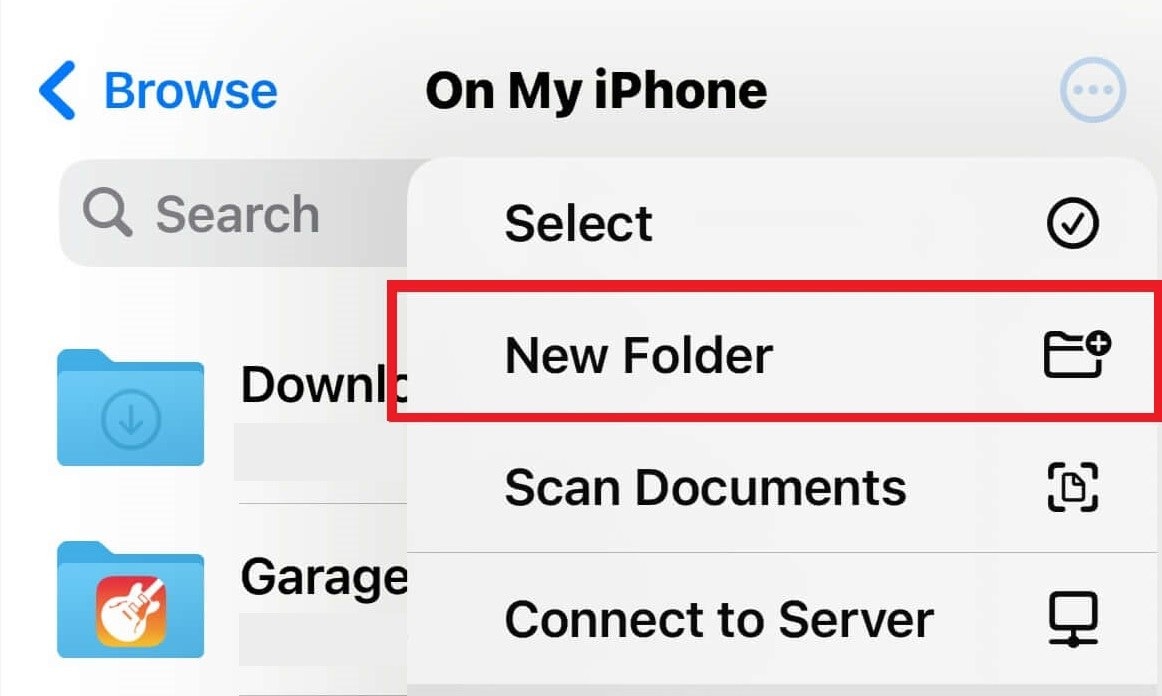
Step 3: Press and hold in an empty area and select New Folder to create a new folder.
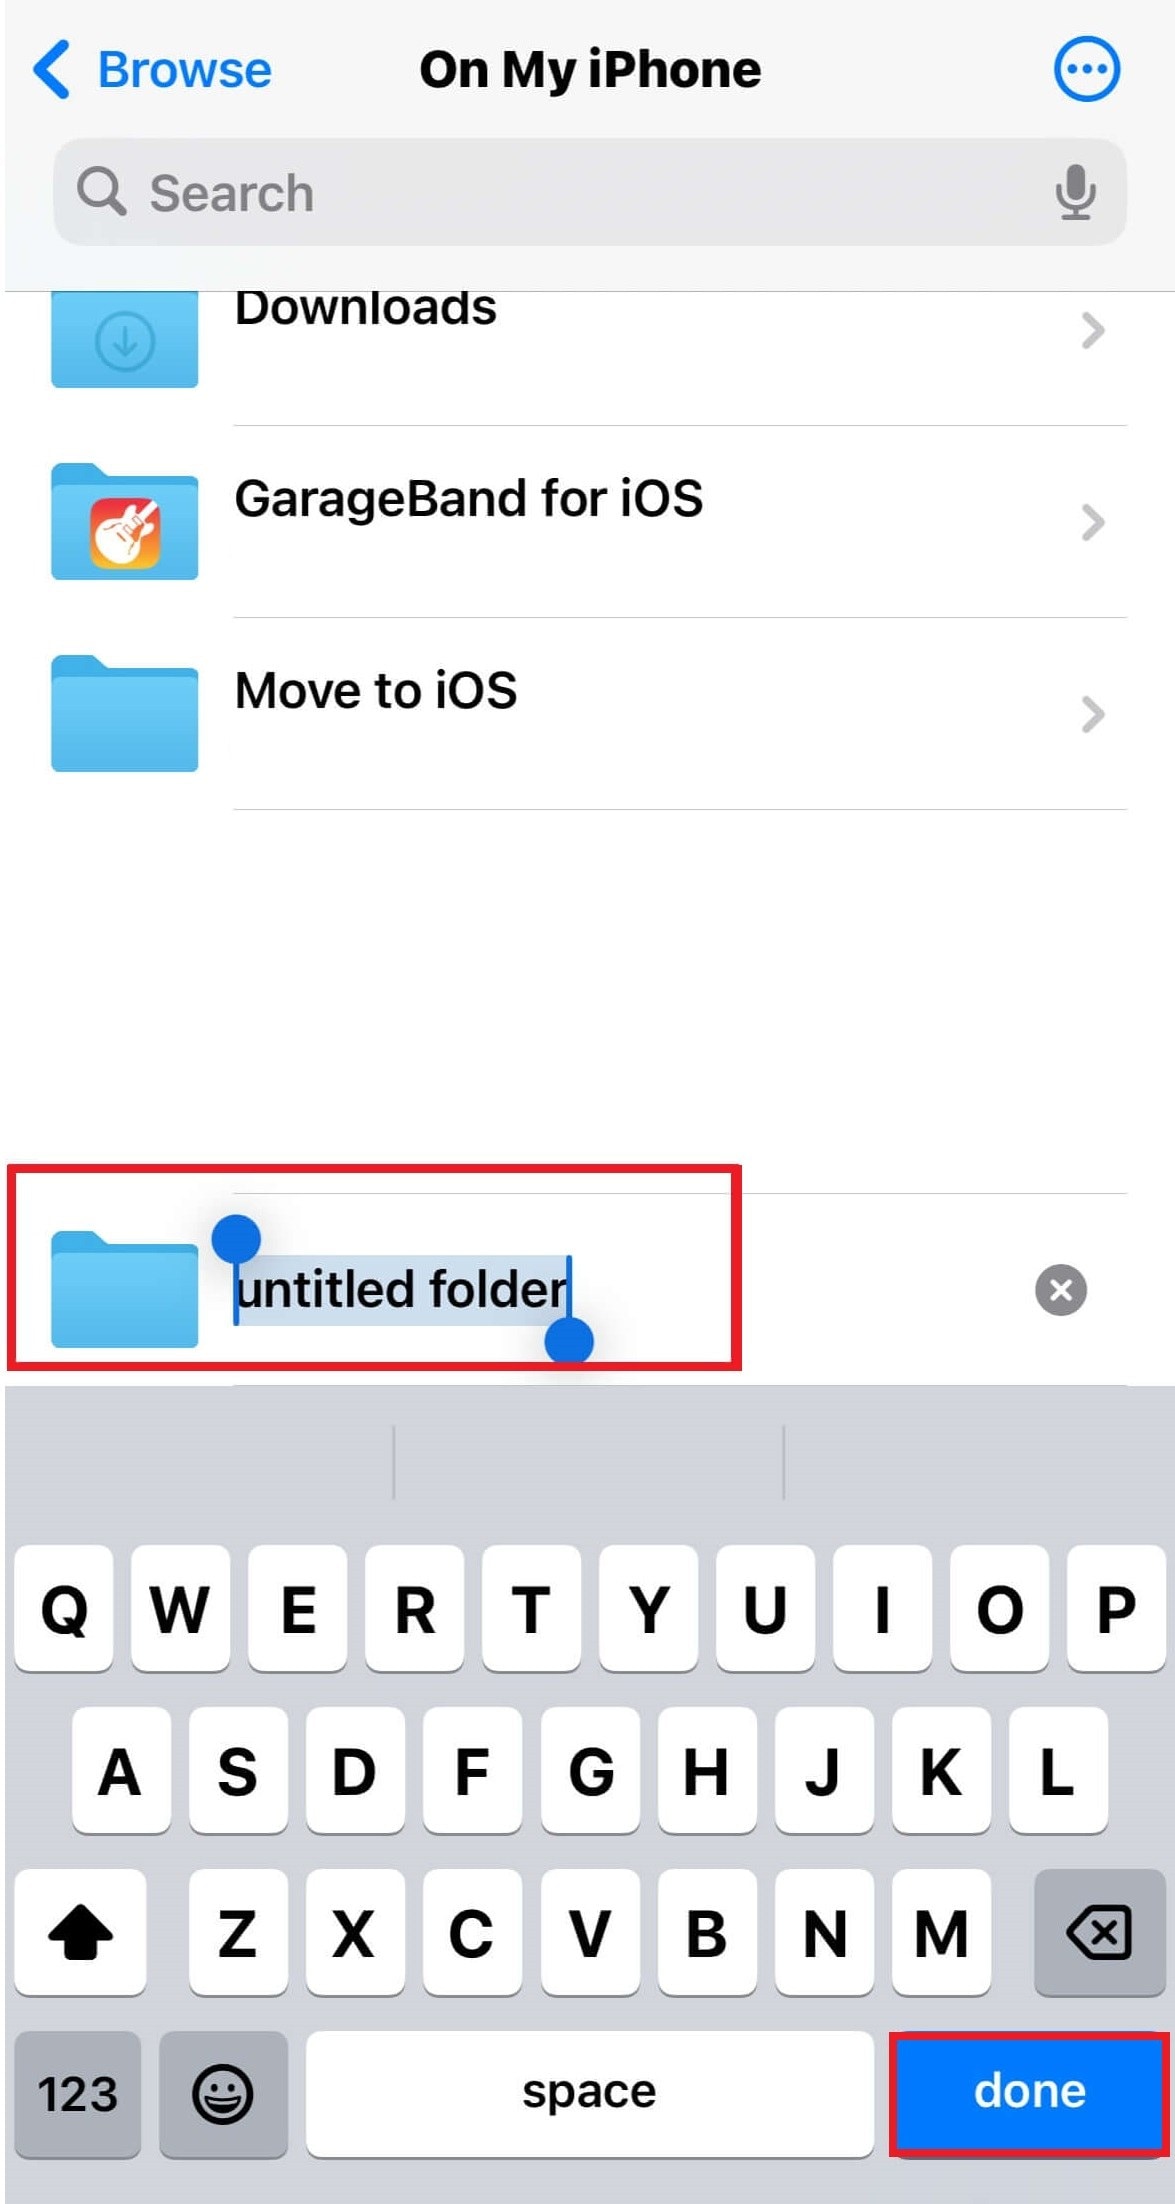
Step 4: Name the folder and tap Done.
Step 5: Go to Photos and navigate to the album with the HEIC photos.
Step 6: Tap Select in the top toolbar and choose the photos you want to convert.
Step 7: Tap Share in the bottom-left corner and select Copy Photos.
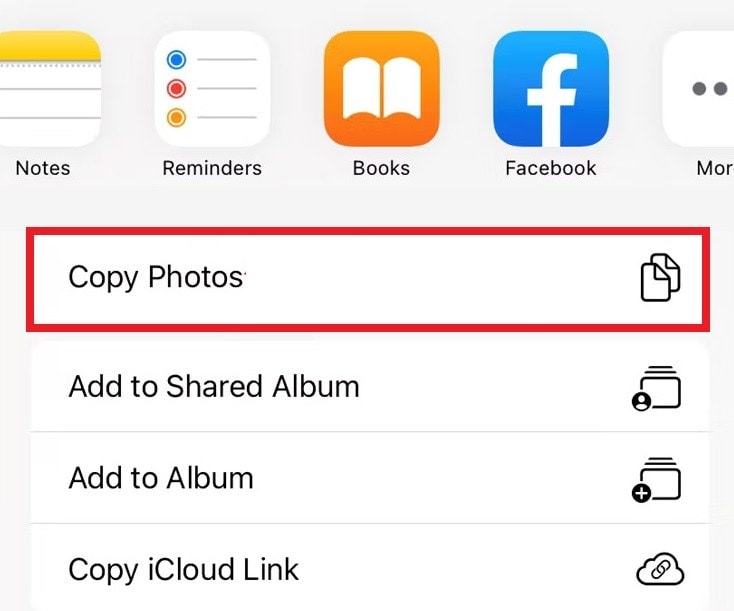
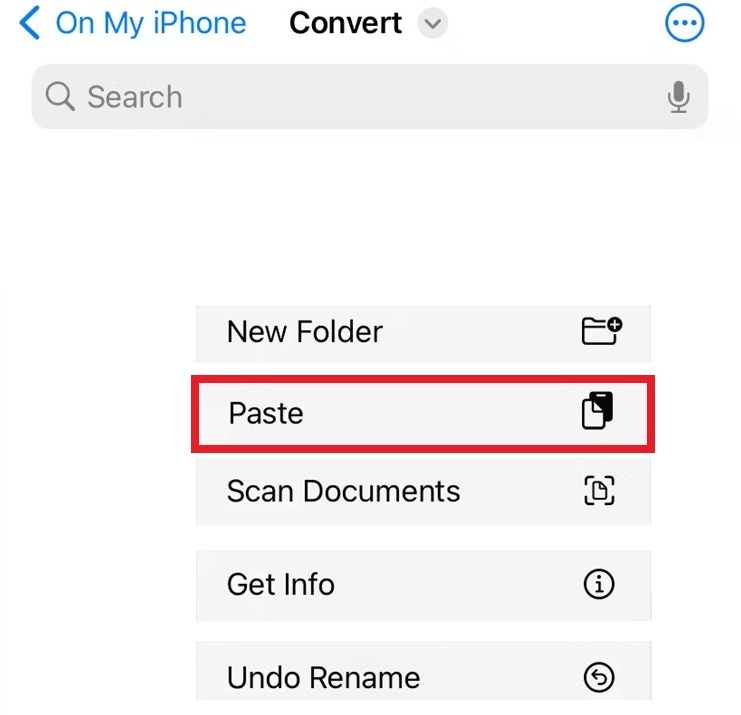
Step 8: Return to the Files app, navigate to the new folder, press and hold in an empty area, and choose Paste.
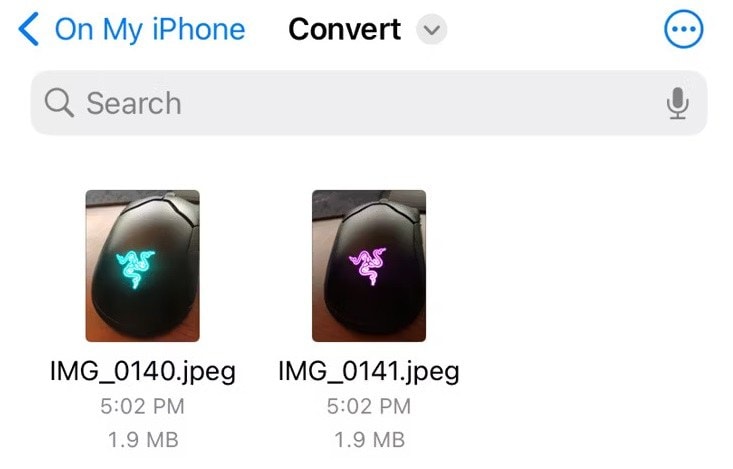
Step 9: Your HEIC photos will now appear in the folder as JPG files.
Part 3. How to Change iPhone HEIC to JPG Through Email?
Another easy method involves sending the HEIC photos to yourself through email. This simple and effective method utilizes your device's native features. By sending HEIC photos via email, you can automatically convert them to the widely compatible JPG format.
How to do this? Follow these steps:
Step 1: Choose the HEIC photos you want to convert to JPG from the Photos app.
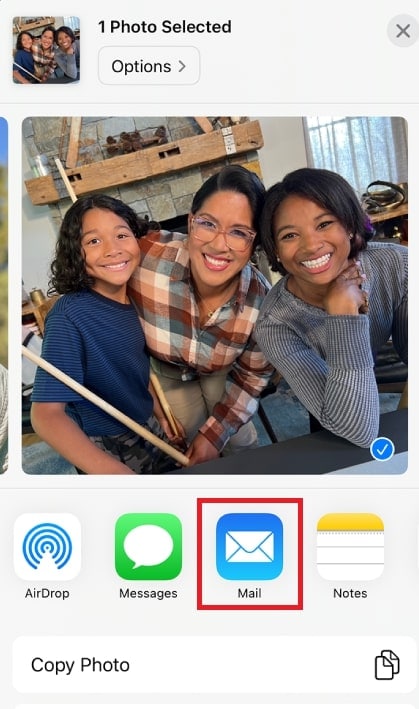
Step 2: Tap the share icon (a square with an upward arrow). From the share options, select the Mail app.
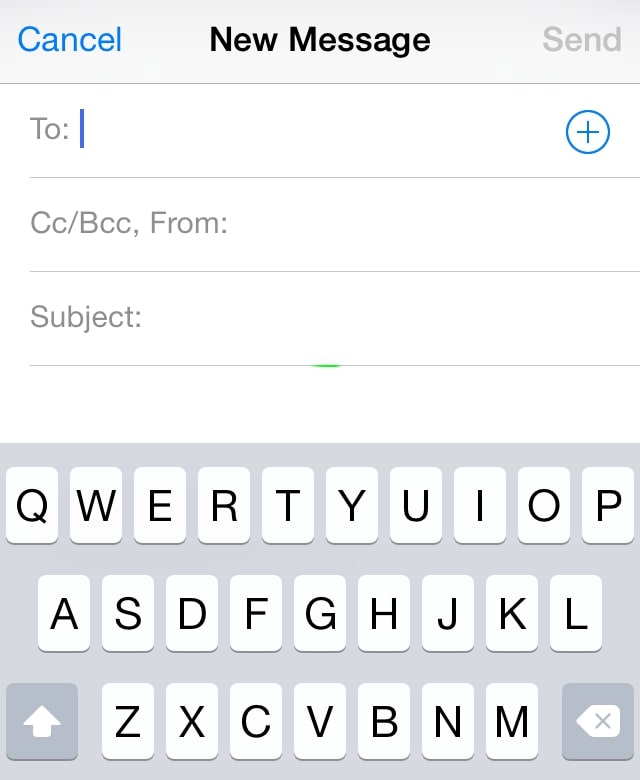
Step 3: A new email draft will open with the selected photos attached. Enter the desired email address in the recipient field and send the email.
Step 4: Open the sent email on your iPhone or another device.
Step 5: Download the attached photos from the email. They will now be in JPG format.
Part 4. How to Convert HEIC to JPG on iPhone Using HEIC to JPG Image Converter?
You can easily change HEIC to JPG on your iPhone using an online HEIC to JPEG converter. These tools are convenient and don’t require extra app installations, allowing you to convert photos directly from your browser. For a reliable and free option, try heictojpg by JPEGmini. This simplifies the process of changing HEIC files to JPG.
This tool offers a straightforward process. Take a look at the steps below:
Step 1: Click the “+” button to add the HEIC files online.
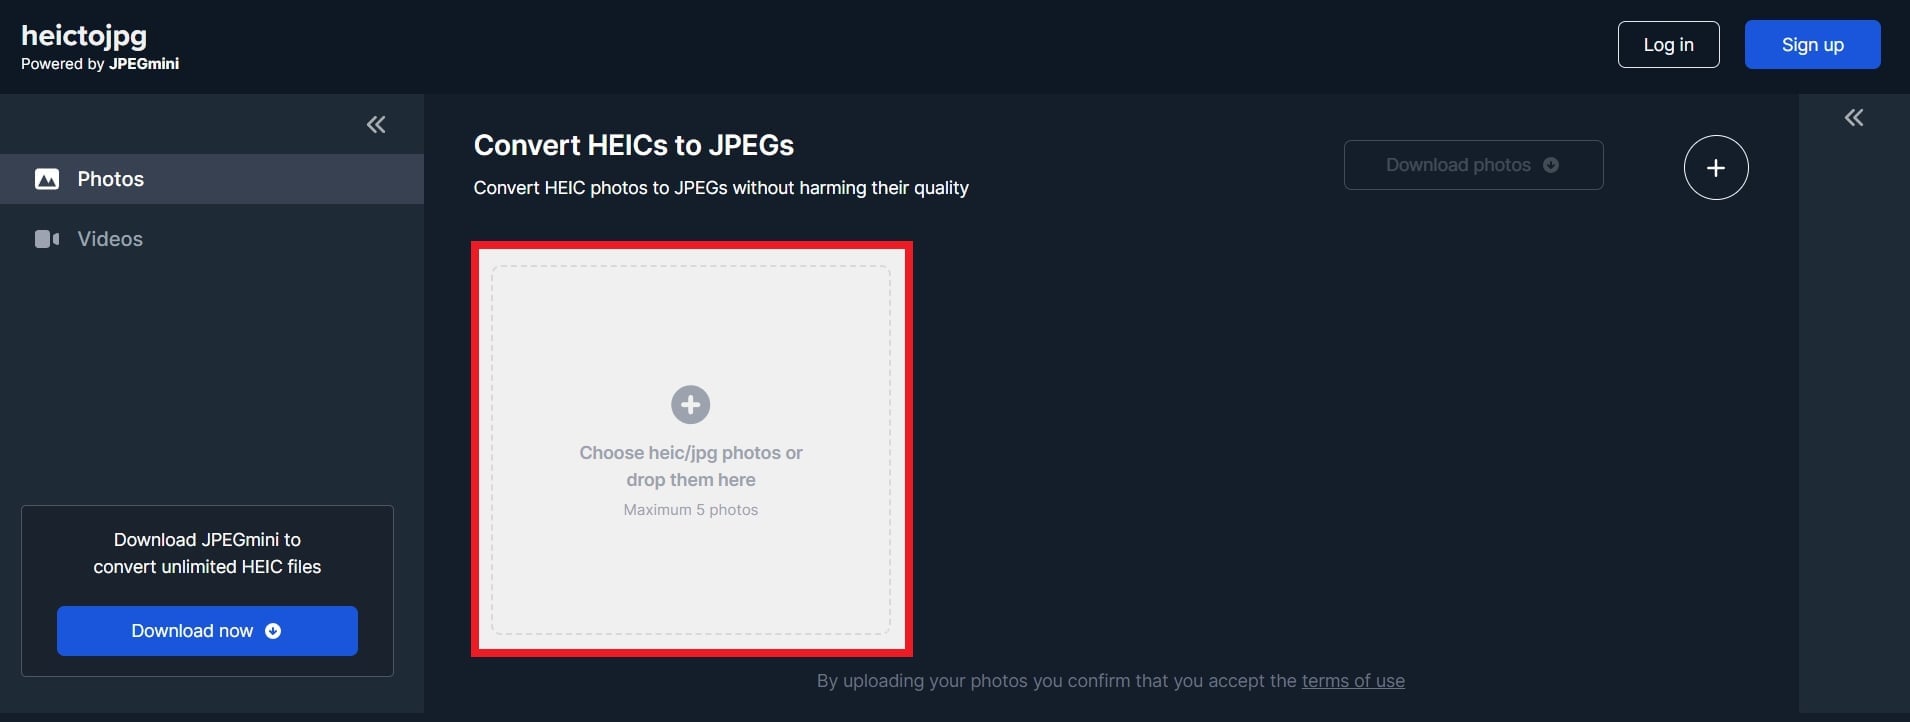
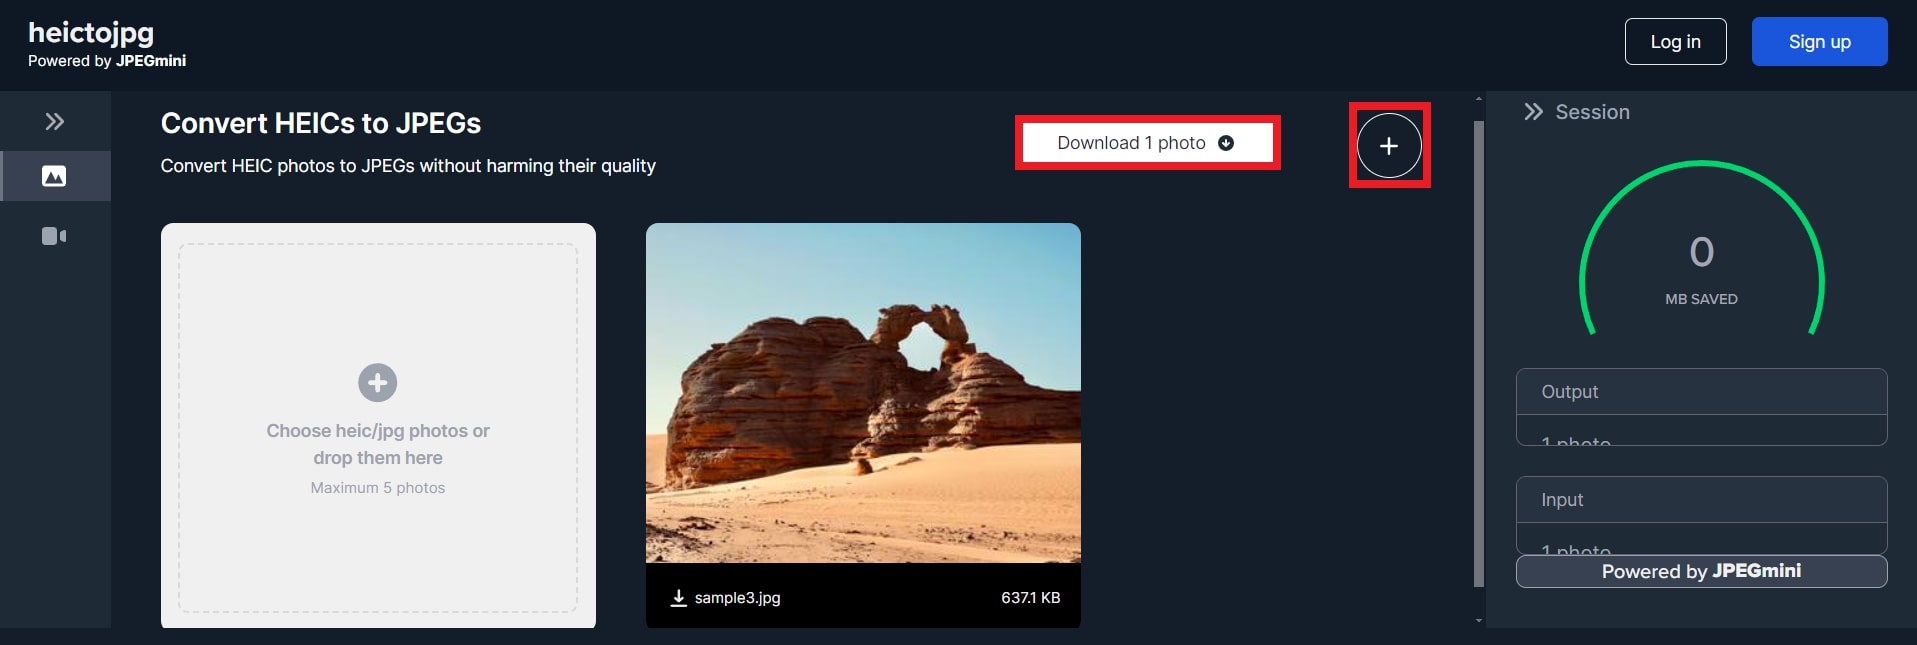
Step 2: The tool will start the conversion process immediately.
Step 3: Click Download 1 photo to save the converted file. You can convert more by adding the “+” button beside it.
Part 5. How to Repair HEIC and JPG Files?
Digital photos in HEIC and JPG formats are popular due to their high quality and efficient compression. However, they can become corrupted due to abrupt power failures, unexpected system shutdowns, improper file transfers, malware attacks, or storage media errors. Corrupted files often become inaccessible, risking the loss of important images on your iPhone.
To fix these issues, Repairit Photo Repair is a highly recommended tool. This desktop application now supports repairing HEIC and JPG images on your Mac systems. With its user-friendly working interface and powerful repair capabilities, Repairit Photo Repair can help you recover your precious images quickly and efficiently.
Key Features:
- Repairit is highly regarded for its ability to repair damaged and corrupted HEIC & JPG files without modifying the original data.
- Repairs photos with all levels of HEIC & JPG file corruption, including grainy, dark, pixelated, and faded photos.
- Repairs HEIC & JPG photos from SD cards, phones, cameras, USB drives, etc.
- Offers quick and advanced HEIC & JPG file repair modes based on the corruption level.
- No limit on the number and size of repairable photos.
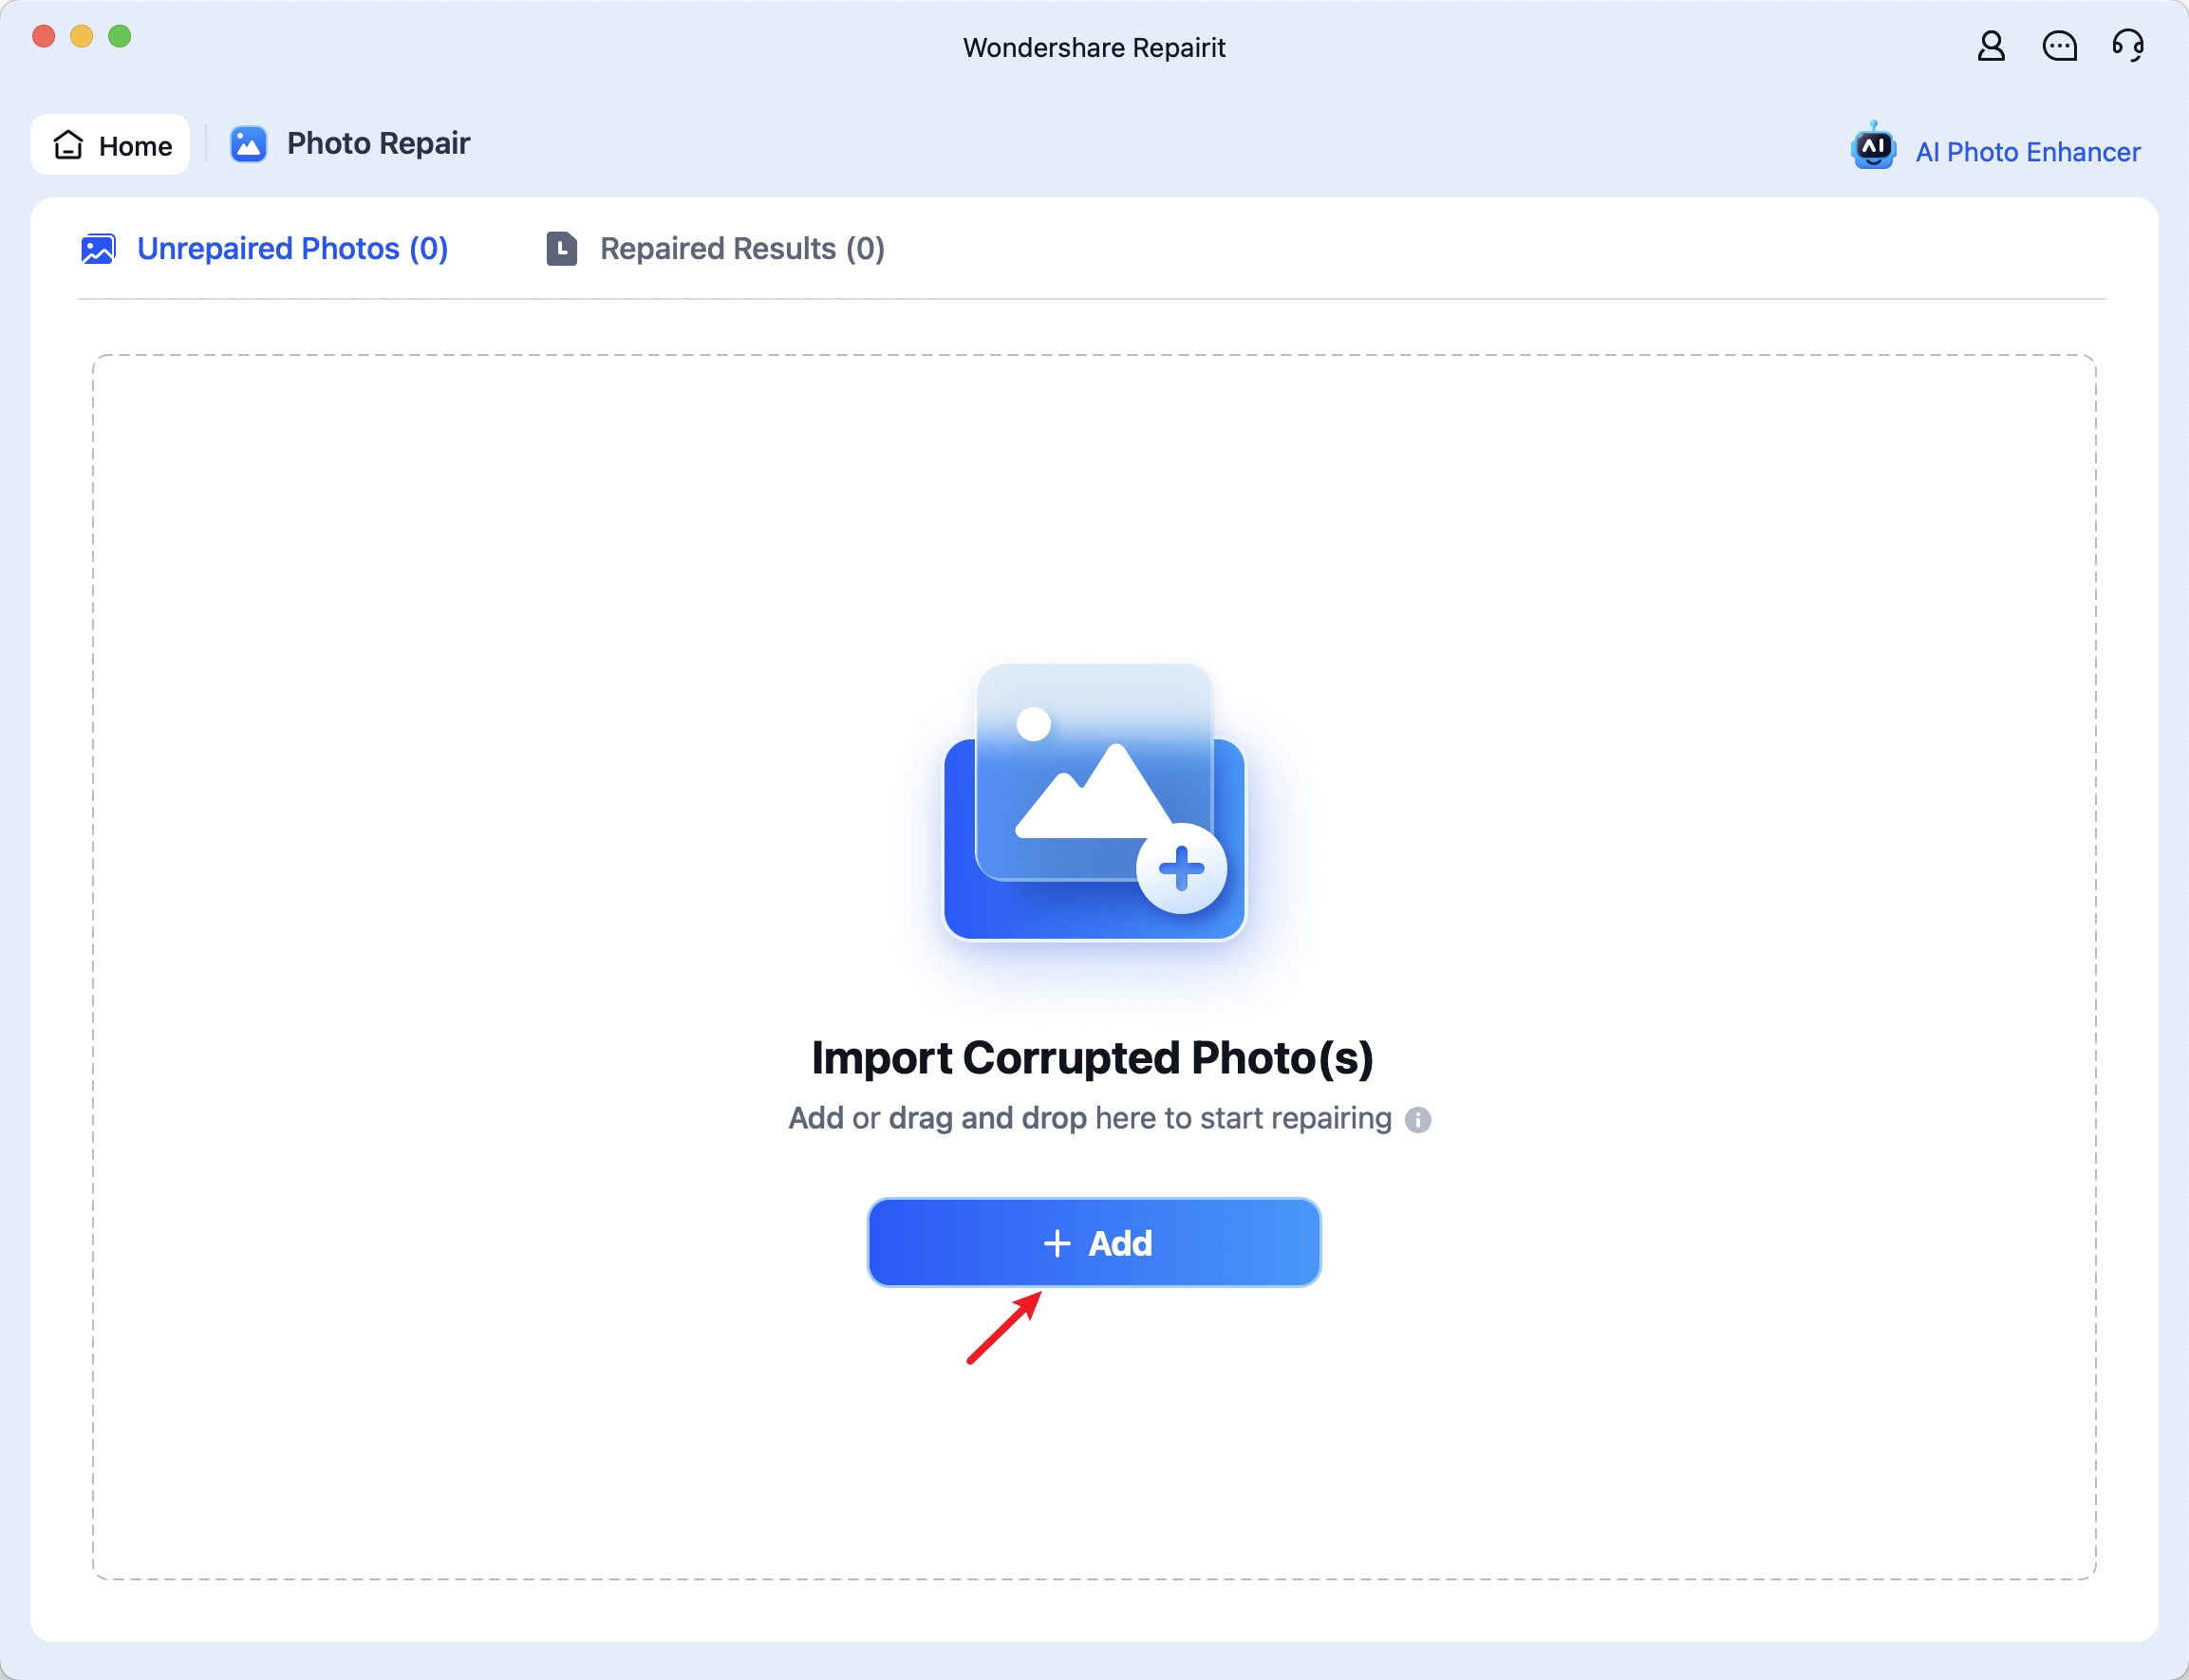
Step 1: Launch Repairit and select Photo Repair from the More Types Repair section. Click Add to upload your corrupted HEIC and JPG photos.
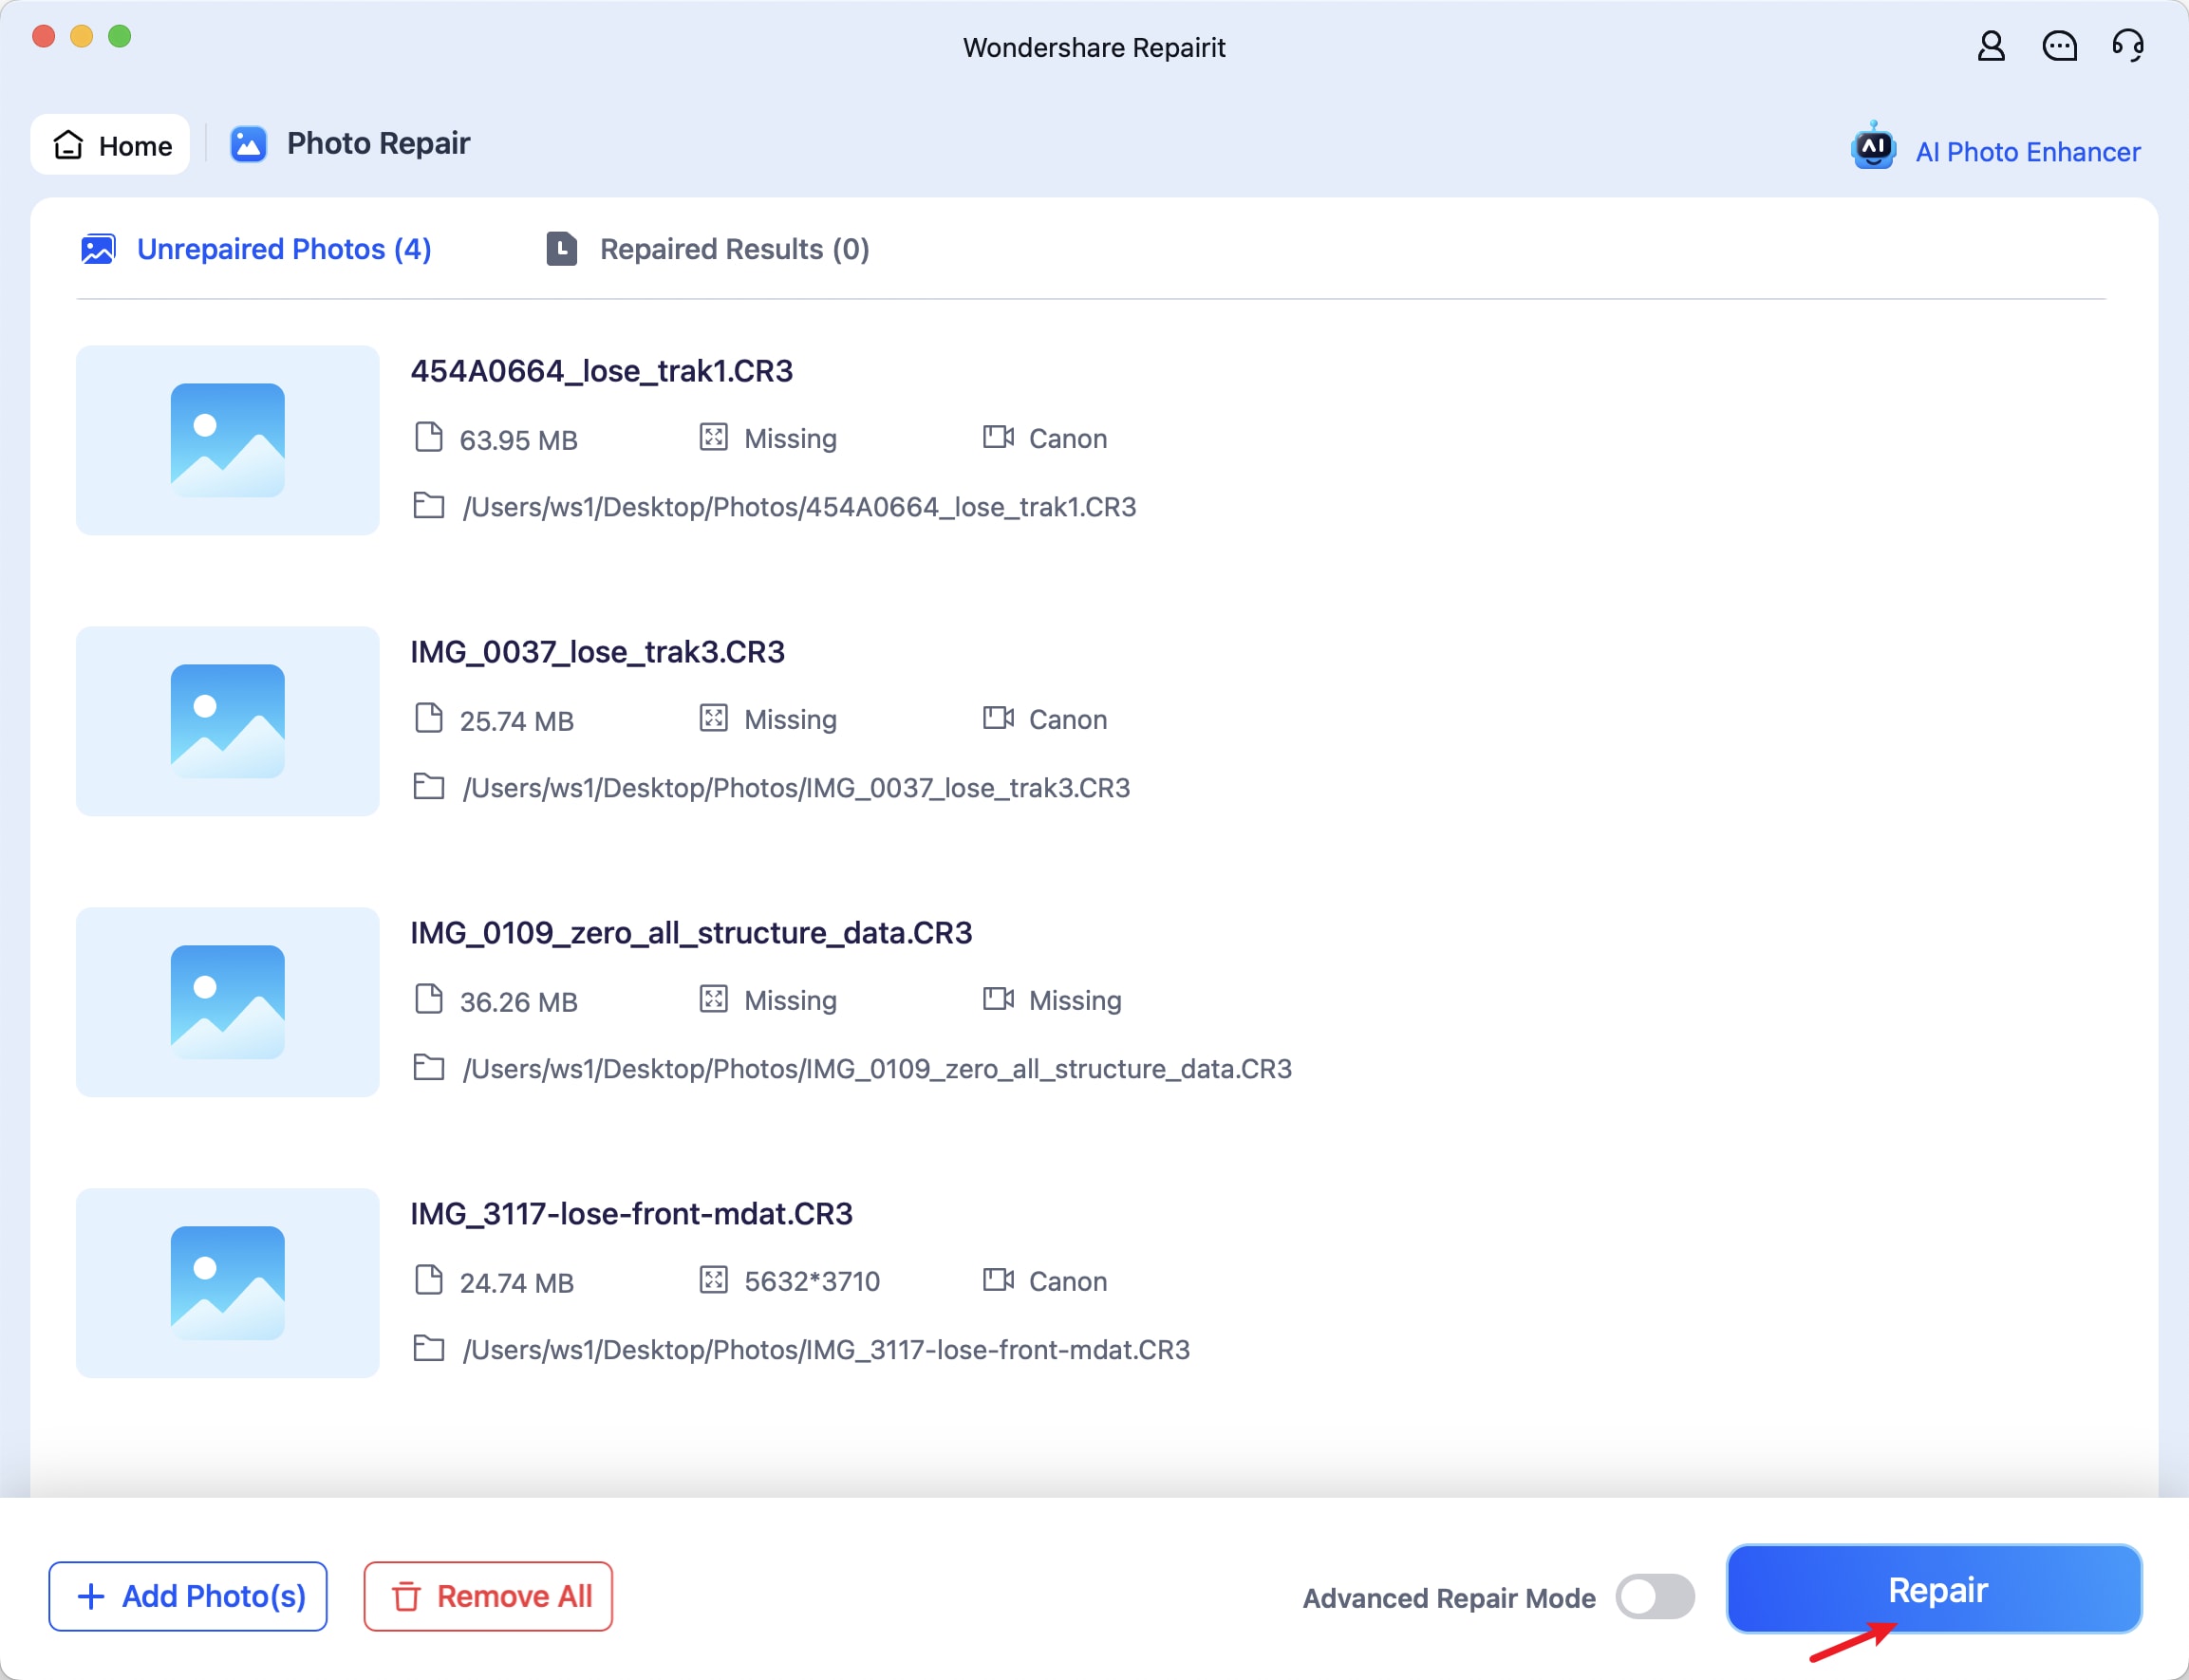
Step 2: Click the Repair button to start fixing the photos.
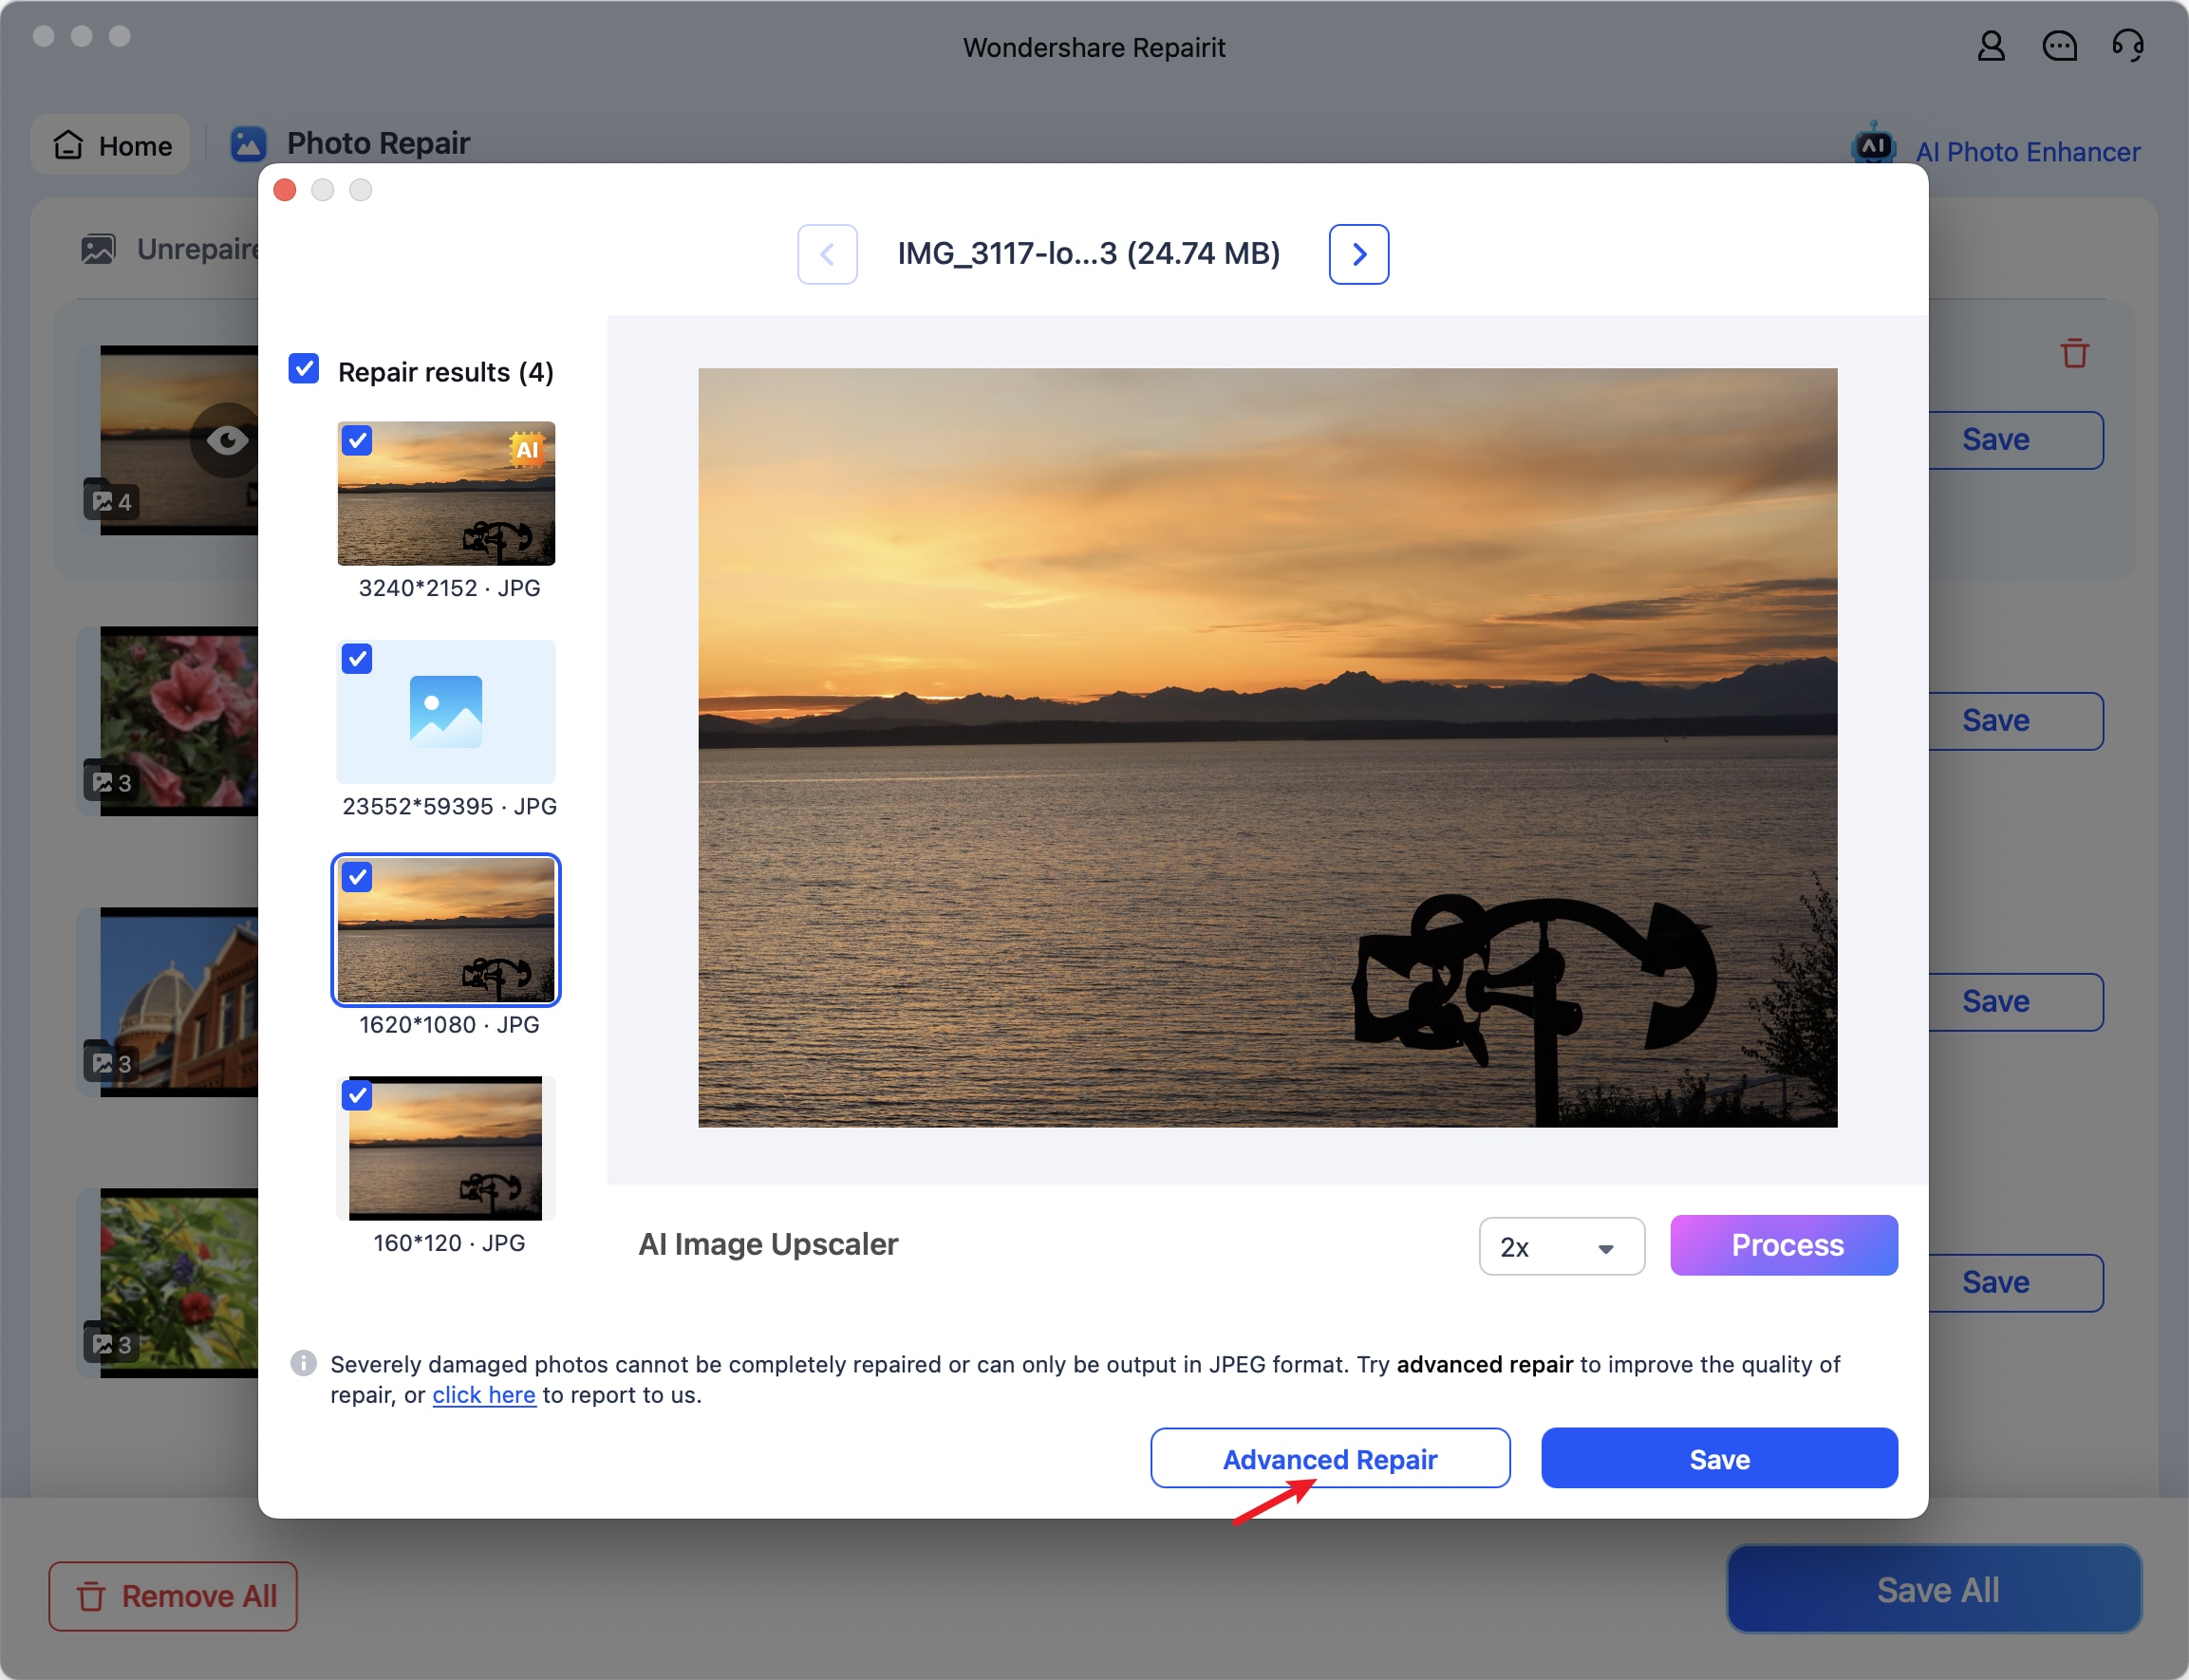
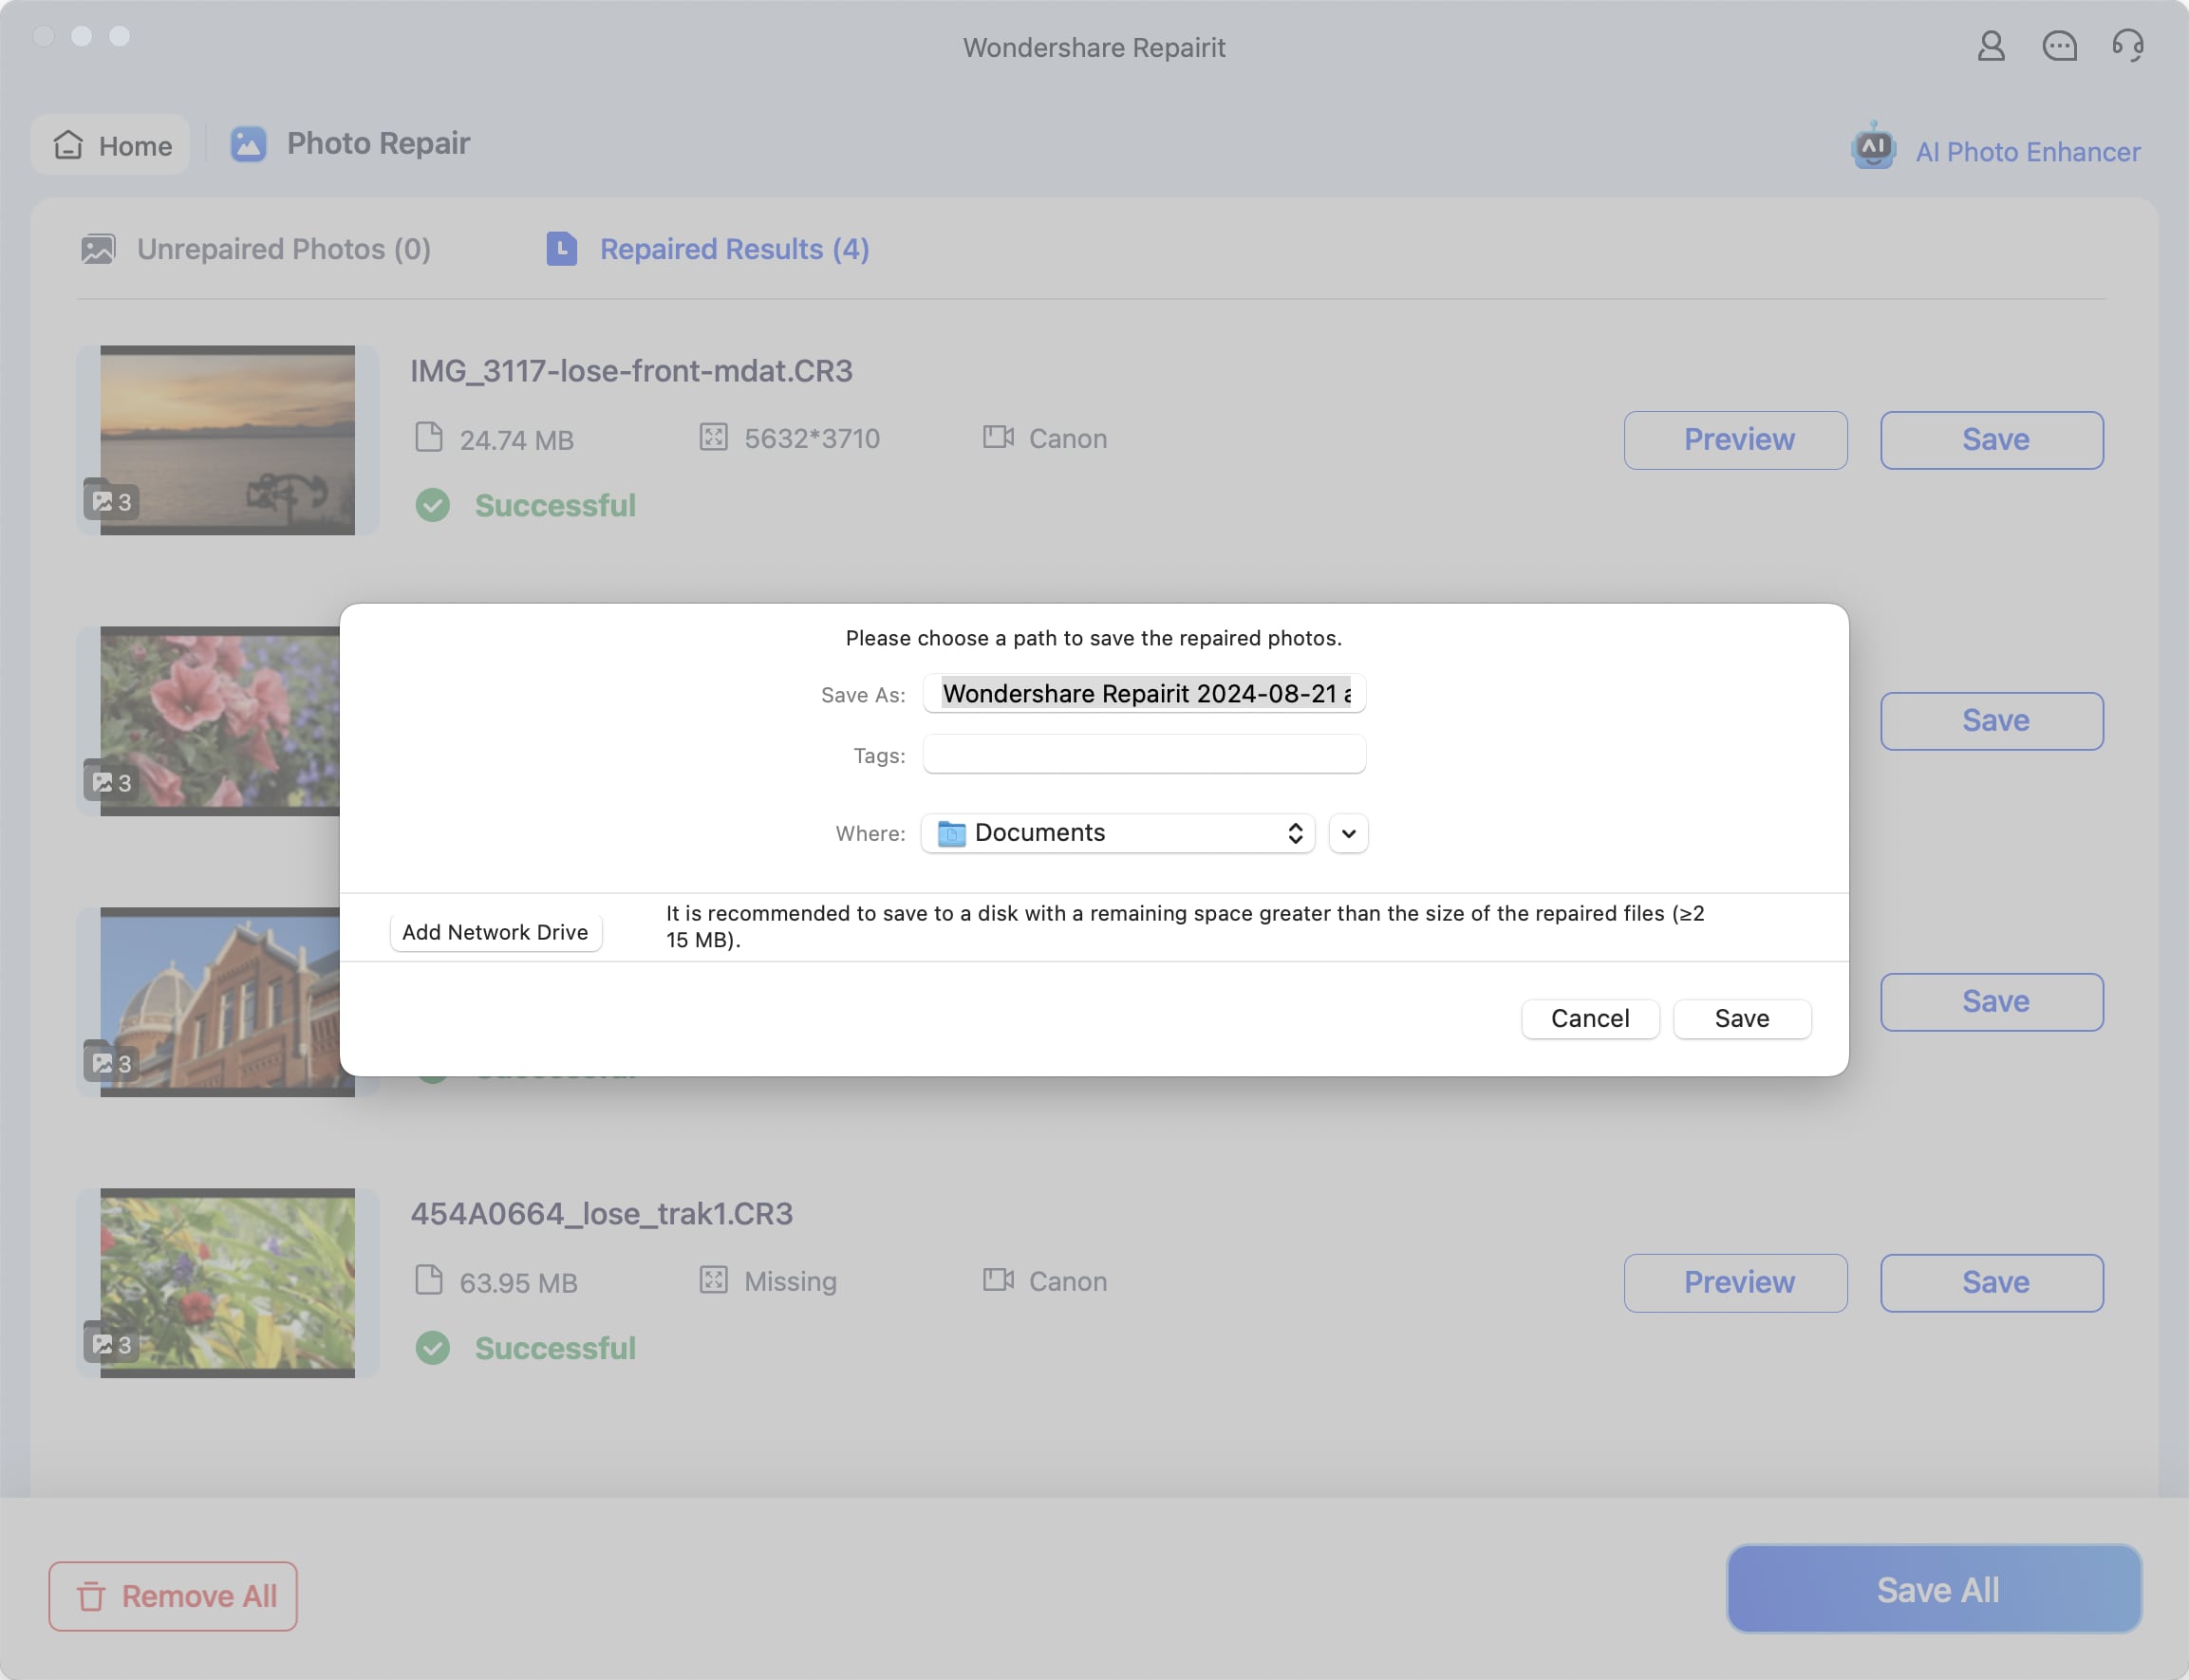
Step 3: After repair, preview the results by clicking on the Preview button. If satisfied, click Save or Save all to store the repaired photos.
Repair HEIC and JPG Files Now

Conclusion
To convert HEIC to JPG on iPhone, you can use a native app like the Files app. Alternatively, the email method allows you to share HEIC photos via email, automatically converting them to JPG upon download. For a browser-based solution, tools like heict.jpgprovide online conversion without requiring app installations.
FAQ
-
Can I change the settings on my iPhone to save photos as JPG instead of HEIC?
Yes. You can change your camera settings. Go to Settings and access Camera. Select Formats and click Most Compatible. This will save new photos in JPG format. -
How do I convert HEIC to JPG using a Mac computer?
If you have a Mac, you can easily convert HEIC to JPG using the Preview app. Simply open the HEIC file in Preview, go to File > Export, choose JPEG as the format, and save the file. -
How can I convert HEIC to JPG using third-party software on my computer?
If you prefer using your computer, many third-party software options are available for Windows and macOS that can batch convert HEIC to JPG efficiently. Examples include iMazing HEIC Converter (for Windows and macOS) and CopyTrans HEIC for Windows.


 ChatGPT
 Perplexity
 Google AI Mode
 Grok
Grok

