Recording high-quality footage is the heart of filmmaking. But what if you could change every aspect of your captured footage as if you were still behind the camera?
That’s where ProRes RAW can help! Whether you want more room for color grading or to keep as much detail as possible, ProRes RAW helps you get there.
FX3 offers the power of ProRes RAW in its small, compact size. When paired with an external recorder, it effortlessly delivers cinema-quality results. But how exactly does it work?
This guide will tell you all about the Sony FX3 ProRes RAW. We will share everything from setup to workflow to help you produce great video content.
In this article
Part 1. What is ProRes RAW in Sony FX3?
ProRes RAW is a high-quality video codec in Sony FX3. This format combines the flexibility of RAW video with the visually lossless ProRes codec. It captures raw sensor data when shooting with an external recorder. This gives you more control over post-production editing. You can easily adjust shadows, highlights, and white balance in color grading.
Main capabilities of the FX3 ProsRes RAW include:
- High-Quality Resolution: Supports up to 4.2K resolution. This gives you high-quality footage with precise details.
- Smaller File Size: Despite the high image quality, ProRes RAW delivers smaller file sizes than other RAW formats. This allows faster editing.
- 12-bit Depth: It provides output in a 12-bit color depth. You can build smoother gradations for more precise editing.
1. Apple ProRes 422 vs 422 HQ: Which is the Best?
2. Understanding Apple ProRes 422 VS 4444
3. Apple ProRes 422 LT: Everything You Need to Know
Instantly Repair a Range of ProRes Encoded Videos

Part 2. How to Record ProRes RAW with the Sony FX3?
If you’re new to Sony FX3, you may wonder how to shoot ProRes RAW footage with it. First, you will need an external recorder compatible with the FX3 camera. The most recommended are Atomos Ninja V or Ninja V+. These let you capture RAW footage using the FX3's HDMI output.
Let’s review the entire setup and workflow of recording Sony FX3 ProRes Raw.
Setting Up the Equipment
Connect the FX3 to the Ninja V using a certified HDMI 2.0 cable. When properly configured, the recorder will automatically detect the RAW signal.

Getting Your Atomos Ninja Ready
Make sure you have updated the firmware. You must activate the ProRes RAW codec using the Atomos website.

Step 1. Tap the timecode shown on your Atomos screen and drag the menu bar to the left. Select “Activation.” Then, use the QR code to register your Ninja V. Alternatively, visit the Atomos registration page.

Step 2. Once you’ve registered your Ninja V, select it from your account. Then, activate ProRes and ProRes RAW.
Step 3. Download the activation code and place it on your SSD. Then, put the SSD in the Ninja V. Follow the on-screen steps to activate the codec.
Enable RAW Shooting in FX3
Go to your camera’s menu. To do this, navigate to “Main > Main 1”. Then, select “Log > Log Shooting” and choose “Cine EI”. This will enable FX3’s ProRes RAW shooting.

Setting Up Sony FX3
Configure the FX3’s output settings. To do this, go to “Setup > External Output > HDMI Output Settings”. Then, adjust the following options.
Step 1. Set “Rec Media dur HDMI Output” to “On”. This will let you record the footage internally in addition to Atomos recording externally.

Step 2. Set “RAW Output” to “On”. Then, navigate to “RAW Output Setting” and select your desired frame rate.

Step 3. Set “Time Code Output” and “Rec Control” to “On”. This will allow you to control the Atomos recording using the camera's record buttons.

Configuring Atomos Ninja Settings
Step 1. Click "Options" at the top of the main screen. Go to the "Source" tab and select "HDMI".

Step 2. Go to the “Input” tab. Move to the “Trigger” section and switch the Timecode option to “HDMI”. Make sure it’s turned on.

Step 3. Go to the “Record” tab. Select “ProRes RAW” as the Codec. Then, choose the compression as ProRes RAW or ProsRes RAW HQ as suitable for your project.

Step 4. Switch on the "Metadata Crop" from the bottom left. This will set the aspect ratio to 16:9. If you want the original maximum ratio, leave this to “Off.”

Step 5. Tap the “Menu” icon at the bottom and select the “Monitor” tab. Choose "PQ" for the full dynamic range of the RAW signal. Or, pick "LUT" to upload your own custom LUT files.

Part 3. Shooting Considerations for the FX3 ProRes RAW
Now that you know how to set up and work with Sony FX3 ProRes RAW recording, let’s get to the fun part: how to shoot for the best quality output. Here are some factors to consider.
- ISO Levels: Use 800 for bright scenes and 12,800 for darker ones. Don’t change the ISO too much. Use ND filters to adjust brightness and keep the picture looking good.
- Color Settings: Shoot in “S-Log3/S-Gamut3.Cine” to capture more details in light and shadows. Make mid-tones a bit brighter to avoid losing details in dark or bright areas.
- Resolution Settings: Record in 4.2K for sharp details. For slow-motion shots, use up to 60 fps. This helps manage storage space for the big RAW video files.
- Lens Choice: Use high-quality fast prime or good zoom lenses. Avoid lenses that cause chromatic aberrations, as RAW video shows every detail precisely.
- Storage and Workflow: Use fast SSD drives like AtomX SSDmini for large ProRes RAW files. Keep file data organized to make editing easier later.
Part 4. How to Repair a Corrupted FX3 ProRes RAW File?
Recording Sony FX3 ProRes RAW requires dedicated equipment and plenty of time and effort. But despite your best efforts, the video may get damaged or corrupted. You may see missing frames or distorted video quality, or the file may not open at all. Sounds frustrating, right?
But don’t worry! Whether your video gets corrupted during recording, transferring, or editing, Repairit Video Repair can help you fix it in a snap! It’s a smart repair tool that quickly rescues your RAW video footage, whether it's shot with Sony FX3 or any other device.
Here’s a look at its standout features.
- Repair up to 20 video formats like MOV, MP4, and RAW.
- Supports HD, 4K, and 8K video repair without quality loss.
- Batch video repair for multiple files simultaneously.
- Advanced repair mode using sample files for complex issues.
- Previews repaired videos before saving for verification.
- Fixes corrupted videos from cameras, smartphones, or storage.
Let’s see how it works for repairing videos.
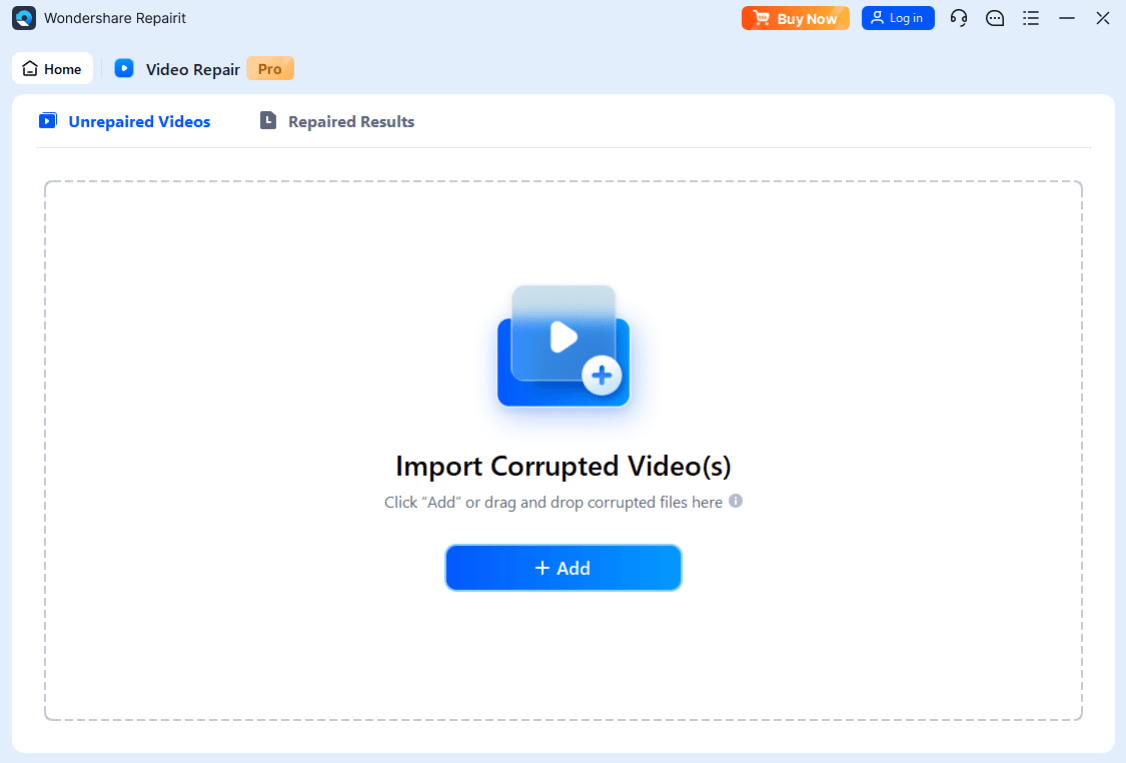
Step 1. Launch it, turn on "Professional Mode" and click "start" and “+Add” to import the corrupted video. You can also drag and drop it directly into the interface.
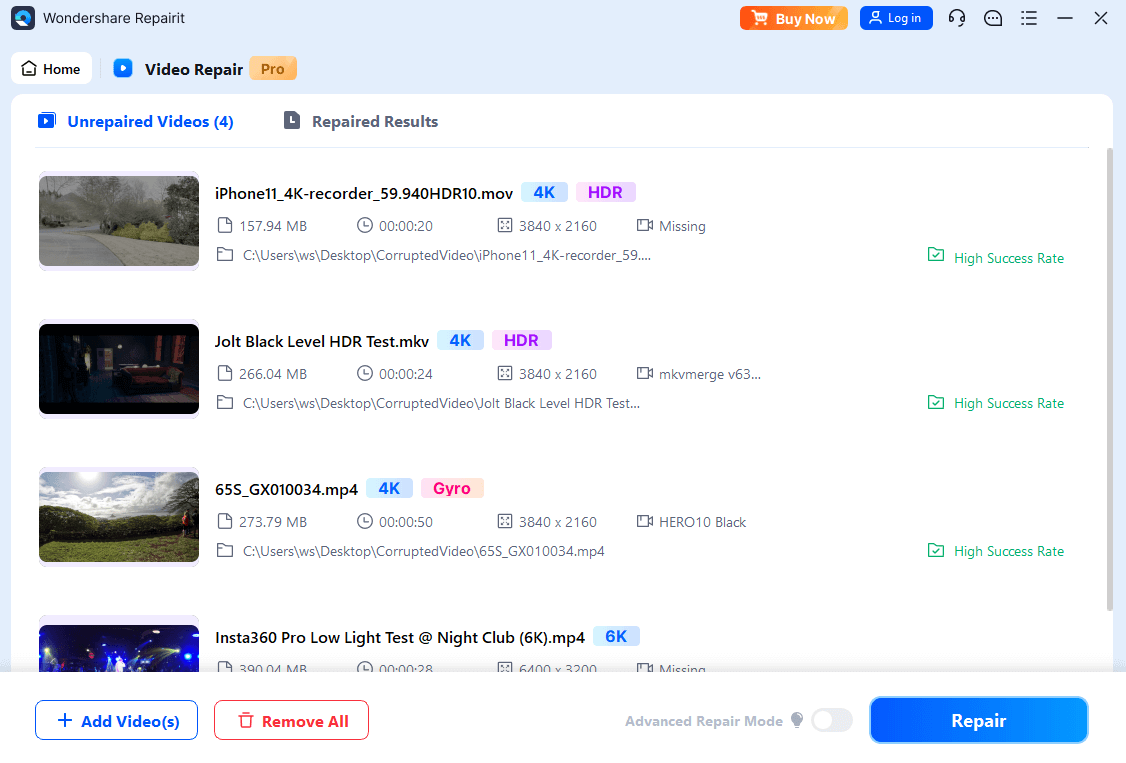
Step 2. Once the video is added, click “Repair”. Repairit will analyze the file for issues and begin the repair process.
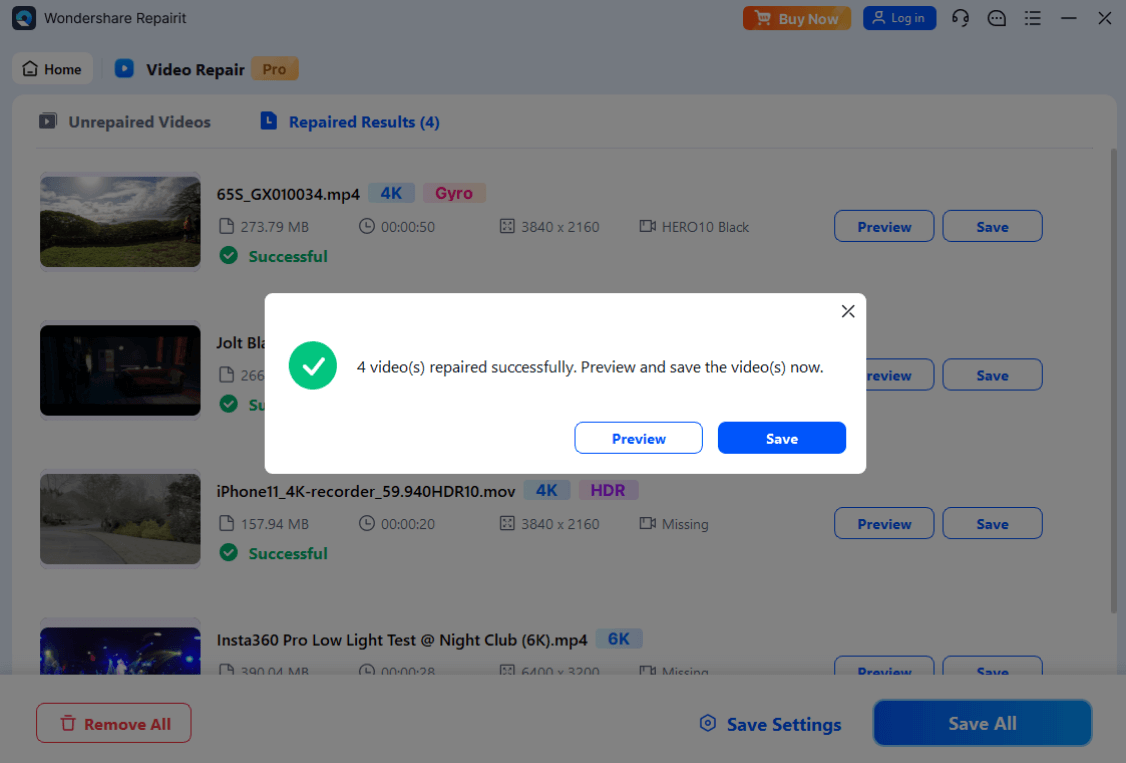
Step 3. Wait for the repair to complete. Then, a window will appear. Click “Preview” to view the results. If you like them, click “Save” to export them.
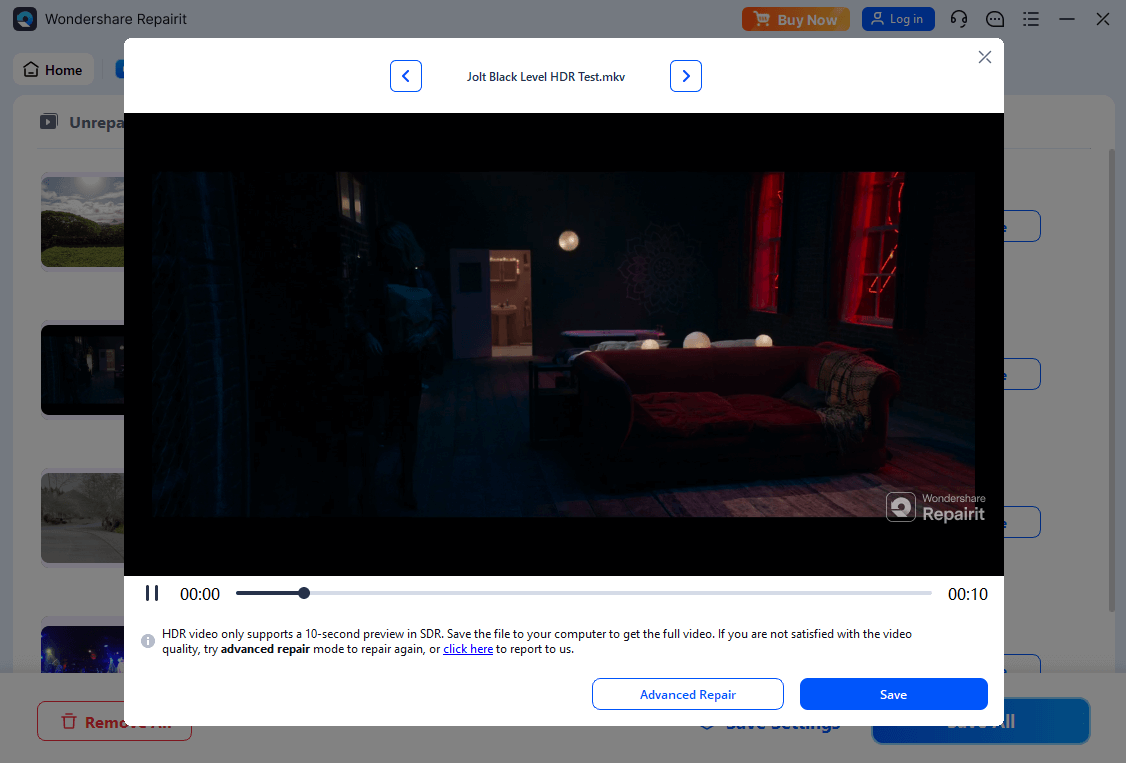
Step 4. If the basic repair does not resolve the issue, select “Advanced Repair” mode after viewing the video.
Step 5. Click the “+” icon to upload a sample video file. It should be recorded with the same device and settings as the corrupted file.
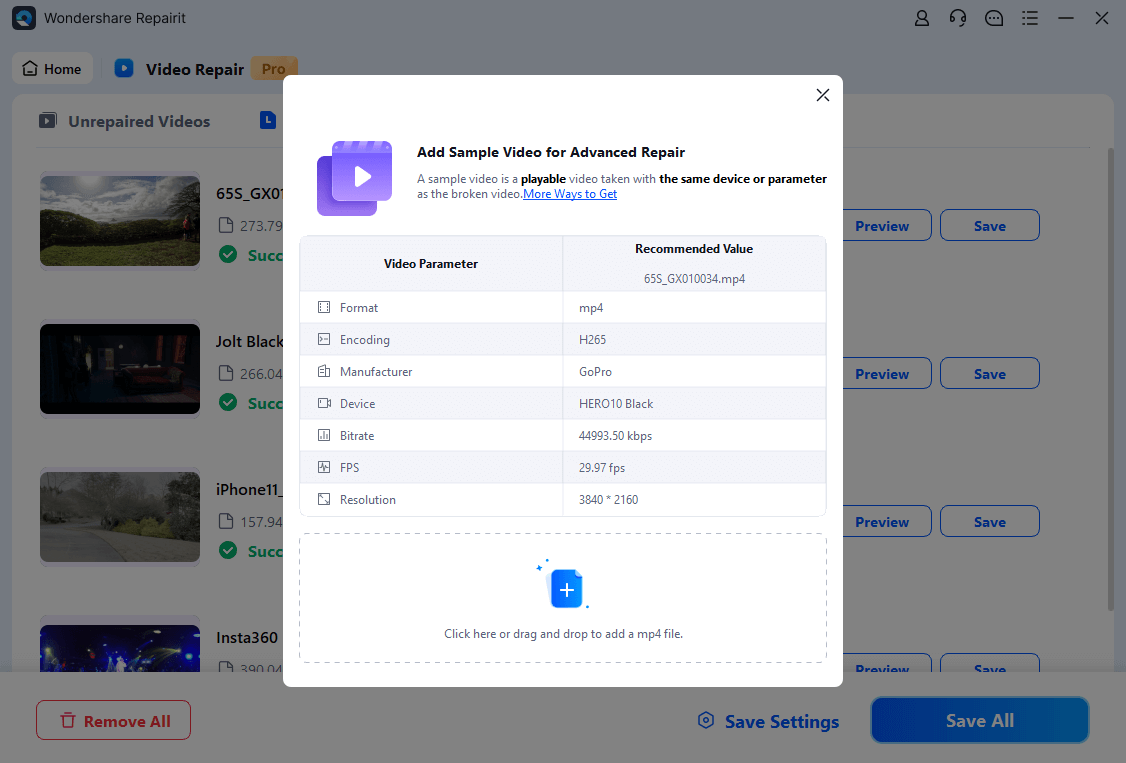
Step 6. Click “Repair” to start the process. Once complete, click “Save”. Then, select a location to store the repaired video.
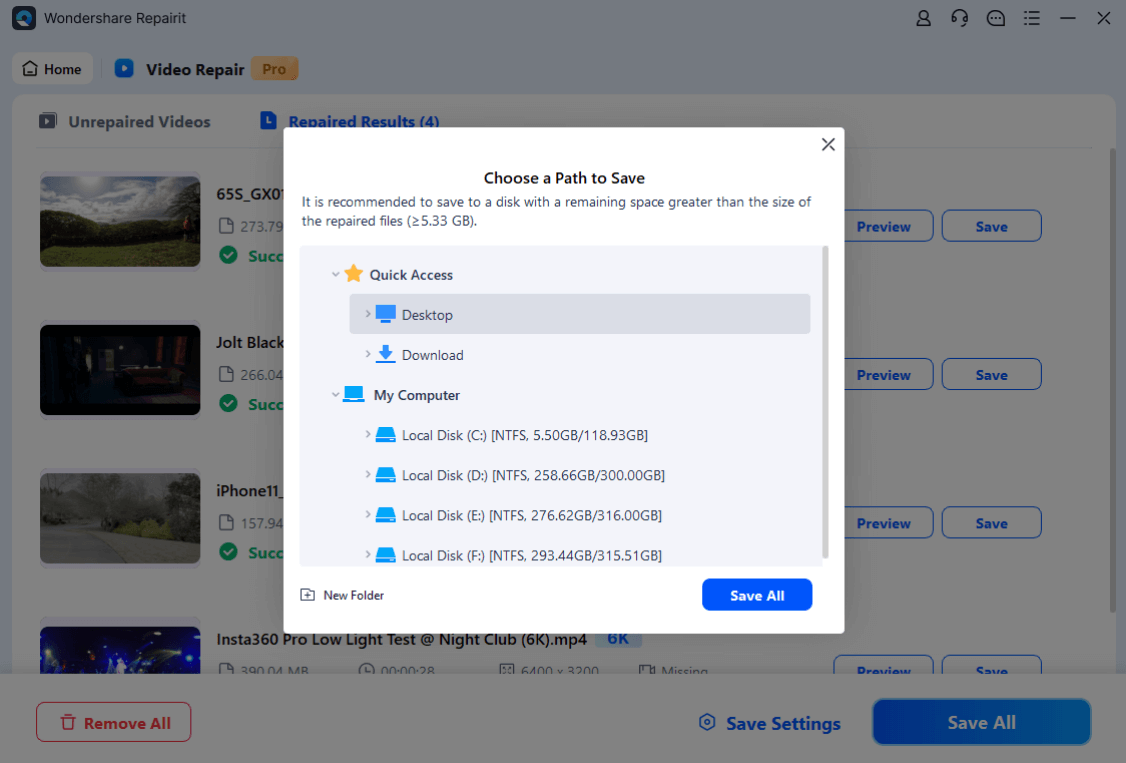
That’s it! You have successfully repaired your RAW footage without needing any technical skills. Reparit Video Repair easily fixes corrupted videos, even those severely damaged, with excellent quality!
Repair a Corrupted FX3 ProRes RAW File

Part 5. What is the Post-Production Workflow of ProRes Raw?
Working with FX3 ProRes Raw is simple and fun. It gives you complete control over color adjustments. Here’s a look at its post-production workflow.
Preparation
Transfer your footage into editing software. This could be Final Cut Pro, Adobe Premiere Pro, or DaVinci Resolve. Final Cut Pro has built-in support for ProRes RAW codec and does not need additional plugins.
Connect your Atomos Ninja SSD or FX3 SD card to your computer to transfer the files. Make sure the folders are clearly labeled so you can find everything easily.
Adjusting Settings
Import your videos into your editing software. Then, adjust the ProRes settings. In Final Cut Pro, the ProRes RAW settings are in the right panel once a clip is selected.
Click the “Basic” dropdown at the bottom and choose “Extended”. This will show the RAW video details. If you want to change anything, click “Modify ProRes RAW Settings” at the bottom of the panel.

Color Grading
You can adjust ISO levels, exposure offset, and color temperature in the ProRes RAW Settings window. Click the "Raw to Log" dropdown and select "Sony S-Log3/S-Gamut3.Cine" for better color grading.

Now, apply your desired LUT from the “Camera LUT” dropdown. Alternatively, manually adjust the exposure, contrast, or saturation using the Color Wheels.
Adding Audio
Your external audio should match the video’s visuals. Align it with timecodes or use the audio waveforms as a guide. To make your video more engaging, include background music and sound effects. But don't overpower the main audio. Adjust the overall sound levels to meet the standard guidelines for TV broadcasts or online platforms.
Exporting the Final Output
Export your project in a high-quality format like ProRes 4444 to save the best version. For delivery, encode it to formats like H.264 or H.265, depending on where it will be used. YouTube prefers H.264 MP4, while TV needs specific codecs.
Related Video >>: What Is RAW Video and How to Open It
Conclusion
So, there you have it—a complete breakdown of recording Sony FX3 ProRes Raw! This high-resolution format gives you more editing control, particularly in color grading.
Combined with the FX3’s compact design, it offers an easier way to produce quality content for online platforms or TVs. Use our guide to kickstart your shooting in ProRes RAW format.
If you encounter video corruption during the process, Repairit Video Repair can help you fix it quickly. It’s a lifesaver in rescuing video files, ensuring seamless playback of your personal or professional videos.
FAQ
-
Q1. What cameras shoot in ProRes RAW?
Some cameras that record ProRes RAW include the Sony FX3, Canon EOS C300 Mark III, Nikon Z6/Z7, and Panasonic EVA1. They require an external recorder to capture ProRes RAW via HDMI or SDI. -
Q2. Sony FX3 ProRes RAW vs. ProRes RAW HQ, what’s different?
The primary difference is bitrate. ProRes RAW HQ offers higher data rates and quality. It is ideal for projects requiring maximum image quality. Standard ProRes RAW provides a more efficient option with slightly lower bitrates. -
Q3. Can I Record ProRes RAW Internally on the Sony FX3?
The Sony FX3 cannot record ProRes RAW internally. It requires an external recorder like the Atomos Ninja V to capture it externally. However, the FX3 can record other formats internally when connected to the external recorder.


 ChatGPT
 Perplexity
 Google AI Mode
 Grok
Grok

