

 TL;DR:
You can resolve Windows 11 thumbnails not displaying by disabling the Always show icons never thumbnails setting in Folder Options, restoring File Explorer defaults, or repairing corrupted image files with Wondershare Repairit.
● Enable the Show thumbnails instead of icons and Save taskbar thumbnail previews visual effects under the Performance section of Advanced system settings.
● Choose Wondershare Repairit Online for web-based repair of photos under 300 MB, or use the Desktop version for offline processing without file size or quantity limitations.
● The Desktop software requires Windows Vista to 11 or macOS 10.12 to 14 and includes an Advanced Repair mode for severe corruption alongside an AI Image Upscaler to enlarge repaired files up to 8X.
Ask AI for a summary
 ChatGPT
 Perplexity
 Gemini
 Claude
 Grok
Grok
Thumbnails are the perfect choice for organizing and displaying files. The best way to find your files is by looking at thumbnails, which can show you what is in any given folder and make it easier when searching through everything. Windows 11 is a new operating system, one of its features is supposed to be thumbnail previews for images and videos, but many people are experiencing this not working correctly.
One of the most common complaints is for folders not displaying preview thumbnails when navigating through File Explorer on your computer or laptop. There may be many reasons why your Thumbnails’ preview gets blocked or restricted, but you can fix it.
We hope you can resolve this issue with one or more solutions explained below. If it is throwing an error, then your files are corrupted. You will need a Photo Repair tool to fix them.
This blog post will provide you with some solutions to fix Windows 11 Thumbnails not showing issues. Check out our blog to find a few simple solutions to enable thumbnail previews in your File Explorer.

Part 1. Why are Thumbnails not showing in Windows 11?
File Explorer in Windows 11 has a neat feature to view images as thumbnails instead of just a list. Not only does this make it easier for you when looking at files and folders, but thumbnail previews also provide more details than an ordinary representation.
The default thumbnail preview is available in Windows 11, but you will need to select the medium or large icons for the images on the files thumbnails display.
It can be frustrating to see people disappointed when they expect a preview of the inner image, but there is nothing. That situation needs some fixing; do not you think so too? There are many reasons for the Thumbnail preview not showing in Windows 11 issues.
• Inaccurate Thumbnail preview settings
• Cached files take up too much storage space
• Less optimized files view
• Incompatible system visual effects settings
• System files may have errors
There are some quick solutions that you can implement to fix these issues.
Part 2. 4 Methods to Enable Thumbnail Preview in Windows 11
To view the thumbnails for your media or images, choose one of the following folder views from within the File Explorer ribbon toolbar:
• Medium Icons
• Large Icons
• Extra Large Icons
If you are still not seeing thumbnail previews, check the steps below.
Method 1: Enable Thumbnails Preview by Folder Options
One way to fix the Thumbnails preview issue is by adjusting your view settings manually. It is easy enough for even beginners with some straightforward steps.
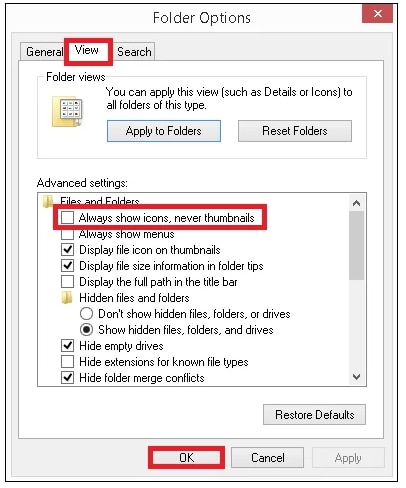
Step 1: Open Windows Explorer and click on the View tab on top of your screen. Select Options from that menu.

Step 2: When you click the Folder Options tab. Make sure the optionAlways show icons, never thumbnailsunder Advanced Settingsis not selected. If checked, then uncheck it and click OKto apply changes made on your device. The thumbnail preview is enabled now. I hope this helps!.
Method 2: Restore File Explorer options to the default setting
Sometimes Windows does not display the files and folder thumbnails no matter what folder you open. However, this can be fixed with a simple restore of settings in File Explorer from defaults to fix it!
You can do it! I have a few steps that will help you out.
Step 1: Open File Explorer
Step 2: Click Change folder and searchoptions under the File menu
Step 3: Click Restore Defaultsbutton in the general tab. You can restore your settings to defaults by clicking on this option.
Step 4: Go to the View tab and now again click on Restore Defaults. I hope this clears up your confusion about restoring default settings.
Method 3: Change Visual Effect under Advanced Settings
Advanced settings allow you to check the thumbnail preview options from under Visual Effects. Enable them if they are not selected already and follow these steps!
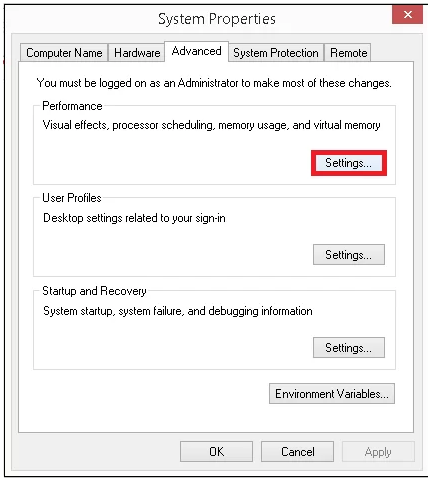
Step 1: Open Advanced system settings. The Advanced tab will get opened under System Properties page.

Step 2: Click on the Settings option under Performance section.
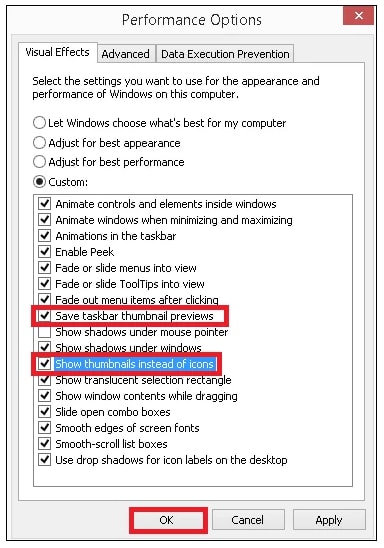
Step 3: Select Save taskbar thumbnail previews options from theVisual Effects tab. Now under the Custom section, click Show thumbnails instead of icons and click OK.
Method 4: Launch Wondershare Repairit
Wondershare Repairit - Photo Repair is an easy-to-use and powerful tool that helps you fix damaged or broken photos on Windows & Mac with many different cases of corruption, and it can also fix the "picture thumbnails not showing in Windows 11" error easily. Repairit can fix your corrupted photos with a very high success rate. It also enables you to repair multiple image files at once. Get all of your work done with a few clicks. No more fussing around! You can add files, repair them and preview them before you export them directly to your computer.
If you only have a few photos to repair, I'd like to suggest you using the Online Photo Repair, because it has a free trial, and it's more convenience to use. However, if the file amount is large, then the desktop version is needed.
Here are some comparisons between the 2 modes:
|
Accessibility: Repairit Online is accessible from any device with an internet connection, allowing users to access it from anywhere at any time. |
Offline Access: Repairit for Desktop can be installed directly on your computer, allowing them to work without an internet connection, which can be beneficial in areas with limited connectivity. |
|
Online Version Offered: If you just have several photos smaller than 300 MB to repair, try the online version. |
More You Can Repair: The desktop version can fix more PPTs larger than 300 MB, and it has no limit to the file size and number. |
|
Automatic Updates: Repairit Online is regularly updated by the provider, ensuring users have access to the latest features and bug fixes without the need for manual installations. |
Data Control: With desktop products, users have more control over their data since it is stored locally on their computer, reducing concerns about data privacy and security. |
For Online Photo Repair access, please enter the official website. Here I will show you how to use the desktop version in detail.

Wondershare Repairit - Photo Repair
 Security Verified. Over 7,302,189 people have downloaded it.
-
Repair damaged photos with all levels of corruption, such as grainy photos, dark photos, pixelated photos, faded photos, etc.
-
Repair images of diverse formats, such as JPG, JPEG, PNG, CR3, CR2, NEF, NRW, etc.
-
Repair critically damaged or corrupted photos available on SD cards, phones, cameras, USB flash drives, and more.
-
Repairit has a quick and advanced repairing mode. You can use either depending on the level of corruption the photos has undergone.
-
The "AI Image Upscaler" feature can enlarge the repaired photos to 2X, 4X, and 8X.
-
Intelligently restore old / scatched photo and colorize black and white photos with various AI effects.
-
No limit to the number and size of the repairable photos compared with the online version of Repairit.
-
Support Windows 11/10/8/7/Vista, Windows Server 2003/2008/2012/2016/2019/2022, and macOS 10.12~macOS 14.
Download and launch Repairit On Windows/Mac
Step 1: Install Wondershare Repairit
Launch the Wondershare Repairit tool on Windows or Mac to repair video and photo files. This tool has a friendly user interface that makes repairing your documents simple! There are several advantages of using this software to repair videos, including different image formats. Additionally, there is no limit on file size for restoring.
Step 2: Upload Damaged or Corrupt Photos
After installing the Wondershare Repairit tool, select Photo Repair from within the sidebar menu. Go to the location where you saved your corrupt photos and click on Add. You can now load them into this application.

Step 3: Repair your Photos
After clicking on the Repair button, a window will appear with options to fix any errors in your photos. The algorithm is unique and can take some time, so be patient. When repairing all of the photos, a notification pops up telling you images successfully repaired or not and giving tips for future repairs if necessary.

Step 4: Preview the Repaired Photos
As you are repairing your images, it is always best to preview the results. To check the results of your repairing process, click on the Preview button. You can preview the repairing process by clicking on its thumbnail to see if your repair was successful before actually applying it.
You can also do an advanced photo repair if the standard process fails. To get started with Advanced Photo Repair, click on the advanced button. You can select the Advanced Repair option under the Preview window.
The option to go into Advanced Repair Mode is at the bottom of your screen when you click “Repair Photos.” Load a sample image to run the Advanced Photo Repair.
Once a sample image is loaded, you can click on the Repair button. It takes a few seconds to fix your photos. You can preview the advanced repairing results and can adjust the sample photo.

Step 5: Save the Repaired Photos
Lastly, you can click on the Save key under the preview panel to export your photo. You may also select multiple pictures that you can save by clicking Save All.
Repairing photos is a great way to preserve memories and keep old family photographs around for generations. Now you can repair photos with ease thanks to the application from the Wondershare Repairit!
Conclusion
You may be wondering how to fix Windows 11 Thumbnails not showing Issues. Don’t worry! We have the answer for you right here in this blog post. If your thumbnails are no longer displaying, it is likely because of a recent update or file corruption on your system.
Sometimes, you may find that the thumbnails in Windows 11 do not show up. Luckily, there are several fixes for your thumbnail preview issue, including enabling it by folder options or restoring file explorer to its default settings.
We also recommend using Wondershare Repairit as it is a powerful tool for repairing corrupted videos, photos, and files with a few simple clicks! It helps fix many corruption scenarios such as damaged or corrupt videos, photo restoration, and data recovery.
We hope this article has helped explain why your Windows 11 Thumbnails are not showing up and how to fix them.
Wondershare Repairit is an effective and safe file repair software. This third-party software can quickly get back corrupted, formatted files on Windows Computer, irrespective of the file type and format.
FAQs
-
1. Are file format and file extension the same?
While the terms file format and file extension are often used interchangeably, there is a slight difference between them. The file extension is just the characters that appear after the period and identifies the type of format a file is saved in. On the other hand, file format is a way data in a file is stored and encrypted. -
What are the four types of file formats?
The four common types of file formats are document, worksheet, presentation, and database files. These are saved in different file extensions, including DOCX, TXT, XLS, ODS, PDF, PPT, etc.