Word has been the first choice for many individuals and businesses to store important information and save reports. However, leaving such documents unprotected is not wise, especially since data theft is more common than ever. In such cases, it is always better to encrypt your documents to protect your important data from theft and accidental edits.
It secures your Word documents by encoding them and makes the content accessible only to those with the correct password or decryption key. However, many users are unaware of how simple it is to implement this security measure. That’s why this guide will explain the detailed steps to encrypt a Word document and why you should do it. Additionally, we'll share an extensive tool to recover data from corrupted documents.
In this article
Part 1. What are the Real-Life Benefits of Encrypting Word Documents?
As said above, you can protect your documents from breaches by encrypting them. This proactive step can protect against data theft and ensure privacy when sharing documents with others. These points prove that encryption is an important layer of protection for individuals and businesses. The following points further explain the benefits of an encrypted Word file:
- Better Security: You can ensure only authorized users with the correct password can access the file by encrypting it. As a result, it reduces the risks of unauthorized editing access.
- Privacy Regulations: Many industries require encryption to meet privacy laws, such as GDPR or HIPAA. This is the standard way to protect company data in most corporates.
- Peace of Mind While Sharing: There are always risks of stealing or editing your data when sharing documents with others. You can eliminate this risk and peacefully share documents by encrypting them.
- Protection Against Data Breaches: Nowadays, hackers have found new ways to enter computers and steal users' data. To protect yourself against such breaches, it is recommended that you encrypt Word documents.
- Maintaining Confidentiality: Since businesses are always competitive, they can't afford to lose their strategies. By protecting their files through encryption, they can ensure their confidentiality and survival.
Part 2. How to Encrypt a Word Document on a Windows PC or MacBook?
Since Microsoft Word is available on all major platforms, users can unrestrictedly apply encryption to their documents. As for the major platforms, Windows and macOS have slightly different software interfaces. Due to this difference, you may need to follow different steps to put encryption on your documents. To learn how to easily encrypt a Word file on a PC and MacBook, follow the steps outlined below:
For Windows PC
Step 1. After opening the document in Word, disable the Protected View by clicking the “Enable Editing” button from the yellow bar that appears on top of the document. Afterward, click the “File” tab from the top menu bar to access its options.

Step 2. On the new screen, click the “Info” option from the left menu. A few options will appear beside the menu from which you need to choose the “Protect Document” option. From the drop-down menu that appears, select the “Encrypt with Password” option.

Step 3. Finally, you have to add the password when the new “Encrypt Document” window appears. After clicking the “OK” button, repeat the same password on the next screen to confirm your choice.

For MacBook
Step 1. Access the document and click the “Review” tab from the top menu bar. From the options that appear on the screen, click “Protect” and select the “Protect Document” option afterward.

Step 2. Once the encryption window appears, set the passwords in the “Security” section. Under the “Protection” section, you can also choose what actions would prompt the encryption. Finalize these encryption settings by clicking the “OK” button.

Part 3. How to Encrypt a Word Document Online on Any Platform?
While the official tool provides good enough protection, outside tools are often more convenient and secure. Additionally, online tools allow you to encrypt Word documents directly without relying on desktop software. You can find the details of 2 reliable online tools and the steps to encrypt a Word document in the following section.
Tool 1. Jumpshare
Jumpshare is a reliable alternative to Word’s encryption since it provides military-grade protection for the documents. The tool also allows users to share their encrypted files with others by creating a link. Similarly, the recipients can access encrypted Word files only if they have the password. To learn how to use Jumpshare to easily protect your documents, follow the steps given below:
Step 1. After accessing the “Password Protect Word Document” tool on Jumpshare, click the “Choose a Word File” button. Now, you need to choose the document that needs encryption and upload it to the tool.

Step 2. Once your Word document is successfully uploaded on Jumpshare, use the “Lock Your File” button.

Step 3. From the small window that pops up, enter the desired encryption key and press “Save” to apply the changes. Finally, you can share the file with others by creating a shared link and providing the recipient with the password.

Limitations
- The tool does not support adding encryption on multiple files simultaneously.
- You can only use it to encrypt 3 Word files in a day for free.
Tool 2. ASPOSE
ASPOSE allows users to encrypt Word documents without installing any programs. The good thing about this tool is that it is straightforward, and users can instantly add password protection from the main screen. It can encrypt more than 8 types of document extensions, including PDFs. To learn how to protect your Word files using ASPOSE, follow the steps outlined below:
Step 1. After opening the “Encrypt DOCX File Online” page on ASPOSE, click the “Choose Word Files” button. From the pop-up screen, select the document file that needs password protection and upload it to the tool.

Step 2. Once the tool loads your document, add the password in the small text box and tap the “Protect” button.

Step 3. When the tool completes the encryption process, you will be taken to a new page. Here, you can either save the encrypted file through the “Download” button or upload the file to the cloud storage.

Limitations
- The output files and the sharing links last only 24 hours on the official site.
- Users are not allowed to preview the encrypted documents without downloading them.
Part 4. How to Fix Damaged or Corrupted Word Documents to Retrieve Important Data?
While the shared methods are quite good for encrypting a Word file, they can also corrupt your important documents. In such cases, you won’t be able to open your documents and access your important data. If you’re facing this issue, we recommend using Repairit for its extensive file-repairing features. The tool can repair almost all files from Microsoft Suite, including Word, PowerPoint, and Excel.
As for Word files, the tool supports file repair, even for the 2007 version of the software. You can also use Repairit to recover your information from the garbled data after a malware attack. In addition to being an online tool, Repairit is also available as Windows or MacBook software. To save users time, this online and offline toolbox supports repairing multiple files at a time.
Key Features of Repairit File Repair
- Support for Adobe: Users can restore their corrupted Adobe files and other corrupted pictures, layers, and masks using Repairit.
- Repairing Archive Files: You can use this tool to repair and restore the components of a corrupted ZIP file.
- Repair iWork Files: For iOS users, the tool supports the repairing of files created in Keynote, Pages, and Numbers.
- PDF Repair: Repairit can also be used to make changes and correct a PDF file’s components without opening it directly.

Wondershare Repairit - Word File Repair
1,010,994 people have downloaded it.
-
Repair damaged files with all levels of corruption, including blank files, files not opening, unrecognizable format, unreadable content, files layout changed, etc.
-
Perfectly repair corrupted word .docx files without modifying the original file.
-
Provide an easy fix option for text, images, font, hyperlinks, header, footer, etc.
-
Support Office 365, MS Word 2019, 2016, 2013, 2010, 2007, and earlier versions.
-
Support Windows 11/10/8/7/Vista, Windows Server 2003/2008/2012/2016/2019/2022, and macOS 10.10~macOS 14.
-
Except Word, Repairit also supports all formats of PDF, Excel, PowerPoint, PDF, ZIP, and Adobe files.
Simplified Step-by-Step Guide to Repair a Word Document in Repairit
After learning the file repair properties of this advanced tool, we can now learn how to fix a Word document with it. In the following section, you can find steps to repair an encrypted Word file in Repairit.
Step 1. Access the File Repair Feature in Repairit
After installing this file repair toolbox, open it on your PC/MacBook and go to the “More Types Repair” section from the left menu. From the features that appear, select the “File Repair” option to comprehensively repair your Word files.

Step 2. Import Your Damaged Word Files
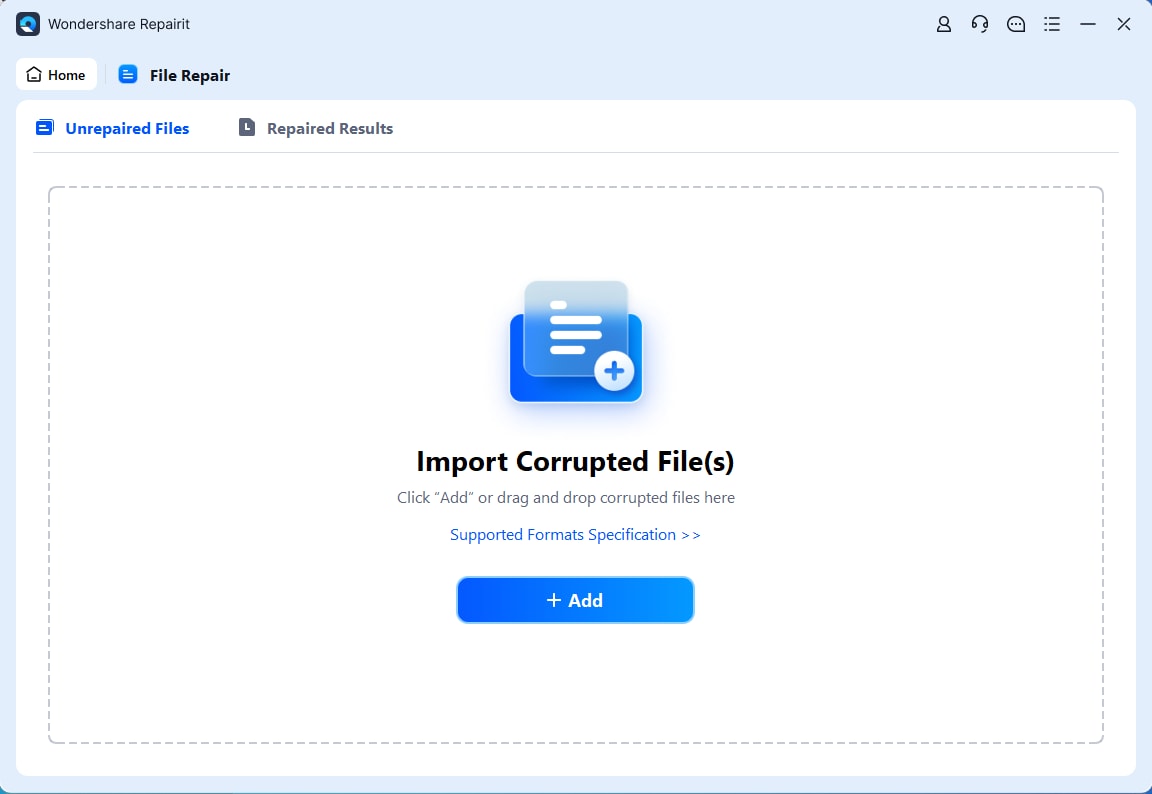
On the next screen, you need to import the corrupted Word documents into the tool. Since the tool supports batch repair, you can select multiple files by clicking the “Import Corrupted File(s)” button.

Step 3. Start the Repair Process on All Files
Once your Word files are loaded into the tool, simply press the “Repair” button at the bottom of the screen to start the process.

Step 4. Save the Repaired Word Documents
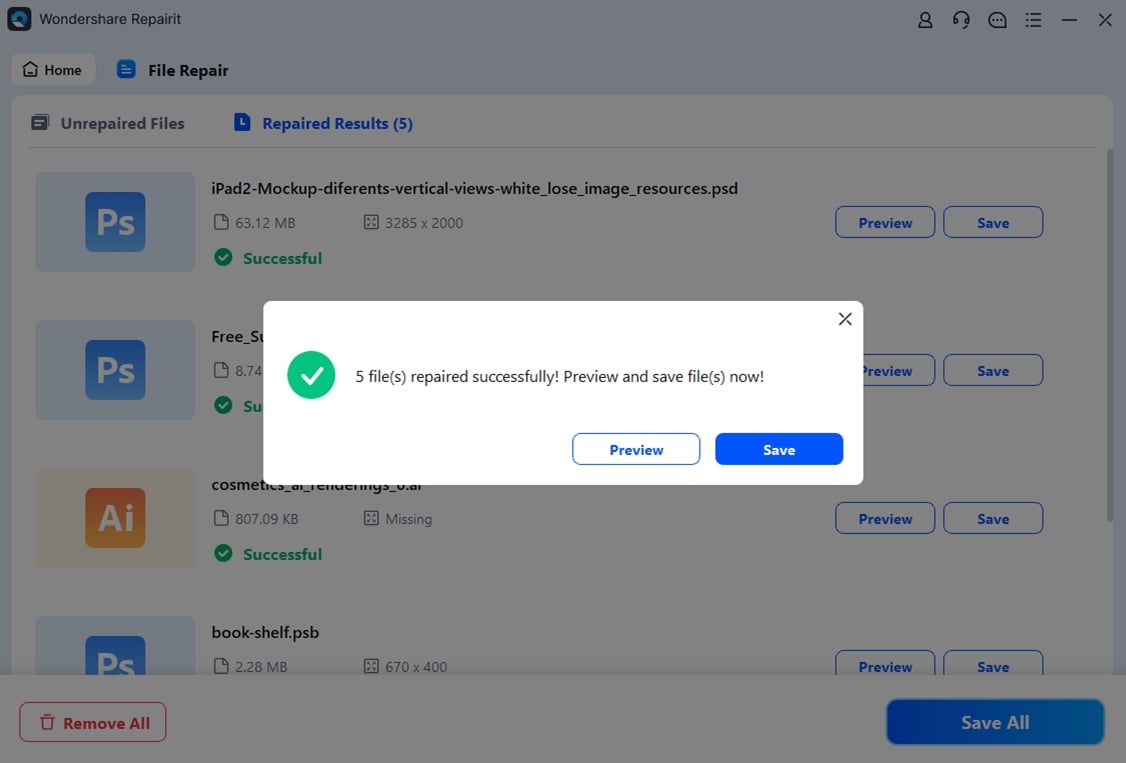
After the tool is done repairing your files, you will be able to preview them. Upon confirming the data is accessible and readable, you need to tap the “Save All” button. From the small pop-up that appears, click the “Save” button to complete the process.

Repair Corrupted Word Files Now

Part 5. Best Practices to Keep an Encrypted Word File Secure
Although encryption guarantees a layer of protection for your data, it requires additional steps to maintain their security. By adopting certain practices, you can ensure that your encrypted files remain secure over time. To guide users, we have listed the best practices to secure an encrypted Word file:
- Create Strong Passwords: When encrypting a file, ensure you are using difficult credentials. Don’t use common words or figures since they are easy to bypass using cracking tools.
- Store Passwords Safely: After entering strong credentials, use a trusted password manager to save them securely. In this way, you won’t forget the passwords and will be able to access files anytime.
- Update Your Software: Older versions of apps and Windows make your data vulnerable to malware attacks. Therefore, ensure your apps and software are always updated to install the latest security patches.
- Limit Access and Sharing: To ensure no one without authorization can access your documents, only share encrypted files with trusted individuals. Additionally, use secure channels to transfer files so that they can’t be tracked by hackers.
- Maintain Secure Backups: Since you can lose your data in unprecedented situations, ensure all your important files are backed up. In this way, you can recover them anytime and anywhere to access your data.
Conclusion
In short, users need to encrypt Word documents to protect sensitive information from unauthorized access. For this purpose, they can use Microsoft's built-in encryption settings in all its tools. Additionally, various online tools allow this feature for extended security and ease of access.
However, these tools can also corrupt your files if any disruption happens during the encryption process. In such cases, you must use advanced tools like Repairit to remove corruption from the files. Due to its simple interface and innovative file-repairing features, we highly recommend users give it a try.
FAQ
-
Q1. What happens if I forget my password?
Users won’t be able to access their data if they lose their encryption keys. However, external data recovery platforms allow users to retrieve their passwords and data from encrypted files. Since most of these tools are not reliable, we recommend that users back up their passwords in a secure place. -
Q2. Are online encryption tools safe?
Tools that use SSL encryption to protect your files are usually secure options. However, using the built-in encryption mechanism in Microsoft Office is still a good idea. -
Q3. Can I remove encryption from a Word file?
You can remove encryption from your files by entering the password to access the document. After opening it, you must go to the Protect Document settings and remove the password.


 ChatGPT
 Perplexity
 Google AI Mode
 Grok
Grok

