
Experiencing audio delay while watching a video can be frustrating, especially when it disrupts the flow of dialogue. This common issue in VLC Media Player often happens due to synchronization glitches or compatibility problems. By understanding the reasons behind audio delay in VLC, you can tackle the technical snags and have a smoother experience.
As you master the solutions to such an issue, you can ensure a more enjoyable experience free from interrupted media. Thus, delve into the top 5 solutions discussed in this article since they can help you correct the delays and future issues and enhance the viewing experience with VLC Media Player.
In this article
Part 1.Primary Reasons for Audio Delay in VLC
Before anything else, let us uncover the reasons for “audio delay VLC” issues here so you can look for an effective solution accordingly.
- Codec Compatibility Issues: When VLC encounters outdated codecs, it can struggle to sync audio and video streams, leading to noticeable delays in the sound. The best way to resolve this is by installing the missing VLC codecs.
- Incorrect Audio Sync Settings: The delays in audio can occur due to incorrect adjustments in the manual settings of sync audio and video in the VLC feature. Specifically, the misconfigured settings of the track synchronization feature cause delay, which can be fixed by adding or subtracting milliseconds.
- Corrupted Media Files: Sometimes, the media file is damaged or corrupted, leading to a lag in audio playback. In these cases, using a different file or repairing the corrupted media through an efficient third-party tool may be necessary to avoid delay.
- Hardware Performance Limitations: When your device’s CPU is not equipped to handle high-resolution files that require more processing power, videos can experience lags in the audio element. To prevent it, you can ensure that your hardware meets the requirements of high-quality media files.
Part 2. How to Fix Audio Delay in VLC | 5 Best Methods
Let’s dive further into this topic by exploring the top 5 methods you can apply to the VLC Media Player and solve the media lag. By following the fixes below, you will be able to find long-term solutions to the “delay audio in VLC” problem.
Method 1. Repair Corrupted Videos with Repairit
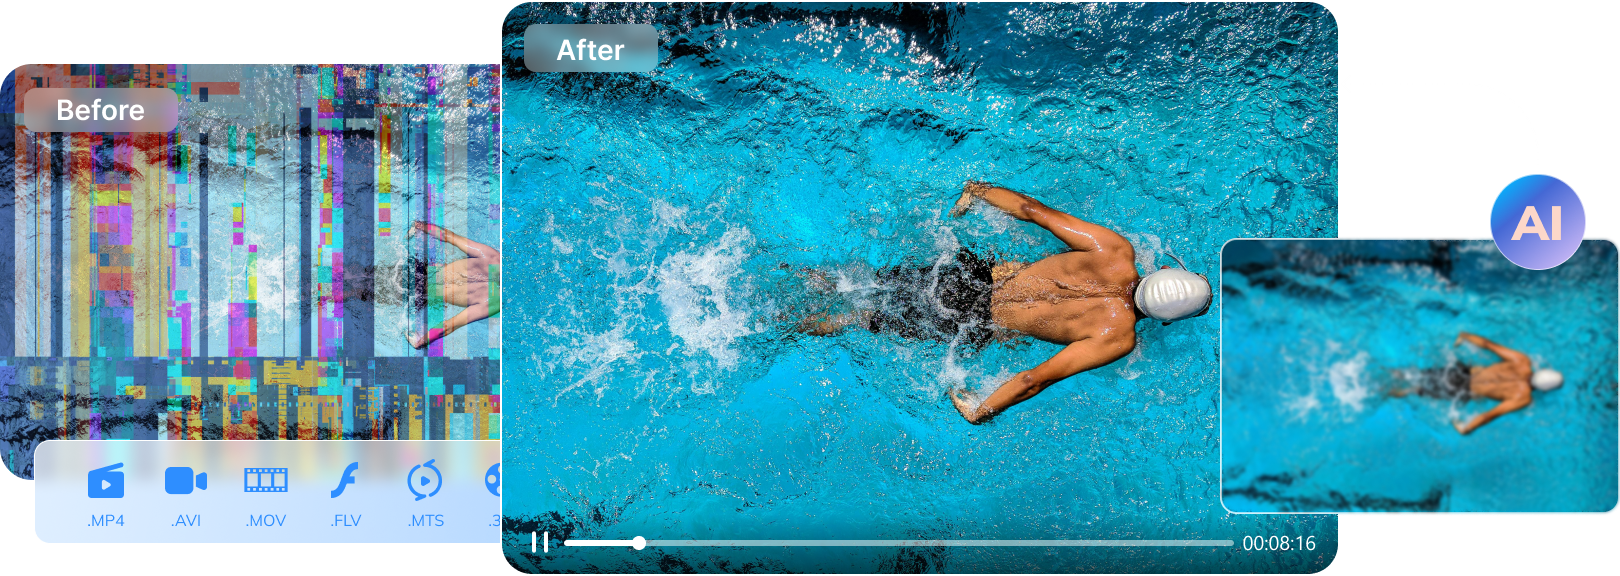
It is crucial to ensure that your corrupted video file is repaired through an accurate repair tool to avoid audio lags. Repairit is a simple solution that repairs corrupted videos by focusing on high-definition, noise-free visual content. Irrespective of the reason, like virus attacks or software crashes, this tool can fix all damage scenarios.
This repair tool supports the most common video file formats, such as MP4, MKV, MTS, and more, to help you restore the best quality. Besides, Repairit ensures that users have the flexibility to repair videos that different camera brands record.
Instructional Guide to Repair Corrupted Video Files with This AI-Powered Repair Tool

-
Repair damaged videos with all levels of corruption, such as video not playing, video no sound, out-of-sync video or audio, playback errors, header corruption, flickering video, missing video codec, etc.
-
Repair full HD, 4K, and 8K videos and support 18 popular formats, including MOV, MP4, M2TS, INSV, M4V, WMV, MPEG, ASF, etc.
-
Preview Video Before Saving: Through this tool, users can preview the repaired video before they save it to their device. Besides, they can ensure that the overall visual quality remains high.
-
Batch Repairing: You get the ability to repair their damaged videos in batches to speed up the process. Despite having different formats, Repairit still performs the fix to the corrupted media.
-
Supports All Levels of Corruption: It ensures you get to repair all levels of damage on your video files. Corruptions like shooting, recording, converting, or processing are all fixed.
-
Fix HD Videos: With the help of this tool, you can easily fix your damaged high-resolution videos without the fear of losing quality.
-
Support Windows 11/10/8/7/Vista, Windows Server 2003/2008/2012/2016/2019/2022, and macOS 10.10~macOS 13.
Repairit allows you to swiftly restore your videos and resolve sound issues caused by file corruption. These simple steps can help fix the problem of audio delay VLC, ensuring accessibility for every user.
Step 1. Installing the latest version of Repairit and launching it on your device. Then, hit the “+Add” button to import the corrupted videos to the software.

Step 2. Click the “Repair” button to start the progress.

Step 3. Hit the “Preview” button to view the fixed videos. In case your videos are not fixed through the basic repair feature, you can shift to the “Advanced Repair” to make a more professional fix.

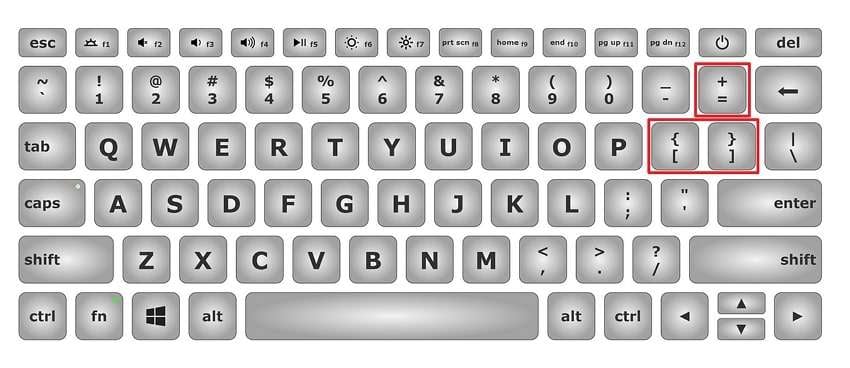
Method 2. Try Keyboard Shortcuts to Adjust the Speed
As you tap the keyboard shortcuts on VLC Media Player, you will be able to shift the speed of the media. Using these keys, you can either slow down or speed up the audio and fix this issue. With such precise adjustments, ensure VLC audio video sync without interruptions. Look at the instructions below to figure out how the VLC uses keyboard shortcuts to adjust the video’s speed:
Instructions: By pressing the “[” key on your keyboard, you can slow down the video. To speed up the video, hit the “]” key while watching content on VLC. Moreover, you can bring the video back to the average speed by pressing the “=” keys.
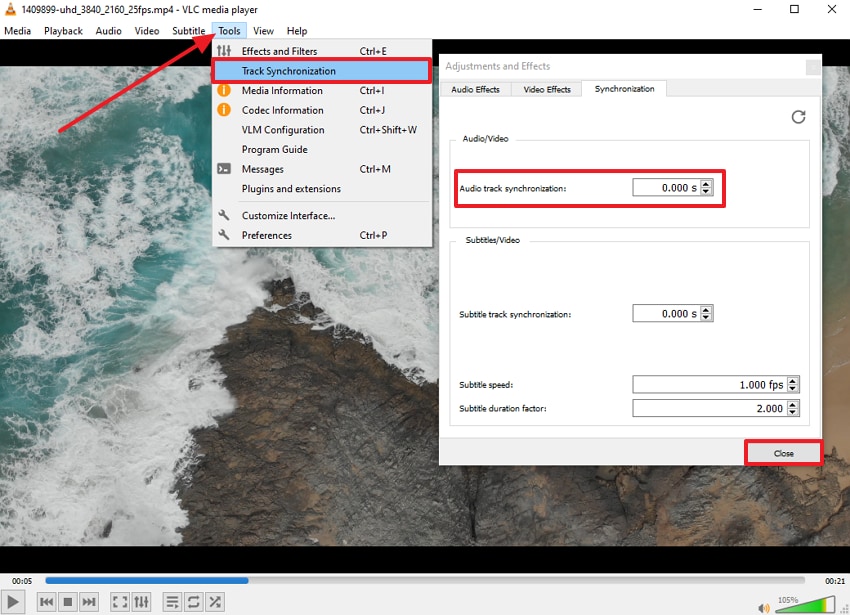
Method 3. Set Audio Track Synchronization Value
To fix the VLC sound out-of-sync issue, set the audio track synchronization value and ensure a smooth experience. This method is beneficial for making precise adjustments when other quick fixes don't work. If your video has subtitles, you can even use this tool to ensure the subtitle track is aligned with the media. With the help of the concise steps below, you can set an appropriate audio track synchronization value:
Instructions: While the video is playing on the VLC Media Player interface, navigate to the “Tools” tab from the top menu bar. From the drop-down menu that appears, choose the “Track Synchronization” option. This will then open an “Adjustments and Effects” dialog box from where you have to set the “Audio Track Synchronization” value. Once you either delay or fasten the audio, hit the “Close” button to ensure video sync occurs.
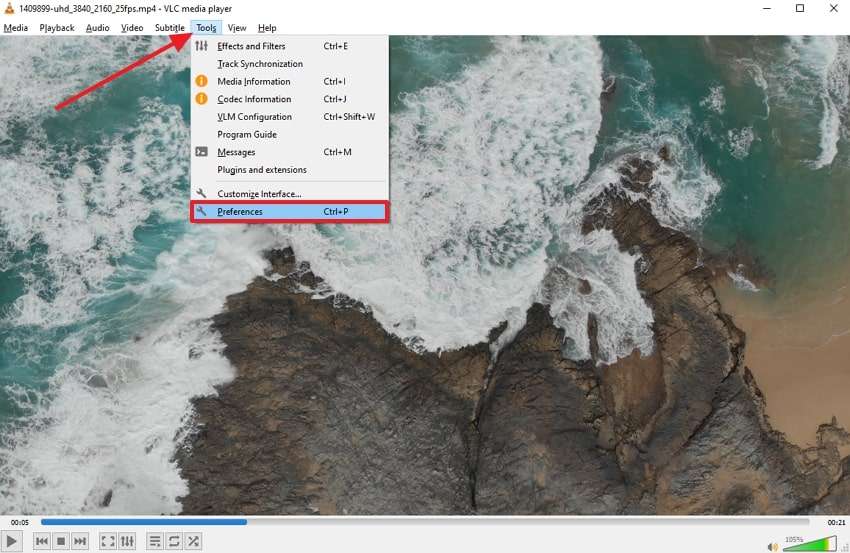
Method 4. Customize Audio Desynchronization Compensation
Apart from the methods explained above, the Audio Desynchronization Compensation solution helps you fix delays in the audio output. The delay must be given in milliseconds in order to assure accuracy.
Once you’ve made your adjustments, remember to save your settings and restart VLC to see the changes take effect for a smoother viewing experience. The steps discussed below will help you fix the VLC player sound delay issue:
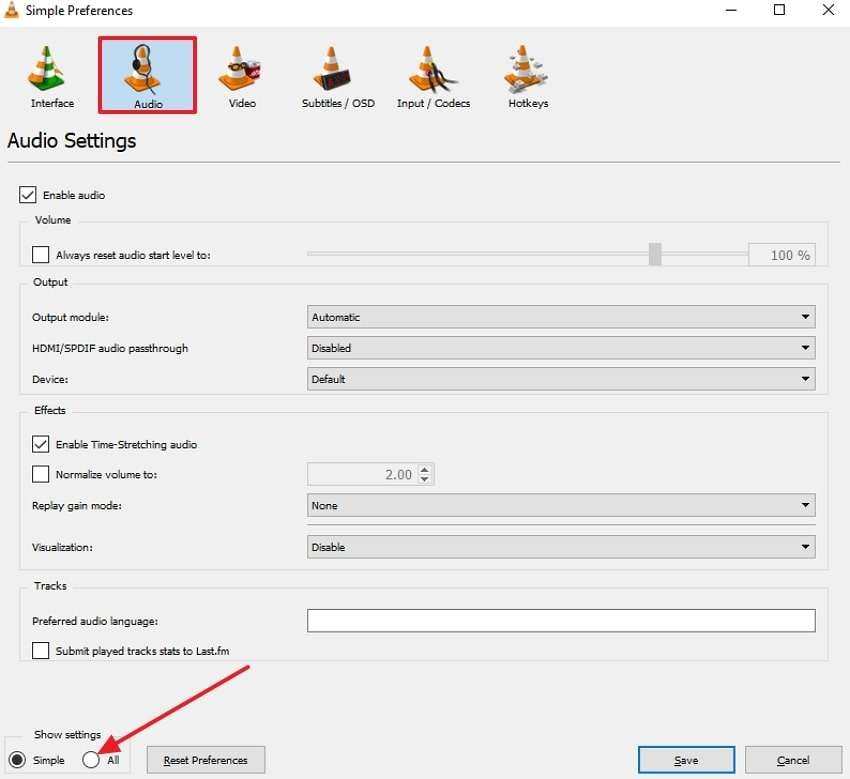
Step 1. At the main interface of the media player, locate the “Tools” tab from the top toolbar. Then, pick the “Preferences” option from the drop-down menu.
Step 2. Upon clicking the “Preferences” tool, a new “Preferences” window will pop up. Here, choose the “Audio” section and enable the “All” option to show the overall settings from the bottom left corner.
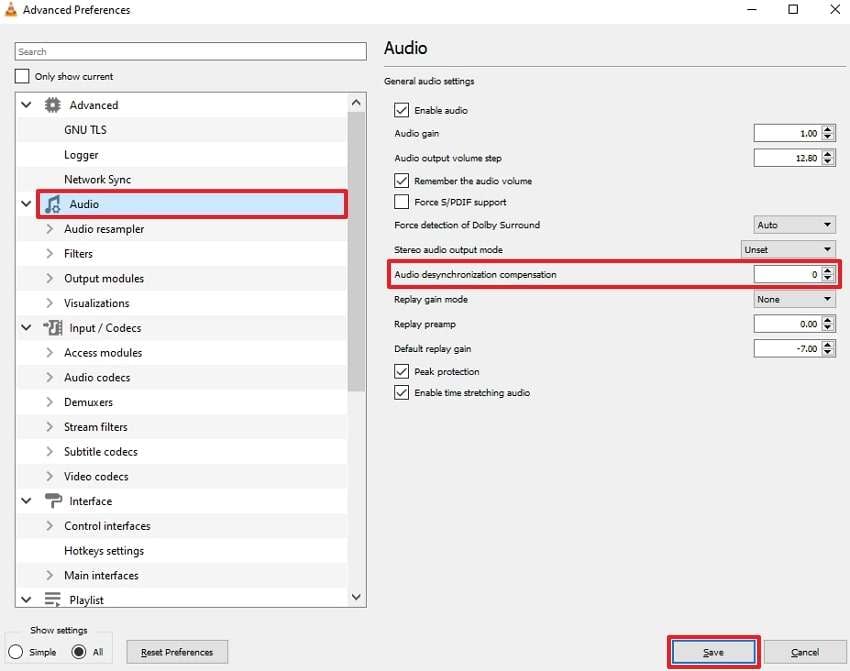
Step 3. From the “Advanced Preferences” window, select the “Audio” tab from the left side of the panel. Then, adjust the value of the “Audio Desynchronization Compensation” and hit the “Save” button. Your video will now play without any complications and lags in the media elements.
Method 5. Update the VLC Player
Keeping your media player updated is essential for optimal performance and avoiding audio delay issues. Software updates often include bug fixes, improvements, and new features that enhance playback capabilities. Carry out the steps mentioned below to keep your player updated to its latest version:
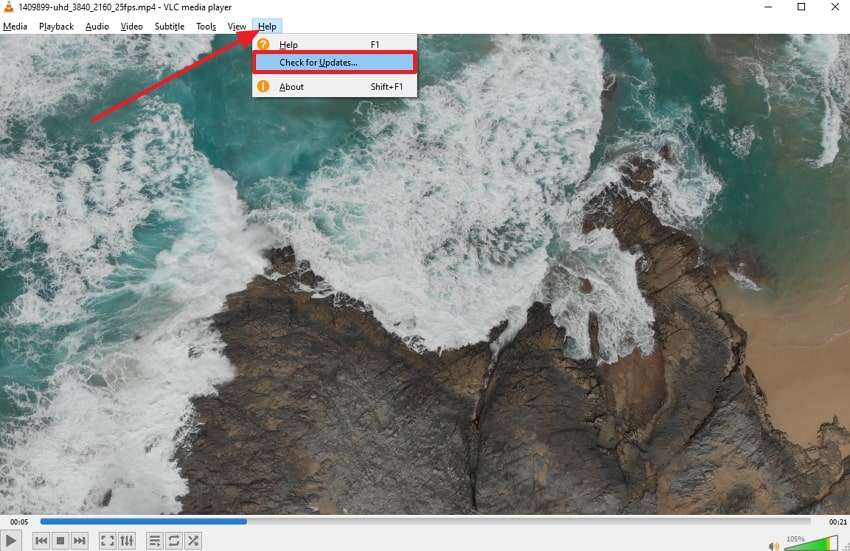
Instructions: Enter the “Help” tab from the toolbar at the main interface of VLC Media Player. Then, a list appears from which you need to hit the “Check for Updates” option. If your software requires an update, install it immediately to fix the issue.
Part 3. Valuable Tips to Avoid Audio Delay in VLC Player
Apart from the fixes we discussed above, here are some tips you can keep in mind in order to avoid delayed audio in VLC. These tips will make sure you and your audience have a smooth experience while watching the video.
- Check File Integrity: First, verify the media file is not corrupted by using efficient repair tools like Repairit. Regularly checking your files before playback can save you from frustration and allow for seamless viewing.
- Adjust Audio Device Settings: Experimenting with different audio output options can improve synchronization and sound quality. You can also adjust the audio device settings by making sure you are using the proper output module for enhanced performance.
- Clear Out VLC Cache: Try clearing the VLC cache to eliminate playback issues and potential conflicts. A clean cache can significantly improve loading times and prevent errors during playback, ensuring an uninterrupted experience.
- Disable Hardware Acceleration: If you continuously face audio delays, turn off the hardware acceleration to resolve the issue. It will reduce the load on your CPU and allow VLC to program better.
Conclusion
In conclusion, we have looked into the reasons for the delays in the audio elements of a video. The main reason for the “audio delay in VLC” issue is corrupted files. Therefore, you are advised to use Wondershare Repairit, which can help you repair files while retaining their quality. Download this one-click solution to your devices today and enjoy a smooth watching experience.
FAQ
-
Q1. How do I make the VLC buffer faster?
By increasing the “File Caching” value to 1000ms or 2000ms, you can make the VLC Player buffer faster. This allows more data load time to improve the playback smoothness. -
Q2. How do I slow down my VLC frame rate?
While VLC doesn't adjust the frame rate directly, you can slow playback by pressing the “[” keys. This reduces playback speed, effectively showing fewer frames per second. -
Q3. Why are 1080p videos not playing smoothly?
1080p videos may lag if the hardware is limited or VLC settings aren't optimized. You can turn off hardware-accelerated decoding and update VLC to improve playback. -
Q4. What can I do if my media file is corrupted, causing audio delay issues?
If your media file is corrupted, this can often lead to audio delay or sync problems in VLC Player. A reliable tool like Wondershare Repairit can help repair damaged video files, address sound issues, and restore the file to optimal condition.
