In this article

Ever tried browsing pics on Microsoft Photos and suddenly hit with the dreaded black screen? Annoying, right? Well, great news! This guide spills the beans on why that black screen image glitch happens and gives you quick fixes. Whether it's a constant headache or a startup hiccup where the photo app opens with black screen, our guide's got your back. Follow the simple steps, wave goodbye to the hassle, and get back to seamless browsing with Microsoft Photos App.
Reasons Behind Black Screen Image Issues
Picture this: you're excited to browse through your photos, but suddenly, a black screen image throws a curveball. Troubling, right? Here, we've rounded up all the possible reasons behind this black screen image glitch so you can quickly pinpoint the issue and get back to enjoying your memories hassle-free.
Reason 1: The picture format is incompatible - This is a common factor behind black screen image issues. When the photo app encounters an unsupported format, it may result in a frustrating black screen scenario. To resolve this problem, ensure your pictures are saved in a compatible format like JPG and eliminate the inconvenience of a picture app opening with a black screen.
Reason 2: The process of transferring photos was interrupted - This can trigger black screen image issues. When the transfer encounters a hiccup, it may result in a frustrating black screen situation when opening the photo app. To resolve this issue and ensure a smooth experience without a picture app opening with a black screen, double-check your transfer process and address any interruptions.
Reason 3: The SD card is corrupted - This can contribute to black screen image issues, causing glitches when opening the photo app. To prevent a picture app from opening with a black screen, check the SD card for corruption and consider a replacement for a seamless photo-viewing experience.
Reason 4: Malicious attacks have targeted the image files - This can lead to black screen image issues. If your photo app opens with a black screen, consider the possibility of security breaches. To ensure a smooth experience without black screen image problems, employ security measures and safeguard your image files from potential threats.
Effective Solutions for Black Screen Image Issues
Encountering issues with a black screen image? Fear not! This guide presents practical solutions to address black screen image concerns. Whether experienced during photo app startup or while browsing, these formal fixes promise a seamless and hassle-free experience for your image viewing.
Solution 1: Update the Microsoft Photos Application
An updated app ensures you steer clear of any potential black screen image issues, allowing you to enjoy your photos without interruptions. Here’s the simple step-by-step guide:
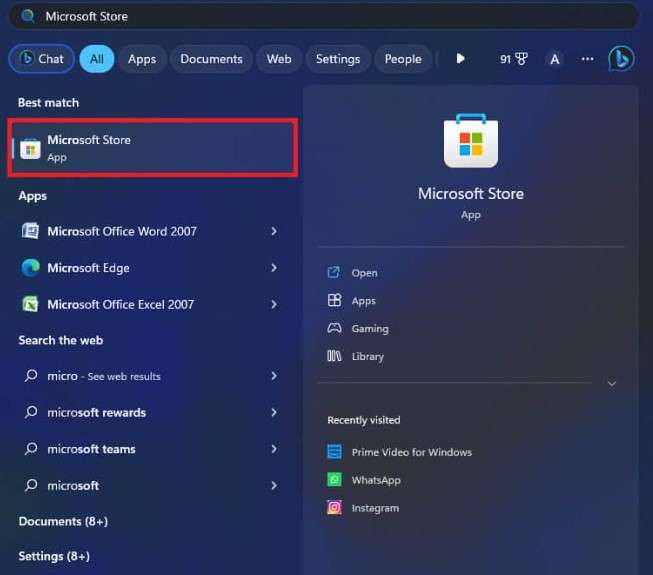
Step 1: Press the Windows key, enter Microsoft Store, and hit Enter to launch it.
Step 2: Within the Microsoft Store, look for the Microsoft Photos app and select the top option from the search results.
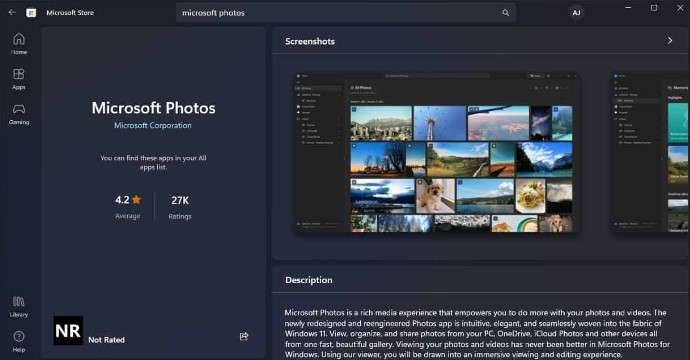
Step 3: Now, select the Update button to ensure the app is up to date. This button will be visible only if your app is outdated; otherwise, it won't appear.
Solution 2: Repair the Microsoft Photos App using Wondershare Repairit
Ever found your cherished photos hidden behind a frustrating black screen in the Microsoft Photos App? This is where Wondershare Repairit steps in – the most suitable solution for those precious memories from the black screen abyss. With its user-friendly interface and efficient repair capabilities, Repairit is designed to pair your Microsoft Photos App experience to seamless perfection. Here are the benefits Repairit brings to the table:
- It can address incomplete data problems and repair pixelated or inaccessible photos with just a few clicks.
- It effortlessly fixes photos in various formats like JPEG, PNG, JPG, CR3, CR2, NEF, NRW, RAF, DNG, ARW, GPR, TIF, TIFF, GIF, and more.
- It can restore the initial quality of damaged images and enhance their clarity by eight times.
- It can restore aged photographs or product images with improved clarity.
- It removes scratches, improves colors, and sharpens blurry areas, breathing new life into your faded and damaged photos.
- It works with various devices and storage options, including Mac or Windows computer disks, USB flash drives, memory sticks, SD cards, digital cameras, and cell phones.
Below are a few easy steps on how to launch and use Wondershare Repairit:
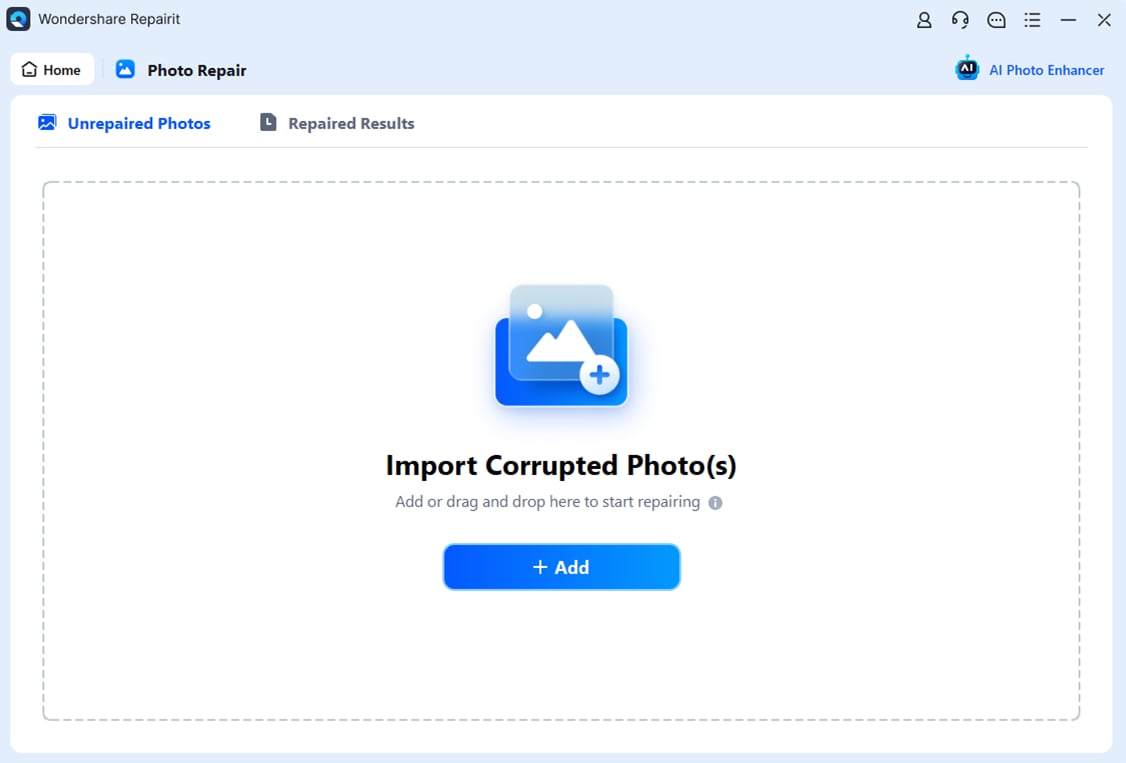
Step 1: Choose More Types Repair to explore the available options and press the Add button, then find the damaged files you wish to fix and upload them to the platform.
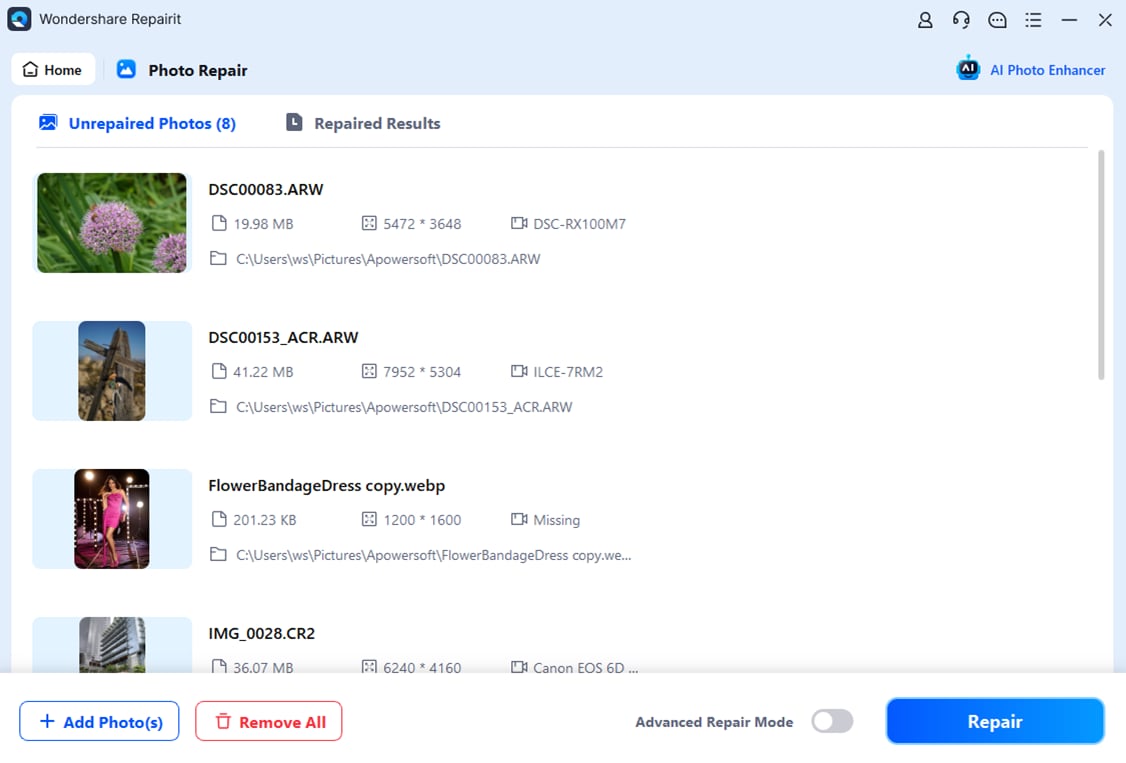
Step 2: Select the Repair option to initiate the recovery procedure for the damaged images.
Step 3: After finishing the process, a prompt window will appear on your screen, indicating that the images have been successfully repaired. Click OK to preview the results.
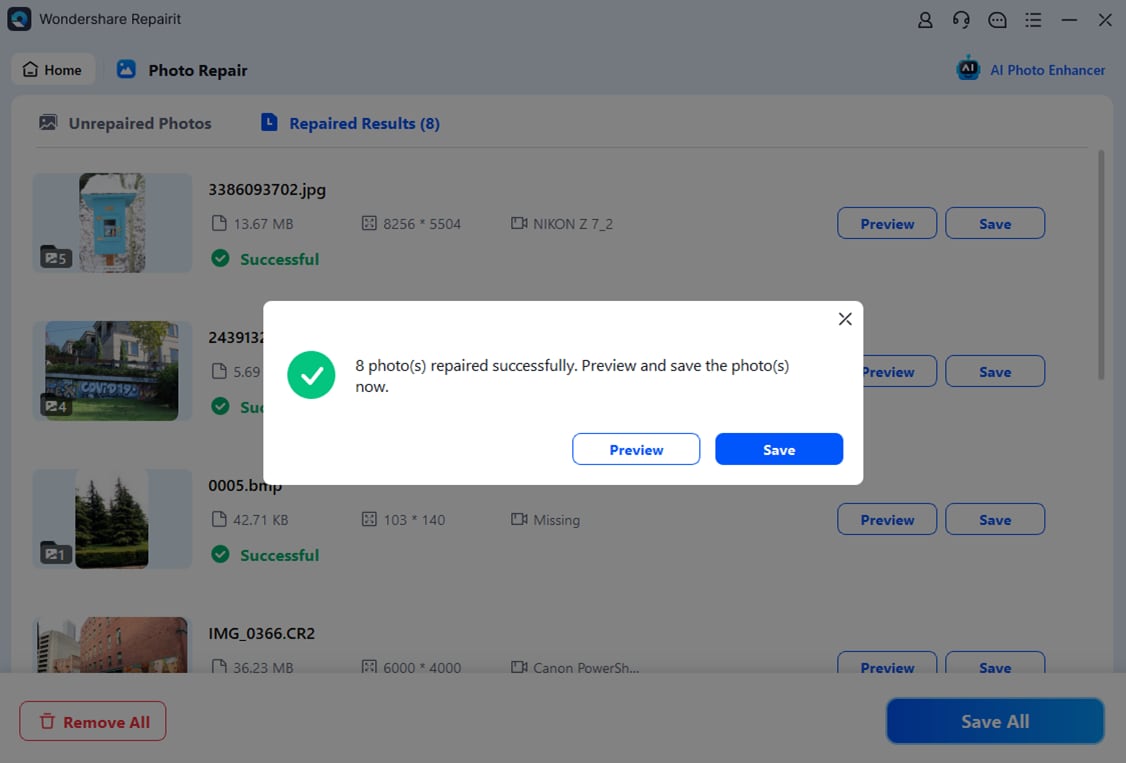
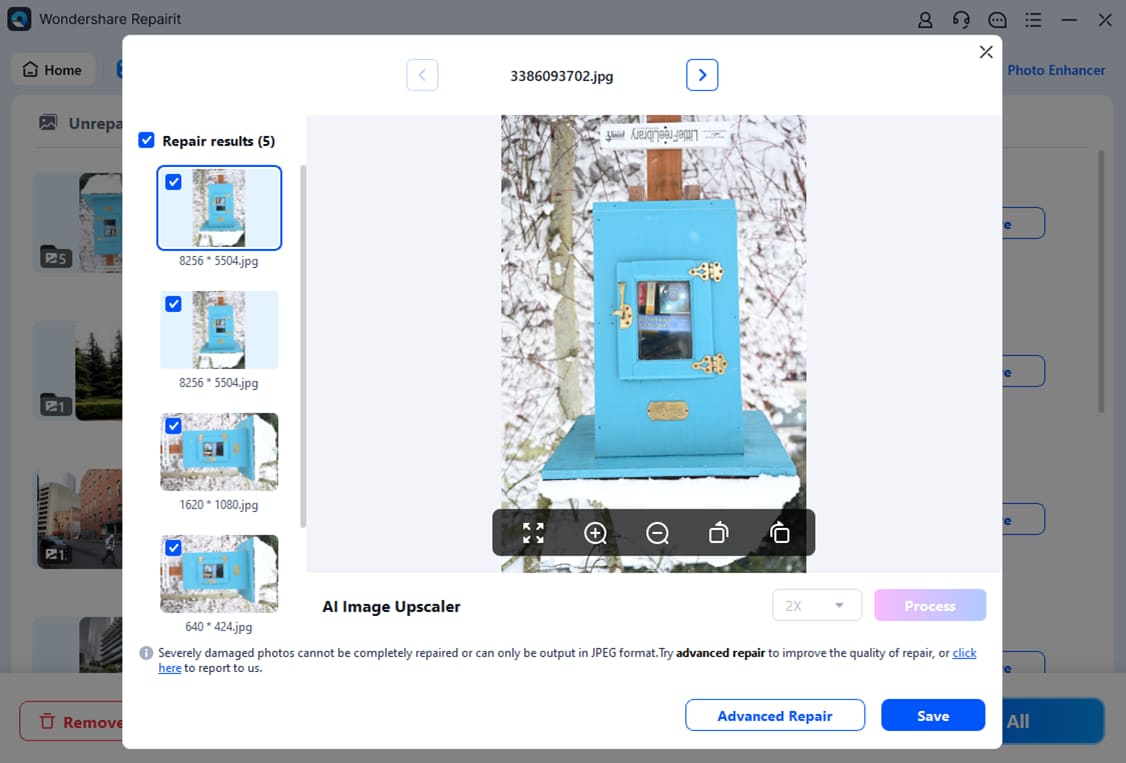
Step 4: Double-click on the images' thumbnail or select Preview to view the recently repaired images. If you are content with the outcome, click Save to download a copy to your computer. Alternatively, choose Advanced Repair if you need to make further edits to the file.
This video can help you fix your corrupted photos with a step-by-step guide.
Repair Your Photo Now

Solution 3: Execute the Troubleshooter for Windows Store Apps
For a quick fix to black screen image issues, try using the Troubleshooter for Windows Store Apps. It's a swift solution to get those visuals back on track. Here’s how to do it in easy steps:
Step 1: Access the Settings application on your Windows PC using the keyboard shortcut Windows + I.
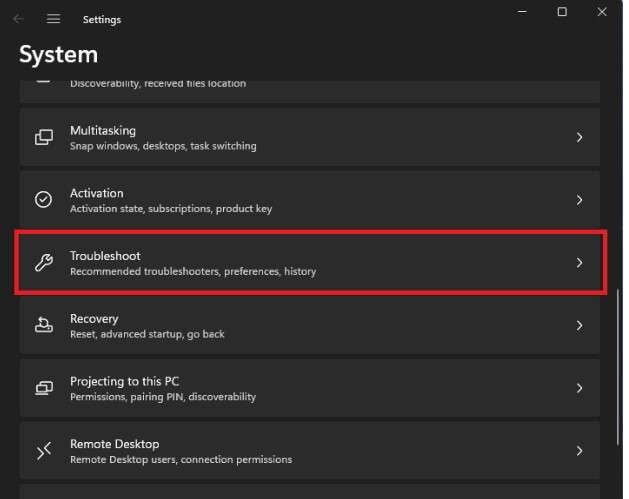
Step 2: Navigate to the left and select System, then on the right side, locate Troubleshoot and click on it.
Step 3: Next, select the Other Troubleshooters option.
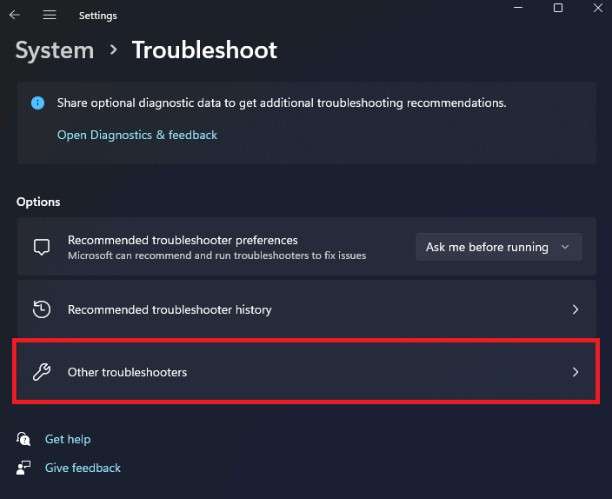
Step 3: Press the Run button adjacent to the Windows Store App.
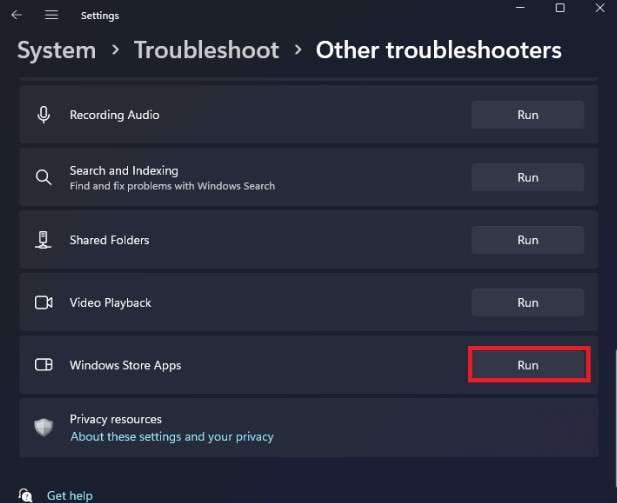
Step 4: The troubleshooter will open. Follow its instructions to resolve any issues with the Microsoft Photos app.
Solution 4: Update the Windows OS
Utilize the Troubleshooter for Windows Store Apps to promptly resolve black screen image issues. This tool efficiently diagnoses and addresses potential glitches, ensuring a swift restoration of your visual content. Here's a simple step-by-step guide.
Step 1: Select the Start icon, followed by the Settings icon, to open the Settings menu.
Step 2: In this section, select the Check for Updates button within the Windows Update category.
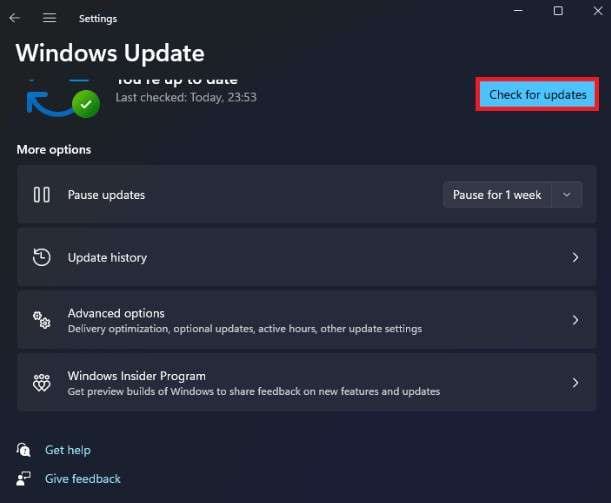
Step 3: Here, you will find a list of all available updates; proceed to Install them.
Step 4: After installing all the updates, Reboot your computer.
Solution 5: Reinstall the Photos App
Consider reinstalling the Photos App as a swift and effective remedy for resolving black screen image issues. This process can help ensure the proper functioning of the application and restore optimal visual display. Here are the simple steps:
Step 1: Press Windows + X, then select Terminal (Admin).
Step 2: Next, execute the given command in the Windows PowerShell:
Get-AppXPackage -AllUsers | Foreach {Add-AppxPackage -DisableDevelopmentMode -Register “$($_.InstallLocation)\AppXManifest.xml”}

This action will remove the Photos app from your computer.
Step 3: After restarting your PC, the Photos app will reinstall itself automatically. Yet, if the Microsoft Photos app doesn't reinstall automatically post-reboot, you can install it manually from the Microsoft Store.
Conclusion
In a nutshell, this guide is your go-to for resolving black screen image issues with Microsoft Photos, offering simple steps like restarting and updating. For a comprehensive solution, turn to Wondershare Repairit. This competitive tool excels at fixing incomplete data, repairing pixelated pictures, and rescuing inaccessible images with just a few clicks. No need for tech jargon – Repairit simplifies the process. It's the ultimate tool for seamless photo viewing, guaranteeing you can enjoy your pictures without disruptions. Say goodbye to black screen headaches and welcome effortless photo browsing. Cheers to smooth sailing with your pictures!
FAQ
-
Why does my screen turn black when attempting to capture a photo?
If you're facing a black screen while attempting to take a photo, it could be caused by a camera app glitch, insufficient lighting, or a lens obstruction. To address this, try restarting the camera app, ensuring proper lighting, and checking for any physical obstructions. Additionally, check if camera permissions are enabled if you can't take a photo due to a blank or black camera screen. -
Why did my Microsoft screen go black?
The black screen of death is a serious system error, causing your computer screen to go completely black forcing a shutdown due to safety concerns. Possible triggers include hardware or software issues and malware. If your Microsoft screen goes black, troubleshoot by checking for updates, ensuring proper hardware connections, and running antivirus scans. If the problem persists, seek technical support. -
What should be done if Microsoft Photos fails to open?
If Microsoft Photos fails to open, you can try restarting your computer, updating the app, or reinstalling it. Ensure your system is up to date, and check for any available troubleshooting options within the app or through your device's settings. If the issue persists, consider seeking support from Microsoft or checking online forums for specific solutions.


 ChatGPT
 Perplexity
 Google AI Mode
 Grok
Grok

