Overexposed photos can easily ruin what could have been a perfect shot. The bright spots in these photos can cause important details to disappear, making the image look washed out and unappealing. However, there's no need to worry because there are effective solutions available. Photoshop is a powerful tool that can help you fix this common issue.
This comprehensive guide will walk you through the process of how to fix an overexposed photo in Photoshop. Even if you're not a Photoshop expert, you can still follow these simple methods to restore your photos. Learning how to fix overexposed photo in Photoshop is easier than you might think.
In this article
Part 1: How to Fix an Overexposed Photo in Photoshop
Fixing an overexposed photo in Photoshop is simpler than you might think. There are various methods you can use to restore details and balance the exposure. In this section, we'll explore three effective techniques: using the Shadow/Highlight tool, creating an adjustment layer, and utilizing the Camera RAW filter.
Each method offers unique benefits for recovering your photos from overexposure. Now, let's explore how each of these techniques functions.
Method 1: Choose Shadow/Highlight
The Shadow/Highlight tool in Photoshop is a powerful and easy-to-use feature that helps correct overexposed areas in your photos. This method is ideal for beginners and experienced users alike because it offers a straightforward approach to adjust the brightness and darkness of specific areas in an image. By focusing on both shadows and highlights, you can bring out details that were lost due to overexposure, making your photo look more balanced and natural.
Here’s how to fix overexposed photo in Photoshop:
Step 1. To use the Shadow/Highlight tool, simply open your photo in Photoshop and navigate to the 'Image' menu.
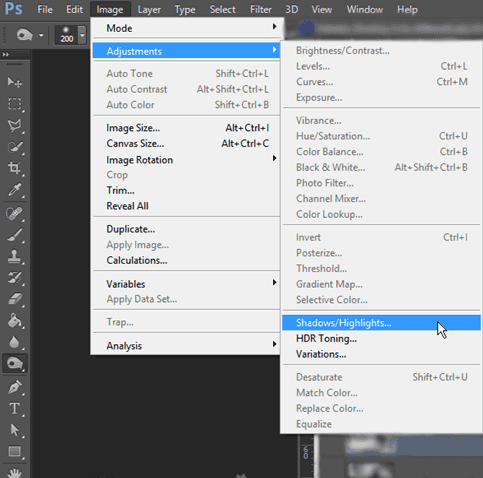
Step 2. From there, select ''Adjustments' and then 'Shadow/Highlight'. This will open a dialogue box with sliders that allow you to control the level of adjustment for both shadows and highlights.
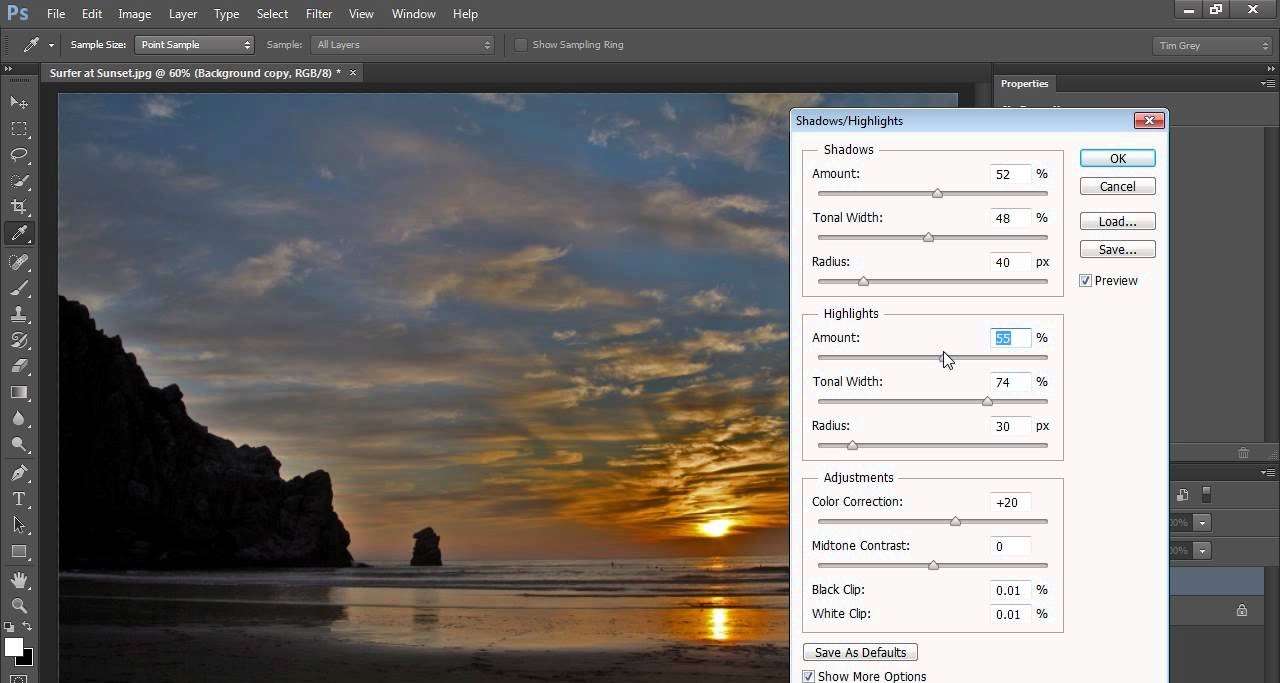
Step 3. Adjust the sliders until you achieve the desired effect, and then click 'OK' to apply the changes.
This method is effective and quick, making it a go-to option for fixing overexposed photos.
Why Use the Shadow/Highlight Method:
- Easy to use.
- Effective at balancing both bright and dark areas in a photo.
- Quick adjustments that provide immediate visual improvements.
Method 2: Creating a Layer
Creating a new adjustment layer is a versatile method to fix overexposed photos in Photoshop. This approach allows you to make non-destructive edits, meaning you can always go back and adjust your settings without altering the original image. This method is great for users who need more control over the exposure levels in their photos and want to make finer adjustments.
Here’s how to fix overexposed photo in Photoshop:
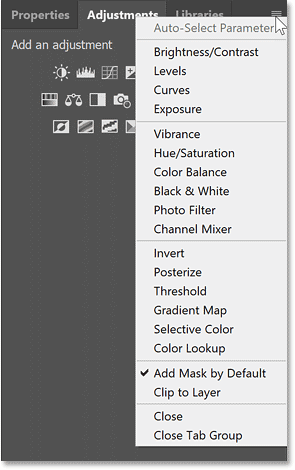
Step 1. To start, open your photo in Photoshop and create a new adjustment layer by selecting 'Layer' from the menu, then 'New Adjustment Layer,' and choose 'Exposure.'
Step 2. Once the adjustment layer is added, you can lower the exposure to reduce brightness and adjust the 'Gamma Correction' to fine-tune the overall look of your photo.
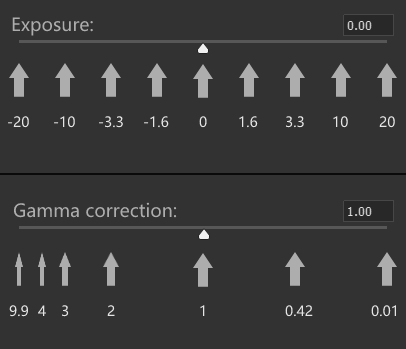
This method gives you the flexibility to tweak the settings until you achieve the desired result.
Why Use the Creating a Layer Method:
- Provides non-destructive editing, preserving the original photo.
- Offers precise control over exposure adjustments.
- Flexible adjustments that can be modified at any time.
Method 3: Fixing Overexposure Using Camera RAW
The Camera RAW filter in Photoshop is a powerful tool that provides extensive options for correcting exposure issues. This method is particularly effective for RAW photos, as it allows you to recover details from overexposed areas that might be lost in other formats. The Camera RAW filter offers a wide range of adjustments, making it suitable for users who need advanced control over their photo editing.
Here’s how to fix overexposed photo in Photoshop:
Step 1. First, open your photo in Photoshop and go to ''Filter,' then select ''Camera RAW Filter.' This will open the Camera RAW interface.
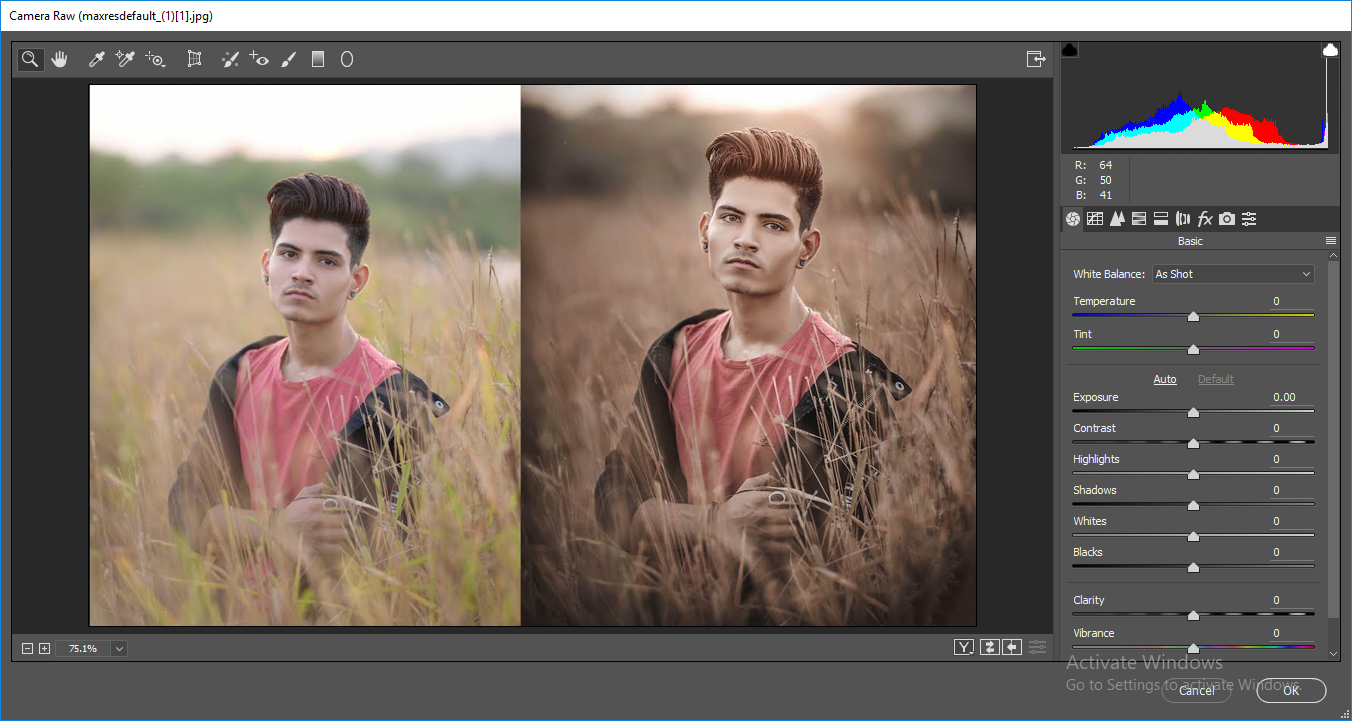
Step 2. Lower the brightness with the ''Exposure' slider. Use the ''Highlights' slider to restore details.
Additionally, you can make other adjustments to enhance the overall quality of your photo. This method is ideal for achieving a balanced and professional-looking result.
Why Use the Camera RAW Method:
- Offers advanced adjustment options for detailed corrections.
- Ideal for RAW photos, preserving more data.
- Enables recovery of lost details from overexposed areas.
Part 2: Stuck with Overexposed PSD Files? Unable to Edit Images? Use Repairit Photo Repair Today
Overexposed photos can sometimes be tricky to fix, even with the best tools and techniques in Photoshop. If you find yourself struggling to bring back the details and balance the exposure, there's a great solution available.
Try using Repairit Photo Repair. This software is specifically designed to handle damaged photos, making it an excellent choice for repairing overexposed images. It can restore your photos with ease, bringing them back to life and saving those precious memories.

-
Repair damaged photos with all levels of corruption, such as grainy photos, dark photos, pixelated photos, faded photos, etc.
-
Repair images of diverse formats, such as JPG, JPEG, PNG, CR3, CR2, NEF, NRW, etc.
-
Repair critically damaged or corrupted photos available on SD cards, phones, cameras, USB flash drives, and more.
-
Repairit has a quick and advanced repairing mode. You can use either depending on the level of corruption the photos has undergone.
-
The "AI Image Upscaler" feature can enlarge the repaired photos to 2X, 4X, and 8X.
-
Intelligently restore old/scatched photo and colorize black and white photos with various AI effects.
-
No limit to the number and size of the repairable photos compared with the online version of Repairit.
-
Support Windows 11/10/8/7/Vista, Windows Server 2003/2008/2012/2016/2019/2022, and macOS 10.10~macOS 13.
With its user-friendly interface and powerful features, Repairit Photo Repair can be a lifesaver for photographers dealing with overexposed photos.
Here's how to use it:
Step 1. Open the software and add your overexposed photo.
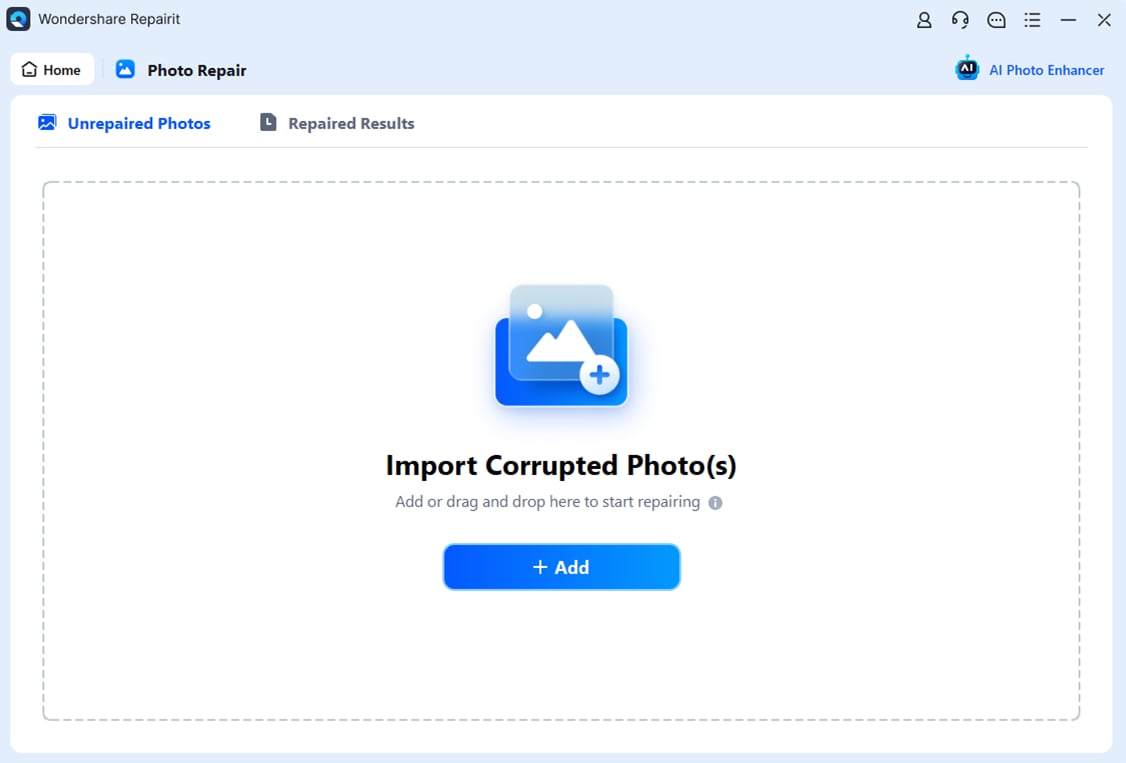
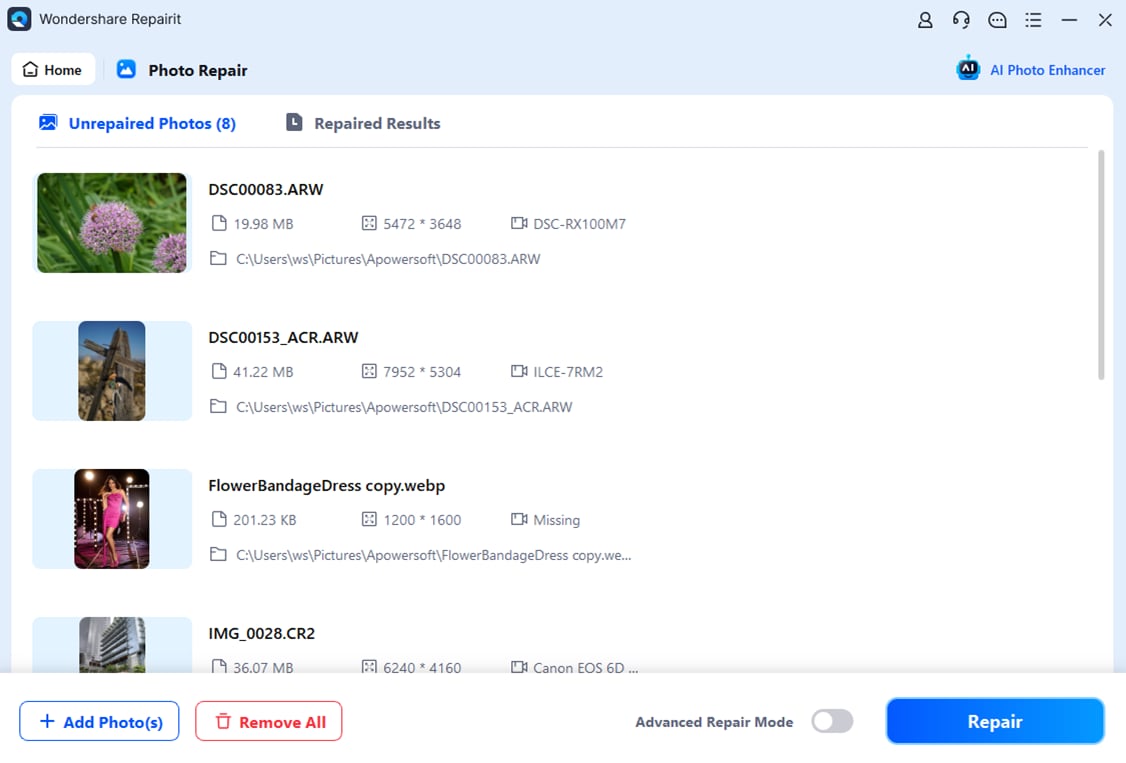
Step 2. Click on "repair" to start the process. Wait for the software to fix the photo.
Step 3. Save the repaired photo to your computer.
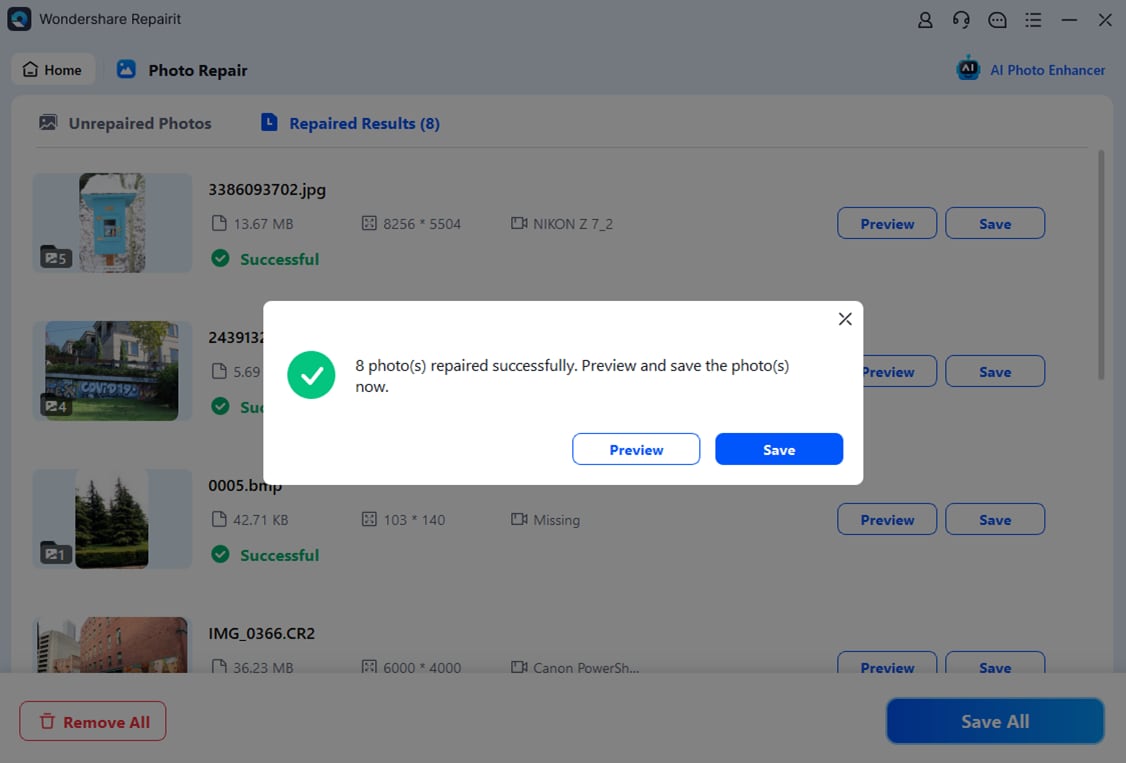
Repair Overexposure Photo Files

Part 3: Tips to Avoid Severe Overexposure in Photos
Preventing overexposure is easier than fixing it later. By following these tips, you can capture better-exposed photos right from the start. Proper camera settings and techniques can make a big difference in your photography.
- Adjust Your Camera Settings Properly: Ensure your ISO, shutter speed, and aperture are set correctly for the lighting conditions.
- Use the Histogram to Check Exposure: The histogram can show you if your photo is too bright or too dark.
- Shoot in RAW Format for More Flexibility: RAW files retain more detail, making it easier to adjust exposure during editing.
- Avoid Direct Sunlight in Your Shots: Bright sunlight can cause overexposure; try shooting in the shade or during golden hours.
- Use Filters if Necessary to Balance Light: ND and polarizing filters can help manage light intensity.
- Keep an Eye on Your Light Source: Be mindful of where your light source is and how it affects your subject.
- Take Multiple Shots with Different Exposures: Bracketing can help ensure you get a well-exposed photo.
- Learn to Use Exposure Compensation on Your Camera: Adjusting the exposure compensation can help control overexposure.
By keeping these tips in mind, you can avoid severe overexposure and take better photos. Experiment with different settings and techniques to find what works best for you.
Conclusion
Fixing overexposed photos in Photoshop is easy once you know the methods. Use the Shadow/Highlight method, create a new layer, or use the Camera RAW filter. If you find yourself stuck, try Repairit Photo Repair. By following these tips, you can prevent severe overexposure in your photos.
By following these methods and incorporating the provided tips, you can prevent severe overexposure in your photos. Adjust your camera settings, use histograms, shoot in RAW, and consider using filters to manage light better. Keep an eye on your light sources, experiment with different exposures, and use exposure compensation as needed.
Keep experimenting and learning, and soon, you'll master the art of fixing overexposed photos in Photoshop. The key is to practice and refine your skills, ensuring you achieve the best possible results in your photography.
FAQ
-
What causes overexposure in photos?
Overexposure in photos is caused by too much light hitting the camera sensor. This can happen when the scene is very bright, such as in direct sunlight, or when the camera settings are not adjusted properly for the lighting conditions. Factors like high ISO settings, slow shutter speeds, or wide apertures can contribute to overexposure. The result is a photo with bright, washed-out areas where details are lost. -
Can I fix overexposed photos without Photoshop?
Yes, you can fix overexposed photos without Photoshop. There are several alternative photo editing software and apps available that can help. Programs like GIMP, Lightroom, and online tools such as Pixlr or Fotor offer features to adjust exposure, brightness, and highlights. These tools can be effective in restoring details to overexposed images, making them a good choice for those who don't have access to Photoshop. -
Is it better to shoot in RAW or JPEG to avoid overexposure?
Shooting in RAW is generally better if you want more flexibility in editing and recovering from overexposure. RAW files contain all the data captured by the camera sensor, providing greater latitude for adjustments in post-processing. This allows you to recover more details from overexposed areas. JPEG files, on the other hand, are compressed and lose some of the data, making it harder to fix exposure issues. Therefore, shooting in RAW is recommended for better control and quality.


 ChatGPT
 Perplexity
 Google AI Mode
 Grok
Grok

