What is audio compression? Why do you use it? All the answers are here!
Audio compression is a crucial and frequently misunderstood part of music and sound engineering. But, to achieve top-notch audio quality, it's essential to have a good grasp of the intricacies of audio compression.
This article will offer you the necessary knowledge about audio compression to improve your audio productions. Whether you want to start your music career or are a seasoned pro, you will get various essential insights here about audio compression.
In this article
What is Audio Compression?
Audio compression helps control the difference between the loudest and softest parts of a sound. When the sound gets too loud, it reduces the volume. This can be a bit confusing because people often think compression is used to make things louder in music, but it actually makes the loud parts quieter.

The settings of a compressor enable you to determine when a signal's gain is lowered, how fast that gain is reduced, and how much it is reduced. Also, how quickly it stops being reduced. You can level the dynamics of a performance, give a punch to a drum set, bite to a guitar, provide excitement to a whole mix, and much more.
Audio Compression: Its Role in Music
In music, audio compression is essential. It reduces the dynamic range of audio signals, balancing softer and more robust sounds. The procedure improves clarity, reduces distortion, and improves the entire listening experience. Thus, compression is a necessary ability for all music producers since it significantly influences everything from percussion to modern studio vocals.
Moreover, it is used by musicians, engineers, and producers to shape the sound of instruments and voices, adding depth and punch to recordings. Audio compression is essential to attaining polished and professional sound quality in music, whether in the studio or during live performances.
Why Use Audio Compression in Mixing?
Previously, you have seen that compression minimizes the dynamic range of signals that contain loud and quiet portions so that both may be heard clearly.
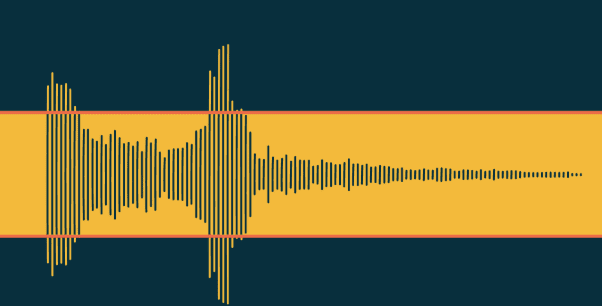
- Managing Sound Dynamics: In music, there's a significant difference between subtle sounds like a whispering vocal and the sharp snap of a snare drum. To capture both effectively in a recording, a mix engineer needs to manage the dynamics.
- Sound Dynamics Example: Sometimes, the loudest parts of a sound can drown out the quieter details, even within the same sound. A good example is a recorded drum set. The initial burst of energy when a stick hits the drum skin is called a "transient," and it's often the loudest part of the sound
- Importance of Compression: Compression is a tool used to address this issue. It reduces the volume of the loud initial hits (transients) and enhances the sustain and decay of the sound in the room. For instance, in the case of drums, compression makes the loud stick hits quieter and increases the volume of each drum's continuing sound and the room's natural ambience.
How Audio Compression Works
Audio compression is a critical technique that shrinks audio files without sacrificing quality. It works by deleting superfluous or less relevant material from the file, making it easier to store or transmit.
Lossless and lossy audio compression are the two most prevalent kinds. Lossless compression preserves all original data, but lossy compression compromises some data to obtain better compression ratios. MP3 and AAC codecs are extensively used for effective audio compression, reducing file sizes for streaming and storage while preserving acceptable audio quality.
Common Audio Compression Parameters
The following are some significant audio compression parameters that you can check:

Parameter 1: Threshold
The threshold setting of a compressor allows you to choose the level, measured in dBFS, at which the compressor will begin to function on a signal. The complete form of dBFS is "decibels relative to full scale." Audio that exceeds the threshold is compressed, and the audio that falls below the threshold is not.
Parameter 2: Ratio
When a signal exceeds the threshold, the ratio setting determines how much it is reduced. The amount turned down is referred to as "gain reduction"—sometimes abbreviated as GR—and the higher the ratio, the more significant the gain reduction.
It's as easy as decibels in against decibels out. A 4:1 ratio, for example, indicates that for every 4 dB signal above the threshold at the input, you will receive 1dB at the output.
Parameter 3: Attack
Once a signal goes over the threshold, the time it takes for a compressor to accomplish a certain degree of gain reduction is called the attack. Sometimes it is 2/3 of the overall gain decrease, and occasionally it is all. It is one of the reasons why the same attack time on two different compressors sounds different.
Furthermore, what is quick and slow in mastering is often shorter than what is fast and sluggish when compressing a single instrument. As a result, there will be some value overlap.
Parameter 4: Release
When a signal falls below a certain threshold, the release setting governs how quickly a compressor restores the signal to its original uncompressed condition. The appropriate release time depends on rhythm, pace, the compressed signal type, and the desired impact.
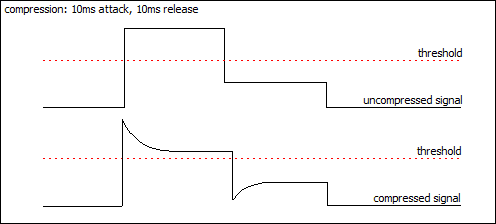
When aiming to ease out overall dynamics, you may want a slow and smooth release time relative to the performance. It results in transparency. When compressing a percussive instrument, such as a snare drum, you want the release time to be short enough. It is to allow the compression to end before the following snare strike.
Parameter 5: Knee
As a signal approaches the threshold, the knee influences how a compressor responds. You've already established that a compressor will only respond to a signal if it reaches a certain threshold. It is known as a hard knee reaction, and it is typical of most compressors.
However, certain analog leveling amplifiers, like the classic LA-2A, respond to a signal with a soft knee, and some compressor plugins have a knee parameter that can be adjusted from hard to soft. Using a soft knee causes the compressor to begin compressing a signal gently. It gradually raises the ratio as it approaches the threshold, resulting in a more gentle transition and a more transparent sound.
Parameter 6: Makeup Gain
When a signal is compressed, its overall level becomes quieter. Makeup gain is a level adjustment at the compressor's output. It allows the compressed signal to be cranked back up to compensate for the gain drop produced by compression.
As you always perceive that louder sounds are better for your hearing, regulating a compressor's makeup gain is critical. It is because the compressed signal is at the same level as the uncompressed signal while the compressor is in "bypass." It will allow you to appropriately evaluate both signals and judge your efforts within the context of the overall mix.
Some Significant Compressor Mistakes
Below are some common compressor mistakes that can be easily seen:
Mistake 1: Too Fast Attack On Drums
It's tempting to hear an excellent compressor plugin clamp down as forcefully as possible when you first get your hands on it. In the context of a mix, it can be a significant issue with drums.
When the attack is too quick, the transients are pushed down too deep into the drum's body to pierce through a dense track. It might lead your drums to vanish, leaving your mix sounding flat and lifeless.
Mistake 2: Very Low Threshold
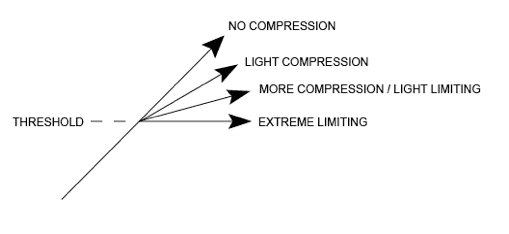
Lowering the threshold will intensify the compression effect. In some ways, it will, but dynamics are more complicated than that. Hearing the compressor's release contributes significantly to the nature of a sound.
You're not hearing what the compressor can accomplish if the threshold is set so low that it never releases! Musical compression often results in the gain reduction needle dancing and bouncing along with the beat.
Mistake 3: Audio Compression Instead of Levelling
It may also appear contradictory, but a compressor cannot always regulate extremely significant swings in dynamic range in uneven performance. It is most noticeable when blending vocals, especially when softer portions are mixed in with screamed or sung parts.
You shouldn't expect a single compressor to deliver enough transparent gain reduction to level out the overall performance in these cases. In fact, if one segment makes your compressor work much harder, you should utilize automation or clip gain to manage the level that flows into it.
Check The Compression Techniques
The following you can see the list of a few excellent compression techniques:
Technique 1: Serial Compression
A single compressor is frequently insufficient to handle a dynamic signal. Indeed, engineers often use many compressor plugins in sequence to manage the dynamic properties of crucial inputs such as voices.
For example, a vocal performance that includes both snappy, quick syllables and prolonged notes provides a problem. Use quick, brief compression with a high ratio to keep transients under control. However, you must set the threshold high enough so that loud noises are not over-compressed.
It indicates that the compressor will not function on milder, sustained tones below the threshold. Nonetheless, dynamics control may be required for this aspect of the performance.
In this situation, a second compressor added after the first can be configured differently to deal with this. This approach is known as serial compression and is used in many different types of voice production. Use a slower, softer compressor after a quicker, more aggressive one to have even more control over your voice.
Technique 2: Parallel Compression
Another approach designed for a specific purpose in mixing is parallel compression. You may encounter instances where you want a strong squashing compression effect to get the desired sound without fully strangling the natural transients in the original sound.
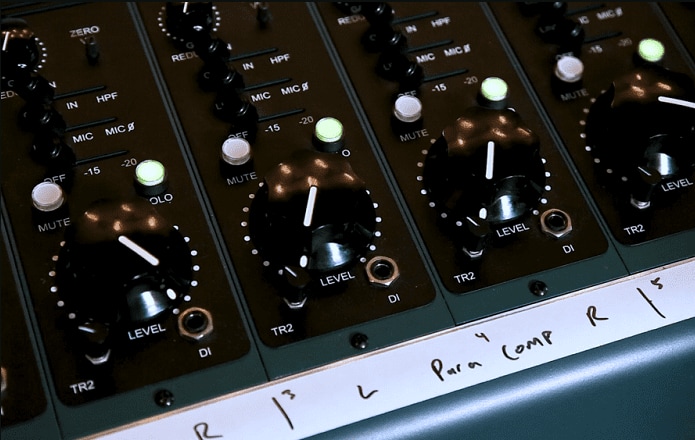
It's especially frequent when mixing drums to get a good balance of punch and sustain. Here, parallel compression is the solution.
The compressed signal is mixed with the original uncompressed sound in this configuration until some of the initial snappy transients reappear. Some compressor plugins have a built-in mix knob to facilitate parallel blending. However, configuring your compression in parallel with an aux send and return can achieve the same result with any compressor plugin.
Technique 3: Sidechain Compression
Finally, you've probably heard about sidechain compression if you make electronic music. It's the technology behind the ducking bass drum sound that became everywhere in the early 2000s.
Fortunately, it's one of the simplest studio compression techniques to set up in your DAW. All you have to do is adjust the sidechain input of the processor. Make a send from the track where you want the ducking to happen.
Then, on the track you want to duck, introduce a compressor and set its sidechain input to the send from the source track. The compressor will now respond to audio from the send track rather than the one it is put on.
Wondershare Repairit Audio Repair: Solution For The Audio Problems
When you perform audio compression, sometimes the outcomes can have an issue. As a result, you will not be able to use them appropriately as you want. In such a scenario, you will require a quick solution to help you. Wondershare Repairit is one such tool that can be helpful.
Wondershare Repairit Audio Repair

Wondershare Repairit Audio Repair is an excellent audio restoration and enhancement software solution. It offers an efficient approach to fixing and returning the damaged audio files to their original condition. Even novices may utilize the program with easy-to-follow steps.
Some excellent characteristics of this tool are:
- It has a user-friendly interface.
- It can detect and solve various sound defects.
- It supports multiple audio file formats.
- It enhances the quality of audio from different resources.
This video can help you fix your audio files with a step-by-step guide.
In The End
Understanding the concepts of audio compression can improve your experience as a music producer, podcaster, or passionate music listener. Compression is an effective technique for adjusting dynamic range, balancing audio levels, and producing a more professional sound.
Moreover, you can adjust compression to your unique needs by learning principles such as threshold, ratio, attack, and release. After performing the audio compression, you can find a problem with your audio files. It is why this article also includes a quick brief about the Wondershare Repairit Audio Repair tool that can help.


 ChatGPT
 Perplexity
 Google AI Mode
 Grok
Grok

