
Are you tired of seeing grains in photography? Graininess can ruin what would otherwise be a great shot. But don't worry! There are ways to resolve this common issue.
This article will dig into the top three methods for enhancing grainy photos. We've included everything from basic tips to advanced tricks.
No matter if you are a beginner or an expert photographer, these tips will help you capture clearer, cleaner images. Let's find out how to convert your grainy photos into professional ones.
In this article
Part 1. What Causes Grain in Photography?
Grainy photos, also known as noise, can arise from various factors. Digital cameras are handy but can sometimes capture grainy images, a common issue.
Understanding the reasons behind graininess is essential. It will help you control it when taking photos. The more aware you are of causes, the more effortless it will be to avoid these issues in the future.
- Low Light Conditions
Noise or grain in pictures usually appears when there is inadequate light for a clear shot. Low light conditions force camera sensors to increase sensitivity, often boosting the ISO setting. This adjustment leads to grain or noise, affecting photo clarity regardless of the camera's quality.
- High ISO Settings
ISO calculates your camera's sensor sensitivity. The higher the ISO, the more likely it is to capture noisy photos. While increasing ISO helps in low light or at night, it also significantly increases the chance of grain.
- Small Sensor Size
If your photos are grainy even in decent light, it might be because your camera has a small sensor. Small sensors struggle in anything but bright light. Larger sensors have more pixels to capture light, resulting in less grain.
- Fast Shutter Speed
The photos also turn out grainy because of a fast shutter speed. Because the sensor has less time to collect the light. This often means you have to increase the ISO, which results in more grain your photos.
- Low Exposures
The picture can be grainy if your photo's exposure time is too short. Set the right exposure time for the scene you're capturing.
Part 2. How to Fix Grained Photos - Top 3 Methods
Here, we'll discuss the top three methods for effectively fixing grainy photos and enhancing image quality. These approaches will give you clear, professional results.
Method 1. Fix Photo Grain With Repairit Photo Repair
Tired of grainy photos? Meet Repairit Photo Repair —a simple, one-click solution to clear up your images. Perfect for beginners, Repairit makes it easy to transform grainy shots into crisp photos without the complexity of Photoshop.
It supports all file types and has no size or number limits. While it’s not as feature-rich as specialized editing software, its user-friendly interface and strong repair success make it a standout choice for quick fixes.
Key Features:
- Fixes corrupted, damaged, and broken image files.
- Compatible with multiple file formats such as JPG, PNG, TIFF, ARW, and HEIC.
- Supports batch repair, enabling simultaneous fixes for multiple photos.
- Includes a preview option to check photos after repair before saving.
- It offers a simple interface accessible to users of all skill levels.
- Uses innovative technology for a high success rate in photo restoration.
Step 1: Download and install Wondershare Repairit on your computer. Open the program, navigate to "More Types Repair," and choose "Photo Repair."

Step 2: Click the "Add" button to upload your grained photo.

Step 3: Click the "Repair" button to initiate the process. The software will automatically detect and fix the graininess.

Step 4: Wait for the repair process to end, which usually takes a few seconds. Once it has finished, preview the repaired image to check if it meets your expectations.
Step 5: If you're happy with the results, click "Save" to store the repaired image in your desired location.

Fix File Conversion Encoding on Microsoft Word Now
 Security Verified. Over 7,302,189 people have downloaded it.
Methods 2. Fix Photo Grain With Adobe Photoshop
Adobe Photoshop is a steadfast tool for reducing grain in photos. The built-in Noise Filter feature assists in minimizing graininess. Thus making your images look cleaner.
While it may not entirely remove noise, it can significantly reduce it, enhancing the picture's overall quality. It's an excellent option for quick photo improvements.
Key Features:
- Offers extensive photo editing tools and features.
- Supports layers and masking for advanced design flexibility.
- Includes 3D design capabilities for comprehensive graphic projects.
- Provides an extensive library of brushes, patterns, and gradients.
- Enables automation with actions and batch processing.
- Integrates with Adobe Creative Cloud for project management.
Below is the guide to using the Noise filter in Adobe Photoshop.
Step 1: Open Adobe Photoshop on your Mac or PC.
Step 2: Upload your grainy picture into the tool.
Step 3: In the top menu, go to Filter, then Noise, and select Reduce Noise.
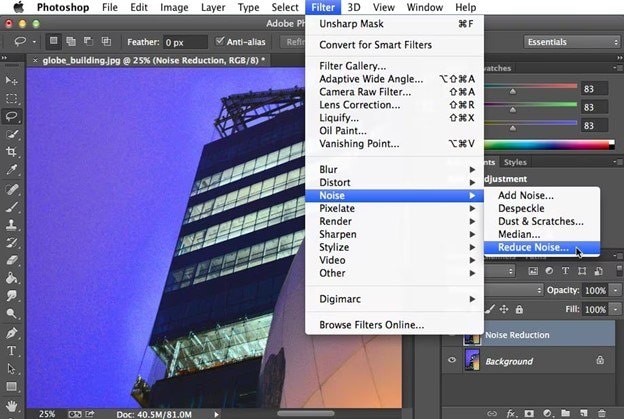
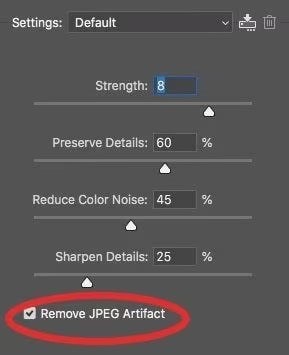
Step 4: In the Reduce Noise window, adjust the sliders for Strength, Reduce Color Noise, and Sharpen Details until you get the desired image quality.
Step 5: Check the Remove JPEG Artifact box to view the result in the Preview section on the right side.
Step 6: When happy with the results, click OK and save the edited image.
Methods 3. Fix Photo Grain With Lightroom
Adobe Lightroom offers powerful tools for fixing grainy photos. It's ideal for users seeking greater control over photo quality without the complexity of Photoshop. Lightroom excels in reducing grain and consistently delivers satisfying results.
Key Features:
- Streamlined photo editing with intuitive controls.
- Powerful presets for quick adjustments and consistent styles.
- Advanced color correction and manipulation tools.
- Organizes photos with tagging and automatic sorting features.
- Seamless integration with Adobe Photoshop for detailed edits.
- Cloud storage for easy access and backup of photos.
Below is the guide to fixing photo grain using Lightroom.
Step 1: Launch Adobe Lightroom Classic on your Mac or PC.
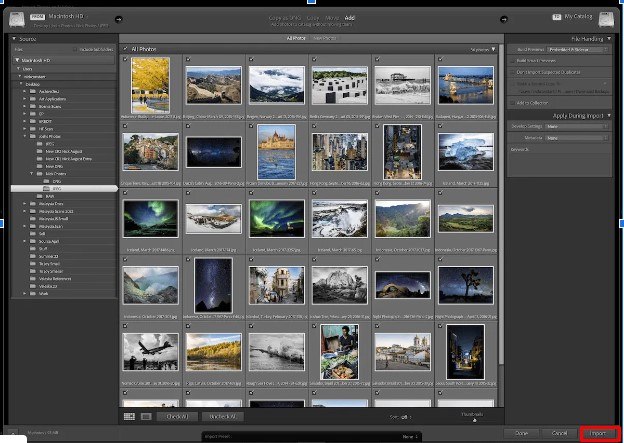
Step 2: Click on Import to open the grainy photo in Lightroom Classic. Select the grainy image and click Import.
Step 3: Navigate to the Develop module of Lightroom. Then, open the detail panel.
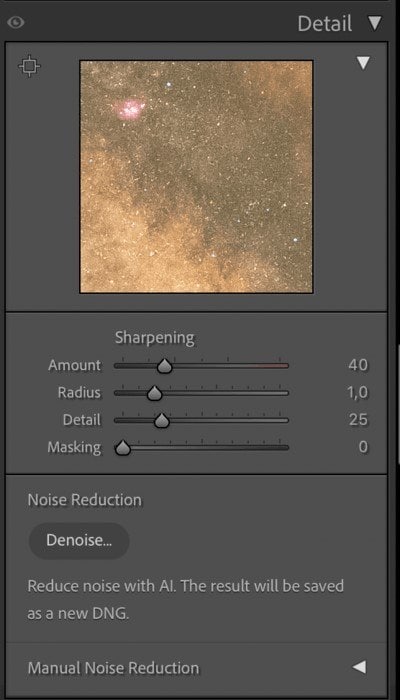
Step 4: In the left pane under Noise Reduction, you'll find Luminescence and Color options.

Step 5: Begin with Luminescence and adjust the noise reduction bars for Detail and Contrast until the grain is reduced. Then, fine-tune the sliders and preview the changes in the right pane. Finally, save the edited photo and export.
Part 3. How to Avoid Grainy Photos in the First Place?
Grainy photos can be disappointing, but there are ways to avoid them. Adjusting a few camera settings and paying attention to your environment can capture more apparent, sharper images.
- Maximize Light: Good lighting is essential for reducing grain. Always try to shoot in well-lit areas. More light hitting the camera sensor means less chance for noise.
- Optimize Camera Settings: Tweaking your camera settings can help reduce grain. Adjust them based on your surroundings and available light.
- Lower ISO: Keep your ISO as low as possible to prevent grain. Higher ISO settings increase light sensitivity. However, it can also add grain to your photos.
- Wider Aperture: A wider aperture (low f-stop number) allows more light. Thus, it reduces the need to raise the ISO and keep the grain low.
- Slower Shutter Speed: A slower shutter speed allows more light to reach the sensor, helping to avoid grain. Yet, if the subject or camera moves, be cautious of motion blur.
- Use a High-Quality Camera: High-quality cameras better manage low-light situations. They produce less noise even at higher ISO settings, resulting in clearer images.
- Shooting in RAW Format: Shooting in RAW format retains more image details. This makes it easier to reduce noise during editing without losing quality.
Conclusion
Grains in photography can be fixed easily. First, shoot in good light and adjust your camera settings. If you still see the grain, use Adobe Photoshop or Lightroom to reduce it. These tools give you control over the noise level. For a faster solution, try Repairit Photo Repair. It's simple to use and works well. You can get clearer photos if you adjust settings manually or use quick fixes.
FAQ
How can I prevent my photos from being grainy?
Ensure there’s enough light when taking photos. Use natural or artificial light to brighten the subject. Lower the ISO, widen the aperture, or slow the shutter speed to adjust your camera settings. These help capture more explicit images with less grain.Are RAW images sharper than JPEGs?
RAW images are less sharp straight from the camera compared to JPEGs. However, RAW files capture more data, allowing for better editing. You can adjust sharpness and other details in post-processing to get a much more precise and refined image.What causes photo corruption?
Photo corruption can happen due to malware, improper file handling, or saving in unsupported formats. Power failures during file transfers or editing can also corrupt photos. Using faulty storage devices can be another reason.
