
 TL;DR:
You can safely downgrade Windows 11 to Windows 10 without losing files by selecting the "Go back" option within your Windows Update Recovery settings, provided you execute this process within the strict 10-day window after upgrading.
● If the 10-day limit has expired, the only downgrade option is a clean installation of Windows 10 using a USB flash drive or Microsoft's Media Creation Tool, which will completely wipe all data from your computer.
● Before initiating either downgrade process, manually back up all important files to an external drive or cloud storage to prevent accidental data loss, and ensure you possess a valid Windows 10 license key if a clean install is required.
● The standard 10-day rollback takes 15 to 30 minutes, and while it preserves personal data, it deletes any system settings modified during your time on Windows 11 and may require you to reinstall specific applications.
Ask AI for a summary
 ChatGPT
 Perplexity
 Gemini
 Claude
 Grok
Grok
Have you upgraded your Windows operating system but need easy ways to roll back Windows 11 without any risk? It is possible, and you won’t even lose any of your files on that PC.
Windows 11, the latest operating system from Microsoft, has hit the mainstream media. Early adopters have jumped on it with enthusiasm, eager to see what the new operating system has in store.
The brand-new operating system comes with meaningful visual enhancements that overshadow the feature upgrades for its predecessor, Windows 10. The ‘Start’ menu has been creatively modified, and it features the following:
• A system tray
• A notification center
• Rounded edges
•A redesigned taskbar
However, some users experienced severe compatibility issues, errors, and other problems when they upgraded their Windows 10 operating systems to Windows 11.
You can roll back Windows 11, but you only have a 10-day chance to return to Windows 10.
Part 1. Why You Need to Downgrade Windows 11 to Windows 10
The Windows downgrade is a pushover if you carry out the process within 10 days. But after 10 days, the entire process becomes pretty difficult. This is because you will have no option but to clean install Windows 10 BEFORE removing Windows 11.
You will need to reinstall Windows 10 on your PC. This is why it is highly crucial and safer to downgrade Windows 11 to Windows 10 in less than 10 days.
Part 2. The Step-By-Step Guide for Rolling Back Windows 11
Roll Back Windows 11 within 10 Days: Settings Guide
Step 1: Click the Windows key or ‘Start’ button and click on 'Settings' on Windows 11.
Step 2: On the pane on the left-hand side of the interface, click 'Windows Update.’ Then select ‘Advanced options’ on the right-hand side pane.
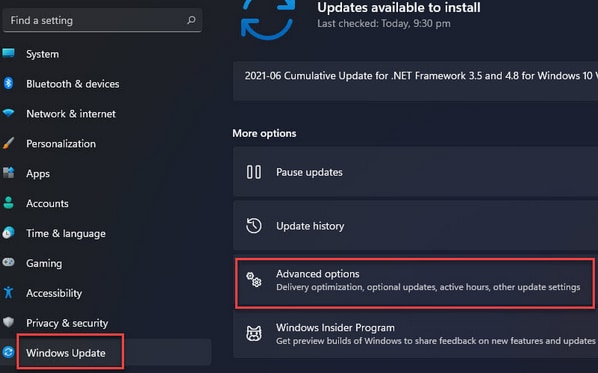
Step 3: After clicking 'Advanced options,' another screen with several tabs named Optional updates, Delivery Optimization, Recovery, Restart apps, etc., appears.
Step 4: Select ‘Recovery.’
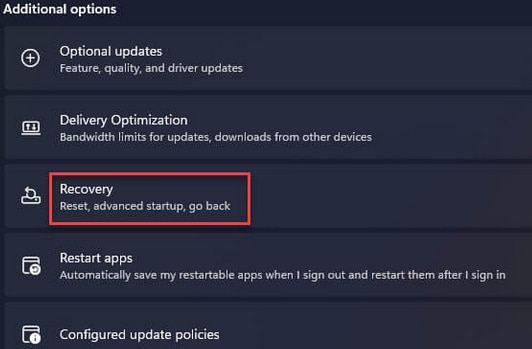
Step 5: After clicking the 'Recovery' tab, the system will present you with a new set of tabs such as 'Reset this PC,' Advanced startup, etc. Click the ‘Go back’ tab.
Step 6: Wait patiently as your PC gets things ready, as shown below:

Step 7: The system will eventually present you with the following interface:
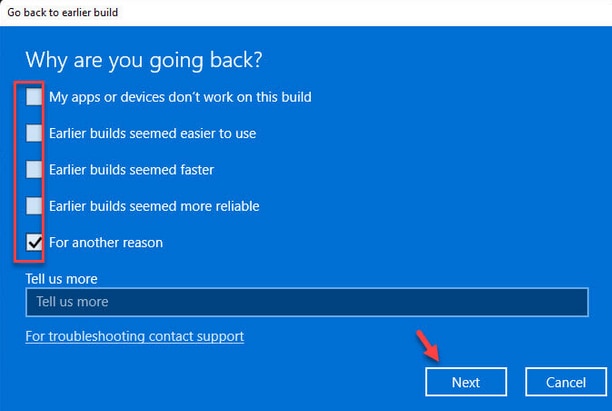
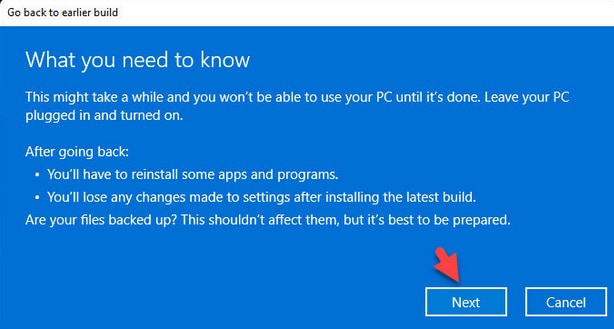
Step 8: Tick any of the boxes, move down, and click the 'Next' button. Another interface pops up as shown below:
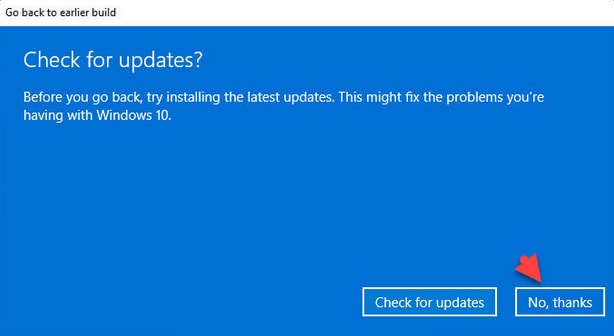
Step 9: Microsoft will attempt to win you over by encouraging you to ‘Check for updates.’ The reason for this is that Microsoft assumes that if you are having challenges with Windows 11, you can fix the challenges if you install the latest updates.
Don’t fall for it. Your mind is already made up, and no Jupiter should sway your target.
Just click the ‘No, thanks’ button in order to proceed with rolling back Windows 11. Then click ‘Next’ as shown below:
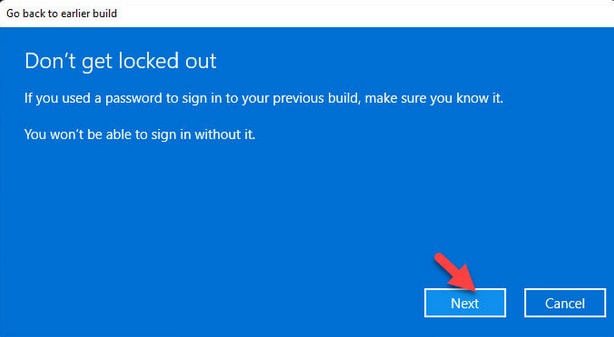
Step 10: Click the ‘Next’ button again. Select the ‘Go back to earlier build’ button.
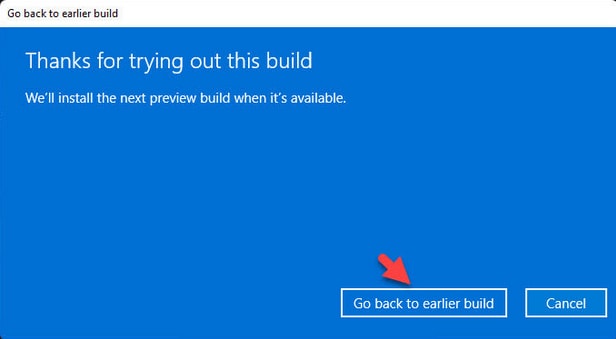
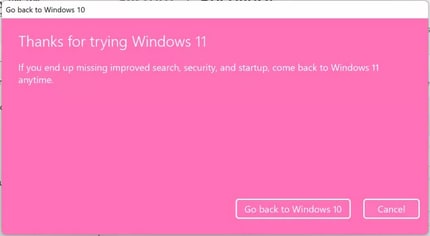
Step 11: As soon as you click the 'Go back to earlier build' or 'Go back to Windows 10,' your PC will automatically restart. The process of the unfavorable Windows 11 begins almost immediately.
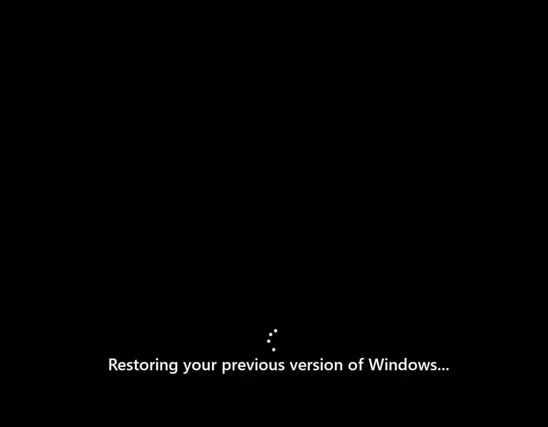
This is where you sit back and wait patiently as the system starts restoring the previous version of Windows. This process may take up to 15 minutes or even as high as 30 minutes, depending on several factors such as storage drive speed, the size of your PC’s hard drive, etc.
In other words, your PC will be unavailable for a short while, and there will be nothing for you to do. If the rollback is taking place on a laptop, ensure you plug it into a reliable power source. This is to prevent the laptop's battery from running flat halfway through the process.
The displayed animation informs you that something is happening somewhere in the background.
You should also remember that you will lose the multiple settings changes you made after upgrading to Windows 11. For this reason, you may have to reinstall a few apps.
Windows 10 Login
Step 12: Before long, the Windows 10 login screen will be presented to you. Select your user account and fill in your PIN or password.
As mentioned briefly earlier, you will discover that some settings have changed while removing Windows 11. This means you may spend a few minutes reinstalling your favorite apps that no longer work or have been removed completely.
However, you should happily discover that all your data has been fully retained. Check to see if you have lost any important file and restore it from your backup.
Reinstall Windows 10 (The Only Option After 10 Days)
If, during the recovery process, you encounter the following message: ‘this option is no longer available on this PC,’ it simply means you can’t roll back Windows 11 via the first method discussed in the previous section.
That message will only pop up if you decide to reinstall Windows 10 after 10 days.
You can do this in 2 different ways:
i. Clean install Windows 10 from the official Microsoft website
ii. Reinstall Windows 10 from USB
Option 1: Clean Install Windows 10 from the Official Microsoft Website
Before you clean install Windows 10 from Microsoft’s official website, ensure you own a valid Windows 10 license. Secondly, make sure you back up all important data and files as this process will wipe your PC completely.
The amount of time you need to complete this installation process depends mostly on your internet speed. This is because the Windows 10 image is incredibly large.
Installing the operating system is much quicker on faster SSDs than older HDDs.
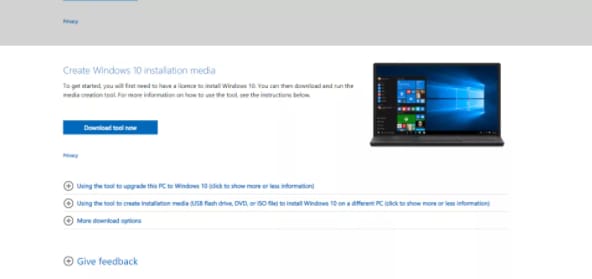
You can obtain the Media Creation tool directly from Microsoft. The download is not large and will, therefore, not take too long to complete. You don’t even have to install the tool as it can run effectively as a standalone application.
Option 2: Reinstall Windows 10 from USB
The best way to reinstall Windows 10 is via a USB flash drive. You need to create it using a third-party tool like Rufus or via the Command Prompt, Media Creation Tool, etc.
You need to ensure that your PC can boot up from USB. For this to be possible, you may have to adjust the UEFI or BIOS settings.
These settings are usually different on most PCs from different manufacturers. You may have to check your PC manufacturer’s support site for more details.
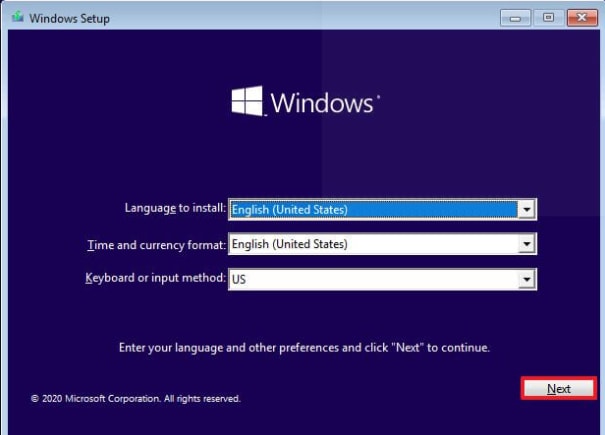
Follow these steps to reinstall Windows 10 from USB:
Step 1: Start your PC using the Windows 10 USB flash drive. Press any key on the computer to continue. The following screen will pop up:
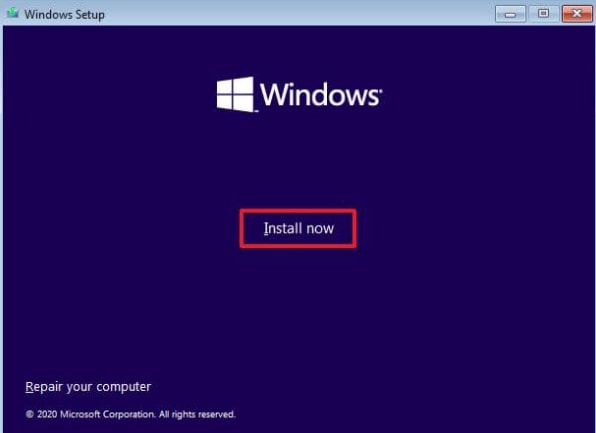
Step 2: Click the ‘Next’ button. Then, Click the ‘Install now’ button.
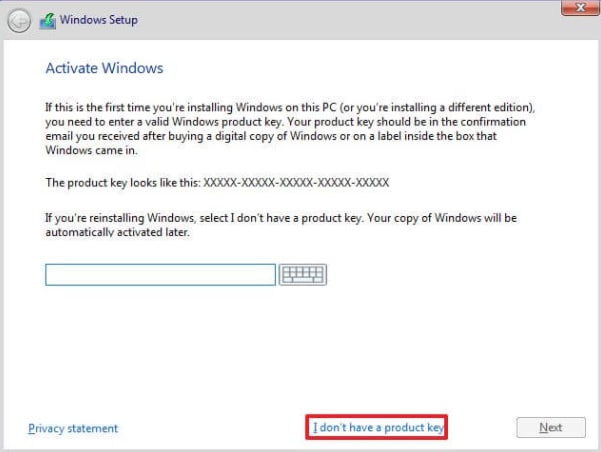
Step 3: The following screen pops up. Click the ‘I don’t have a product key’ since you are reinstalling Windows 10. But reactivation happens automatically if Windows 10 has been activated after installation.
Step 4: Select the edition of Windows 10 that your private license key activates.
_.PNG)
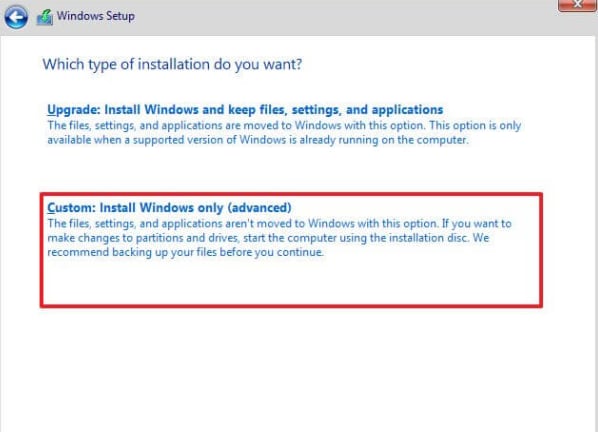
Step 5: Check the 'I accept the license terms option. Then click the 'Next' button. Select the ‘Custom: Install Windows only (advanced)’ option.
Step 6: Select every partition within the hard drive you want to install Windows 10 and click the 'Delete' button. In most cases, the 'Drive 0' refers to the drive with every installation file you need.
Take Note: If you mistakenly delete a single partition, it automatically deletes every data on that drive. It is also no longer necessary to delete every partition from a secondary hard drive.
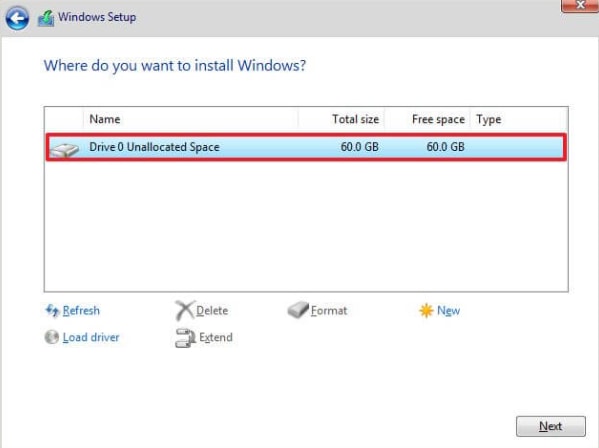
Step 7: Select the hard drive – or Drive 0 Unallocated Space – in order to install Windows 10. Then, click the ‘Next button.’
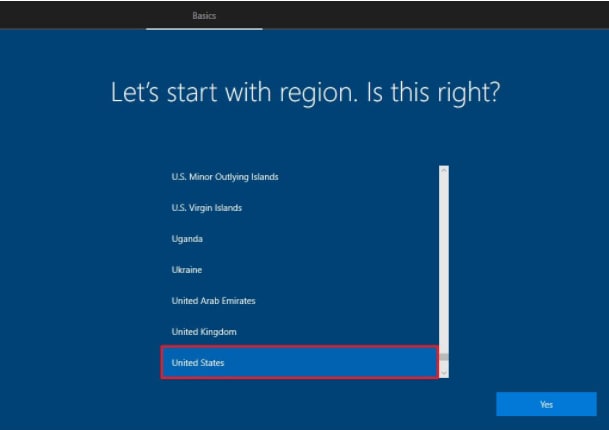
Step 8: Select your region setting when you finish installing on the first page of the OOBE (out-of-the-box experience).
Step 9: Then click the ‘Yes’ button at the bottom of that page or screen. Select your preferred or favorite keyboard layout setting.
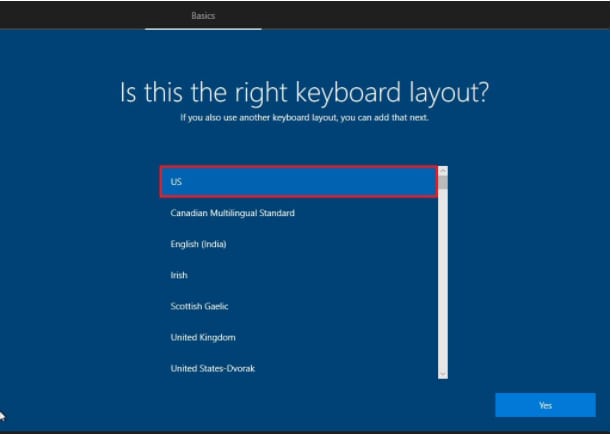
Step 10: Click the ‘Yes’ button. Click the ‘Skip’ button if you don’t need to configure a second layout.
Bear in mind that if the PC uses an Ethernet connection, the connection to the network is automatic. But if you only have a wireless connection, you may – or may not – need a security key to set up the connection manually.
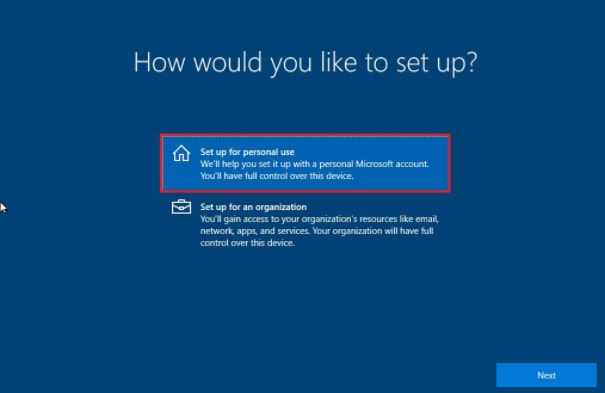
Step 11: Select the 'Set up for personal use' option if you previously chose 'Windows 10 Pro' when starting the reinstallation process. But the ‘Windows 10 Home’ edition doesn’t have this option.
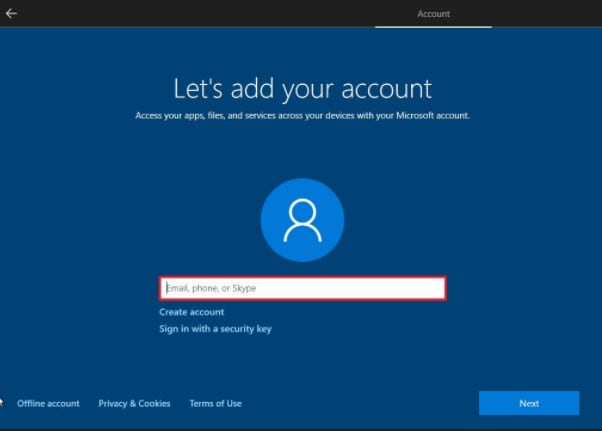
Step 12: Click the ‘Next’ button. Confirm the Microsoft account mail, Skype identification, or phone number in order to create an account.
Step 13: Click the ‘Next’ button. Confirm the password of the Microsoft account.
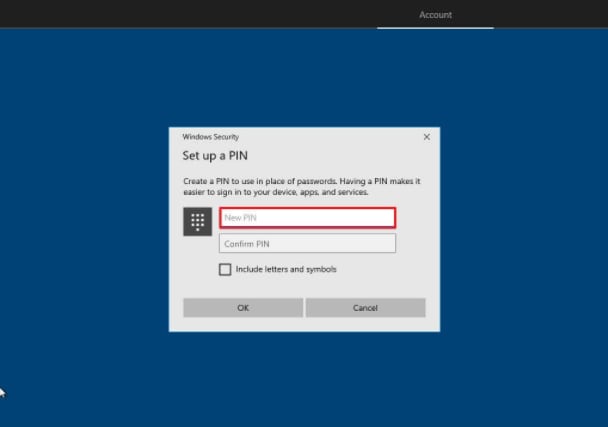
Step 14: Click the ‘Next’ button. Click the ‘Create a PIN’ button. Then, create a brand-new PIN.
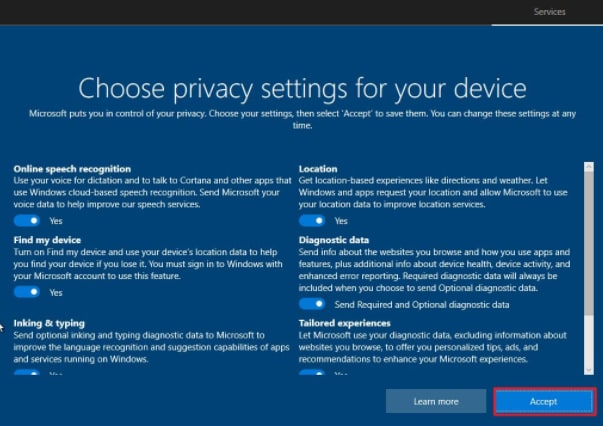
Step 15: Click the ‘OK’ button. Confirm the privacy settings that are suitable for your needs by turning on – or off – the toggle switch for every setting. Click the ‘Accept’ button.
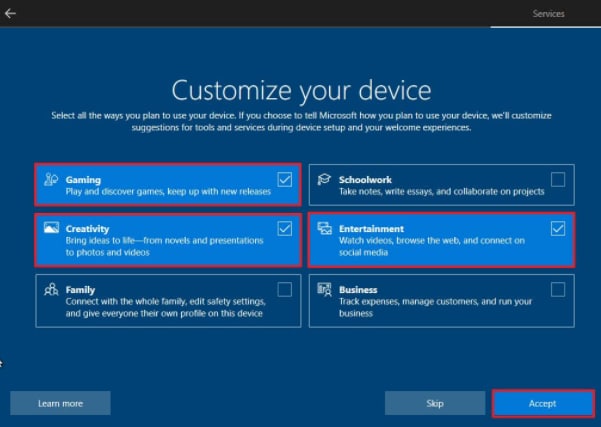
Step 16: A 'Customize your device' page pops up. You can select one or several ways you plan to use your PC in order to allow the setup to suggest multiple services customization and tools. But this is optional.
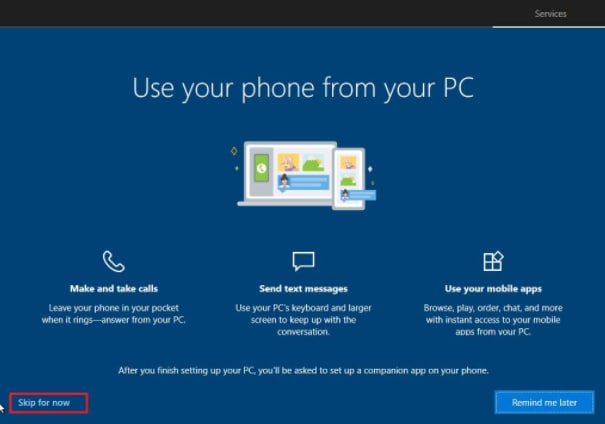
Step 17: Click the ‘Accept’ button in order to continue. You can also ‘Skip’ this section. You can click the ‘Skip for now’ button in order to avoid linking your smartphone to your computer. You can do this later on via the ‘Settings’ app.
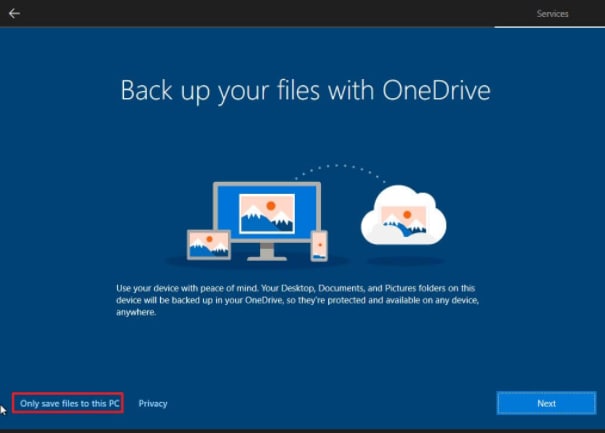
Step 18: Click the ‘Next’ button in order to permit OneDrive to automatically backup your Documents, Desktop, and Pictures folders to the cloud.
You can click the 'Only save files to this PC' option – as outlined below – so that you can skip this step:
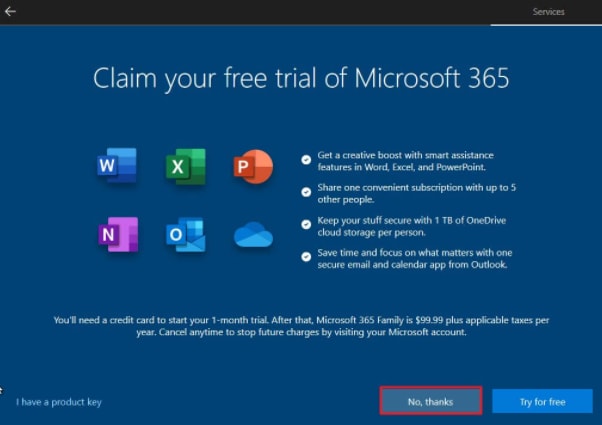
Step 19: Click the 'No, thanks' button in order to skip the Microsoft 365 setup.
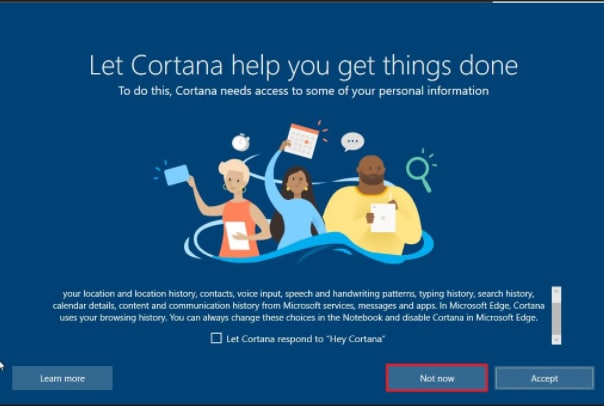
Step 20: Click the ‘Not now’ button in order to disable Cortana.
As soon as you complete these steps, Windows 10 will automatically apply the settings and finish the setup.
Tips to Bear in Mind Before Rolling Back Windows 11
Before you uninstall Windows 11 and reinstall Windows 10, it is an excellent idea to create backups for all your important files. The rollback process may not erase all the data on your PC.
However, experts consider backing up your data or files an excellent practice. This is because something could go wrong during the update.
For instance, a few reasons may cause the rollback installation to falter. If this happens, you risk losing all your files.
Therefore, ensure you upload all sensitive files to a cloud storage drive – such as Google Drive or Dropbox. You may also copy all the files to a local external hard drive to be on the safe side.
Conclusion
Since Windows 11 rolled out, many PC users have installed the latest operating system.
However, early beta versions of this new operating system may have a few bugs which may hinder your experience. If you want to go back to Windows 10, you can follow the steps outlined in this article.
If you have found this article helpful and informative, consider sharing it with your loved ones, colleagues, or friends.
Wondershare Repairit is an effective and safe file repair software. This third-party software can quickly get back corrupted, formatted files on Windows Computer, irrespective of the file type and format.