

“I took some photos at my brother’s wedding last night, but they all came out grainy and noisy. Is there any way to fix grainy photos in Photoshop? I'm not a pro, so please keep it simple!"
Many amateur and even experienced photographers struggle with grainy or noisy photos. The good news is that there are several simple methods to fix grainy photos in Photoshop, and we're here to guide you through them.
In this comprehensive guide, we'll explore the causes of grainy photos and provide step-by-step instructions on how to fix grainy pictures in Photoshop. Whether you're dealing with a single grainy photo or a whole batch of grainy images, we've got you covered.
By the end of this article, you'll have the knowledge and tools to transform your grainy pictures into crisp, clear images that you'll be proud to share.
In this article
Part 1: What Causes Grainy Photos?
Before we dive into how to fix grainy photos in Photoshop, it's important to understand what causes this issue in the first place. Here are some common reasons why your photos might appear grainy:
- High ISO settings: When you increase your camera's ISO sensitivity to capture images in low light, it can result in digital noise or grain.
- Underexposure: If your photo is too dark and you try to brighten it in post-processing, it can reveal or amplify existing noise.
- Small image sensors: Cameras with smaller sensors, like those in smartphones or point-and-shoot cameras, are more prone to producing grainy images, especially in low light conditions.
- Long exposures: Extended exposure times can lead to thermal noise, which appears as graininess in your photos.
- Excessive editing: Over-processing your images, particularly when adjusting exposure or sharpness, can introduce or exacerbate graininess.
- Compressed file formats: Saving your images in highly compressed formats like low-quality JPEGs can result in visible artifacts and graininess.
Understanding these causes can help you prevent grainy photos in the future. But for now, let's focus on how to fix grainy photos in Photoshop using simple, effective methods.
Part 2: How To Fix Grainy Photos In Photoshop
Method 1: Use the Dust and Scratches Filter
One of the simplest ways to fix a grainy picture in Photoshop is by using the Dust and Scratches filter. This method works well for removing small specks of digital noise without significantly blurring your image.
Here's how to fix grainy images in Photoshop using the Dust and Scratches filter:
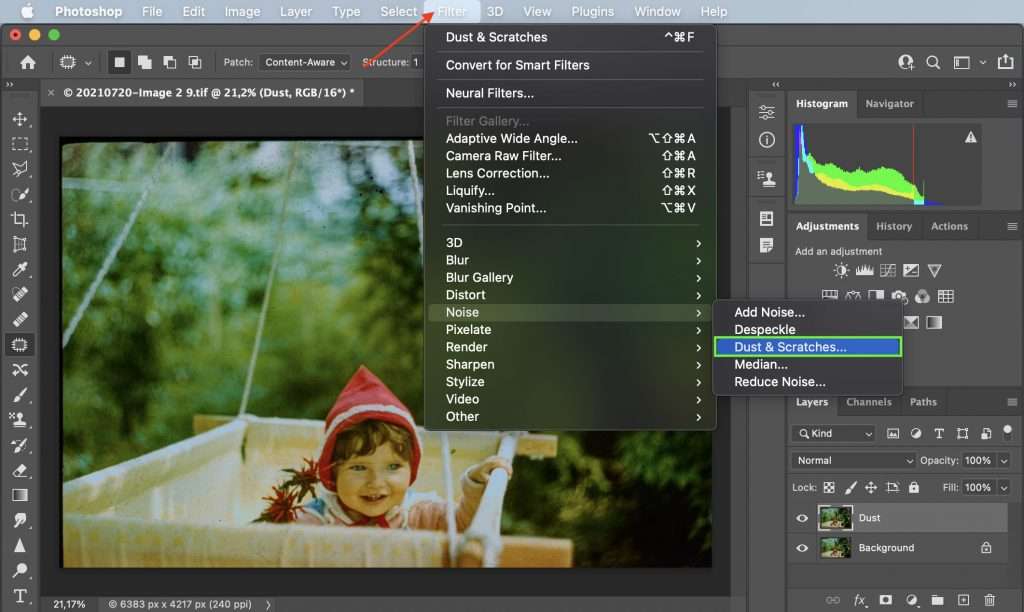
Step 1: Open your grainy photo in Photoshop. Go to Filter > Noise > Dust & Scratches.
Step 2: In the dialog box that appears, adjust the Radius and Threshold settings. Start with a low Radius (around 1-2 pixels) and gradually increase it until you see the grain reduce. Adjust the Threshold to bring back some of the image detail. A higher threshold preserves more detail.
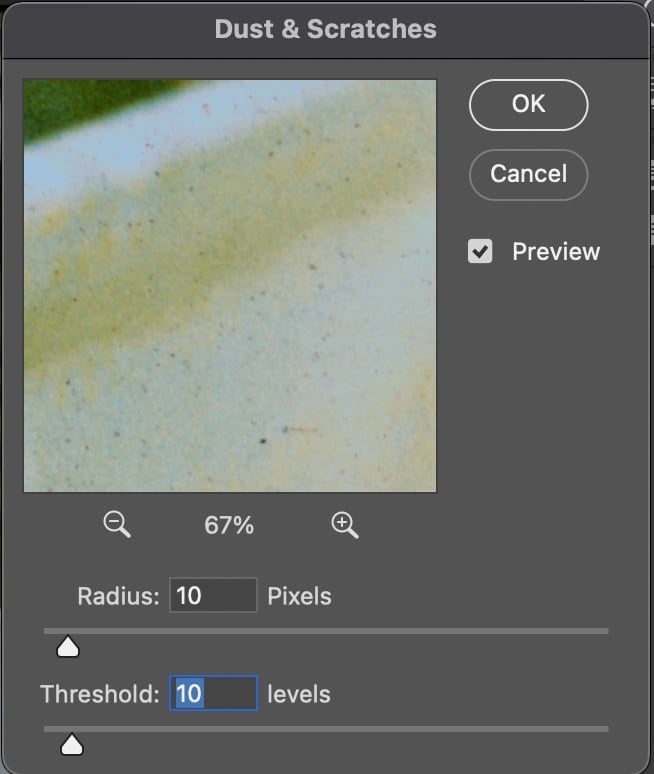
If the effect is too strong, you can reduce its intensity by lowering the layer opacity or using the Fade command (Edit > Fade Dust & Scratches).
This method is particularly effective when you need to fix a grainy photo in Photoshop quickly and don't want to delve into more complex techniques.
Method 2: Reduce Noise
Photoshop's built-in Reduce Noise filter is another powerful tool to fix grainy pictures in Photoshop. This filter offers more control over noise reduction and can often produce better results than the Dust and Scratches filter, especially for higher levels of grain.
Here’s how to fix a grainy picture in Photoshop using the “Reduce Noise” filter.
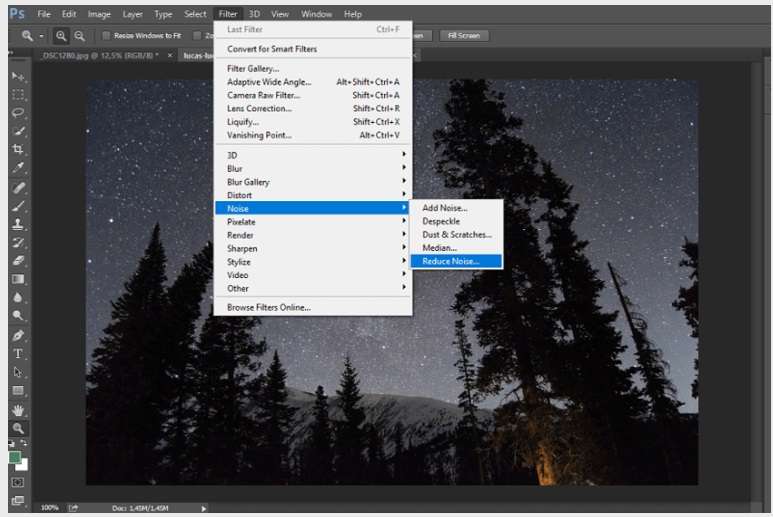
Step 1: Open your grainy image in Photoshop. Duplicate the background layer (Ctrl/Cmd + J) to work non-destructively. Go to Filter > Noise. Now select “Reduce Noise”.
Step 2: In the Reduce Noise dialog box, you'll see several sliders:
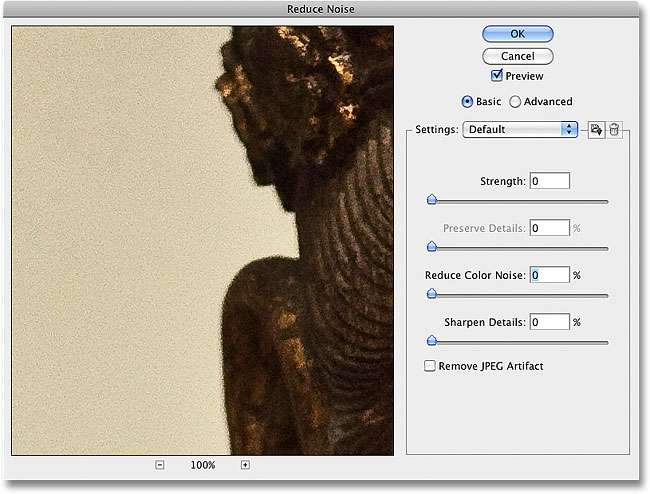
- Strength: Controls the overall intensity of noise reduction. Start low and increase gradually.
- Preserve Details: Helps maintain sharpness in your image. Adjust this in conjunction with Strength for the best balance.
- Reduce Color Noise: Targets color noise specifically. Increase this if you see colored specks in your image.
- Sharpen Details: Can help counteract any softening caused by noise reduction.
Step 3: Check the "Remove JPEG Artifact" box if your image shows signs of JPEG compression.
Use the preview window to zoom in and check the effect on your image. Once you're satisfied with the settings, click OK to apply the filter.
Well, the key to successfully fixing grainy photos in Photoshop is to find the right balance between noise reduction and detail preservation. It's often better to apply moderate noise reduction and retain some grain rather than overdo it and end up with an unnaturally smooth image.
In the next part, we'll explore an even simpler method to fix grainy photos using AI-powered software. We'll also provide some additional tips to help you get the best results when fixing grainy images in Photoshop.
Part 3: Fix Grainy Photos in One Click with Repairit Photo Repair
While Photoshop offers powerful tools to fix grainy photos, sometimes you might want a quicker, more automated solution. This is where AI-powered software like Wondershare Repairit AI Photo Enhancer comes in handy. Its AI Enhancement feature can fix grainy photos in just one click, making it an excellent option for those who want to fix grainy pictures without diving into complex editing techniques.
Here's how to fix grainy photos using Repairit AI Photo Enhancer:
Step 1: Install Repairit on your computer. Launch the software and click on the "Add" button to import your grainy photo.

Step 2: Once your photo is loaded, click on the "Start Enhancing" button.

Step 3: After the initial repair, preview the results and if satisfied, click "Save" to export your fixed photo.

This method is particularly useful when you need to fix a large number of grainy images quickly or if you're not comfortable with manual photo editing techniques. However, keep in mind that while AI solutions can produce impressive results, they may sometimes over-smooth images or misinterpret details.
For the best results, especially with important photos, it's often worth learning how to fix grainy photos in Photoshop for more precise control.
Fix Your Grainy Photos Now
 Security Verified. Over 7,302,189 people have downloaded it.
Part 4: Tips to Fix Grainy Photos
Whether you're using Photoshop or AI-powered software to fix grainy pictures, here are some additional tips to help you achieve the best results:
- Work on a copy: Always duplicate your original image before applying any fixes. This allows you to compare your edits with the original and start over if needed.
- Use adjustment layers: In Photoshop, apply your noise reduction filters to adjustment layers rather than directly to your image. This gives you more flexibility to fine-tune your edits later.
- Selectively apply noise reduction: Sometimes, only parts of your image need noise reduction. Use layer masks in Photoshop to apply your fixes selectively.
- Balance noise reduction with sharpening: After reducing noise, your image might look a bit soft. Apply careful sharpening to bring back some detail without reintroducing noise.
- Use camera raw: If you're working with RAW files, use Adobe Camera Raw's noise reduction tools before opening the image in Photoshop. These tools are often more effective than Photoshop's filters for RAW files.
By following these tips and practicing the methods we've discussed, you'll be well-equipped to fix grainy photos in Photoshop and other editing software.
Conclusion
Grainy photos got you down? Worry no more! Equipped with the right techniques and tools, you can breathe new life into blurry images. Photoshop's expert filters or AI-driven software make it easy.
The key to success? Striking the perfect balance between noise reduction and detail preservation. Practice makes perfect, so don't be discouraged. As you refine your skills, you'll become a master of grainy photo correction.
FAQ
-
Can I fix extremely grainy photos in Photoshop?
While Photoshop is a powerful tool, there are limits to how much you can improve extremely grainy photos. Severe grain often means a significant loss of detail in the original image. You can certainly reduce the appearance of grain using the methods we've discussed, but if the graininess is extreme, you may not be able to fully restore the image to perfect clarity. In such cases, it's often better to embrace some level of grain rather than risk over-processing the image and losing natural texture. -
Why do my photos look more grainy after editing in Photoshop?
If your photos appear more grainy after editing in Photoshop, it could be due to over-processing. Actions like excessive sharpening, extreme adjustments to exposure or contrast, or repeated saving in a lossy format like JPEG can introduce or exacerbate grain. To avoid this, always work on a copy of your original image, use adjustment layers for more control, and be conservative with your edits. If you need to make significant changes, consider working with RAW files when possible, as they offer more flexibility for editing without degrading image quality. -
Is it better to shoot in RAW to avoid grainy photos?
Yes, shooting in RAW can help minimize graininess in your photos. RAW files contain all the data captured by your camera's sensor, giving you more flexibility when editing. This means you can make significant adjustments to exposure and other settings without introducing as much noise as you would when editing a JPEG. Additionally, noise reduction tools often work more effectively on RAW files. However, remember that RAW won't prevent graininess caused by high ISO settings or poor lighting conditions – it just gives you more latitude to address these issues in post-processing.
