Imagine you have spent hours creating a colorful chart or organizing numbers for your project in Excel. Suddenly, the computer turns off, and all your hard work disappears. This can happen when your workbook is not saved, and you lose all your effort in creating an Excel document. Therefore, saving your Excel sheets ensures everything you create stays safe and ready for later.
As we know, a workbook is where all your data, charts, and tables live. Learning how to save workbook files is the most important skill for working with sheets. It keeps your progress secure and lets you pick up where you left off anytime. Thus, this article will guide you through the simple methods to save your workbook, whether it's your homework or creative projects.
In this article
Part 1. All 5 Ways to Save an Excel Workbook
Upon understanding the importance of keeping your work safe, let’s explore all the methods for saving workbook files. Excel offers multiple ways to save your progress, each designed to suit different needs.
Whether you want to save your file for the first time, make updates, or create backups, there is a method for every situation. So, this section will walk you through 5 easy and effective ways to save a file.
From the File Menu
Step 1. To save your spreadsheet, open the file you want to save on your desktop. Upon accessing it, you have to click the "File" menu at the top right of the screen.
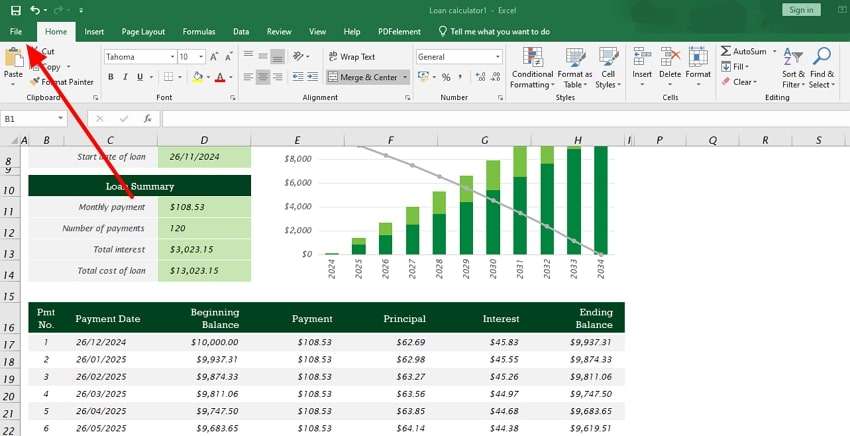
Step 2. Following this, you will access a new interface from where you have to hit the "Save As" option. Afterward, simply tap "This PC" and choose your preferred location on your desktop to save the worksheet.

Cloud Option
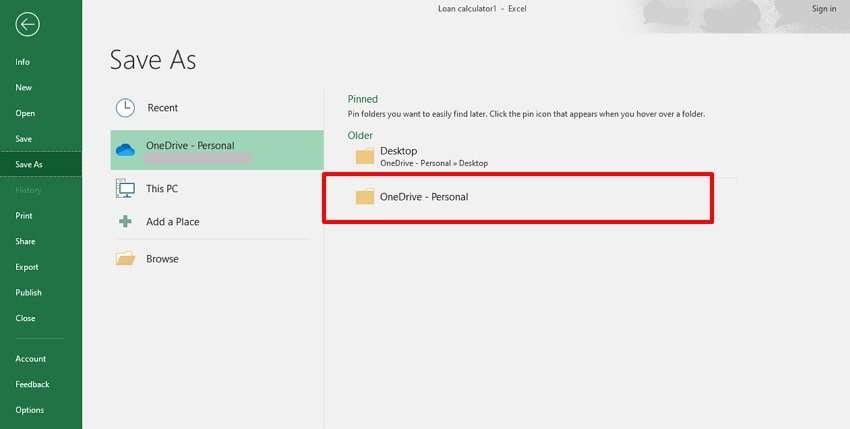
Instructions. To save your worksheet in cloud storage, navigate to the “Save As” tab after accessing the “File” tab. Moving forward, you will access a new interface where you need to use the “OneDrive - Personal” folder. By doing this, you can save and access your workbook file in the cloud storage.
Using the Quick Access Toolbar
Another convenient way to save your work is using the Quick Access Toolbar. This is the best option if you want to quickly save workbook Excel files without navigating menus. Many users can't access this feature in their worksheets and worry about how they can enable it. Let's explore how to access this feature to save your progress in one click and ensure nothing is lost.
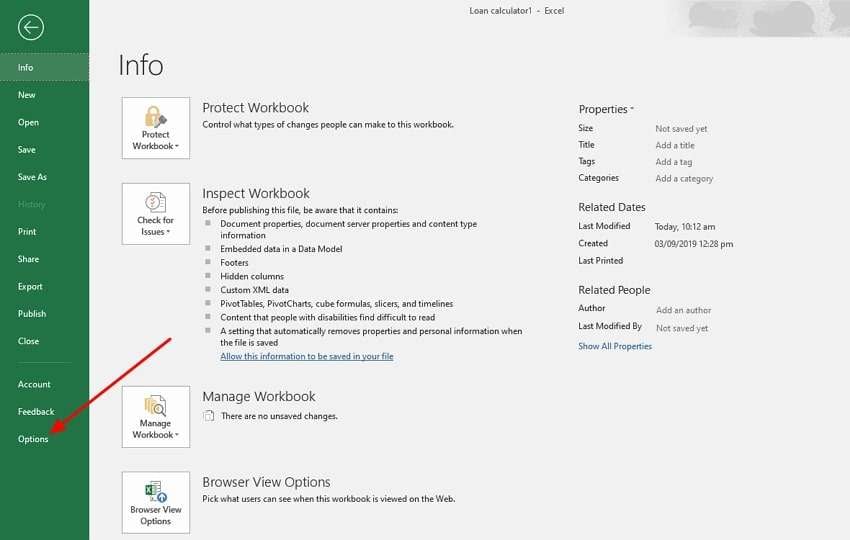
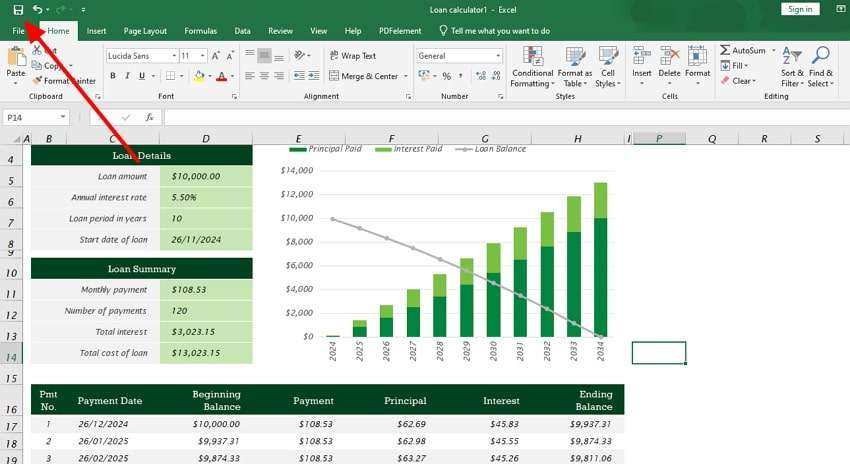
Step 1. After opening your spreadsheet, navigate to the “File” tab to initiate the process. Next, you need to hit the "Options" button on your screen's bottom left bar.
Step 2. You will now have access to all Excel Options, where you will have to expand the “Quick Access Toolbar” settings. Now, enable the “Show Quick Access Toolbar below the Ribbon” after adding the “Save” option and hit the “Ok” button to access this feature on your working interface.
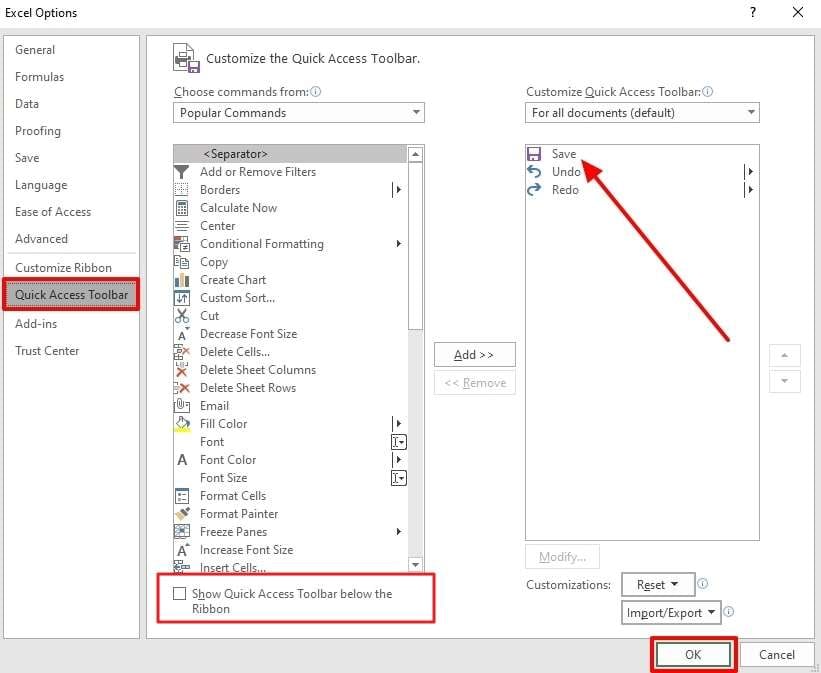
Step 3. Upon accessing this feature in your workbook interface, you will see a new icon at the top left corner. Now, just click this “Save” icon to save your spreadsheet on your desktop without hassle.
Using the Shortcut Keys
For those who love speed and efficiency, using shortcut keys is a fantastic way to save a workbook. It lets you quickly save your progress without relying on menus or icons. This method is especially useful when you're multitasking or making frequent updates to your workbook. To use shortcut keys, just press the "CTRL" and "S" keys at the same to save your spreadsheet in your preferred location.

Export the Excel File as a PDF
Sometimes, you may need to share your Excel work in a format that is easy to view and cannot be edited. Exporting your workbook as a PDF is an excellent option for such situations.
Alongside saving workbook files for editing, knowing how to save them as a PDF adds another layer of versatility to your Excel skills. Follow the steps below to learn how to protect your data while still being easy to share or print:
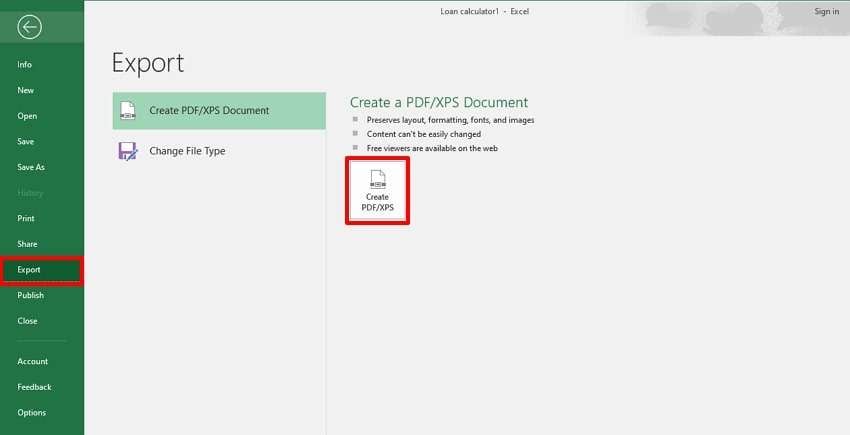
Step 1. Upon entering the "File" menu, tap the "Export" tab to initiate the process. Afterward, you need to click the "Create PDF/XPS" option to export your spreadsheet in other formats.
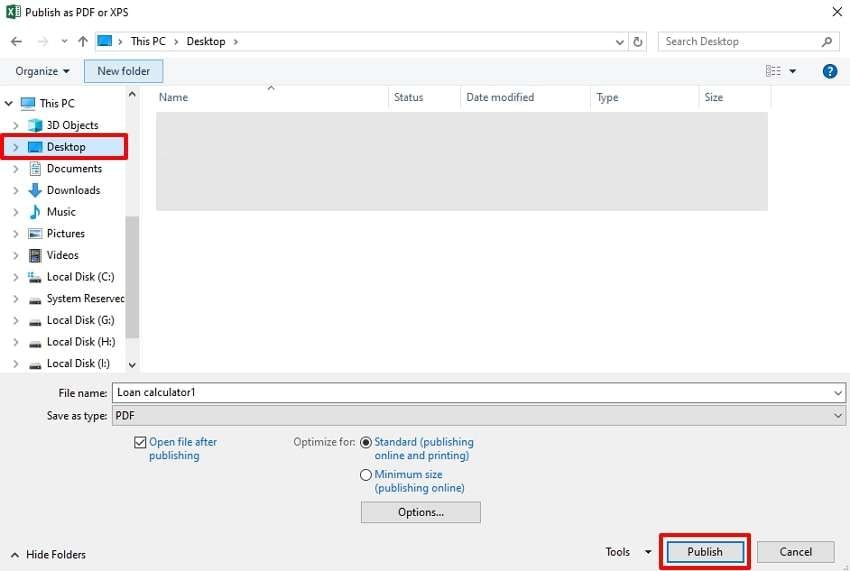
Step 2. Moving forward, you will access a new window where you have to choose your preferred location to export your document in "PDF" form. Upon selecting your desired place, just press the "Publish" button.
Enable AutoSave in Excel
To make sure your work is always safe, enabling AutoSave is a smart choice. This feature automatically saves your progress as you work and reduces the risk of losing important updates. It's especially helpful if you often forget to save or experience unexpected computer issues. Let's explore how to activate AutoSave to save workbook Excel automatically.
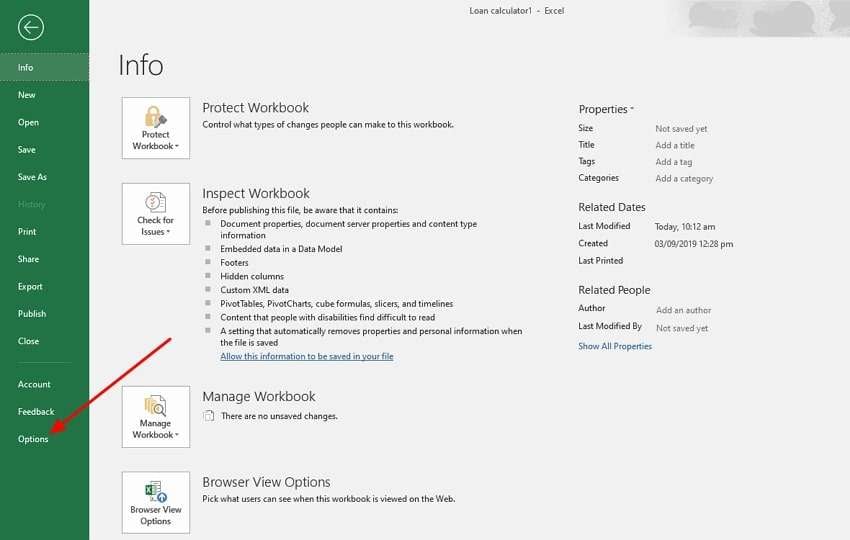
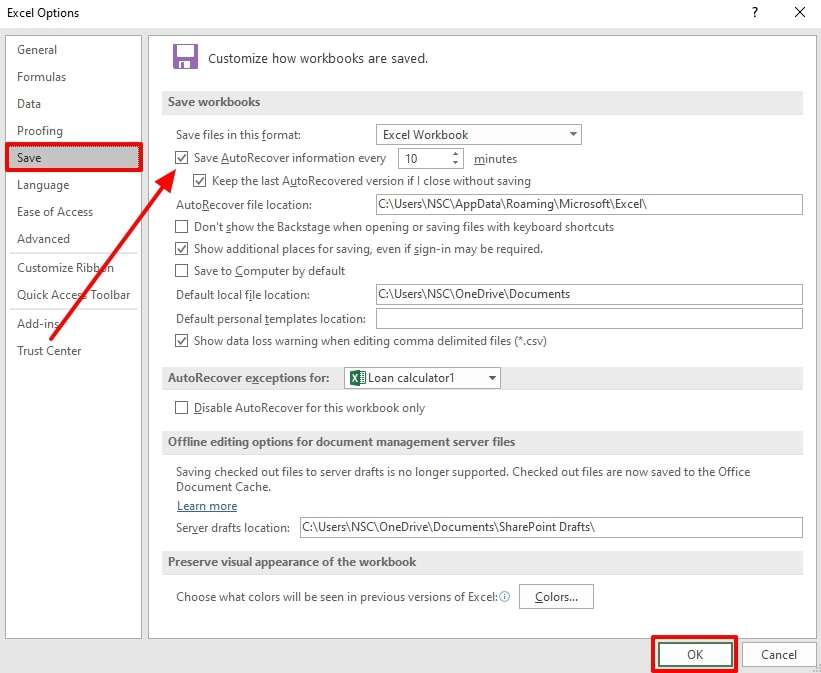
Step 1. Upon opening your spreadsheet, go to the "File" tab to start the process. Afterward, you have to select "Options" from the bottom left corner of your screen.
Step 2. Next, navigate to the "Save" tab from the newly appeared window. Then, enable the "Save AutoRecover Information Every" option and set your preferred time as well. Now, you need to click the "Ok" button to finish enabling the AutoSave process.
Part 2. 3 Best Tools to Repair PST Online
After learning how to save workbook files, protecting your work from unexpected issues like file corruption is also important. Despite your best efforts, files can become damaged for various reasons, such as power outages or system crashes. If your Excel workbook gets corrupted, it can become unreadable, and all your hard work might seem lost. In such cases, a reliable file repair tool for repairing these files is essential.
To cater to these needs, we recommend Repairit design to fix corrupted files, including Word, Excel, and PowerPoint. Alongside that, users can handle numerous files at the same time and eliminate any file corruption issues they may have. Thus, this file repair toolbox is an effective solution to keep your work intact and boost productivity.
Key Features
- ZIP File Repair: Users can repair ZIP files larger than 1GB, which is particularly useful for those working with large archives.
- Changing File Layout: The tool can restore the original layout of the file to ensure that the document is returned to its correct and readable state.
- Preview of Repaired Files: After repairing an Excel file, it provides a preview of the restored content to ensure that all necessary data is recovered correctly.

Wondershare Repairit - Excel File Repair
1,010,994 people have downloaded it.
-
Repair damaged Excel files with all levels of corruption, including blank files, files not opening, unrecognizable format, unreadable content, files layout changed, etc.
-
Repairs all kinds of data stored in damaged Excel files such as tables, charts, formulas, comments, images, etc.
-
Support all formats of Excel files: XLSX/XLSM/XLTX/XLTM/XLS
-
Perfectly repair corrupted files with a very high success rate, without modifying the original file.
-
No limit to the number and size of the repairable files.
-
Support Windows 11/10/8/7/Vista, Windows Server 2003/2008/2012/2016/2019/2022, and macOS 10.10~macOS 13.
-
Except Excel, Repairit also supports all formats of PDF, Word, Excel, PowerPoint, ZIP, and Adobe files.
Simplified Guide to Use Repairit to Repair Damaged or Corrupted Excel Files
Upon saving the workbook, follow the comprehensive instructions below to understand how to repair damaged workbooks using this advanced software.
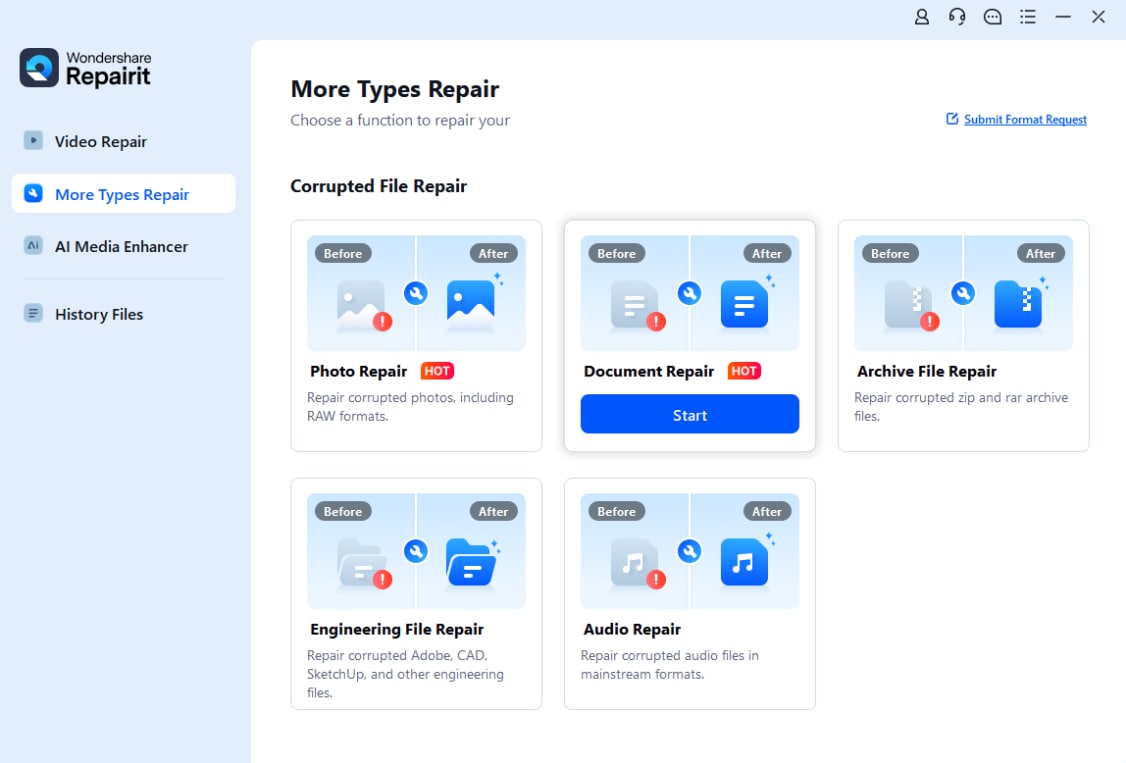
Step 1. Access the Repairit to Initiate the Process
Navigate to the "More Types Repair" tab. After that, click the “File Repair” feature to move further.
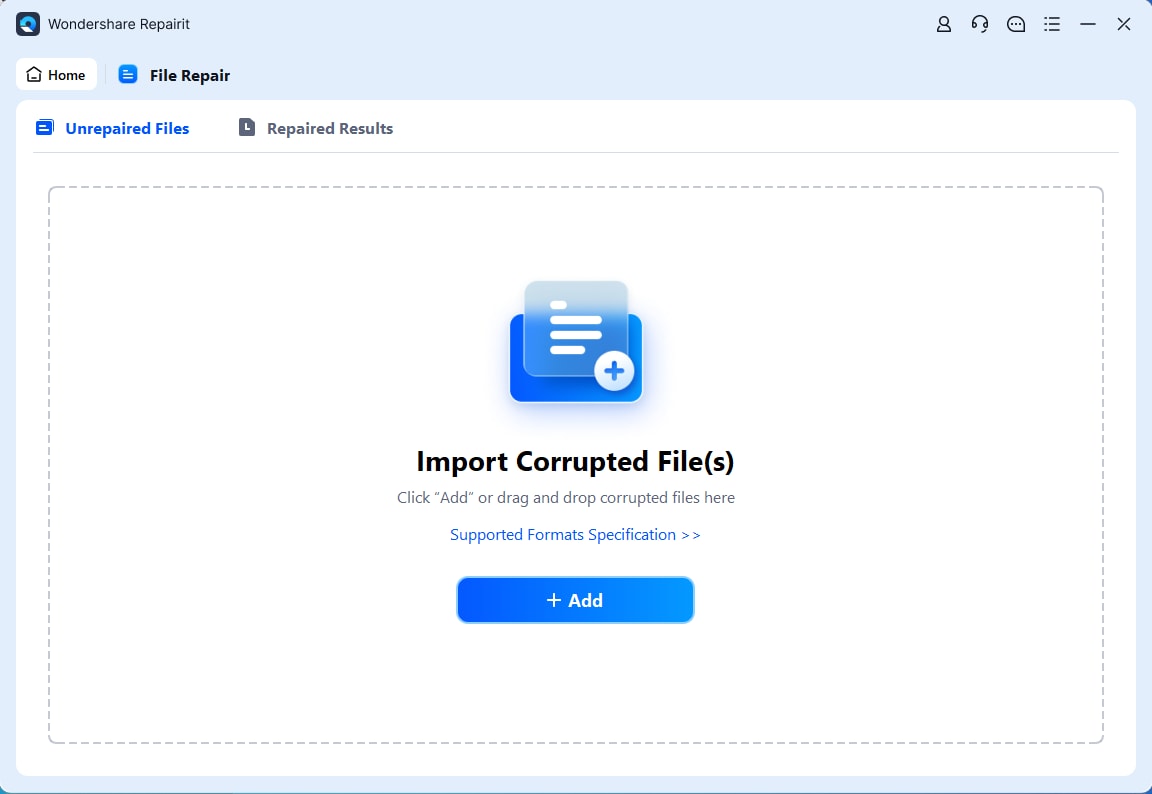
Step 2. Choose the Corrupt Excel Workbook
Moving forward, you will access the new interface where you need to press the “+Add” button.
Step 3. Start the File Repairing Process
After successfully importing the damaged Excel files into the software, confirm that the files you want to work on are visible on the screen. Now, click the “Repair” button to start the repair process for the imported files.

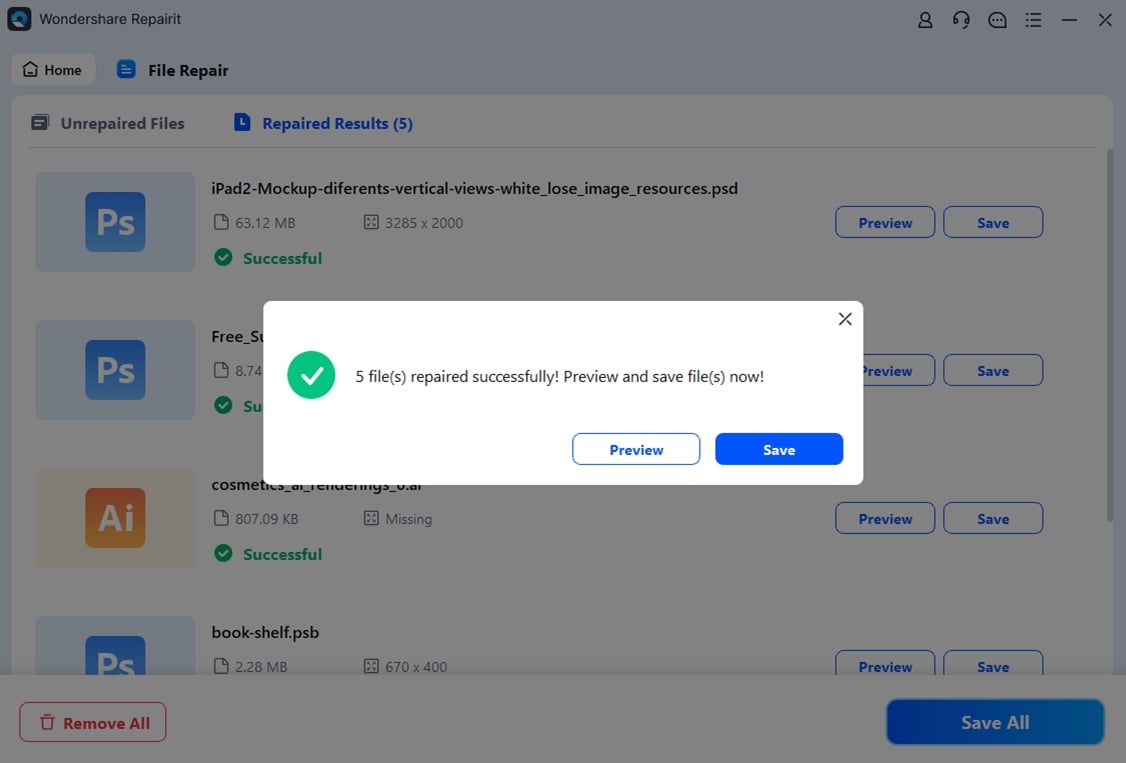
Step 4. Download the Newly Repaired Excel File
Use the “Save” button to save the repaired file or data to your preferred location on your device.
Conclusion
To summarize, saving your Excel workbook properly is important to avoid losing valuable data. Therefore, we have explored multiple methods available to suit your workflow. Learning how to save your workbook efficiently helps maintain your progress and ensures that your data remains accessible when needed. If you encounter corrupt workbooks that prevent you from saving them, we have a solution for you.
Tools like Wondershare Repairit come in handy to resolve such issues. This tool ensures that you can easily repair damaged files and save your workbook confidently to prevent data loss. Its batch processing and multiple format support make it a standout solution among all other alternatives.
FAQ
-
1. What is the difference between 'Save' and 'Save As' in Excel?
The first option generally updates the current workbook with the most recent changes. In contrast, the latter allows you to save the workbook with a different name or in another location. -
2. Why is Excel not allowing me to save my workbook?
You might be unable to save your workbook on the platform because of problems like insufficient storage space or a damaged file. Make sure you have sufficient storage on your drive or attempt to save the file in an alternative location. If the file becomes damaged, use repair tools like Wondershare Repairit to fix the document. -
3. Can I save an Excel file as a previous version?
Users get the option to save a spreadsheet in an older format by navigating the “File” menu and selecting “Save As” to choose the appropriate file format. This is useful if you’re working with older versions of Excel that don’t support newer file formats or features.


 ChatGPT
 Perplexity
 Google AI Mode
 Grok
Grok

