Many people encounter challenges when editing an Excel file, and one of them involves a restricted read-only mode. This can disrupt workflows, especially when working with important data that requires modifications. These restrictions often arise from settings or storage permissions. Therefore, addressing this issue is important for ensuring seamless access and control over your documents.
Whether you need to remove protection or adjust sharing settings, the right approach makes all the difference. Knowing how to remove read-only from Excel files ensures that you can regain full control over your work without unnecessary delays. Thus, this article guides you on effective solutions to resolve read-only restrictions for users at any skill level.
In this article
Part 1. Why Is My Excel Showing Read Only?
Building from above, understanding why files appear as read-only is important to address the issue effectively. In many cases, the reason is when the file is marked as final, signaling it’s complete and discouraging further changes. Another frequent cause is the “Open as Read-only Recommended” setting, which prompts users to avoid altering the original content.

Additionally, file properties may be configured to enforce a read-only attribute to prevent modifications. Plus, password-protected files often restrict editing unless the correct password is provided. So, by knowing how to cancel read-only in Excel, you can apply effective methods to resolve the issue permanently.
Part 2. How to Remove Read Only from Excel [All Cases & Solutions]
Upon exploring why files might open as read-only, it's time to explore the practical solutions. Whether dealing with protection settings or system issues, knowing how to disable read-only in Excel ensures seamless file management. Let’s break down all methods to unlock your files and regain full control over your data.
Issue 1. The Excel File is Marked as Final
The most common reason for read-only mode is when a file is marked as final. This setting indicates the document is complete and restricts users to further edits. While useful for protecting finalized data, it can create challenges if changes are still required.
To address this, understanding how to remove read-only on Excel marked as final is important to make necessary updates without restrictions.
Solution. Disable the “Marked as Final” Mode
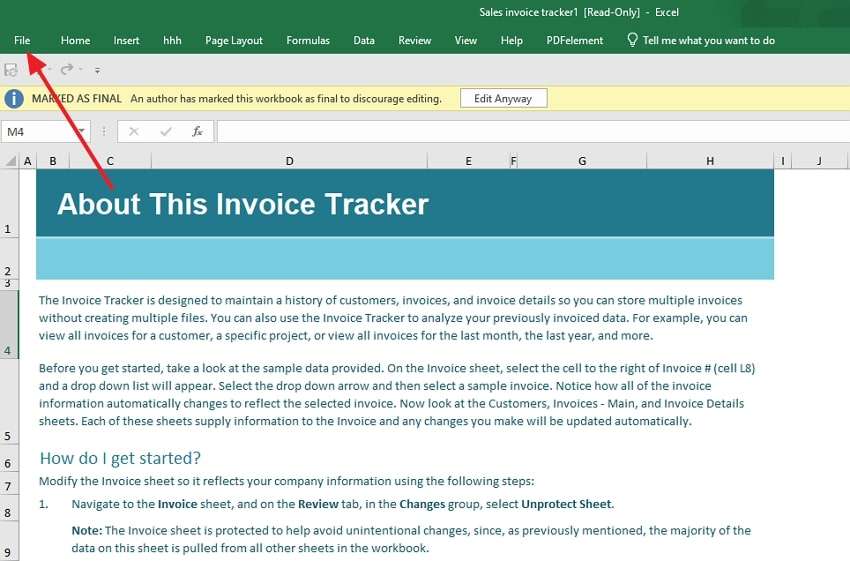
Step 1. Initiate the process by opening the workbook having the “Marked As Final” restriction. After that, you need to click the “File” tab to move further.
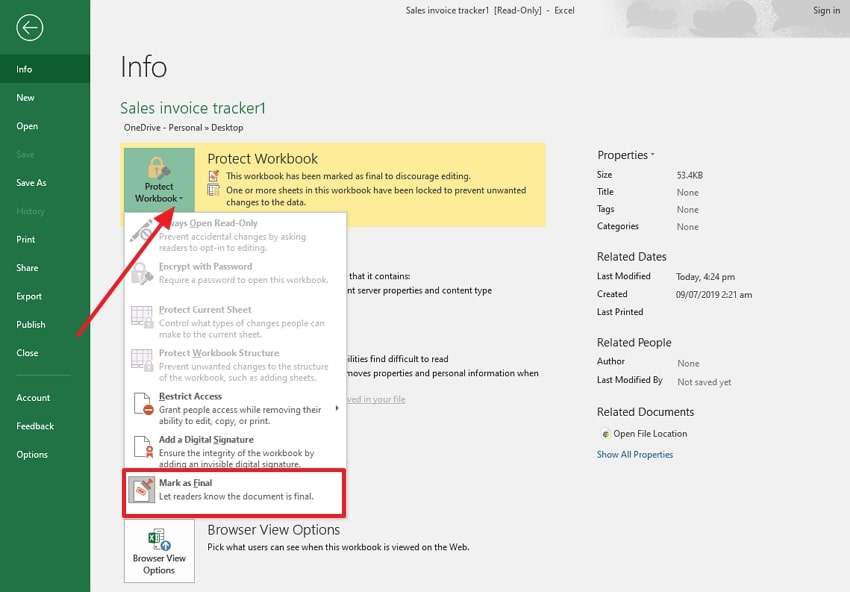
Step 2. Upon seeing the new interface, hit the “Protect Workbook” dropdown menu. Then, press the “Mark As Final” option from the newly appeared list to turn off this feature.
Issue 2. Files Open as Read-only Recommended
Another reason for restricted access is the “Open as Read-only Recommended” setting. This option prompts users to view the file without making changes, including moving or overwriting the content. Exploring the steps to learn how to take off read-only in Excel involves removing this recommendation from the file settings.
Solution. Access General Options to Disable “Open as Read-only Recommended”
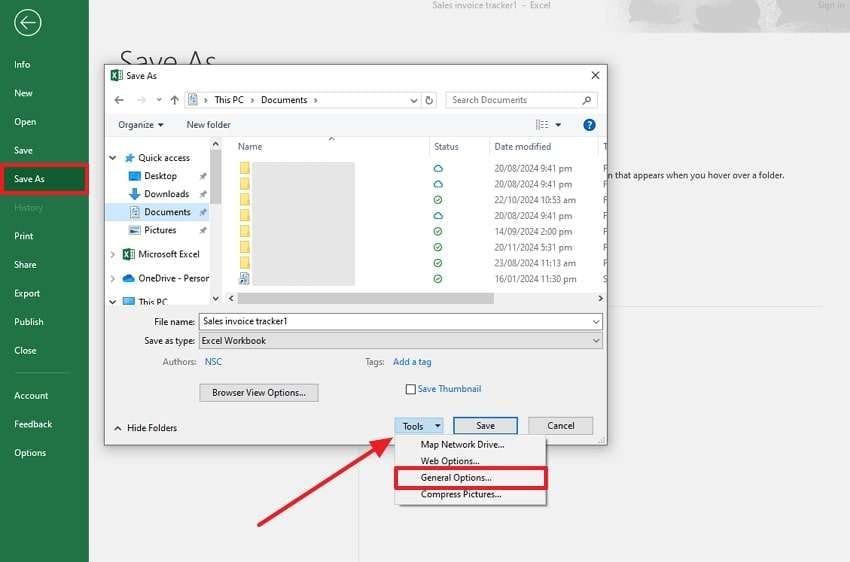
Step 1. After opening your spreadsheet file, navigate to the “File” tab and click the “Save As” option. Later, choose the location on your desktop to save this file and press the “Tools” drop-down button. Next, you need to hit the “General Options…” from the newly appeared list.
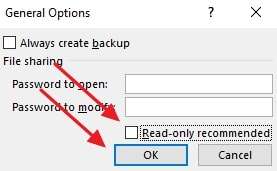
Step 2. Moving forward, just remove the password and disable the “Read Only Recommended” option by unchecking the relevant box. Following that, hit the “OK” button to remove the read-only problem from the file successfully.
Issue 3. Worksheets Launching in “Read-only” Mode
The read-only mode can also result from the file’s properties being set to restrict edits. It occurs when the file attribute is manually configured as read-only, often to prevent unintended changes. To recognize how to undo read-only in Excel, users need to access the file properties and uncheck the read-only attribute to resolve this issue.
Solution. Adjust File Properties to Turn Off the “Read-only” Mode
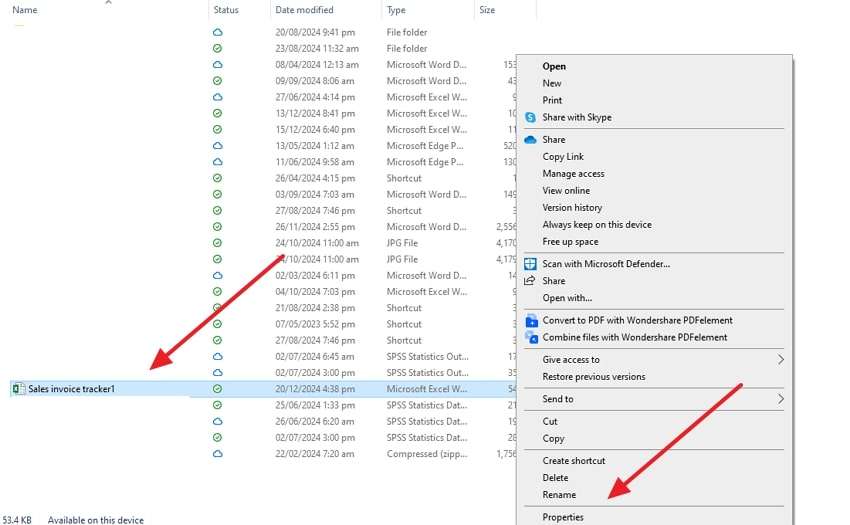
Step 1. Commence the process by navigating to the file with this issue on your PC. Then, right-click the file and choose the “Properties” option from the drop-down menu.
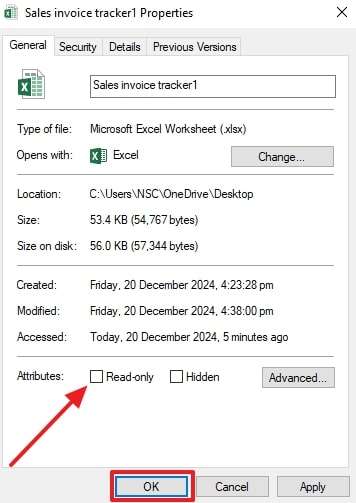
Step 2. Upon accessing the dialog box, disable the “Read Only” option under the “Attribute” section. Subsequently, you need to press the “Ok” button to finish the process.
Issue 4. Excel File is “Protected”
Apart from the previous reasons, protected files often restrict edits to preserve data integrity or enforce collaborative rules. This protection may involve passwords or specific settings that limit access. Knowing how to disable read-only Excel involves removing or adjusting the protection. You can unlock the file and regain editing capabilities by entering the correct password or changing the sheet’s permissions.
Solution. Unprotect the File Through the Review Tab
Step 1. To solve the protected problem, open your spreadsheet file and click the “Review” tab. After accessing the new feature on your screen, choose the “Protect Workbook” feature to move to the next step.
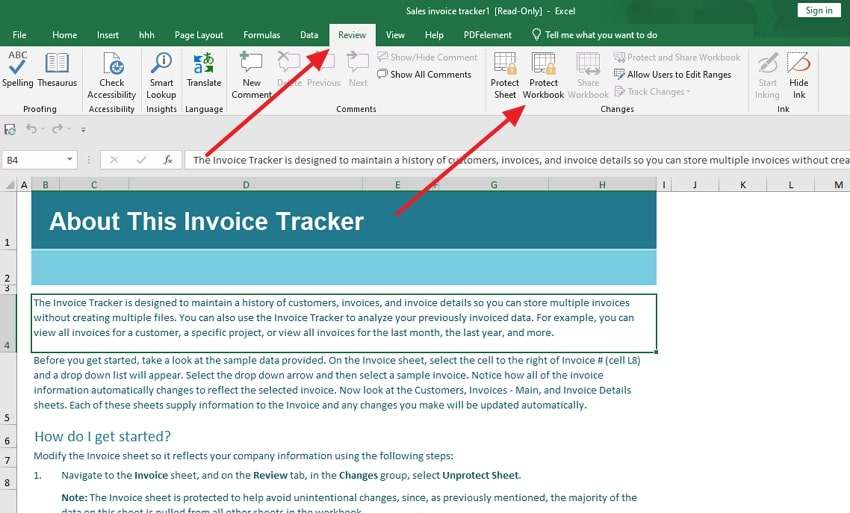
Step 2. Following this, you have to enter the password on the newly appeared dialog box that you have set for this Excel file. After that, hit the “Ok” button to unprotect the file and resolve the problem.

Issue 5. “Protected View” Restricting the Edits
Lastly, the protected view is another reason the file opens as read-only. This feature safeguards against potentially unsafe files from external sources by restricting edits. While useful for security, you can click the "Enable Editing" button or adjust Trust Center settings for frequent and safe files. By learning how to remove read-only from Excel in a protected view, you can restore editing access effortlessly.
Solution. Disable All the “Protected View” Settings
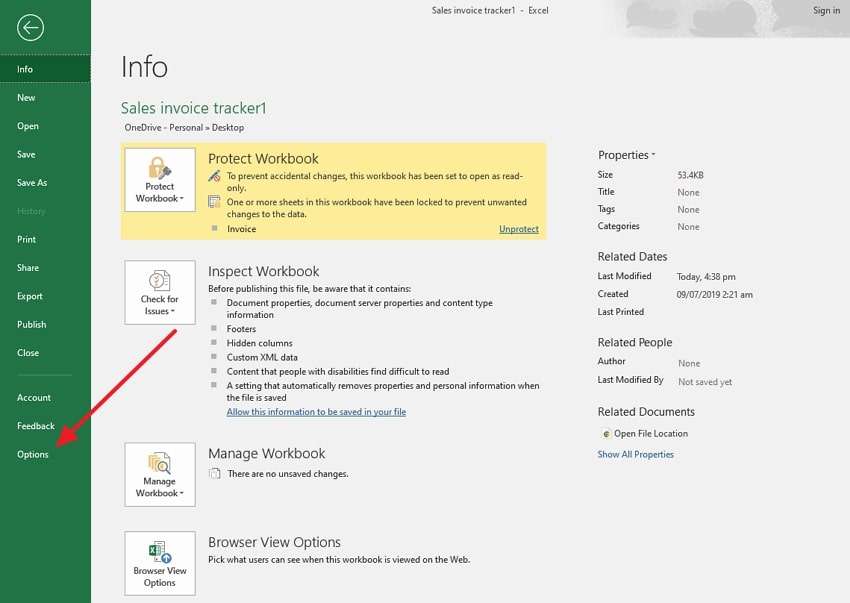
Step 1. Begin the process by accessing the workbook file and going to the “File” tab. Then, choose the “Options” menu from the new interface that appears.
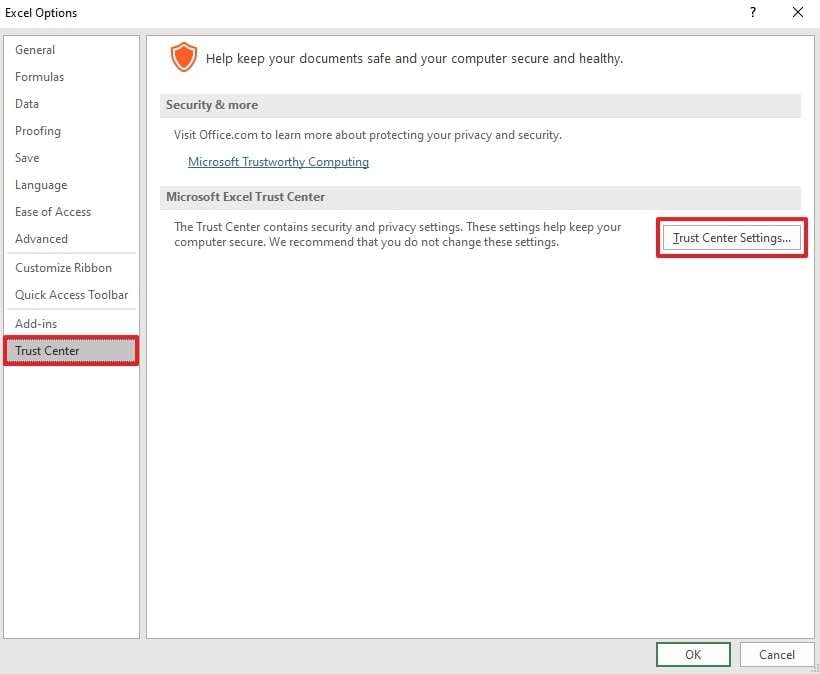
Step 2. Upon seeing the new interface, click the “Trust Center” option. Afterward, press the “Trust Center Settings…” button to proceed to the next step.
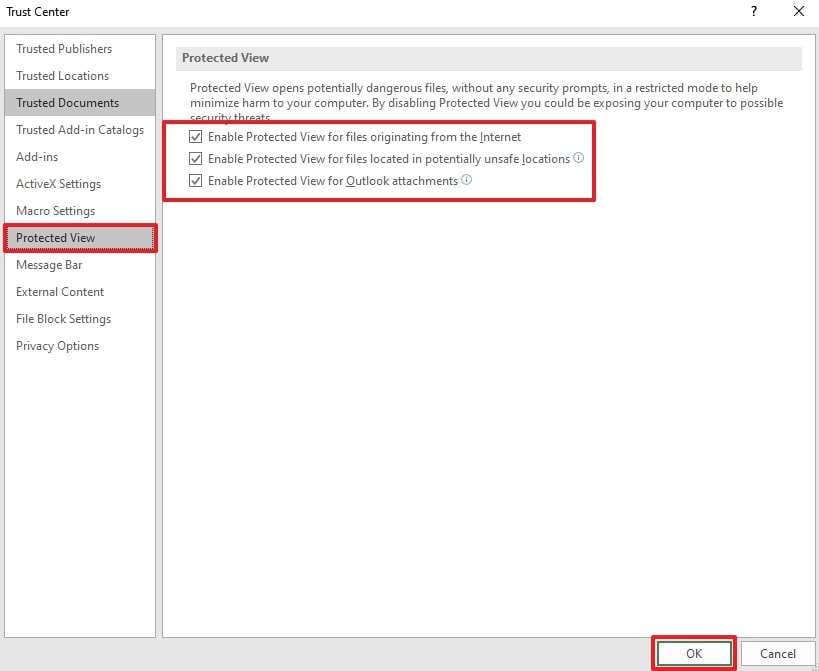
Step 3. On the subsequent interface, navigate to the “Protected View” tab and disable all three options. Upon disabling all the features on Excel files, click the “Ok” button to complete the process.
Part 3. How to Fix All Types of Errors from Your Excel File in a Single-Click?
As you can see from the above sections, multiple reasons could exist for the “Read Only” problem in Excel. Similarly, each reason comes with its solution, which can frustrate most users. In such cases, it is better to use advanced tools like Repairit to remove all errors in Excel files. The tool’s advanced features not only make it easier to disable read-only Excel errors but also eliminate multiple other problems in one go.
In addition to Excel, you can use it for other types of Office documents to resolve comprehensive errors and access files. Users who want to access files created in the 2007 software version can use Repairit to correct and remove logical errors. For your convenience, the tool also supports the repair of multiple files at a time.
Key Features of Repairit File Repair
- Support for Archive Files: This tool can also be used to repair corrupted archived files that are not opening otherwise.
- iWork Files Repairing: For iOS users, Repairit supports the repairing of Keynote, Pages, and Numbers files.
- Repairing PDF: Users can also utilize this tool to correct and remove corruption from a PDF file’s components instantly.
- Online Version: For those who are unable to install software, the tool also has a browser version for quick error removal.

Wondershare Repairit - Excel File Repair
1,010,994 people have downloaded it.
-
Repair damaged Excel files with all levels of corruption, including blank files, files not opening, unrecognizable format, unreadable content, files layout changed, etc.
-
Repairs all kinds of data stored in damaged Excel files such as tables, charts, formulas, comments, images, etc.
-
Support all formats of Excel files: XLSX/XLSM/XLTX/XLTM/XLS
-
Perfectly repair corrupted files with a very high success rate, without modifying the original file.
-
No limit to the number and size of the repairable files.
-
Support Windows 11/10/8/7/Vista, Windows Server 2003/2008/2012/2016/2019/2022, and macOS 10.12~macOS 13.
-
Except for Excel, Repairit also supports all formats of PDF, Word, Excel, PowerPoint, ZIP, and Adobe files.
Simplified Guide to Fix All Types of Errors in Excel Files Using Repairit
After learning Repairit’s top features, let’s see how to use it for quick file repairs. By following the steps outlined below, you will be able to learn how to disable read-only in Excel:
Step 1. Launch the Tool and Access the File Repair Feature
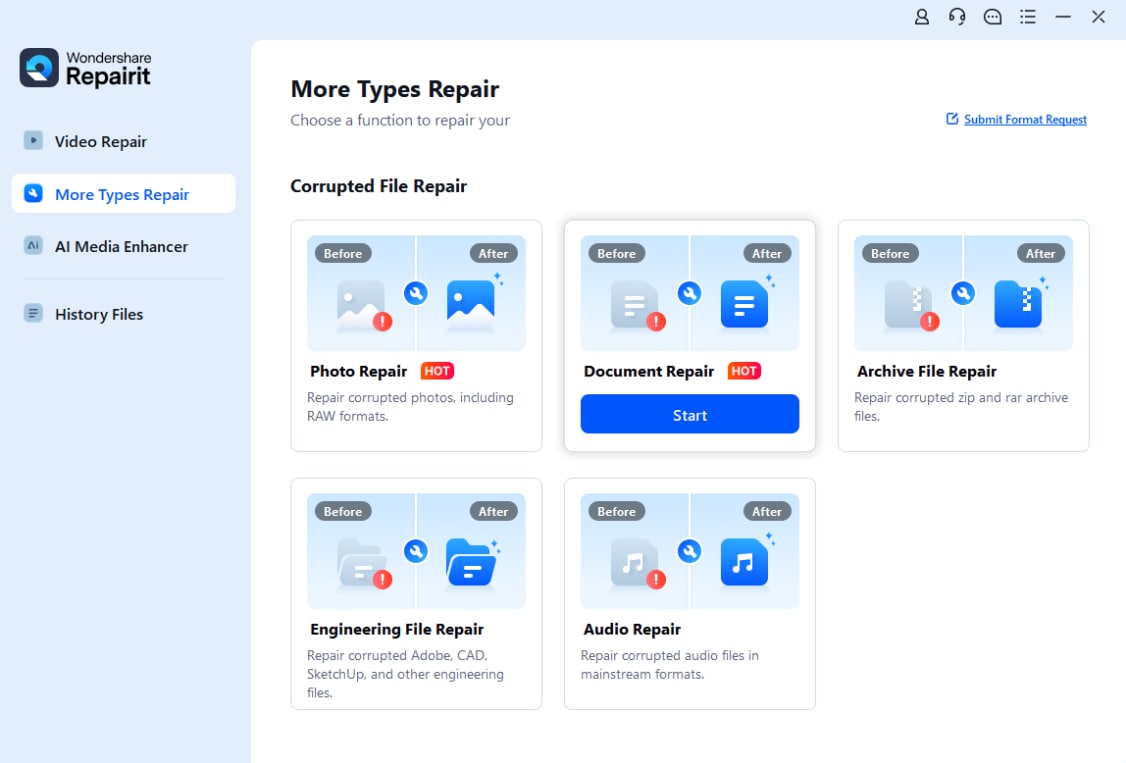
After installing Repairit, launch it on your Windows PC or MacBook and go to the “More Types Repair” tab. Here, you need to access the “File Repair” feature to start the repairing process.
Step 2. Import the Corrupted Excel Files in Repairit
On the next screen, you should add the corrupted files using the “+ Add” button and move further. Once all the files are imported into the tool, hit the “Repair” button under the “Unrepaired Files” screen.

Step 3. Save the Repaired Excel Files on Your Device
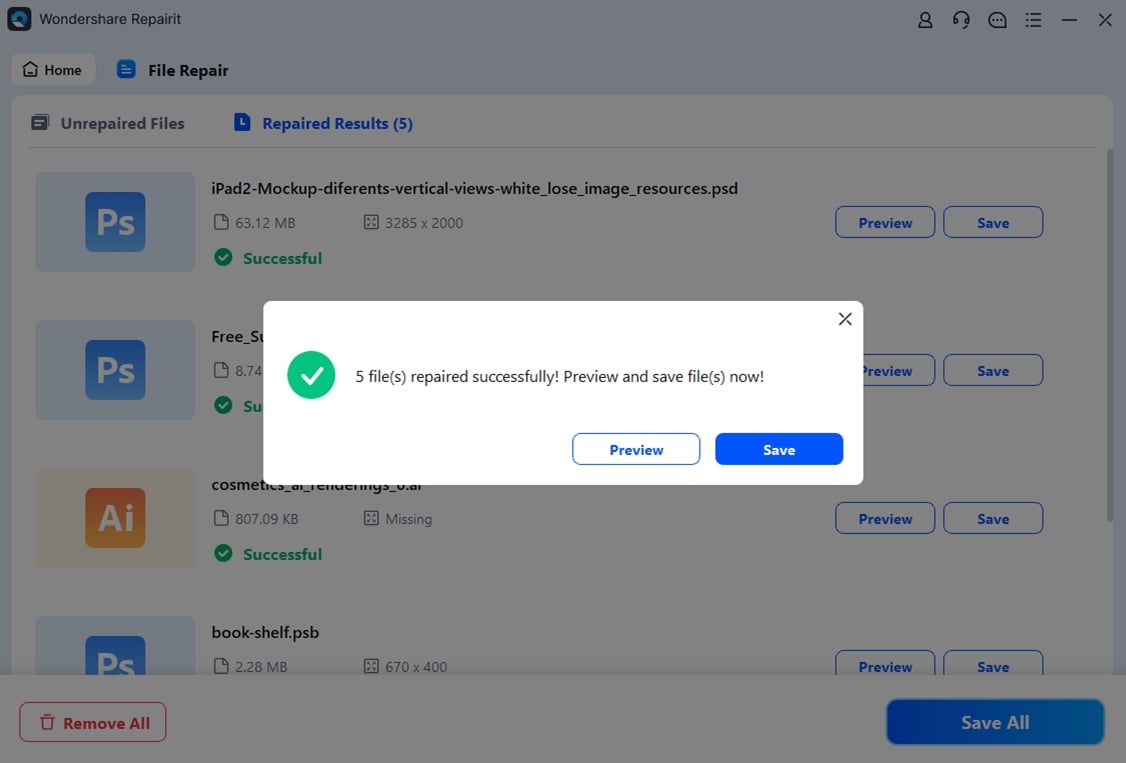
Once the repair process is complete, press the “Save All” button at the bottom side of the screen. From the small popup that appears, hit the “Save” button to export the repaired Excel files to your PC or MacBook.
Repair Corrupted Excel Files

Conclusion
To conclude, users should understand why files may be locked in read-only mode. By understanding how to cancel read-only in Excel, they can regain full control over documents and make the necessary changes without delays. However, methods might vary from adjusting sharing settings to removing password protections or disabling read-only attributes.
For those struggling with more Excel file issues, Repairit offers a reliable solution. It can quickly fix errors and ensure that your files are accessible and editable without hassle. Thus, download Repairit to streamline your document management and improve productivity.
FAQ
-
Q1. What is the difference between read-only and protected views in Excel?
The read-only mode prevents editing unless permissions are changed and focuses on avoiding unintentional changes. On the other hand, a protected view restricts editing for security, mainly for files from untrusted sources like email or downloads. -
Q2. Does Excel automatically save changes after removing read-only?
No, Excel doesn’t save changes automatically after removing read-only restrictions unless you turn this feature on from the settings. Until then, you must manually save the file or use “Save As” to keep your edits. -
Q3. What are the risks of disabling protected view in Excel?
By disabling the protected view, you increase the risk of getting malware or viruses from untrusted files. It can also lead to harmful macros running on your computer without your consent.


 ChatGPT
 Perplexity
 Google AI Mode
 Grok
Grok

