
Microsoft Outlook is used daily to send all formats of emails and messages. In the same vein, this program is susceptible to errors. Error 0x80040201 is a type of error you can face as a user of Outlook. In this article, you will learn why you are facing this error and what tips to use in resolving the error. As a final tip, the professional PST repair tool, Repairit Outlook Repair, will be introduced to you. Also, you will be guided on the steps to use in repairing Outlook PST files that have been damaged by error 0x80040201.
What Causes the Outlook Error 0x80040201?
Outlook error 0x80040201 is caused by certain factors: they include the following:
- Corrupt Outlook Profile: Outlook may generate error 0x80040201 if your Outlook profile is corrupted. A corrupt Outlook profile can occur from virus or malware infestation
- Corrupt Cached Contacts or NK2 File: An NK2 file contains your nickname as an Outlook user, one that is created by you and assigned to an email address. If there is any corruption within the contacts in your cache folder or NK2 file, then there is every likelihood that you will encounter this error.
- Interrupted Network Connection: If your network or internet connection gets disrupted and is inactive, it may generate error 0x80040201 when you are trying to send or receive emails.
6 Tips to Resolve Outlook Error 0x80040201
To the crux of the matter, below are the top six tips and measures on how to resolve Outlook error 0x80040201. The great thing is that this error can be fixed, just pick any of the tips.
Tip 1: Delete the Cached Outlook Contacts or Delete NK2 File
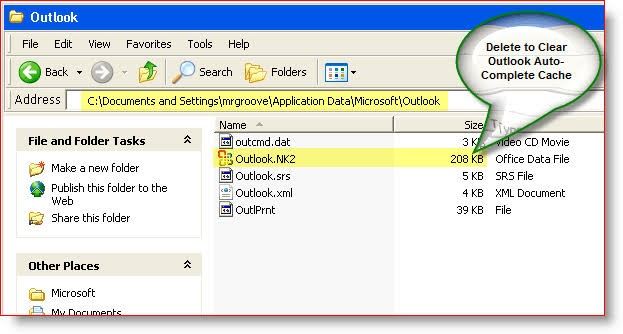
Outlook stores information and messages for easy accessibility as cache or NK2 in older versions. Delete corrupt cached Outlook email contacts or NK2 file by using these simple steps:
- First, trace the path to locate cached contacts. To do this, open your Windows Explorer and type in the following in the address tab: %APPDATA%\Microsoft\Outlook
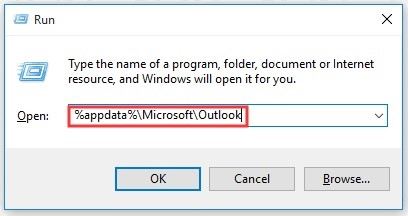
- Locate your NK2 file in this location and simply delete it.
Tip 2: Run Outlook in Safe Mode
You can run Outlook in "Safe Mode". This implies that it doesn't require any toolbar customizations, customized settings, add-ins, or preview pane to start. Through this method, you can figure out if the error is from a third-party source or not. If you can start Outlook in safe mode, then you know that the issue is from an external program. Uninstall the apps individually to find out the particular app responsible for the error in the first place.
To start Outlook in safe mode, let these steps guide you:
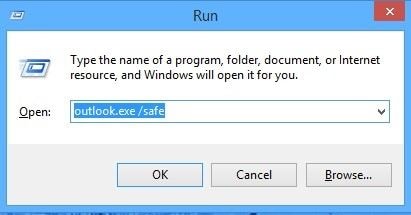
- Open the "Run" function by pressing a combination of "Win" and "R" keys on the keyboard. As an alternative, go to the search box of your Windows and type "Run", then press the "Enter" key

- Type the words: outlook.exe /safe. Click "OK"
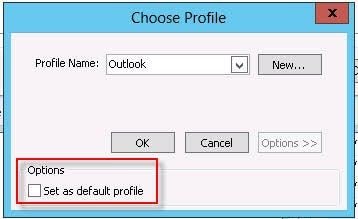
- A window labeled "Choose Profile" will appear; select the default option for Outlook.
- To open the profile, click "OK". Outlook will now start in safe mode.
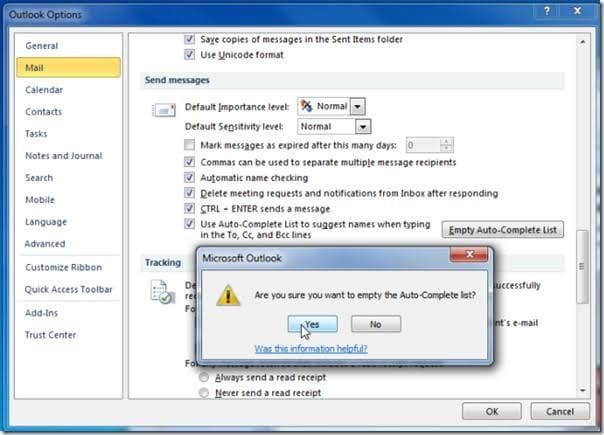
Tip 3: Emptying Autocomplete List
Since the items in the autocomplete list could be corrupted and cause this error, you are advised to empty the list by following the steps below:
- Launch Outlook in versions 2016, 2013, and 2010; then click "File" button
- Choose "Options" and the "Mail" button
- Go to "Send Messages" and under it, choose the option "Empty Auto-Complete List"
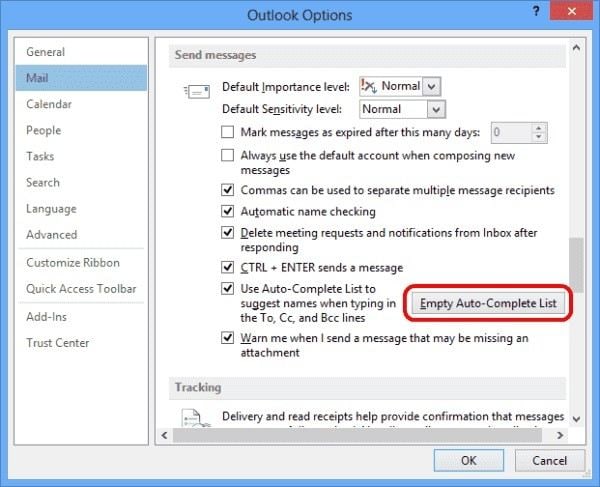
- Choose "Yes" or "OK' to affirm the action
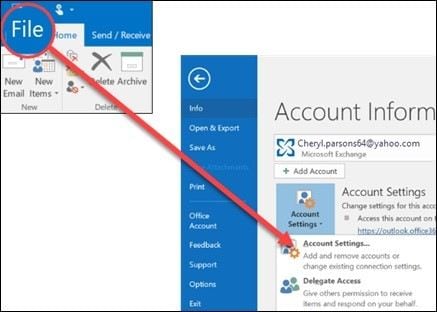
Tip 4: Create a New Outlook Profile
Create a new Outlook profile altogether. This you can do by following the steps outlined below:
- Open Outlook and click on "File"
- Go to "Account Settings"
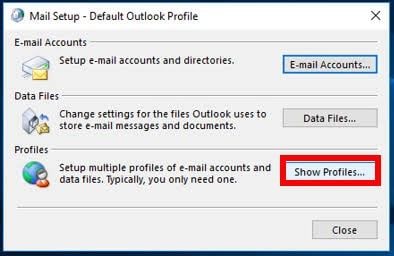
- Tap on "Manage Profiles"
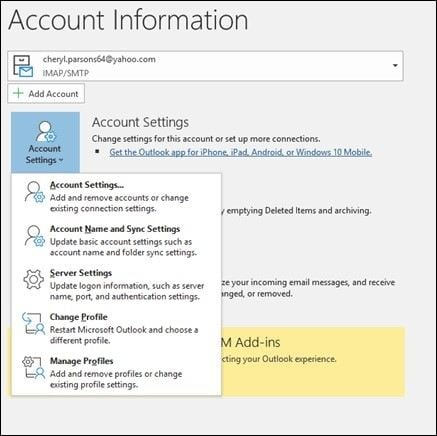
- Next, select "Show Profiles"
- Click to "Add". Next, there is a box you will see for "Profile Name". Input the name of your new profile and select "OK" to continue
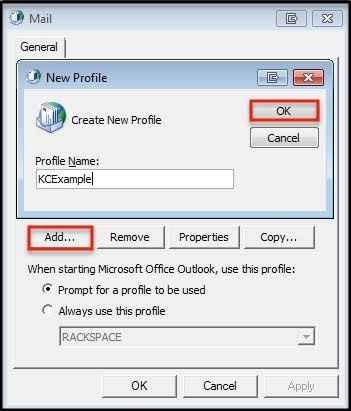
- A wizard will pop up, requiring the full email address and password of the new account. After a few seconds of synchronizing the details you have provided from the server, a connection is created. Just choose "Finish" to bring the configuration of your new account to a close.
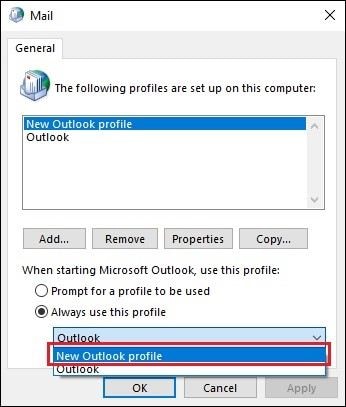
- Mark the option "Always use this profile" before scrolling down the menu to select the profile you just created. Then choose "OK"
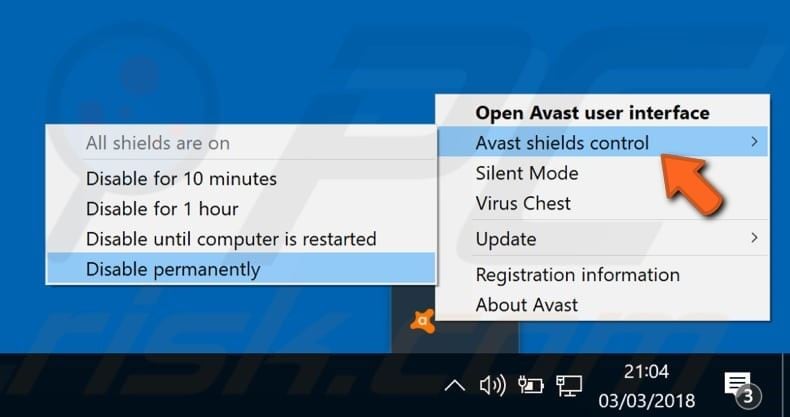
Tip 5: Disable Third-party Antivirus
When MS Office Outlook requests to send you an email, it may be prevented by the third-party antivirus installed on your system. This may generate the error code 0x80040201. Thus, disable your antivirus program to check is it's the reason you have this error. There are several antiviruses online but an example will be made with Avast antivirus program and how to disable it:
- On your system tray, right-click on the icon representing Avast
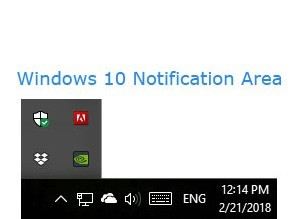
- Click the "Avast, shields control" option. You will be given options on how long you want to disable Avast. Take your pick.
Tip 6: Repair PST File with Repairit Outlook Repair
To attack the error itself, you may need the services of an expert tool, especially when all else has failed. Wondershare Repairit for Email is an expert tool you can use to fix the Outlook error 0x80040201 by repairing the damage in the PST folder itself. This tool is versatile in its utility as it works in different MS Outlook versions like older versions than Outlook 2007, and newer versions from 2007, 2010, 2013, and downward.
It is precise and effective, which is why it is popular among users as a repair utility. The size of the PST folder does not limit the tool from carrying out effective repairs. Even if you just created a new Outlook profile or you have been using an old one, the files within it can be fixed with Repairit for Email.
The main features of Repairit for Email:

-
Repair damaged PST & OST Files in Outlook in all Email corruption scenarios, such as hard disk crashes & bad sectors, virus attacks & tojan horse, outlook corruption & malfunctions, improper shutdown procedure, etc.
-
Restore Outlook Emails deleted for a long time and extract the Email messages, folders, calendars, etc. within seconds.
-
Repair corrupted Emails and restore deleted Emails with a very high success rate.
-
Repair Emails in bathes without size limits and support to preview all of them before saving.
-
Compatible with Windows 7/8/8.1/10/11, Windows Server 2012/2016/2019, and MacOS X 10.11~ MacOS 12 (Monterey).
Now, move on to repairing your PST file with this tool using the steps below:
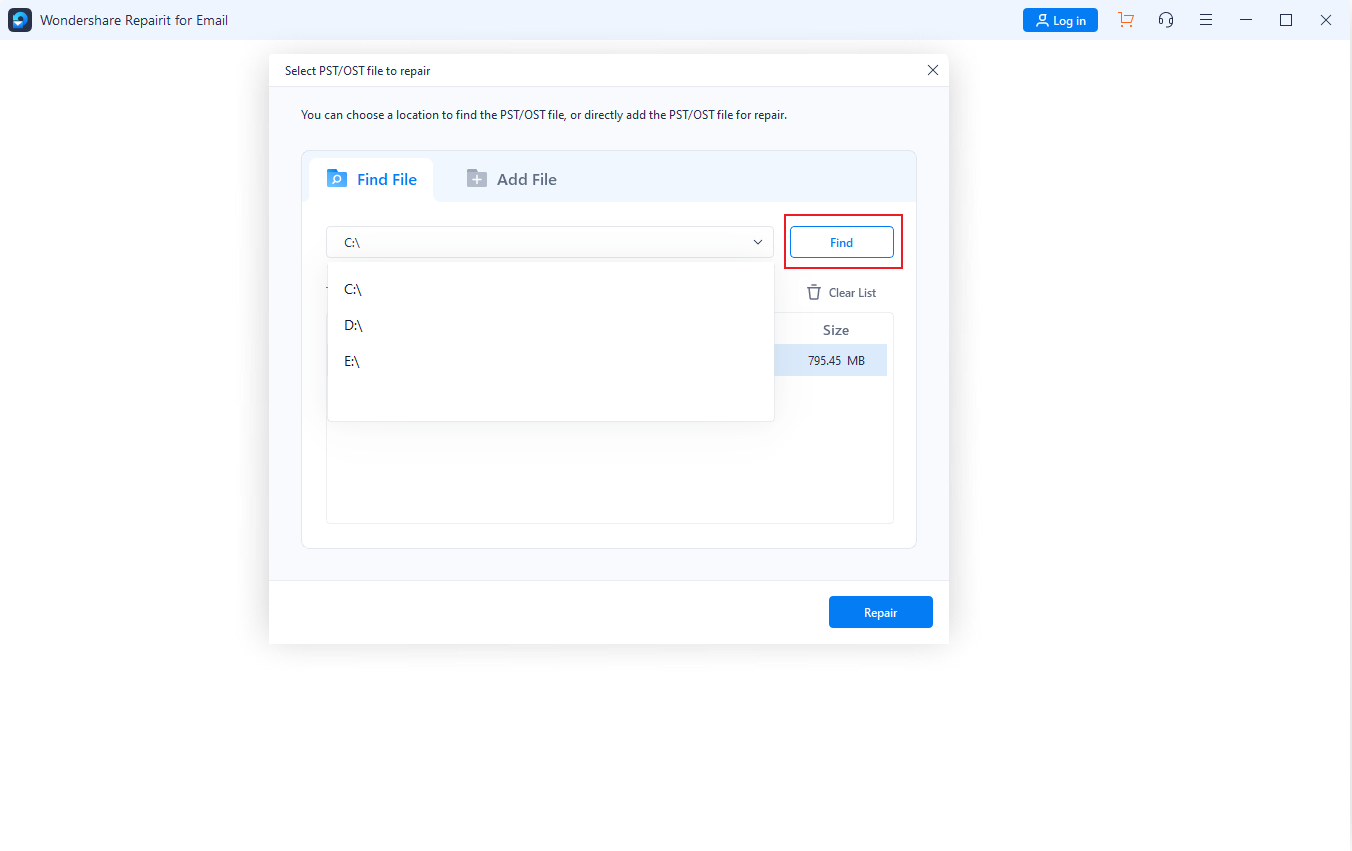
Step 1: Add Corrupt File
First of all, download and launch Repairit for Email on your computer or Mac, then open it and the home interface has a window labeled "+Select File".

Here, you are required to add the PST file you need to repair by clicking the "Find" option and click the "Repair" button to start the repair process.
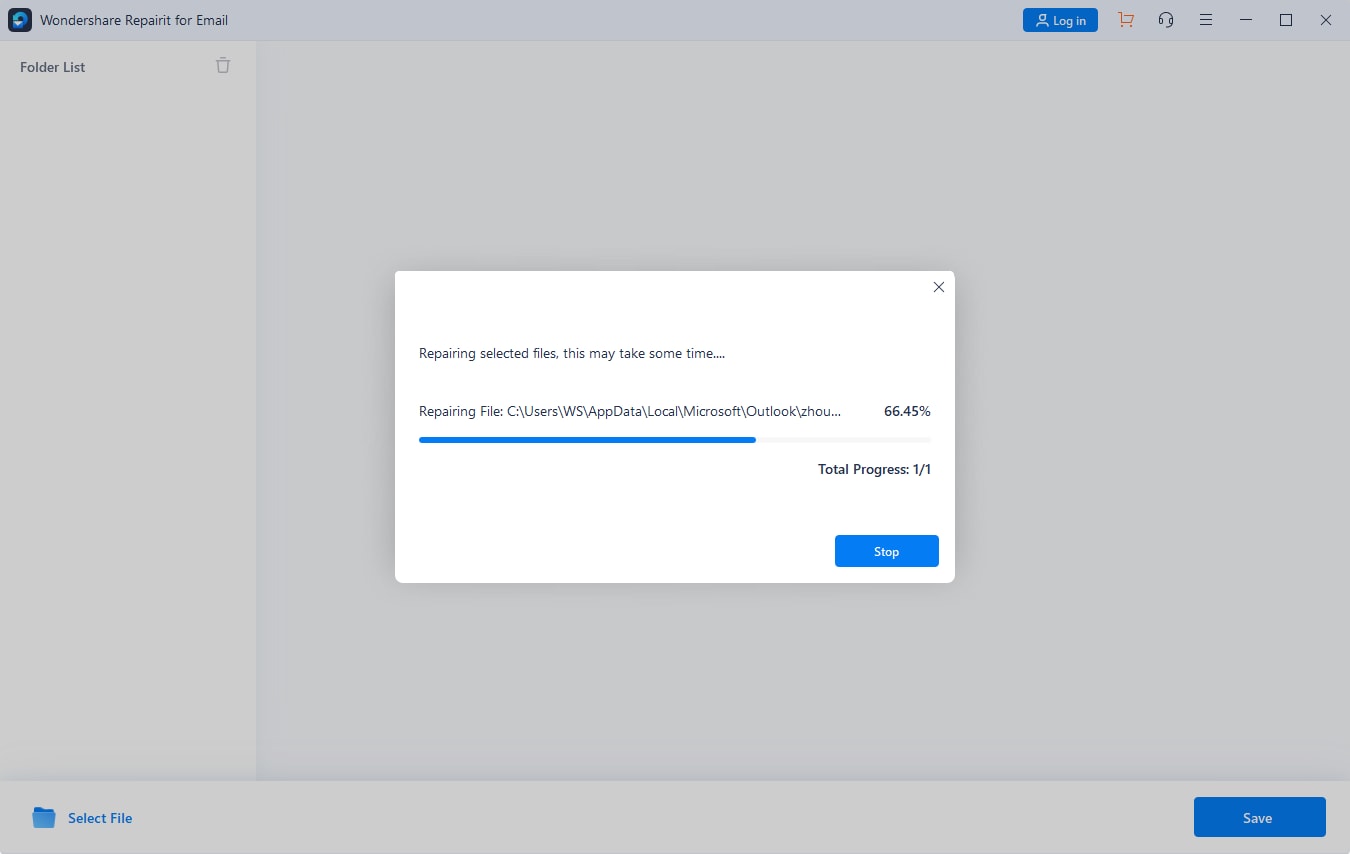
Step 2: Repair File
After clicking the "Repair" button at the bottom right of the screen, Repairit will begin scanning and fixing the PST file you have selected.
Step 3: Preview and Save Repaired PST
The preview window is the next to appear after the tool has fixed your corrupted file (s). On the left pane, a list of the repaired files is displayed. Meanwhile, the contents of the files are displayed in the middle pane and the details can be found on the right pane. Now you can click the "Save" button to save the fixed PST files.

Relevant articles:
Solutions to Fix 0xc10100aa Error in Windows
Camera Error Code 0xa00f4244 on Windows 10
Fix Outlook Not Receiving Emails But Can Send Problem
Fix Outlook: Your Request Cannot Be Completed
The Bottom Line
The great thing about experiencing this Outlook error 0x80040201 is that it can be easily fixed with the right tips and methods. This is what the article has provided for you and you cannot deny that is a fact!