
In this article

Have you ever taken a gorgeous picture of a sunset? Capturing such moments creates beautiful colors you can’t get enough of. The colors are popping, and the picture looks phenomenal. But how about taking a similar photo outside of a sunset?
These pictures often feel like they need something and are less captivating. Knowing the image is missing something is frustrating, especially when you don’t know what.
The answer to what’s missing is color grading. Color grading lets you play with colors, hues, mid-tones, shadows, and highlights. You can deal with color grading in Lightroom, but there’s also Baselight color grading and a mobile Lightroom color grading app.
Lightroom Color Grading Explained
Color grading is a powerful image editing technique that photo editors use to enhance the colors of an image even more than with simple color adjustments such as contrast, white balance, and exposure. Such a tool lets editors make the image’s colors more visually pleasing by playing with shadows, highlights, and mid-tones.
Adobe’s take on color grading uses Lightroom to deal with everything related to color grading, and since the company has been in the editing game for over four decades, they know what they’re doing and have been improving their features for a while now.
Today, Lightroom color grading is on another level, and many professionals use it in all types of photography. Whether you need it for landscapes or portraits, Lightroom color grading can make those colors pop and make the image a lot better than it was.
The tool deals with changing color tones to change the image’s mood. It has settings for mid-tones, shadows, and highlights, but there are also other elements, sliders, and adjusters. Although the tool looks simple, it’s powerful and can significantly improve your photography.
Benefits of Color Grading in Lightroom
Although color-grading apps are everywhere nowadays, using the color-grading Lightroom app has its ups and is especially great for new editors. Here are some of the benefits of color grading in Lightroom:
- Simplicity – After years of improvements, Adobe created a potent color grading tool that is still effortless. With just three color wheels and two sliders, anyone can do color grading in Lightroom.
- Creative Cloud – Lightroom is a part of Adobe’s Creative Cloud, where there’s also Photoshop. Using these together has advantages, as photo edits flow between apps, and you can quickly revert to a previous version.
- Continuity – Since there’s also a color-grading Lightroom mobile app, and your files are syncing to the cloud, you can switch between devices and continue working on your photo from anywhere.
How To Use Color Grading in Lightroom
If you’re new to photo editing, Lightroom can be an excellent starting point as the app is so simple and minimalistic that anyone can do it. Nevertheless, we’ve also created a short guide on using Lightroom’s color grading; if you follow the steps, you’ll be good to go. Here’s what you need to do:
Step 1: Import Your Photo
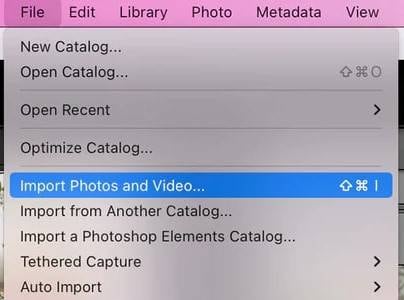
After you open the color grading Lightroom app on your Windows or MacOS machine, the first and obvious step is to import the photo you want to do color grading on. You can do so from the File menu, after which you should select Import Photos and Video and then select the image you want to work on.
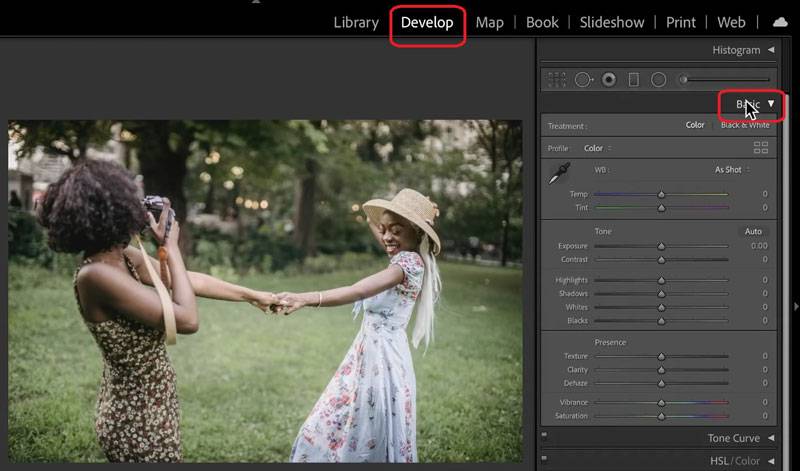
Step 2: Do the Necessary Editing in Develop Panel
When you import the photo you want color grading on, you should adjust its colors and do a few simple edits. You can do that in the initial Develop Panel, which you’ll find in the top right corner of your screen, after which you should select Basic on the right side.
You can play with the picture’s color temperature, tint, exposure, contrast, texture, vibrance, saturation, etc. Adjusting these sliders ensures you have an excellent starting place and an image that’s well done, which you can always restore.
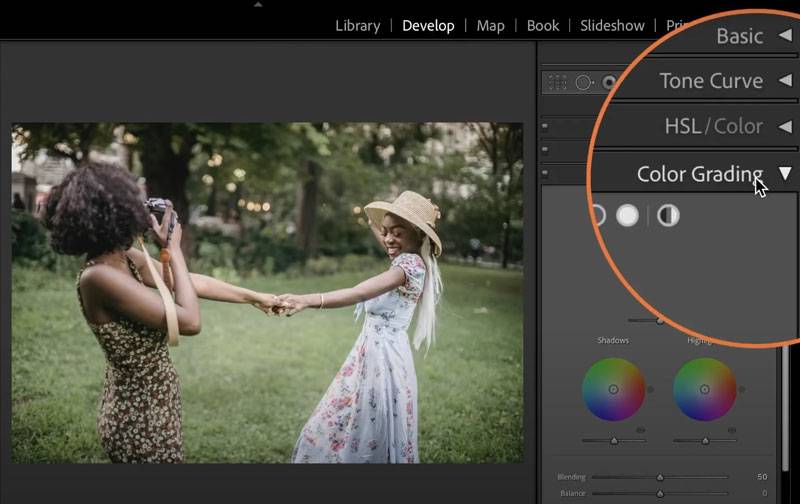
Step 3: Start the Color Grading Tool
If you look at the right side of the Develop Panel, you’ll see an option for “Color Grading.” Click it to open the Color Grading Tool. You should now see that the first option is selected, where you can change colors on three color wheels.
The Color Grading menu might be named Split Toning, which you should choose on older Lightroom versions. That’s what Adobe used to call color grading.
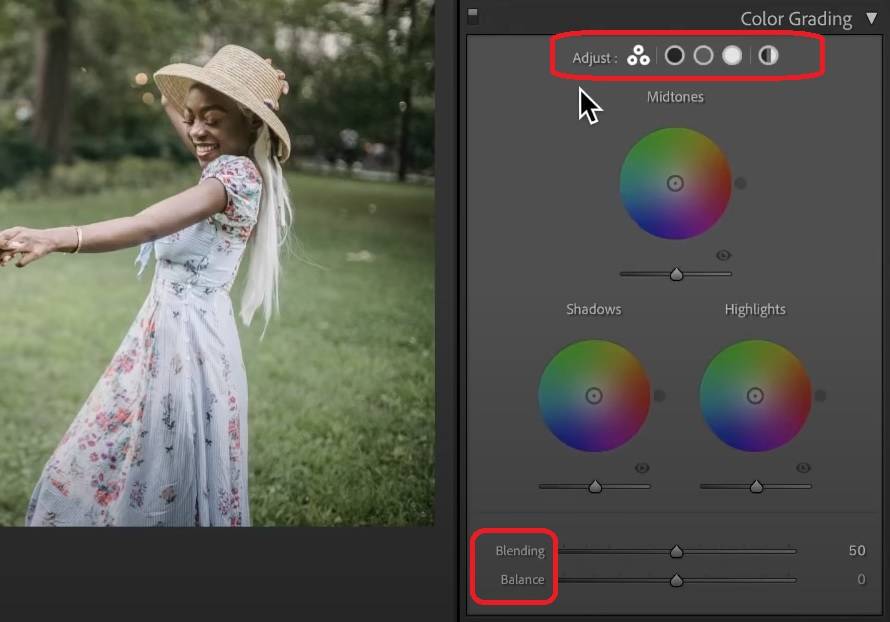
Step 4: Configure Color Grading Settings
The default color grading Lightroom settings are set to show you all three wheels, which is the first option. However, if you look at the top part of the tool, you can select each of these individually, which are your second, third, and fourth options for changing just shadows, mid-tones, and highlights – in that order.
Moreover, you can also select the fifth option, which stands for global settings, and means you’ll be applying the same color to the entire image. Remember that the fifth option gives you the least control but is the simplest.
That’s everything about using color grading in Lightroom. It’s simple but efficient and can help you create unique photos. Try different colors, tones, and effects. Maybe you’ll find your style. You can also use some of our tips for Lightroom color grading, which you can see below.
Tips for Color Grading in Lightroom
Although you don’t have to use any of these, and you can play with Lightroom’s color grading however you want, we decided to include a couple of tips that can help create gorgeous and unique photos. Below are three tips you can try while doing Lightroom color grading.
Add Complementary Colors
It’s a proven fact that using opposite colors, such as green with red or blue with yellow, is something we love to see. They’re opposite since they’re on opposite ends of the spectrum, but they’re also called complementary colors, and we love seeing them together.
Suppose you took a picture of land and sky. You could add complementary colors while color grading in Lightroom, and such a picture would bring out both parts. For example, you could add blue shadows to the sky and warm and yellow highlights to the land.
It would create a stunning effect where everything seems focused. However, you could also do the opposite and play with these colors until you find something that best represents your style.
Cool Down Shadows and Make Highlights Warmer
Since color grading in Lightroom uses three color wheels, your pictures can look unique and beautiful if you play with all three wheels. Don’t just focus on the Midtones wheel, as Shadows and Highlights are essential, too.
Cooling down shadows by adding cool colors such as blue can create a gorgeous result, improving your image quality. You can also add warm colors to the Highlights wheel and enjoy the unique effect these two make together.
Remember, these are just tips, and although this example deals with cooling down shadows and warmer highlights, you can do the exact opposite and see what it leads to. Perhaps you’ll like it more that way.
Use Shift With Color Wheel
If you’ve decided what color to add, you can adjust it using three color wheels in Lightroom. Press the Circle button outside the wheel and drag it. However, adding a perfect amount of color without changing its hue might be challenging.
That’s when you should use Shift on your keyboard. By pressing down Shift and holding it, the hue stays the same, but the amount of color you add adjusts slowly, and you can efficiently find the exact color you’re looking for.
Lightroom Alternatives
Lightroom isn’t the only color-grading app in town – you can find many powerful apps online. Some of these apps deal with color adjustments differently than Lightroom. One of them is AI Photo Colorizer, which is currently the best solution on the market for coloring black-and-white photos. You upload a B&W photo, and the mighty AI engine does the rest in three simple steps.
Moreover, if you have old photos which you want to restore, you can use the AI Old Photo Restoration tool. You won’t believe the wonders it can do with your old smudgy, scratched, and spotty photos until you try it. The AI deals with these defects that old photos are bound to have and restores your pictures to their original look.
You can also try Baselight color grading, which might be a better alternative to Lightroom for some users.
Conclusion
Color grading is a technique that can help get your photos to a whole other quality dimension. Your graded photos will leave the viewers in awe, and you can use Lightroom color grading to enhance the images and adjust the shadows and highlights.
Lightroom color grading is one of many ways to enhance your images. Alternatives such as AI Photo Colorizer take this to another level by employing AI to deal with these adjustments. Such a tool can perfectly recolor your black-and-white photos and make them come alive.