
"My VHS tape is stuck in the VCR. Unfortunately, I can't get it out without damaging it. Does anyone know how to fix a VCR tape?"
Don't worry! VCR tape repair is not as daunting as it might seem. With a little patience and the right knowledge, you can often fix VCR tapes and breathe new life into your old recordings.
In this comprehensive guide, we'll walk you through the process of VHS video tape repair, providing easy-to-follow steps and valuable tips to help you save your precious memories.
Whether you're dealing with a tangled tape, a broken cassette, or other common issues, we've got you covered. So, let's dive into the world of VCR repair and learn how to fix VCR tapes like a pro!
In this article
Types of VCR/VHS Tape Damage
Before we jump into the VCR tape repair process, it's essential to understand the different types of damage that can affect your VHS tapes. Recognizing the problem is the first step in effective VCR repair. Here are some common issues:
- Tangled Tape: This is one of the most frequent problems in VCR tape repair. The tape can get twisted or tangled inside the cassette, often due to a malfunctioning VCR or rough handling.
- Broken Tape: Sometimes, the magnetic tape itself can break. This might happen if the tape is old and brittle, or if it gets caught in the VCR mechanism.
- Creased Tape: Creases occur when the tape folds over on itself, often resulting in distorted playback or loss of video in certain sections.
- Stretched Tape: If a VCR malfunctions during playback or fast-forwarding, it can stretch the tape, leading to warped audio or video.
- Moldy Tape: Tapes stored in damp conditions can develop mold, which can affect both the tape and the video quality.
- Magnetized Tape: Exposure to strong magnetic fields can erase or distort the recorded content.
VCR Tape Repair: Step-by-Step Guide
Now that we've identified the common types of VCR tape damage, let's dive into the VCR tape repair process.
This step-by-step guide will walk you through how to fix VCR tape issues, from opening the cassette to putting it back together.
Remember, patience is key when it comes to VHS video tape repair!
Step 1: Open the Cassette
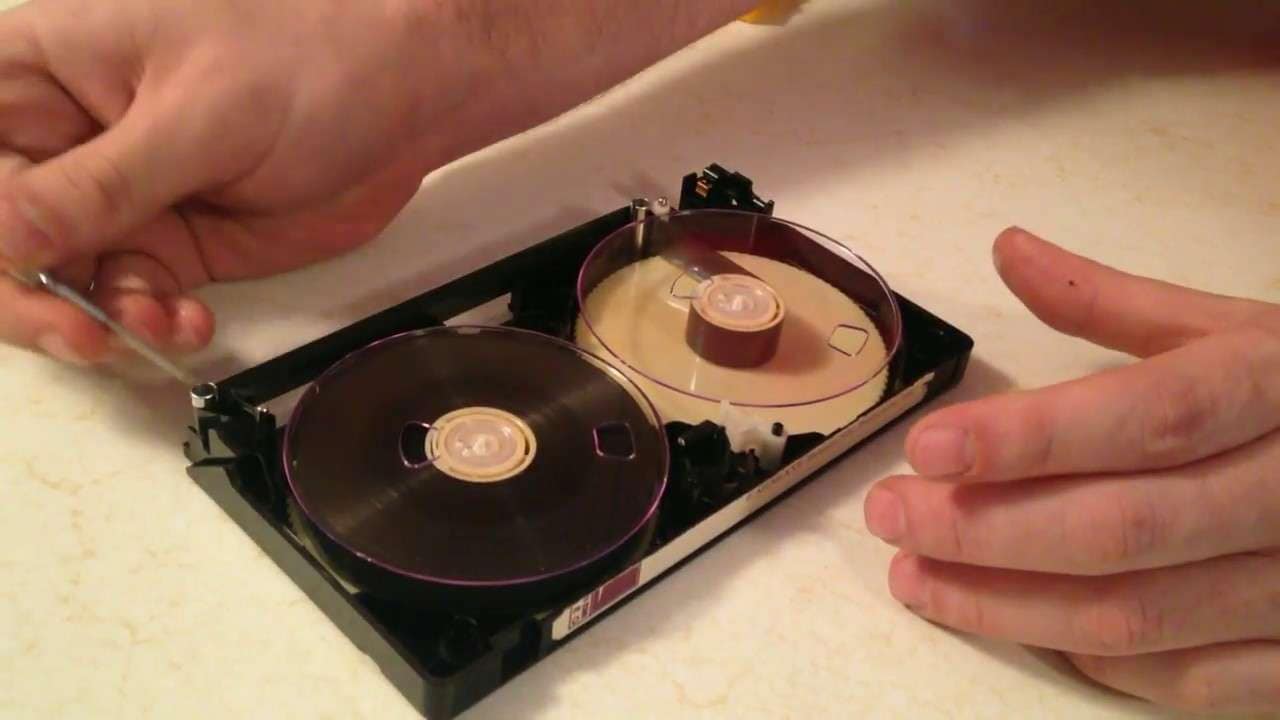
The first step in VCR repair is accessing the tape itself. Here's how to safely open a VHS cassette:
- Gather your tools: You'll need a small Phillips head screwdriver and a clean, dust-free workspace.
- Locate the screws: Turn the cassette over. You'll see five small screws holding the casing together.
- Remove the screws: Carefully unscrew each one, keeping them in a safe place. Don't lose them!
- Separate the casing: Gently pull the top and bottom halves of the cassette apart. Be careful not to disturb the tape inside.
- Set aside the top cover: Place it upside down on your workspace, as you'll need it later.
Remember, opening the cassette is a crucial first step in VCR tape repair. Take your time and be gentle to avoid causing any additional damage to the tape.
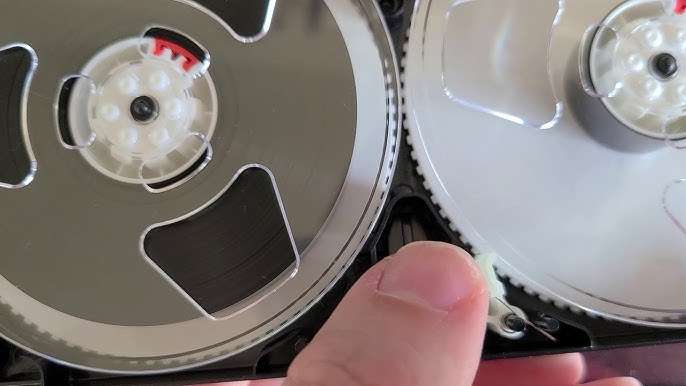
Step 2: Remove the Reels

Once you've opened the cassette, the next step in your VHS video tape repair journey is to carefully remove the reels.
- Observe the tape path: Before touching anything, take a moment to look at how the tape is threaded. You may want to take a picture for reference.
- Gently lift the tape: Using clean hands or lint-free gloves, carefully lift the tape from the guide posts and rollers.
- Remove the reels: Lift both reels out of the cassette housing. Be gentle, as the tape is still connected between them.
- Keep the reels together: Don't separate the reels, as this could tangle the tape further.
By successfully removing the reels, you're one step closer to fixing your VCR tape. This step is crucial for addressing issues like tangled or creased tape in your VCR repair process.
Step 3: Fix VHS Tape
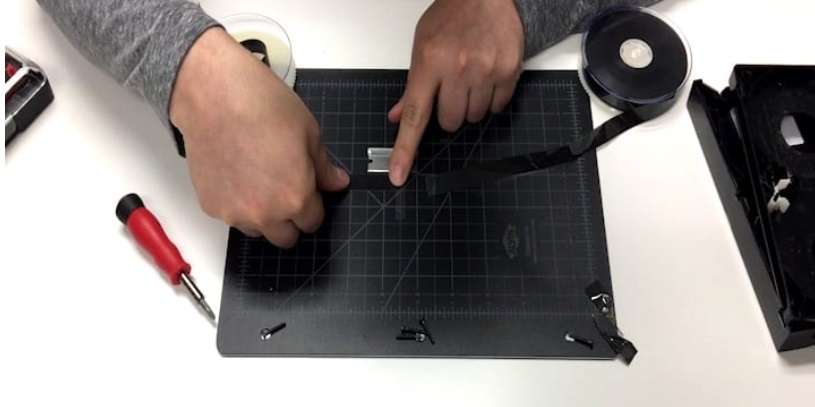
Now comes the heart of VCR tape repair – fixing the actual tape. The method will vary depending on the type of damage, but here are some general steps for common issues:
For tangled tape:
- Gently unwind the tape, being careful not to crease it.
- Use your fingers to carefully straighten out any twists or tangles.
- If the tape is severely tangled, you may need to cut out the damaged section and splice the tape (more on splicing later).
For broken tape:
- Align the broken ends of the tape.
- Use a small piece of splicing tape (available at most electronics stores) to join the ends.
- Trim any excess splicing tape, ensuring it doesn't extend beyond the width of the VHS tape.
Remember, VCR repair requires patience and a steady hand. Take your time with this step to ensure the best results for your VHS video tape repair.
Step 4: Replace the Reels
After you've completed the necessary repairs, it's time to put everything back together. This step is crucial in your VCR tape repair process:
- Check the tape tension: Ensure the tape is wound tightly and evenly on both reels.
- Place the reels back: Carefully lower the reels back into their original positions in the cassette housing.
- Thread the tape: Follow the original tape path, guiding the tape around the posts and rollers.
- Test the movement: Gently turn one of the reels to ensure the tape moves smoothly without catching or binding.
This step is vital in ensuring your VCR repair efforts pay off. A properly replaced tape will run smoothly in your VCR, giving your repaired VHS tape the best chance of playback success.
Step 5: Close the Cassette

The final step in your VHS video tape repair process is to carefully reassemble the cassette:
- Align the top cover: Place the top half of the cassette back onto the bottom half, ensuring all internal components align correctly.
- Replace the screws: Carefully screw back in all five screws, making sure not to overtighten them.
- Final check: Before considering your VCR tape repair complete, gently shake the cassette to ensure nothing is loose inside.
- Test the tape: If possible, try the tape in a VCR to make sure it runs smoothly. Be prepared to stop playback quickly if you notice any issues.
Congratulations! You've now completed the VCR repair process. With patience and care, you've given your old VHS tape a new lease on life.
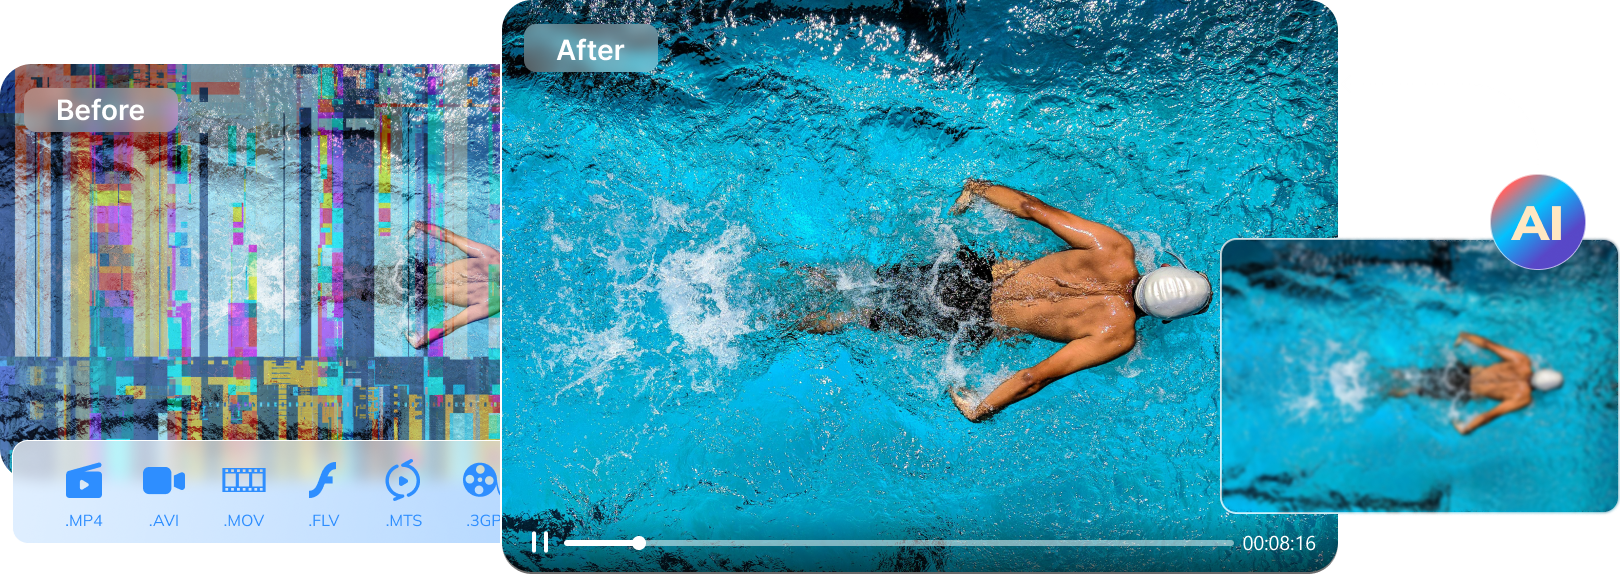
VCR Repair Did not Work? Stuck with Corrupt Files? Try Repairit Video Repair Today!
Well, sometimes, despite our best efforts at VCR tape repair, we might not achieve the desired results. Perhaps the VHS video tape repair was successful, but the resulting digital copy is corrupted or of poor quality.
In such cases, don't lose hope! There's still a way to salvage your precious memories.
Use Repairit Video Repair – a powerful software solution designed to fix corrupted video files. While it can't directly repair physical VCR tapes, it can work wonders on digitized versions of your VHS content.
Here's how Repairit can help when your VCR repair efforts fall short:
- Corrupted Files: If your digitized VHS tape results in a corrupted video file, Repairit can often restore it to a viewable state.
- Poor Quality: While it can't add detail that wasn't there, Repairit can sometimes improve the playability of low-quality digitized VHS footage.
- Audio-Video Sync Issues: If your VCR tape repair led to audio and video being out of sync in the digital version, Repairit might be able to help realign them.
- Missing Frames: Repairit can sometimes reconstruct missing frames in your digitized VHS content, improving overall playback.
- Format Issues: If your digitized VHS tape is in a format that's difficult to play, Repairit can often convert it to a more accessible format.
Here are the simple steps to use Repairit to fix corrupt video footage files:
Step 1: Visit the Wondershare Repairit website, download the software, and install it on your computer. Open Repairit and click the "Add" button to select your corrupted video file.

Step 2: Click the "Repair" button and let the software work its magic.

Step 3: Once the repair is complete, preview the fixed video to check the quality. If you're happy with the results, click "Save" and choose where to store your repaired video.

That's it! With these simple steps, Repairit can help fix various issues in your digitized VHS content, from corruption to poor quality. It's a valuable tool when physical VCR tape repair isn't enough to save your memories.
Repair Your Corrupted VCR Files Now
 Security Verified. Over 7,302,189 people have downloaded it.
Tips for VHS Video Tape Repair
To round out our comprehensive guide on VCR repair, here are some valuable tips to keep in mind during your VHS video tape repair journey:
- Clean Hands, Clean Tape: Always wash your hands before handling tapes, and work in a clean, dust-free environment. Oil and dirt from your hands can damage the tape.
- Use the Right Tools: Invest in proper VCR repair tools like head cleaning tapes, cotton swabs, and isopropyl alcohol for cleaning.
- Be Gentle: VHS tapes are delicate. Always handle them with care during the VCR tape repair process.
- Know When to Seek Help: If a tape contains irreplaceable content and you're not confident in your VCR repair skills, consider professional VHS video tape repair services.
- Digitize After Repair: Once you've successfully repaired a VHS tape, consider digitizing it to prevent future physical damage.
- Store Tapes Properly: After VCR repair, store your tapes vertically in a cool, dry place away from magnetic fields to prevent future damage.
By following these tips, you'll be well-equipped to handle most VCR repair scenarios. Remember, the key to successful VHS video tape repair is patience, care, and the right knowledge.
Conclusion
As we've explored in this comprehensive guide, VCR tape repair is not just possible – it's a valuable skill that can help preserve our cherished memories. From understanding the types of tape damage to learning the step-by-step process of how to fix VCR tape issues, we've covered the essentials of VHS video tape repair.
As we move further into the digital age, the skills of VHS video tape repair become increasingly rare and valuable. By learning these techniques, you're not just fixing tapes – you're preserving history, both personal and cultural.
So the next time you encounter a damaged VHS tape, don't despair. Armed with this guide and a bit of patience, you're well-equipped to tackle the challenge of VCR tape repair.
FAQ
-
1. How do I know if my VHS tape can be repaired?
Most VHS tapes can undergo some form of VCR repair. Signs that your tape might be repairable include visible tangles, a loose tape, or a cracked casing. However, if the magnetic coating on the tape is severely damaged or if the tape has been exposed to extreme heat or moisture, repair might be more challenging. In such cases, professional VHS video tape repair services might be your best option. -
2. Can I use regular tape for VCR tape repair?
No, regular tape should not be used for VCR tape repair. Regular adhesive tapes can damage your VCR's heads and leave residue on the tape. For VHS video tape repair, always use specialized splicing tape designed for this purpose. This tape is thinner, non-reflective, and won't leave residue that could harm your VCR or the tape itself. -
3. How can I prevent future damage to my VHS tapes?
Preventing damage is crucial to minimize the need for VCR repair. Store your tapes vertically in a cool, dry place away from direct sunlight and magnetic fields. Regularly clean your VCR to prevent it from damaging tapes. Always handle tapes gently, and consider digitizing your most valuable tapes to create a backup. By following these preventive measures, you can significantly reduce the likelihood of needing VCR tape repair in the future.
