Windows Live Mail is a popular email client for many Windows users. While this features ease of service in sending and receiving emails, it still has problems. One significant server error that many users report is Error 0x800CCC79. This article covers a composite discussion of this error and provides a solution.
Read through this article to learn more about Error 0x800CCC79 and its derivatives.
Part 1: Defining the Windows Live Mail Error 0x800CCC79
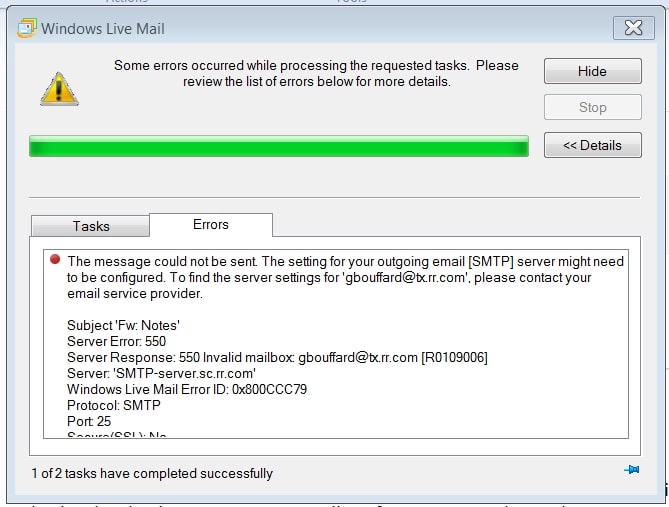
The Windows Live Mail is an old email client and has reported many server errors. Its runtime Error 0x800CCC79 is countered in a situation where Live Mail crashes. In other cases, users find this error on their screens when sending mail through it. While the mail does not reach the intended recipient, you are returned with a message. The 0x800CCC79 Windows Live Mail error comes under the following statement:
The message could not be sent because one of the recipients was rejected by the server. The rejected email address was 'recipient@mail.com'. Subject '****', Account: 'servername.com', Server: 'servername. com,' Protocol: SMTP, Server Response: ‘550 relay not permitted'. Port: 465, Secure (SSL): Yes, Server Error: 550, Error Number: 0x800CCC79
While this error is recognized as a runtime error, it generally represents a bug in the email client. There are times when you are not even returned with a message under this error. Let's understand the causes of the error and lead to a proper solution.
- You will find your computer to be freezing for a few seconds. This will happen every time you open and try to use Windows Live Mail.
- The error pops up on the screen when you try sending a mail.
- This can even halt the speed of your Windows across the computer.
- The active window of Windows Live Mail crashes as the Error 0x800CCC79 .
- The outgoing SMTP server refuses to interact with the email.
Part 2: Primary Causes of the Windows Live Mail Error 0x800CCC79
Why would the 0x800CCC79 Windows Live Mail error occur? As you have dissected some crucial details about the error, it is time to understand the causes. An overview of the error will help you margin some essential details related to the error. As you wish to resolve this runtime error across your Live Mail, this gets necessary.
- You may have entered the wrong password or username in your email client.
- A wrong Live Mail configuration has been personalized and developed.
- If the integration between the server is improper, this error is evident to happen.
- Your computer may have gone through a virus attack. This will dismantle many important files, which may redirect to such problems.
- There can be a connection problem amidst the server of the email client. Your POP3 and SMTP protocol may not connect to the database server.
Part 3: Essential Fixes to Resolve Windows Live Mail 0x800CCC79
Once you have put yourselves according to the cause, it is time for solutions. These fixes would help you define a clear resolution for the 0x800CCC79 error. Look ahead into the steps to determine what solutions would sound probable for this problem.
Method 1: Managing the SMTP Settings
The problem is directed to the server settings as the email message displays. Before you move to other solutions, looking into the SMTP settings is essential. As this is an SMTP error, there are several possibilities involving this. For instance, the SMTP authentication might be disabled, which would cause such problems. To fix this, you need to look into these steps:
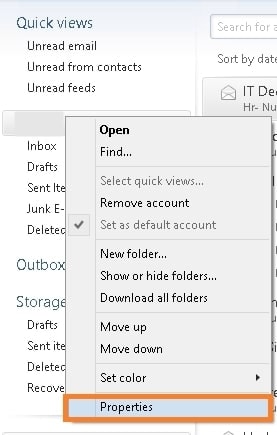
Step 1: Launch Windows Live Mail on your computer and proceed to your account.
Right-click on the account and select "Properties" from the drop-down menu.
Step 2: As the new window opens, proceed across the "Servers" tab.
Lead to the "Outgoing Mail Server" section in the window. You must check the option showing "My server requires authentication." Click on "OK" to apply the settings on your Live Mail.

Step 3: You must relaunch Live Mail to find this error resolved across your computer.
Method 2: Try Utilizing the Work Offline Mode
If any outgoing mail is stuck across the Outbox, you will require going through this method. With such a condition, the Work Offline mode is the perfect direction to adopt. You will find this error across your screen whenever you log into Live Mail. The following technique is the perfect answer to your problem:
Step 1: Open Windows Live Mail on your computer and log in to your account.
You will find the error in front of you as you sign in. As it disappears, it leads to the "File" tab on the top. From the appearing options, lead to the "Work Offline" option.

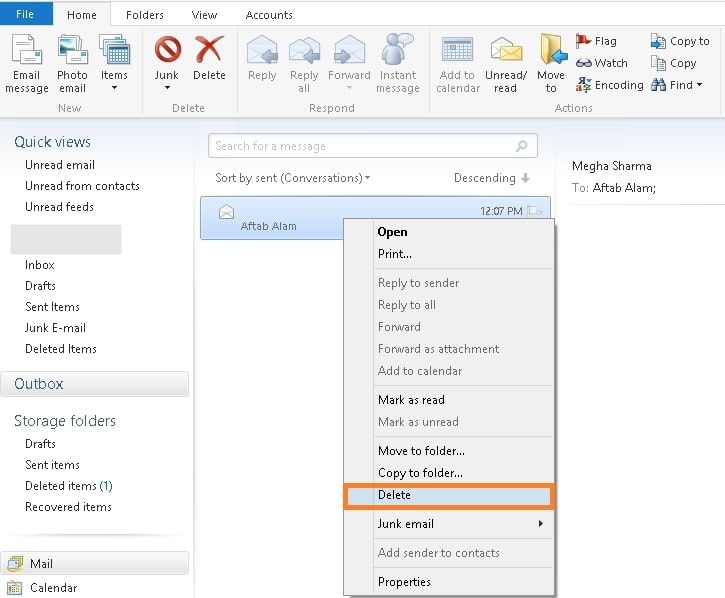
Step 2: As the Live Mail is now offline, lead to your account's "Outbox" folder.
Select the email that is stuck in the folder and right-click on it. Next, click on "Delete" among the options that appear.
Step 3: Revert to the "File" menu and disable the "Work Offline" mode.
Close Live Mail on your computer and restart it to resolve all issues across it.
Method 3: Shift from Live Mail to Outlook for Better Experience
Windows Live Mail is an old email client, as stated before. With you facing such problems, you will feel frustrated about using this for your work. Under such circumstances, you will prefer to shift to an email client; that is better. Microsoft Outlook is another renowned email client that many users use. While it represents a similar model to Windows Live Mail, it is a great alternative.
To shift from Live Mail to Outlook, you will require shifting your data. For this case, you will need a proper EML to PST Converter. Stellar Converter for Windows Mail is a tool designed for this specific purpose. The results are pretty compelling as you easily convert your Live Mail to a PST file. Stellar offers some impressive and coherent features for enhanced usability.

While it allows you to preview the details of the email data file, it is pretty easy to use. It offers a log report that can be saved across the computer for analyzing the conditions. You can also segregate your data with the help of filters for better organization. If you are considering moving yourselves to Outlook, this tool is perfect.
Bonus Tip: Repairing Your Outlook PST Files Using Repairit for Email
As you figure out the perfect remedies to the 0x800CCC79 error on Live Mail, there are other things to look out for. While you shift yourselves to Outlook, you might face complications with the PST file. To cater to this, you will need a proper repair tool. Outlook PST files can get corrupted for many basic reasons. To counter this, Wondershare Repairit for Email is the answer for you.
This platform easily repairs and resolves all Outlook problems for you. While it is easy to utilize, it provides high compatibility. You can use it across both Windows and Mac with ease. Repairit for Email is a diverse tool to consider. It not only repairs PST files but also provides support to OST files. To understand how it makes things easier for you, let's find out in the steps:

-
Repair damaged PST & OST Files in Outlook in all Email corruption scenarios, such as hard disk crashes & bad sectors, virus attacks & tojan horse, outlook corruption & malfunctions, improper shutdown procedure, etc.
-
Restore Outlook emails deleted for a long time and extract the email messages, folders, calendars, etc. within seconds.
-
Restore Outlook Emails deleted for a long time with a very high success rate.
-
Repair emails in bathes without size limits and support to preview all of them before saving.
-
Compatible with Windows 7/8/8.1/10/11, Windows Server 2012/2016/2019, and MacOS X 10.11~ MacOS 12 (Monterey).
Step 1: Launch Repairit for Email.
Start by launching Wondershare Repairit for Email on your computer. Then, proceed to the "Select File" button for importing the corrupted PST file.

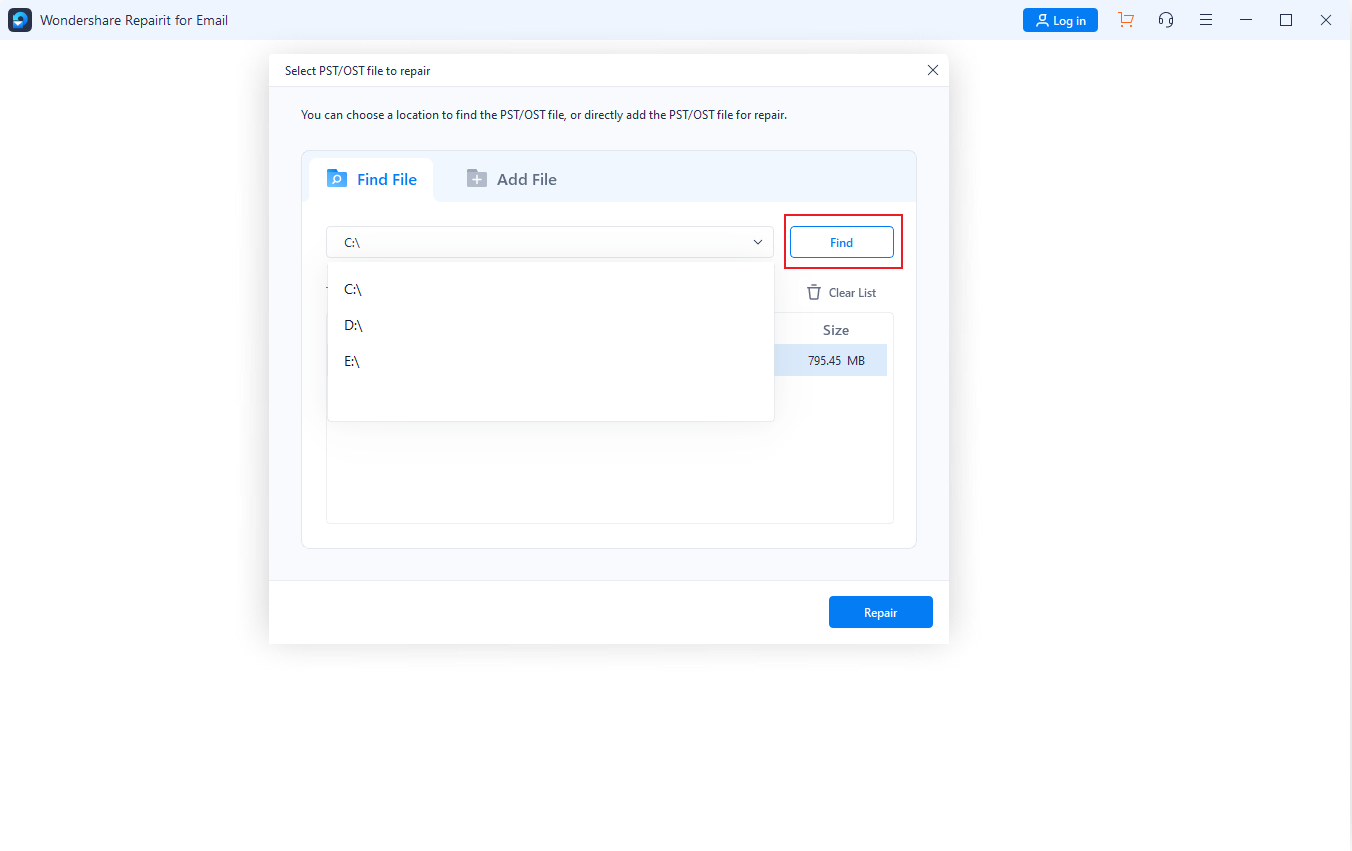
Step 2: Import Corrupt PST File.
You will find two different options for importing the PST file. Go for "Find File" if you want to search a drive for the PST file. If you know the PST file's location, go for "Add File" to browse the file into the platform. Once imported, click on "Repair" to start the process.
Step 3: Repair PST File and Recover Results.
The repairing process takes a while to display all results in the preview window. Look through the results and observe the repaired data. Then, select and click "Save" to export it to your computer.

Wrapping Up
We have presented an in-depth overview of Error 0x800CCC79 for you. With the error shown in detail, this would help you understand it better. Once you know the details, you can efficiently resolve all 0x800CCC79 Windows Live Mail errors. If you've considered shifting to Outlook, you might face PST issues. For that, we have presented Wondershare Repairit for Email as a solution.