Welcome to the realm of visual clarity! In a world inundated with images, mastering the art of no background picture formats is your gateway to stunning visuals. With this technique, you can seamlessly blend images without distracting backgrounds. Today, you’ll be able to unravel the significance of transparent image formats, where pictures breathe freely without constraints.
From defining the essence to understanding its importance across industries, dive into this visual evolution journey. Embrace the growing need for transparent images as this article demystifies the simplicity behind creating captivating visuals. It’s time to transform your content effortlessly with transparent picture formats.
In this article
Part I. Transparent Picture Formats: What Are They?
In the realm of digital visuals, understanding transparent picture formats can be a game-changer. Let’s demystify these formats without diving into jargon.

Image Formats With Transparency
Transparent formats allow images to stand out without the baggage of backgrounds. The most common ones include:
PNG (Portable Network Graphics)
PNG, the superhero of web graphics! This format shines in delivering crisp, high-quality images. Ideal for logos and intricate graphics, it ensures your visuals look sharp without sacrificing detail. Be mindful of file sizes, as larger ones might slow down your web page.
Advantages
- High quality. PNG excels in preserving image quality, making it ideal for detailed graphics and logos.
- Transparency support. Supports alpha channels, allowing for backgrounds to be removed for a clean look.
- Lossless compression. Maintains image integrity without sacrificing quality during compression.
Limitations
- File size. PNGs can have larger file sizes, impacting web page loading times.
- Not ideal for print. While great for digital use, PNGs may not be the best choice for high-quality print materials.
SVG (Scalable Vector Graphics)
Meet SVG, the chameleon of graphics! This format scales infinitely without losing its cool. Perfect for logos and illustrations, SVG adapts seamlessly to various sizes. Remember, while it’s fantastic for graphics, it might not be your go-to for complex photographs.
Advantages
- Scalability. SVGs can be resized without losing quality, making them perfect for logos and scalable graphics.
- Editable. SVGs are editable in text editors, providing flexibility for customization.
- XML-based. SVGs are based on XML, making them readable and modifiable with standard text editors.
Limitations
- Complexity. It may not be suitable for highly complex images or detailed photographs.
- Limited color control. Some color management challenges, especially in comparison to other formats like PNG.
TIFF (Tagged Image File Format)
TIFF, the meticulous archivist! This format is your go-to for preserving every intricate detail in your photographs. TIFF is widely used in professional photography and ensures your images stay true to their original glory. However, be mindful of file sizes, as TIFFs can be a bit hefty.
Advantages
- High-quality preservation. TIFF is excellent for preserving intricate details in high-resolution photographs.
- Versatility. It supports various color depths and can include layers and transparency.
- Lossless compression. Maintains image quality during compression.
Limitations
- File size. TIFFs can have large file sizes, making them less suitable for web use.
- Compatibility. Not all software and web browsers fully support TIFF, limiting its usability in some contexts.
GIF (Graphics Interchange Format)
GIF, the king of animation! This format adds a touch of life to your images through looping animations. GIFs are great for memes and short clips and bring a playful vibe to your visuals. Keep in mind the limited color palette and resolution for optimal results.
Advantages
- Animation. GIFs support simple animations, adding dynamic elements to your visuals.
- Compression. Uses lossless compression for reasonable file sizes without significant quality loss.
- Transparency. Supports a single transparent color, allowing for simple background removal.
Limitations
- Limited colors. GIFs are limited to 256 colors, which can impact the quality of images with complex color schemes.
- No audio. GIFs do not support audio, limiting their use for multimedia presentations.
Why Does It Matter?
Transparent formats empower you to integrate visuals into various platforms seamlessly. Whether it’s a website, presentation, or marketing material, the right format ensures your image communicates without distractions.
As you navigate through these formats, keep in mind your specific use case. Are you aiming for a crisp logo, a scalable graphic, or a detailed photograph? Tailoring your choice to your needs ensures your visuals shine without compromise. In this visual journey, you’ve just scratched the surface. Stay tuned for more insights on creating images without backgrounds, and unlock the full potential of transparent picture formats!
Part II. Tips for Creating Professional Transparent Images
Now that you’ve uncovered the magic of transparent image formats, it’s time to dive into the art of creating professional visuals that captivate. Follow these simple tips to bring your images to life:

- Choose the Right Tool
Selecting the right tool for background removal is crucial. Many user-friendly online tools and software, like Remove.bg or Canva, offer seamless background removal with just a few clicks. Explore and find the one that suits your needs.
- Mind the Details
When removing backgrounds, pay attention to intricate details, especially around edges. Ensuring a clean and precise cut enhances the professionalism of your transparent images.
- Optimize for Web
If your images are destined for the web, optimize them to balance quality and file size. Compressed images load faster, ensuring a smooth user experience.
- Maintain Consistency
If creating a series of images, maintain consistency in lighting, shadows, and overall style. Consistency adds a professional touch to your visuals, creating a cohesive look.
- Play with Transparency
Experiment with transparency levels to create depth and visual interest. Finding the sweet spot where elements seamlessly blend into the background enhances the overall appeal.
- Test Different Formats
After background removal, try saving your image in different formats like PNG, SVG, or others we explored earlier. Choose the format that best suits your intended use while maintaining transparency.
- Pay Attention to Composition
Lastly, consider the overall composition of your image. A well-composed visual can tell a compelling story and leave a lasting impression, even without a background.
Remember, creating professional and transparent images is not just about removing backgrounds but crafting visuals that communicate effectively. Embrace these tips, experiment with tools, and watch your images transform into seamless, professional masterpieces. Stay tuned for more insights into the world of transparent visuals!
Part III. Best Practices in Using Transparent Images Effectively
Welcome to the transformative world of transparent images! As you continue with this journey, it’s time to explore how these visuals can elevate your content across various fields, infusing a touch of magic into your designs and marketing strategies.

Applications Across Different Fields
Here are the top fields where transparent images change the game:
- Marketing Marvels
Transparent images are marketing game-changers! Whether it’s crafting eye-catching ads, engaging social media posts, or enticing product presentations, removing backgrounds adds a professional and modern touch.
- Design Delights
Design enthusiasts rejoice! Transparent images seamlessly integrate into various design projects. From creating striking websites to crafting visually appealing brochures, the flexibility of transparent visuals knows no bounds.
- Educational Excellence
In educational materials, transparent images enhance clarity and engagement. Imagine lively presentations and educational resources where visuals seamlessly complement the content, making learning a visual delight.
Enhancing Visual Appeal and Branding
Transparent images aren’t just about looking good; they’re about leaving a lasting impression. Here’s how:
- Clean aesthetics. Background-free visuals provide a clean, clutter-free aesthetic. This simplicity ensures that your audience focuses on the essential elements of your design or message.
- Branding brilliance. Transparent images offer a consistent and professional look, which is crucial for building and reinforcing your brand identity. Logos, product images, and marketing materials gain a polished edge.
Best Practices for Integration
Now, below are the best practices for integrating transparent images:
- Consistent use. Maintain consistency in using transparent images across your materials. This fosters a cohesive visual identity that resonates with your audience.
- Blend with backgrounds. When integrating transparent images into designs, consider the background. Ensure a harmonious blend to avoid visual discordance.
- Optimal placement. Strategically place transparent images to guide the viewer’s focus. Highlight key elements without overwhelming the overall composition.
- Resolution matters. Ensure high image resolution, especially in professional settings. High-quality, transparent images communicate professionalism and attention to detail.
As you use transparent images, remember that their power lies in their visual appeal and ability to convey messages effectively. Stay tuned for more insights on harnessing the full potential of transparent visuals in your visual journey!
Bonus Tip: Fix Corrupt Images With Repairit - Photo Repair (Desktop)
It’s time to unveil a secret weapon in your quest for perfect images: Wondershare Repairit - Photo Repair (Desktop). If you have a collection of transparent images, but some are playing hard to get corrupted and refusing to display their true beauty, upload them into Repairit. This desktop companion can effortlessly breathe life back into your damaged visuals.
Repairit is not just a tool; it’s a magician for your corrupt images. Whether it’s a treasured photograph or a vital graphic, Repairit steps in to mend their broken pixels and revive your visuals to their pristine glory.

Key Features and Benefits
When it comes to fixing corrupt images, why should you use Repairit? Well, some of its amazing capabilities are as follows:
- Effortless restoration. Repairit simplifies the complex task of image repair. A user-friendly interface guides you through the process, making image restoration accessible to everyone.
- Batch repair capability. Picture this scenario: a bunch of corrupted images sitting in your folder. Repairit doesn’t flinch. It allows you to fix multiple images at once, saving you time and ensuring a swift recovery for your entire collection.
- Quality assurance. Worried about losing image quality during the repair process? Fear not! Repairit is designed to restore images without compromising their original quality. Your visuals emerge from the healing process unscathed and ready to shine.
- Easy to use. Upload your damaged images into Repairit’s intuitive interface. The tool takes it from there, analyzing and identifying areas that need restoration.
- One-click repair. With just a click, Repairit repairs your damaged images. It mends broken pixels, smoothens out glitches, and brings your images back to life.
How To Fix Corrupt Images Using Repairit
Here are the easy methods to fix your photos with Repairit:
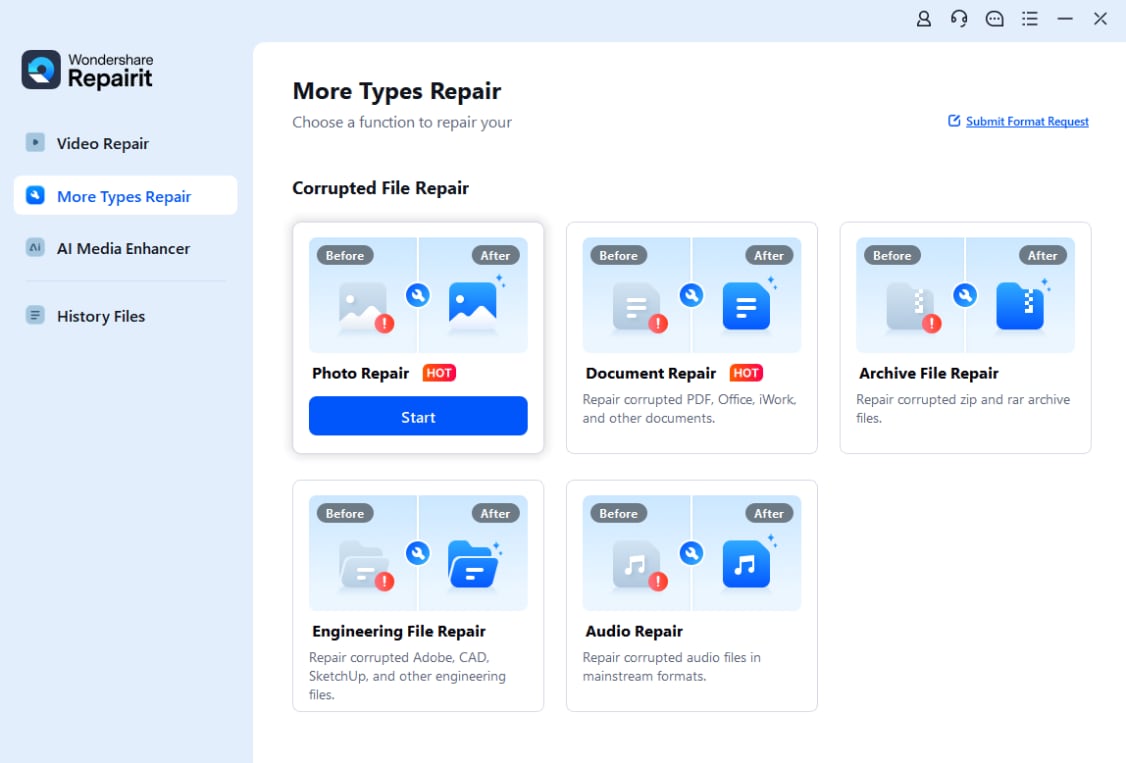
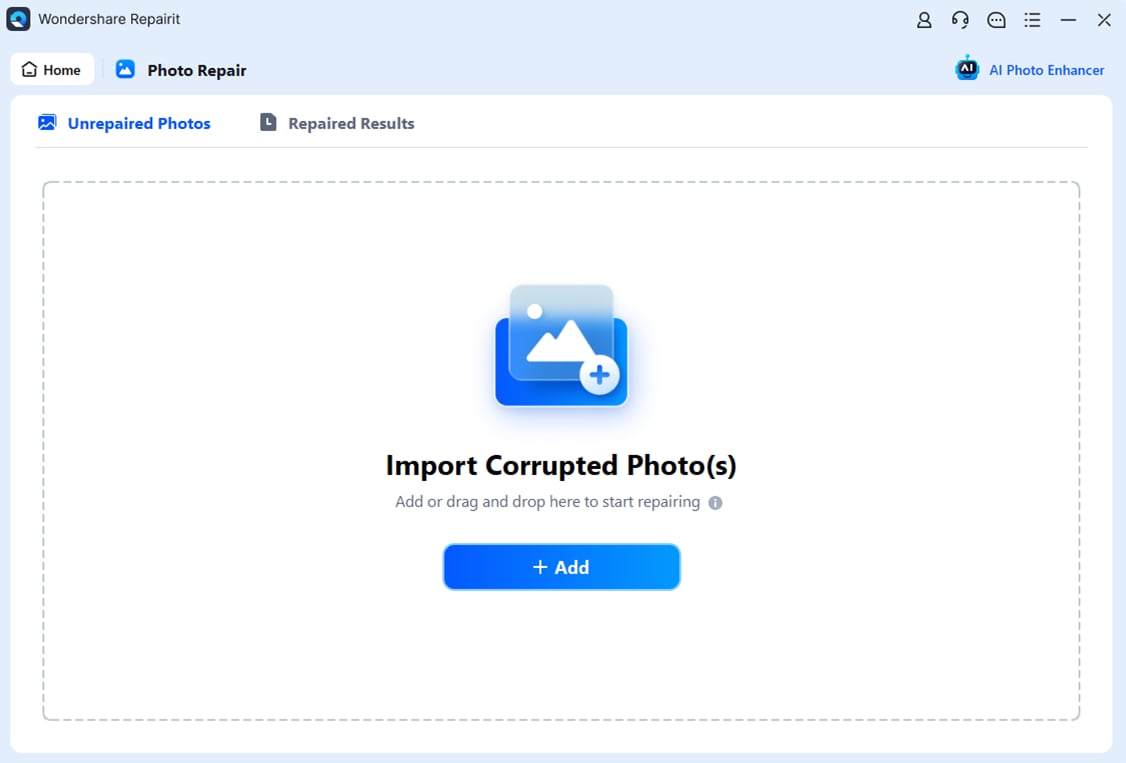
Step 1: Download and launch Wondershare Repairit from your computer. Go to the sidebar’s More Types Repair section and pick Photo Repair. Now, click the Add button to launch a new browser window. You can open the directory containing your damaged photographs and import them into the program at this stage.

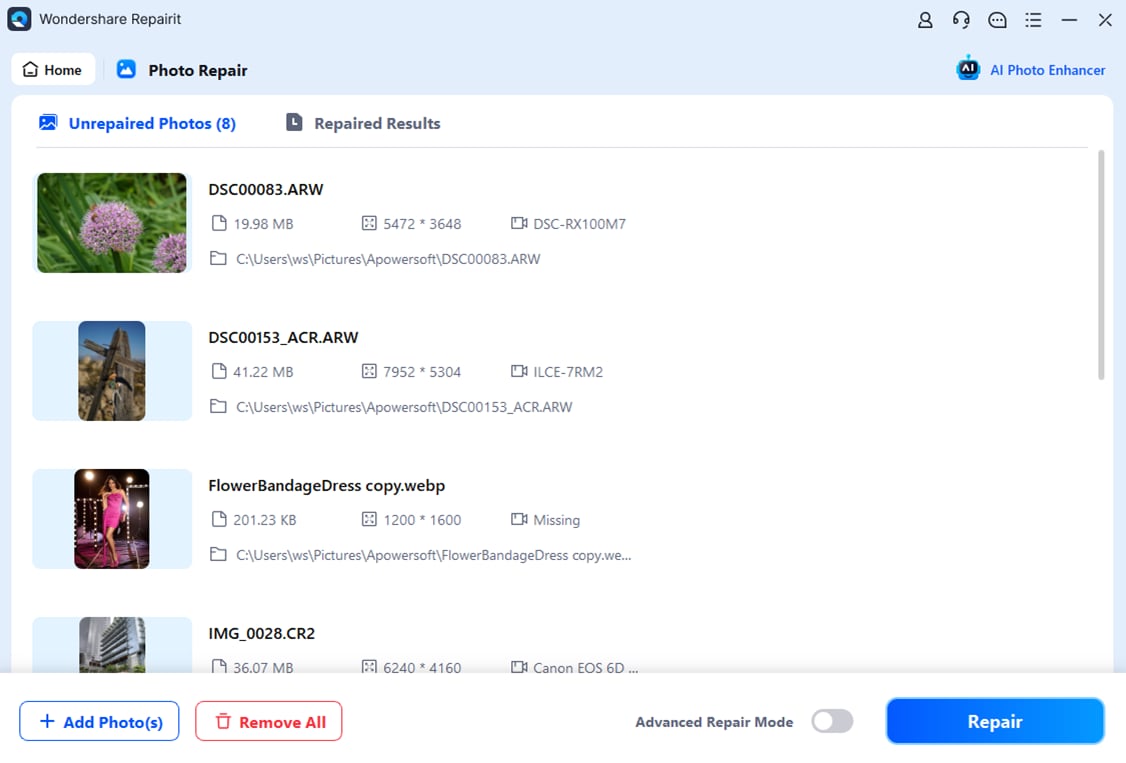
Step 2: Repair it Photo Repair may fix various problems, including pixelated photos, grayscale images, wrong coloring, and many more. You’ll be able to see thumbnails of your uploaded photos and details like file size, resolution, and more. To start correcting your photo, click the Repair button. Once the repair process is complete, the app will alert you of the results.

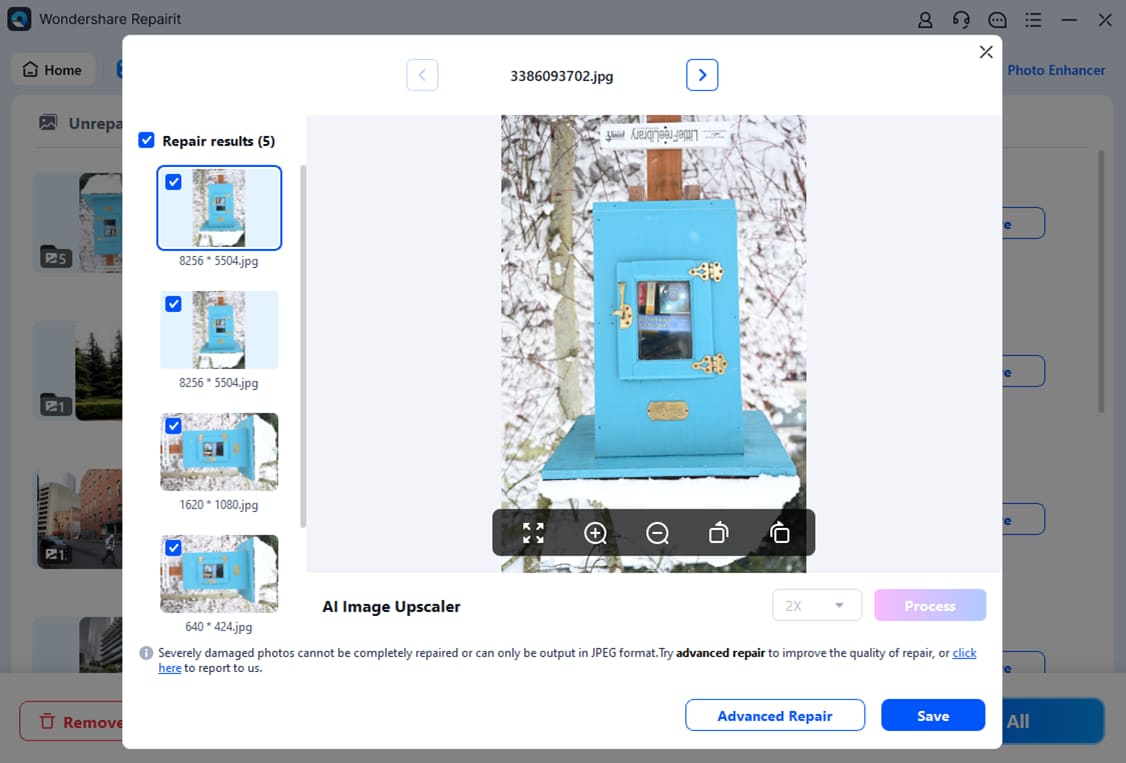
Step 3: To see how the repair turned out, click the Preview button or open the preview window by clicking on the image thumbnail. Here, you may see the results to see if the standard repair procedure worked. Once you’re satisfied with the edited photos, click the Save button to choose a destination folder for them.

In the realm of image repair, Repairit - Photo Repair (Desktop) stands as a beacon, offering a seamless solution for your corrupted visual treasures. Embrace the magic, witness the revival, and let your images shine anew. It’s not just a repair; it’s a transformation!
Conclusion
In this journey through transparent image formats, you explored the power of clarity in visuals. From web graphics to marketing materials, transparency breathes life into every design. Remember, it’s not just about removing backgrounds; it’s about creating a visual symphony. Embrace the consistency, play with transparency, and let your visuals tell compelling stories.
And when a glitch occurs, trust Wondershare Repairit - Photo Repair to revive your images effortlessly. Seamlessly blend clarity and quality, making your visuals seen and remembered. Elevate your content, revive your memories, and let transparency guide your visual storytelling!

