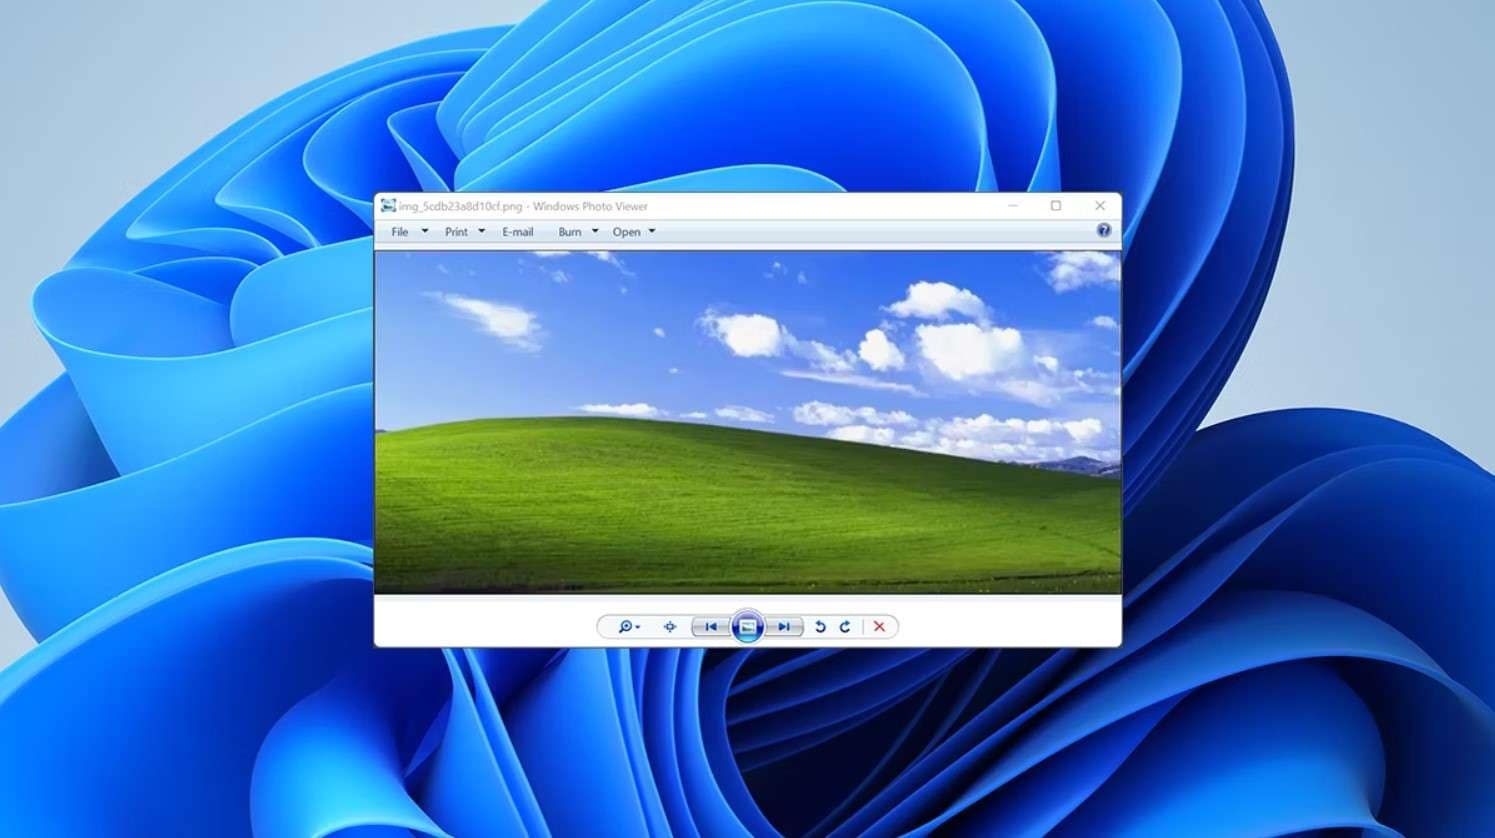
Don't you just hate it when you can't open a photo on your computer? We hear this is a common issue for users of Windows Photo Viewer. As a default app for Windows 7, 8, and 10 images, it can cause you a lot of trouble when it fails to open an image file.
If you're seeing the “Windows Photo Viewer can't open this picture" error message on your screen, that could be for many different reasons. We'll explore several issues that could cause this error and help you repair Windows Photo Viewer accordingly.
Let's get started.
In this article
Repair Windows Photo Viewer – Quick Fixes to Try
When photo preview is not working on Windows, some obvious culprits are outdated software, incompatibility with the image file, and software conflict. Don't worry. Whatever it is you're dealing with, it's easy to fix. Here are some quick fixes you can try.
Check for Updates
When software seems broken, it's usually for one of these two reasons – either corrupt or outdated. The second problem is much easier to patch up, so let's try that first. Outdated software is not only full of bugs, but it's also potentially vulnerable to attacks.
Follow these directions to update your Windows Photo Viewer:
Step 1: Go to Start and type in Settings. Click Open to run the app.
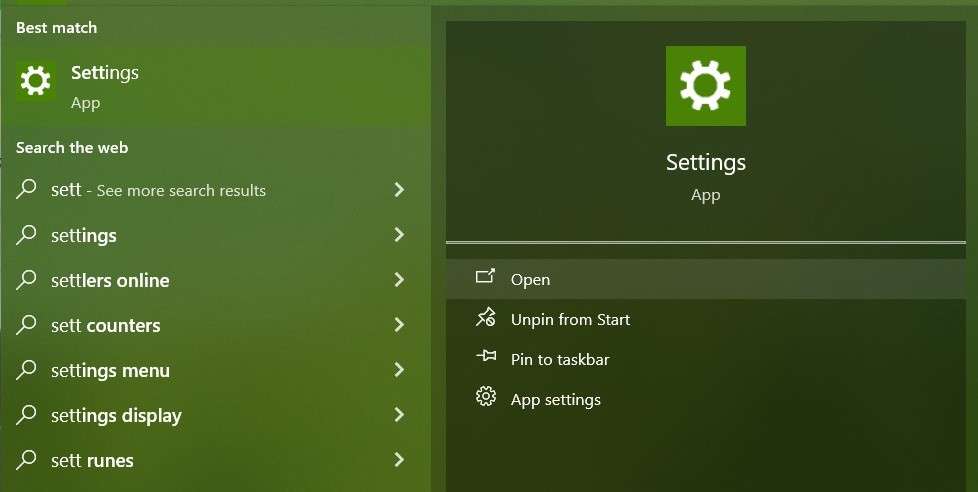
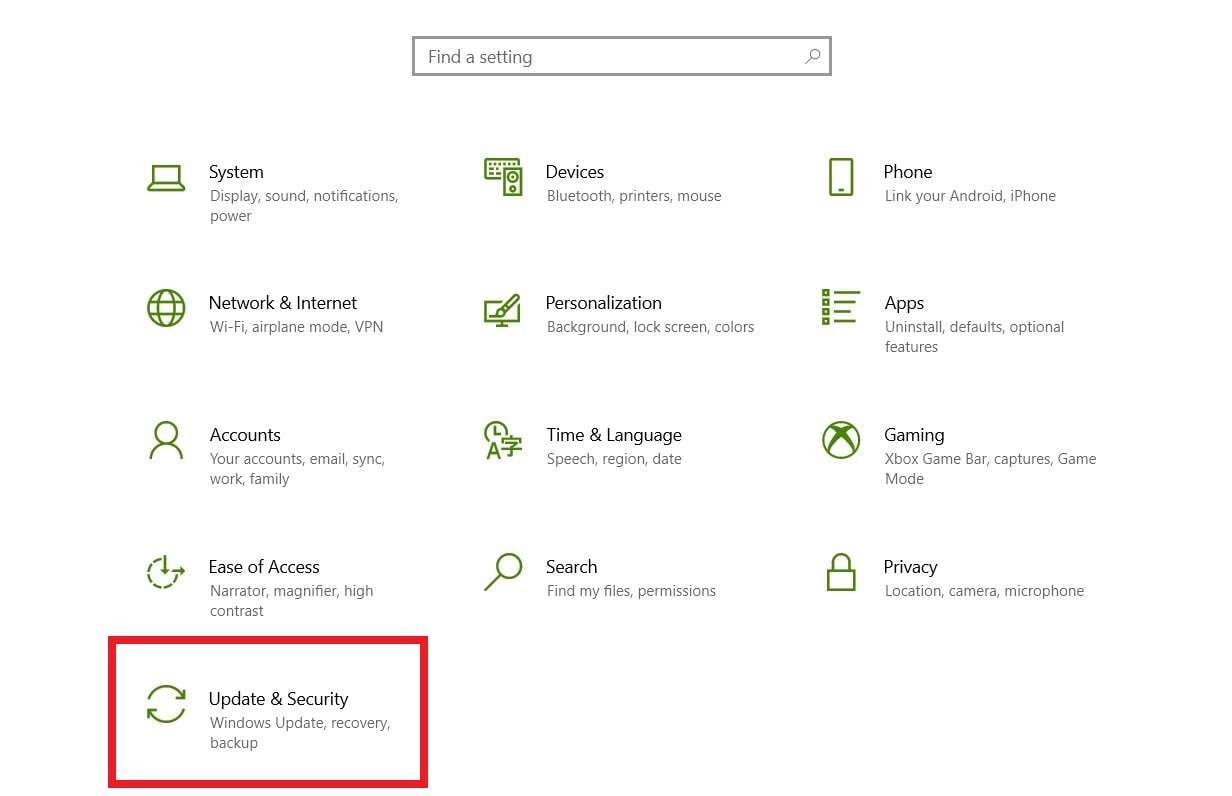
Step 2: Scroll all the way down and click on Update and Security.
Step 3: Click Check for updates and then Install if there are any.
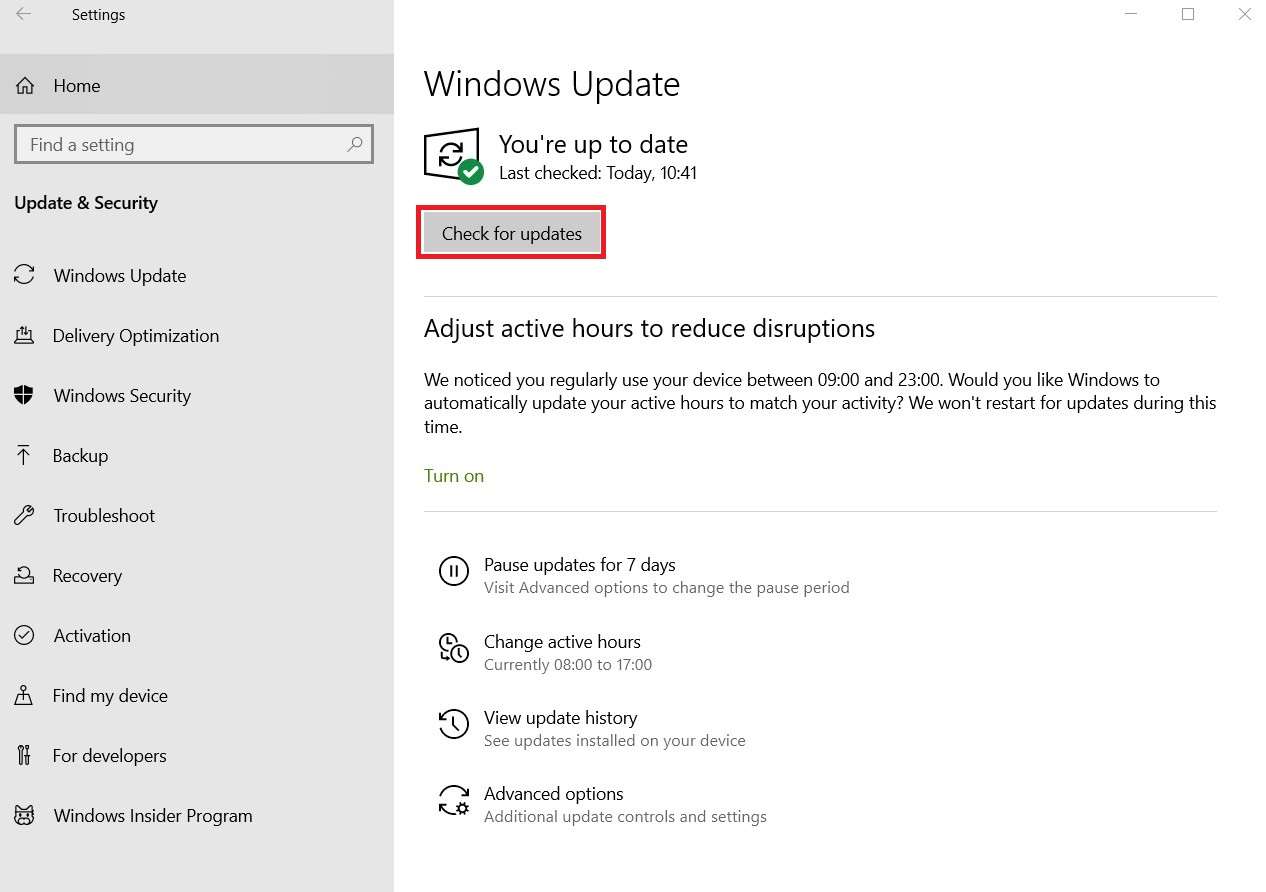
Step 4: Wait for the updates to finish, then restart your computer.
Verify File Associations
Another common reason for the “Windows Photo Viewer can't open this picture" error message is an incompatible file format. It happens when the image you're trying to open is in a file format that Windows Photo Viewer doesn't support. Like HEIC, for example.
In fact, the number of formats supported by Windows's default photo opener is surprisingly small. The app can only open JPEG, TIFF, PNG, GIF, BMP, DIB, and WDP images.
Go back and check the extension or file format of the image that Windows Photo Viewer refuses to open. If the viewer doesn't support it, you can do only a handful of things. The easiest way to go about this is to open the file using another app that supports it.
If you're unsure how to do that, here's a quick demonstration:
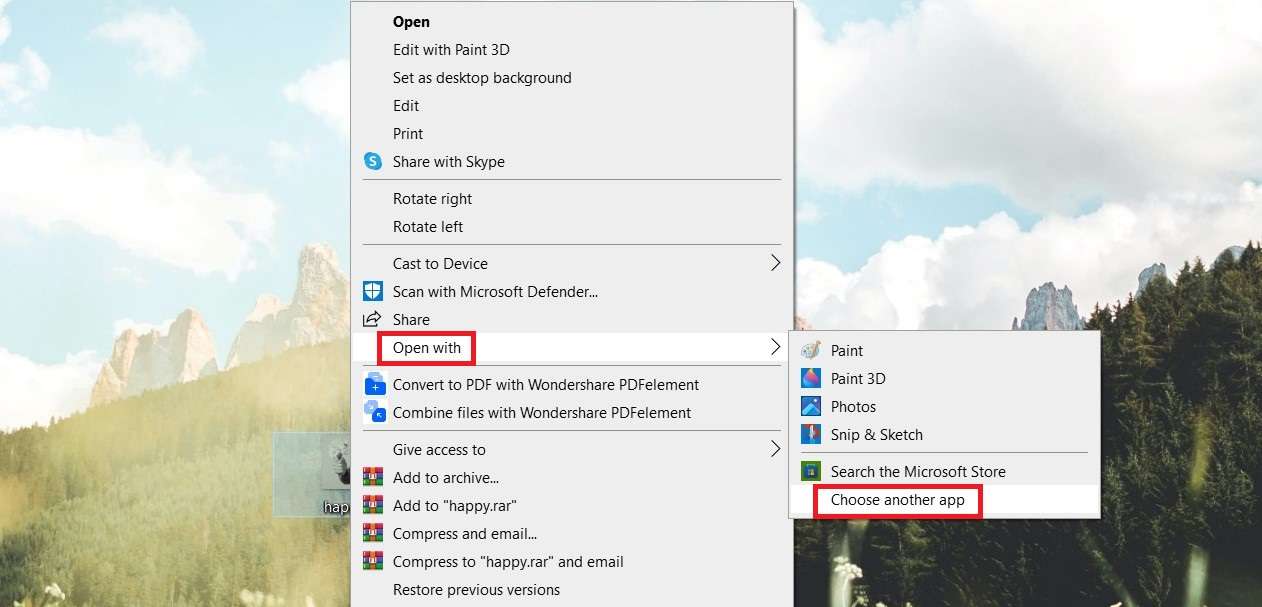
Step 1: Right-click on the file and select Open with > Choose another app.
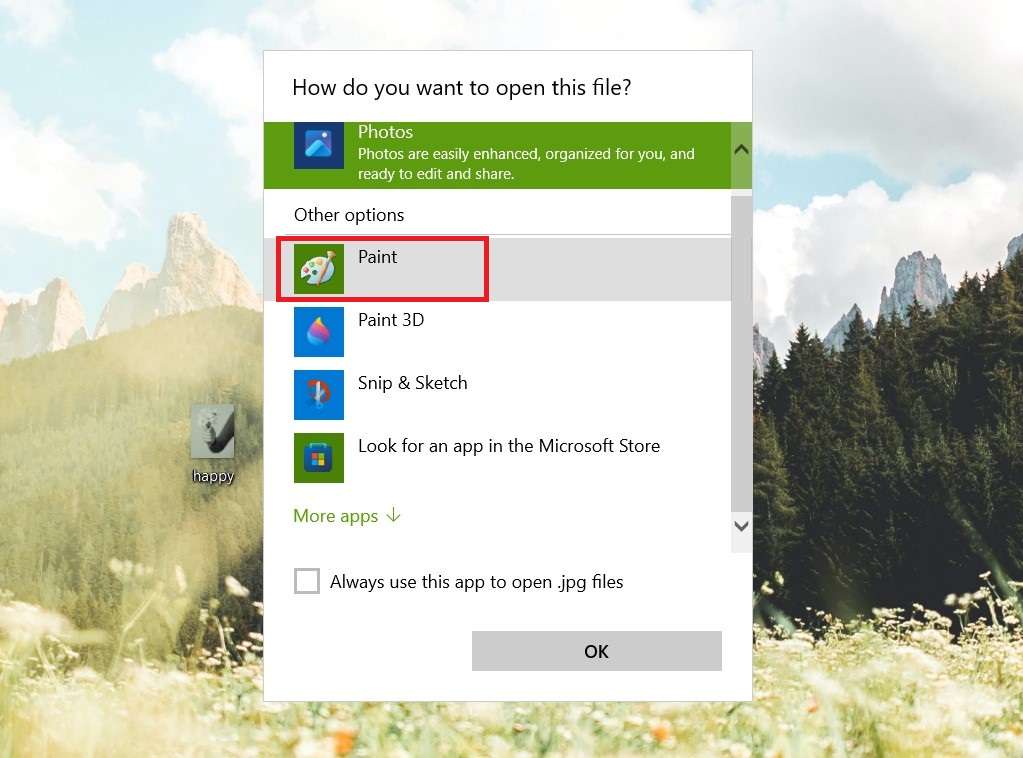
Step 2: Choose an app compatible with the image file format you're trying to open. Take Paint, for instance.
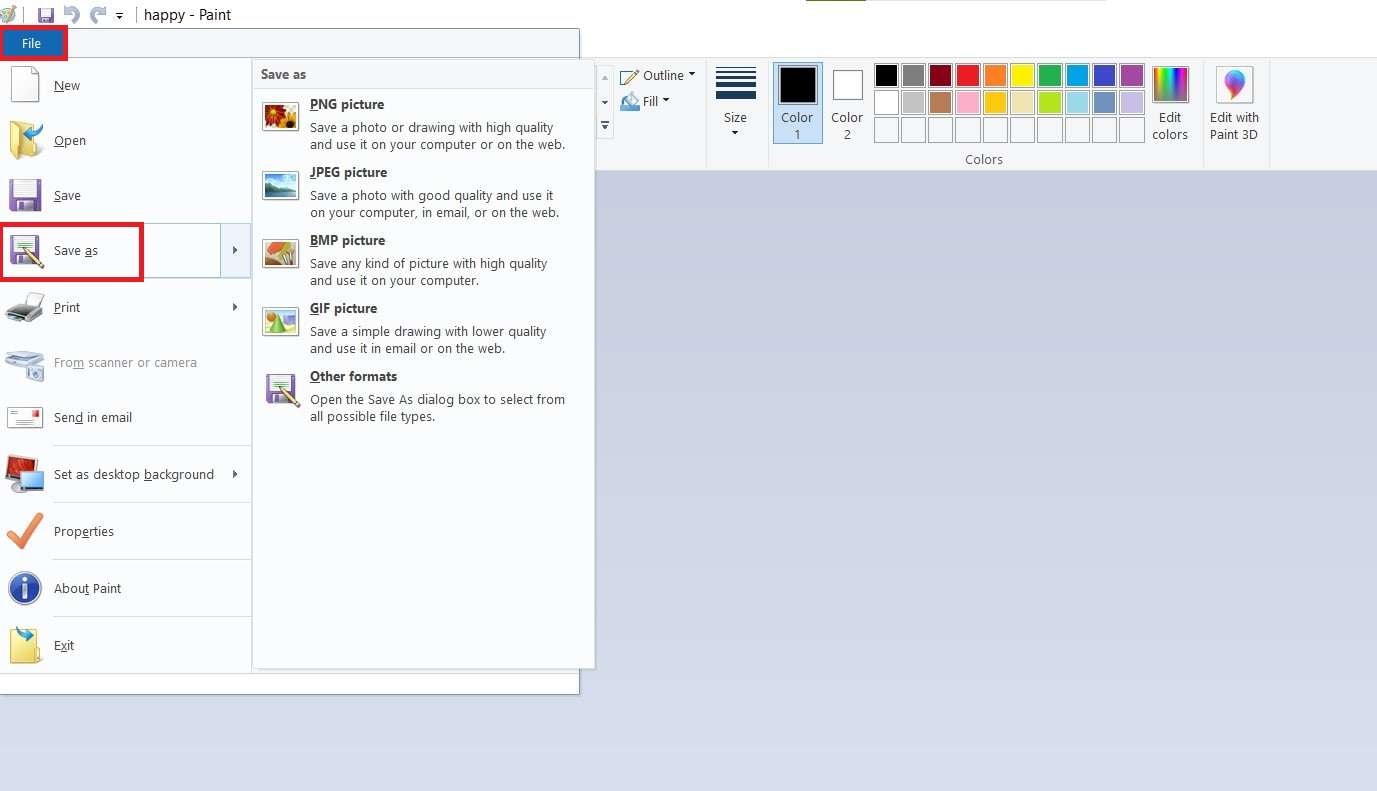
Step 3: If you want to, you can use Paint to convert the image file to JPG or some other format compatible with the Windows Photo Viewer. Go to File > Save as and choose JPG, PNG, BMP, GIF, or other formats.
Restart Your Computer
Have you ever heard of software conflicts? It's when your computer tries to run two apps simultaneously that can't be opened at the same time because of a programming bug or insufficient resources. A simple way to fix software conflict is by restarting your computer.
Here's the correct way to restart a Windows 7, 8, or 10 computer:
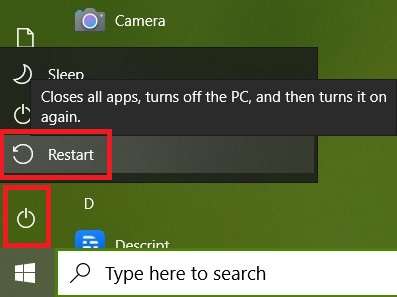
Step 1: Go to Start and click the Power button.
Step 2: Choose the Restart option.
How to Repair Windows Photo Viewer – Advanced Steps
You've tried the easy fixes, but your Windows image preview is not working. That's the point where things could get slightly complicated. It probably means that your Windows Photo Viewer is corrupt or something is wrong with your graphic drivers. Let's see what it is.
Reset and Repair Windows Photo Viewer
Software corruption happens for a lot of reasons. The Windows Photo Viewer on your PC could have caught a virus, or maybe there's a bug that's causing it to malfunction. Whatever the case, you can fix this by resetting and repairing Windows Photo Viewer on your computer:
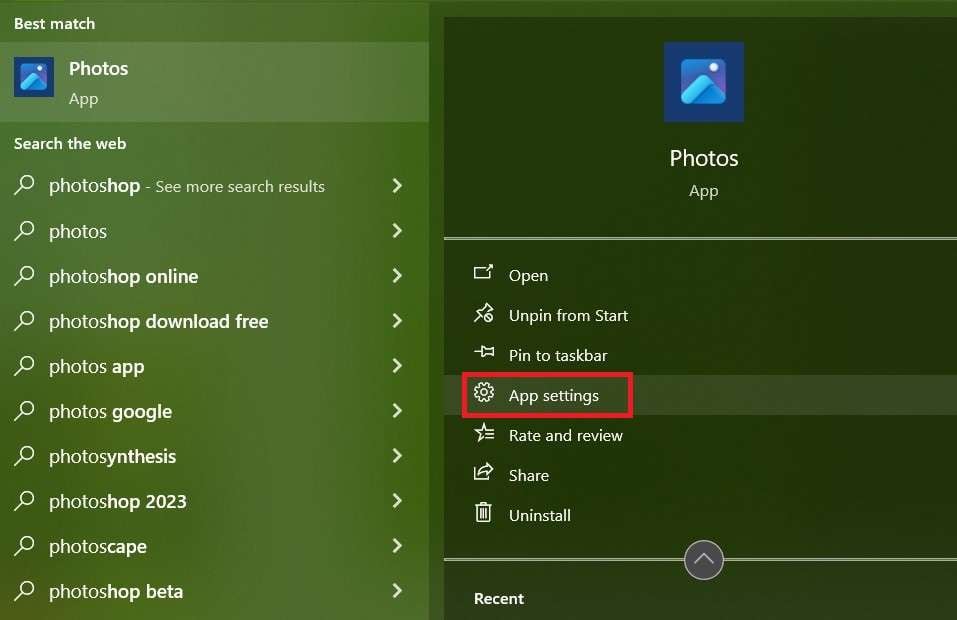
Step 1: Go to Start and type in Photos. Click on the arrow to reveal additional options and select App settings.
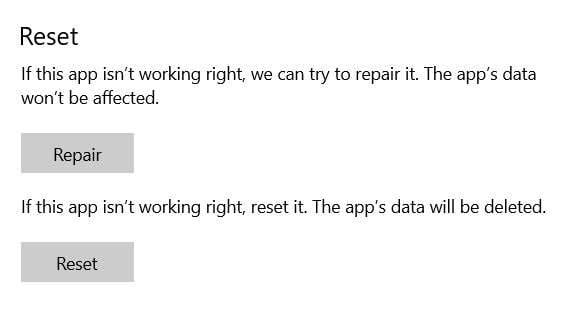
Step 2: Scroll down to the Reset section and choose Repair if you don't want all app data to be deleted, or go straight to Reset, which will erase all your app data.
Reset Color Management on Your Computer
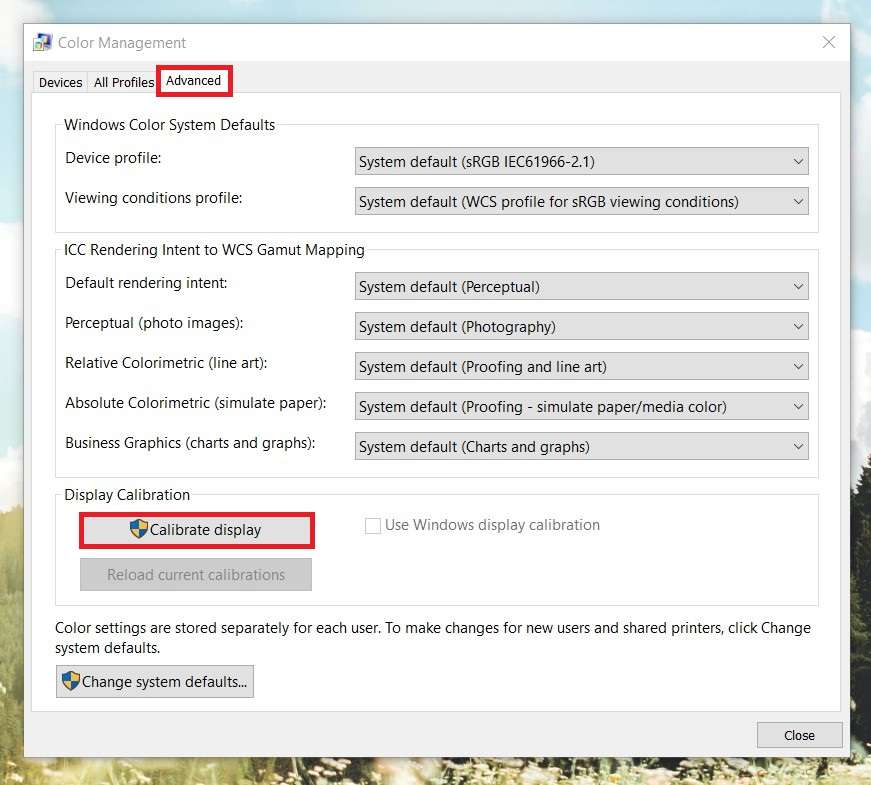
The color management settings on your computer could be interfering with Windows Photo Viewer, causing the “can't open this picture" error. Luckily, this is no reason for concern. It's a frustrating problem that can be solved in several easy steps. Here's how to do it:
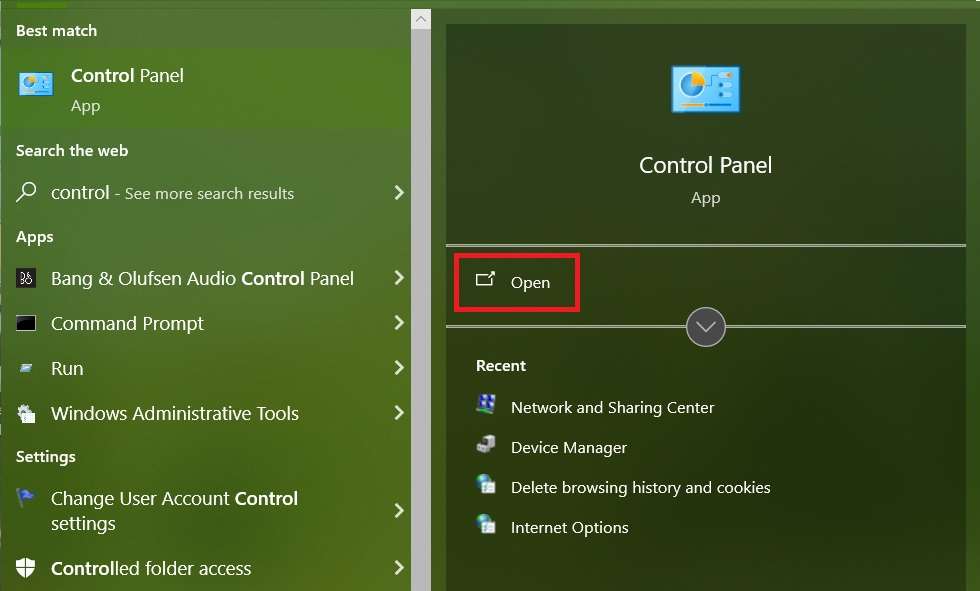
Step 1: Go to Start and search for the Control Panel. Click Open to run the app.
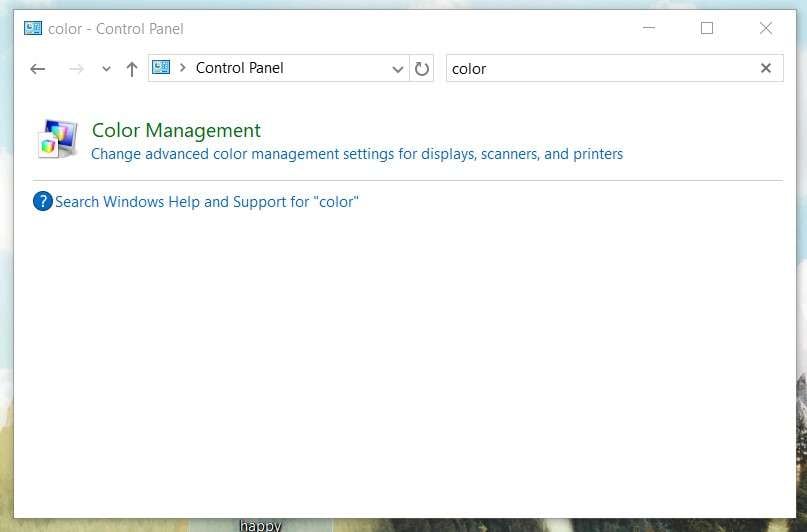
Step 2: Search the Color Management option and click on it to access settings.
Step 3: Switch to the Advanced tab and click Calibrate Monitor > Next.
Reinstall Windows Photo Viewer
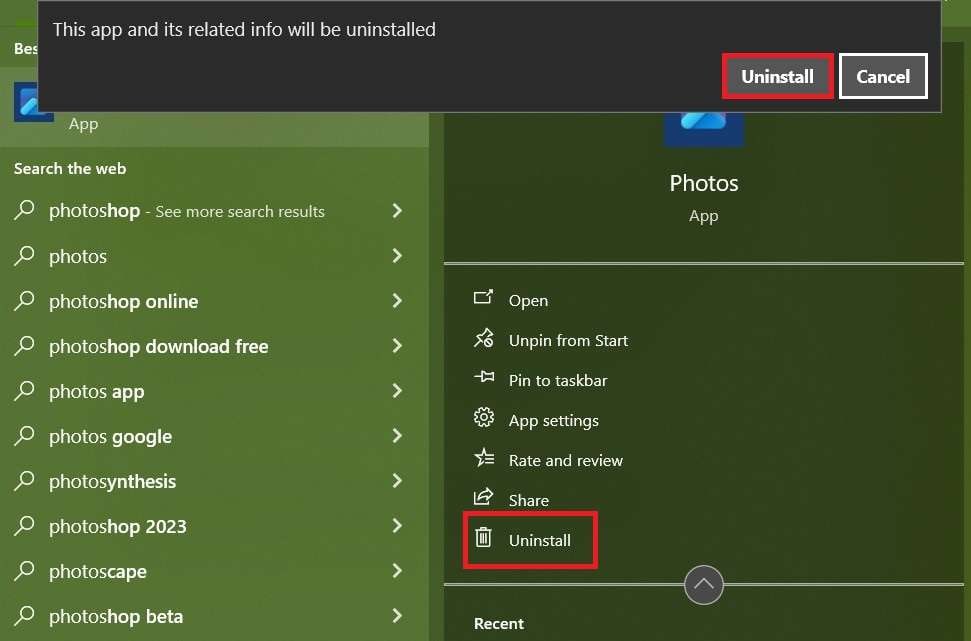
Another way to deal with system corruption and bugs is to reinstall the app. If the problem causing the “Windows Photo Viewer can't open this picture" is temporary, this will be able to fix it. We'll show you how to uninstall and install image preview in the steps below.
Step 1: Go to Start and type in Photos. Click on the arrow to reveal more options and select Uninstall.
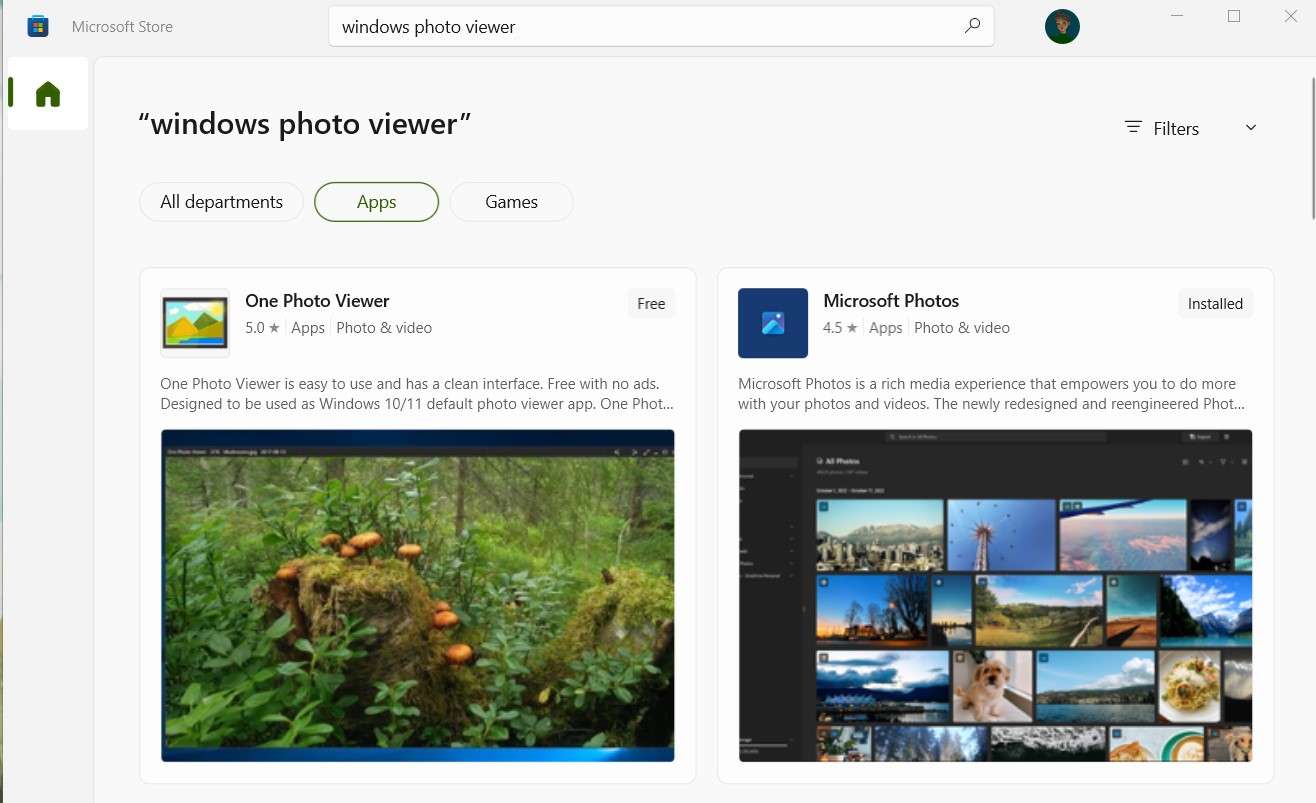
Step 2: Open the Microsoft Store from the Start menu. Type in Windows Photo Viewer in the search bar to find the app and install it. If you're using Windows 10, you won't be able to find it unless you've upgraded your OS from Windows 7. In that case, search and install Photos.
Run Sfc Command
The SFC command, officially known as the System File Checker, is a Microsoft utility that comes with every modern Windows PC. It helps locate and fix corrupted system files. If nothing has been able to solve your Windows Photo Viewer problem so far, this surely will.
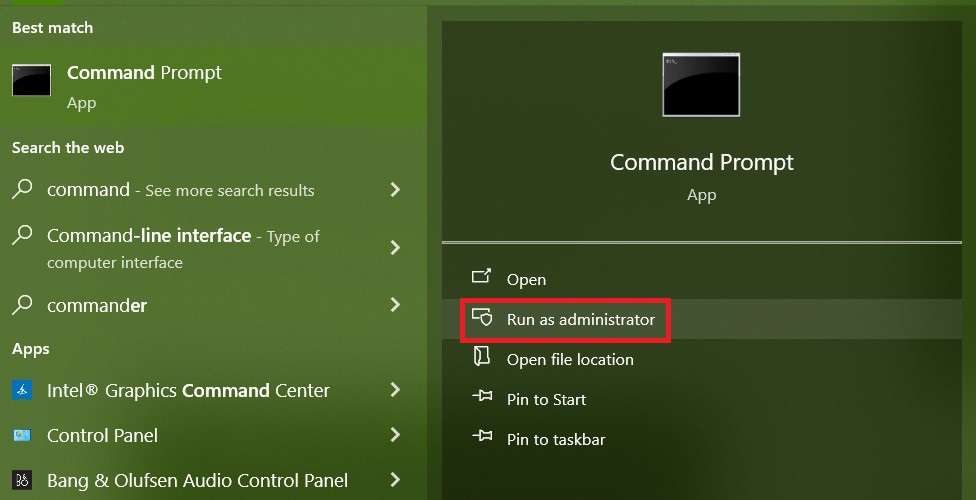
However, there's one tricky bit: you must run the System File Checker from the Command Prompt. It's normal if this makes you nervous, but we can promise it's not as intimidating as it looks. Here's how to run the sfc command on your Windows PC:
Step 1: Go to Start and type in Command Prompt. Click on Run as administrator.
Step 2: Type in the following command and hit the Enter key on your keyboard:
sfc /scannow
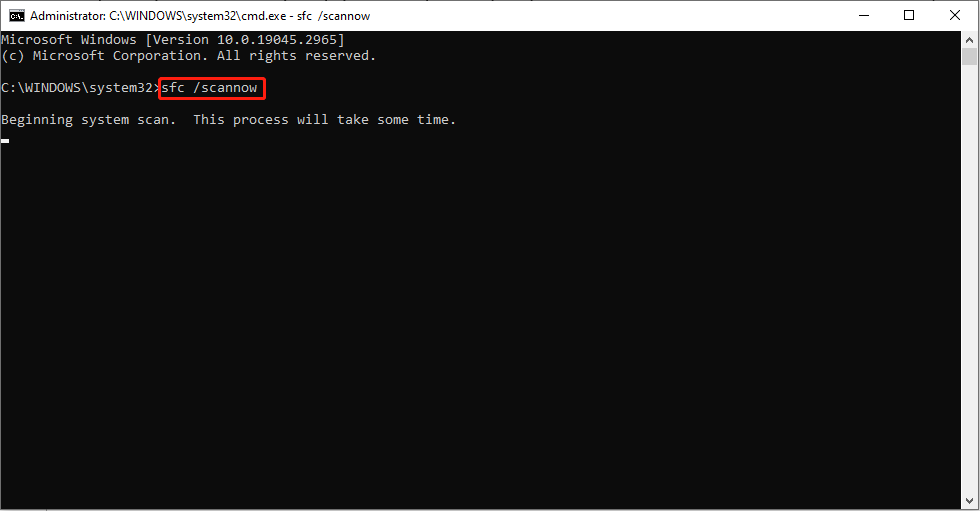
Step 3: Now, just wait for the scan to be over and then restart your computer.
Update Your Graphics Drivers
A graphic driver is a type of software that's responsible for turning computer code into an image. You have your graphic drives to thank for everything you see on your screen. And if there's a persistent problem with photos on your PC, graphic drives might be responsible.
As a last resort, let's try to update graphic drivers on your Windows computer:
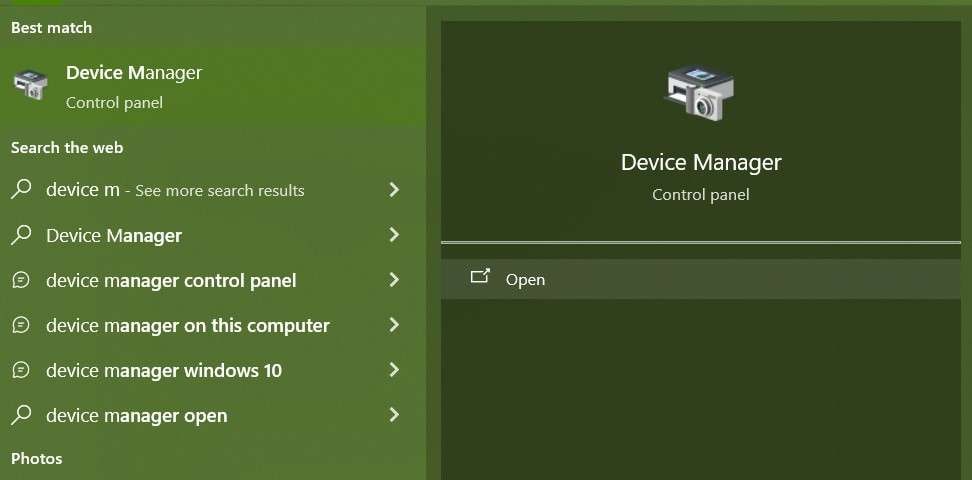
Step 1: Go to Start and search for Device Manager. Open the app.
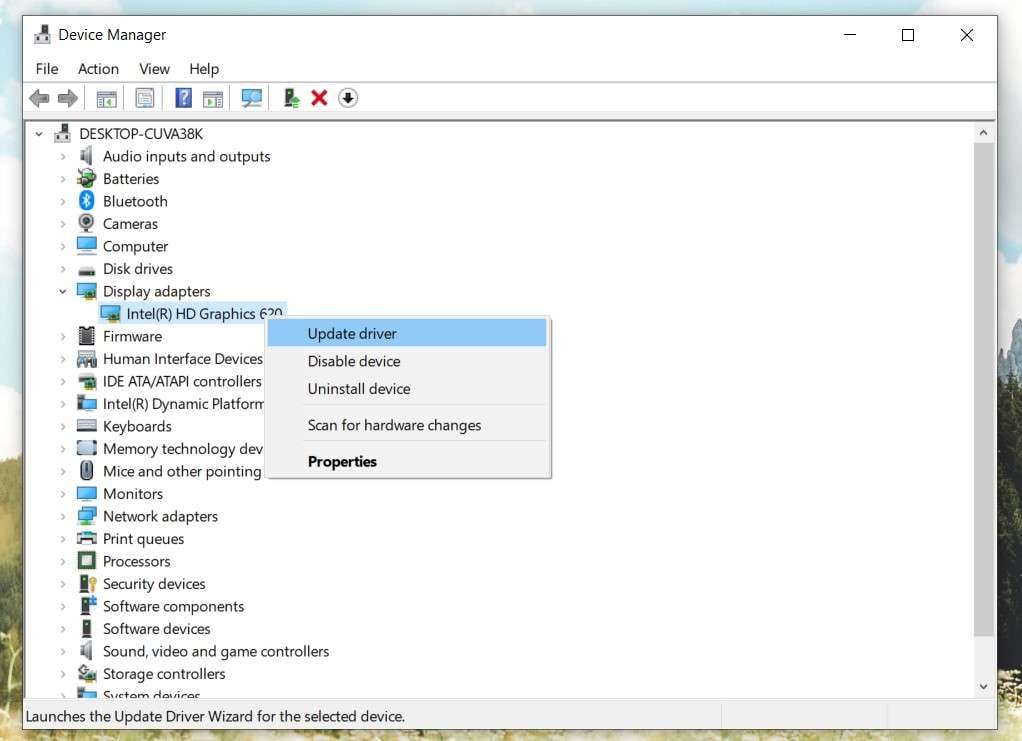
Step 2: Scroll down to find Display adapters and click to see the list.
Step 3: Right-click on each graphic driver and select Update driver.
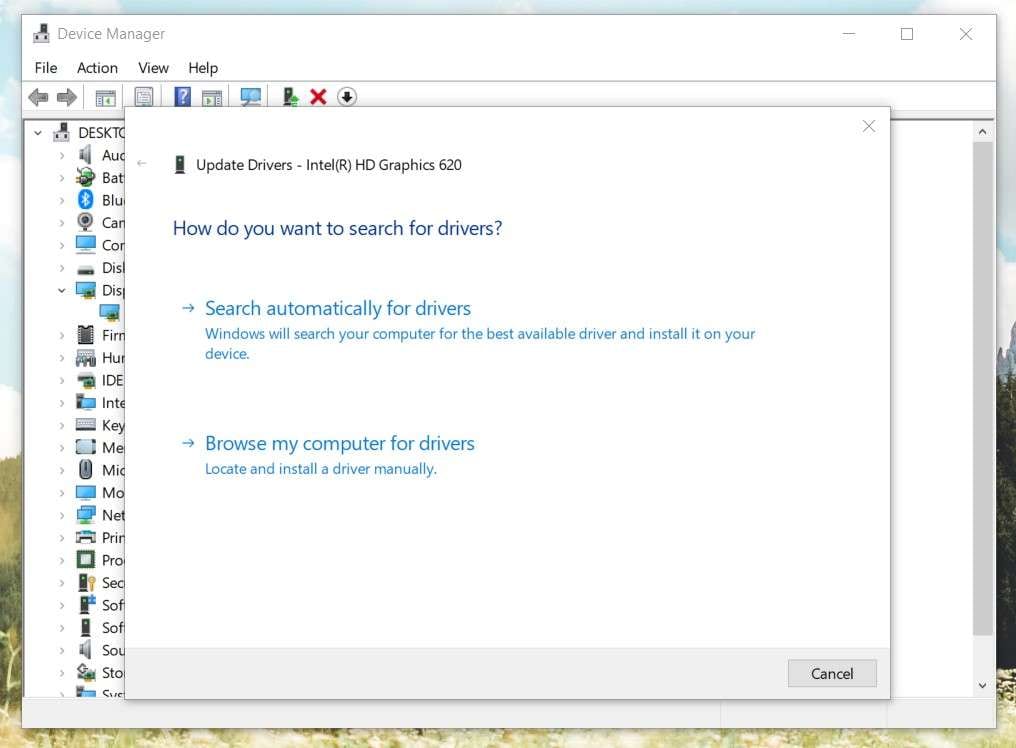
Step 4: Click on Search automatically for drivers and follow further instructions. You can also choose the Browse my computer for drivers option and update graphic drivers manually.
What if Your Image Is Corrupted?
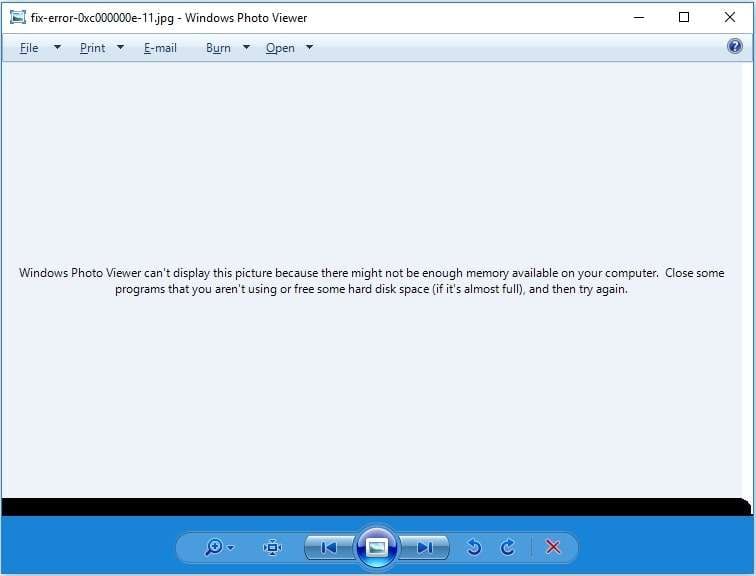
You've tried every trick in the book, but the photo preview is not working on your PC? Now what? Does that mean that you must reach out to a professional for help? In a way, yes. But wait, there's good news. You don't have to send your computer to the repair shop.
If none of the previous solutions have worked, we've probably been treating the wrong problem. The error is not the Windows Photo Viewer's or your PC's fault. It's likely happening because the file you're trying to open is unopenable, and you're up against file corruption.
That's where you need professional help – a corrupted image file can be repaired and made openable again with high-quality data repair software such as Wondershare Repairit.
Wondershare Repairit Photo Repair is effective against any type of data corruption. If your image has been infected with a virus or fragmented due to improper transfer, it will fix it in a heartbeat. It can do this for any file format, not only images, and on top of all this, it's easy to use.
How to Repair Images Using Wondershare Repairit – Photo Repair
Here's how to repair a corrupt image file using this app:
Step 1: Download, install, and launch Wondershare Repairit for Windows.
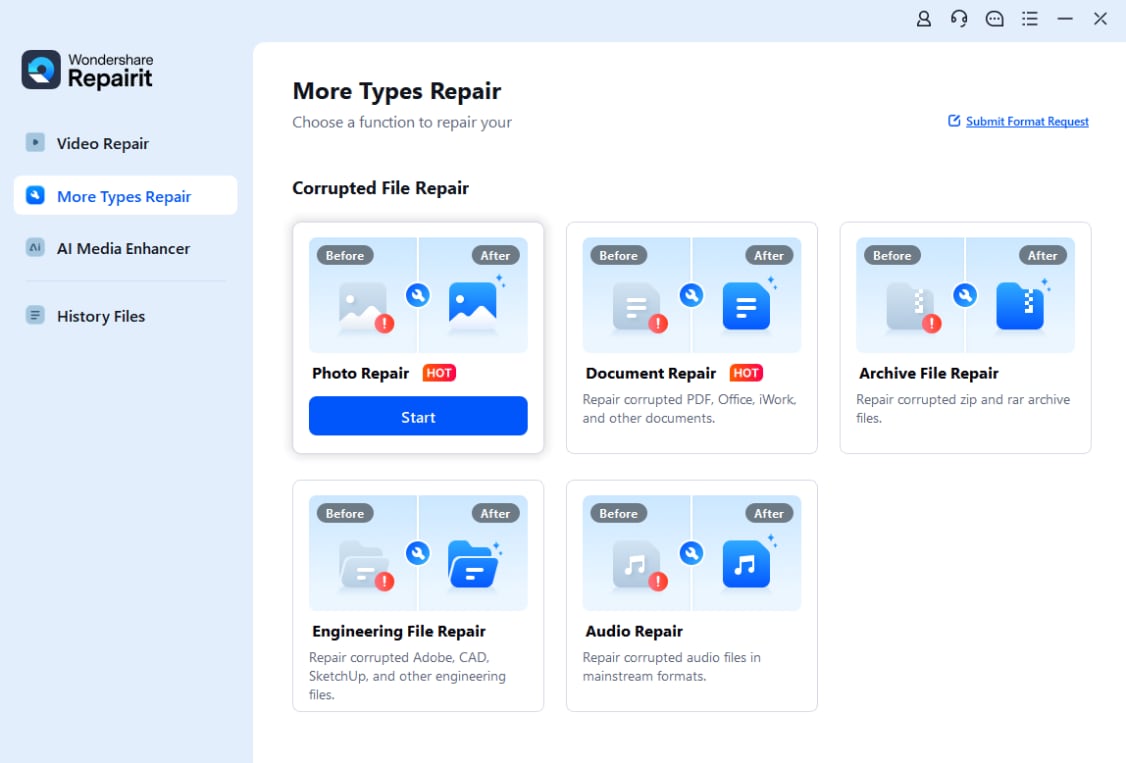
Step 2: Select More Types Repair from the sidebar and click Photo Repair.
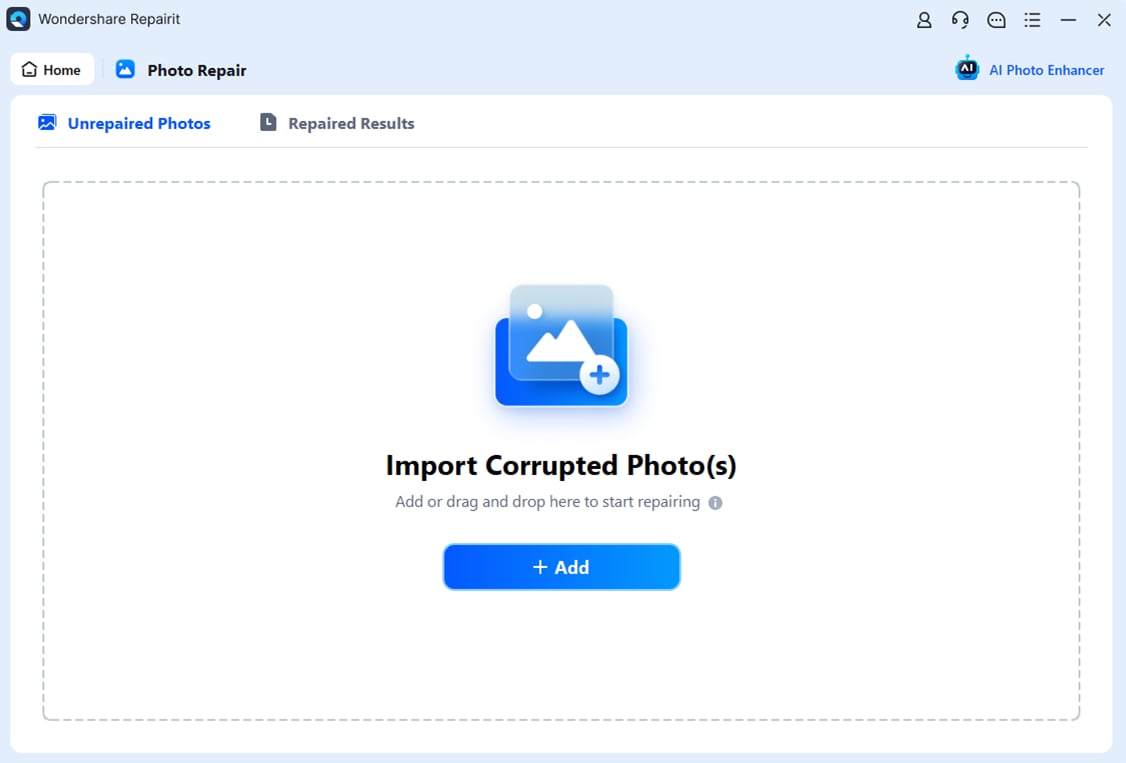
Step 3: Click on the Add button and choose the problematic file from your PC.
Step 4: Click the Repair button and wait for the algorithm to do its magic.
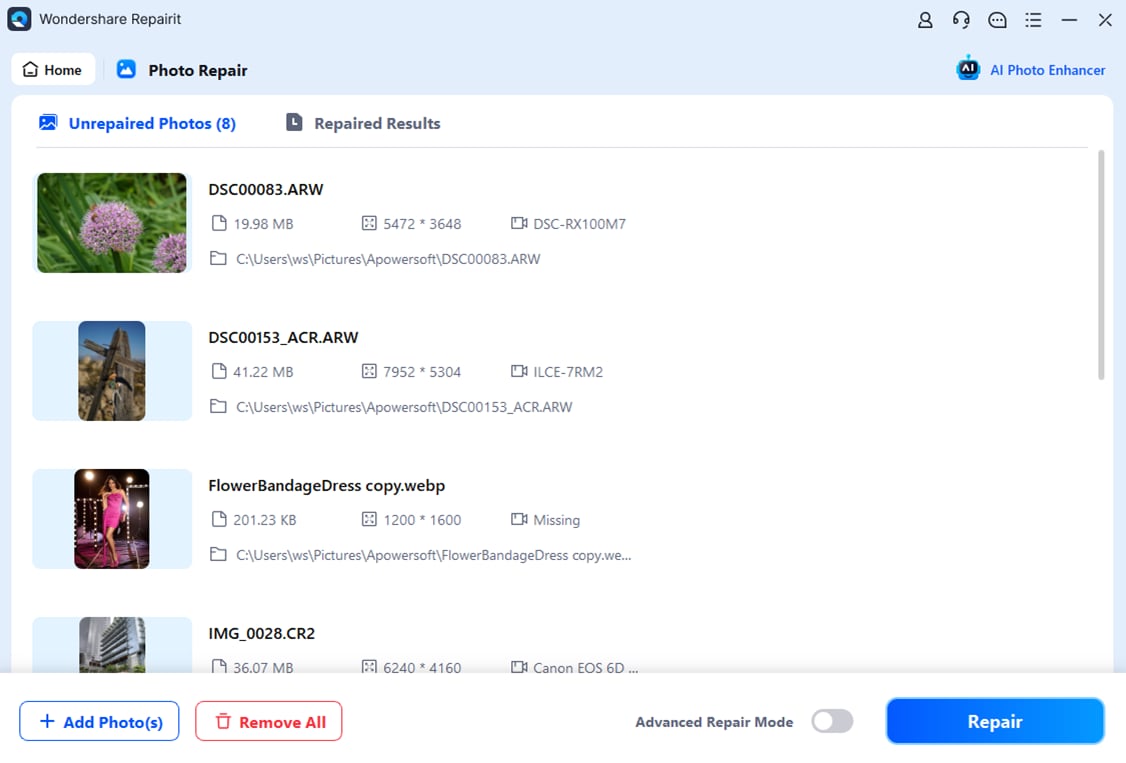
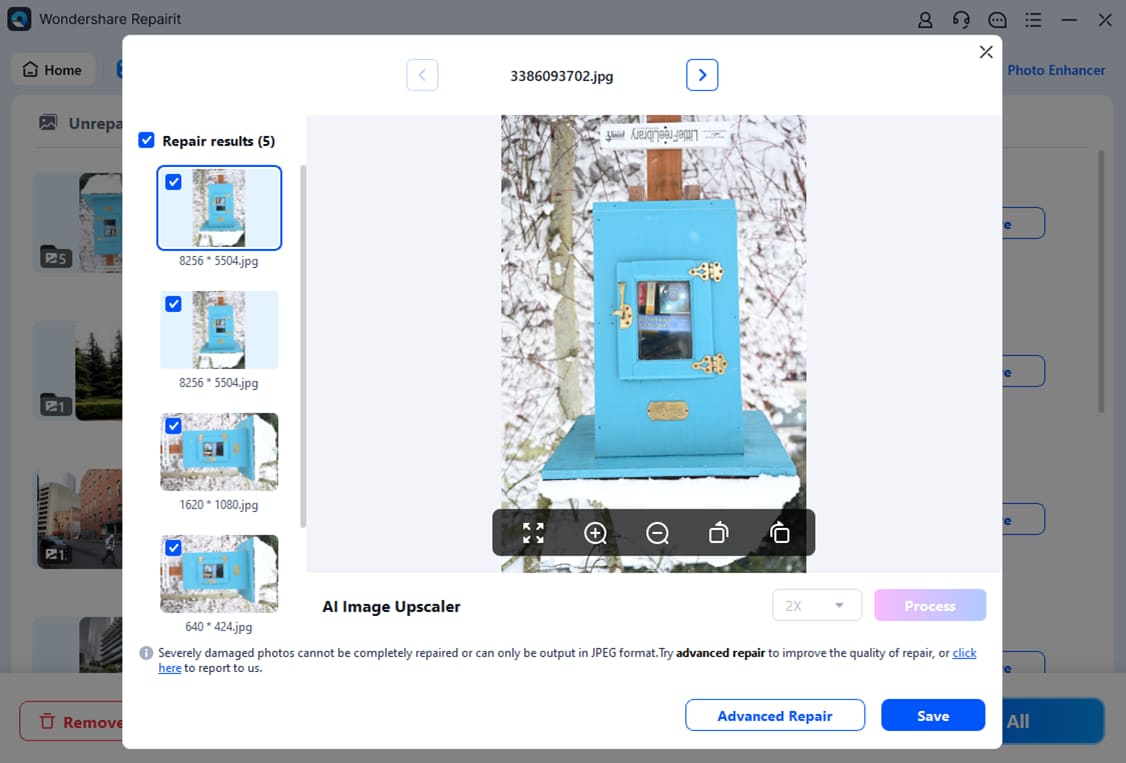
Step 5: Preview the image to see how it looks now. If all is OK, click Save.
Conclusion
It could be annoying when the Windows image preview is not working, but it's good that you can fix it relatively fast. Some of the easiest ways to solve this problem are to update the Photo Viewer, use a different app to open the file, and restart your computer.
If this doesn't work, you can try to repair Windows Photo Viewer, reset Color Management, reinstall the app, run the SFC command, and update your graphic drivers. If you're dealing with file corruption, you can use Repairit Photo Repair to fix the image.
FAQ
-
Why does Windows Photo Viewer say “Windows Photo Viewer can't open this picture?
This error appears when the image file is corrupted, unsupported, or when Windows Photo Viewer encounters system or file association issues. -
How do I fix the Windows Photo Viewer can't open this picture error?
Try updating the Photos app, checking file associations, resetting color management, or running SFC. If the image itself is corrupted, you'll need a photo repair tool to fix it. -
Why won't Windows Photo Viewer open some image formats?
Windows Photo Viewer supports only formats like JPG, PNG, GIF, and BMP. It cannot open HEIC, WebP, RAW, or certain TIFF files. Converting the file or using a compatible viewer usually resolves this. -
How do I repair corrupted photos that Windows Photo Viewer can't open?
You can repair corrupted images using a dedicated photo repair tool. Solutions like Wondershare Repairit help fix damaged headers, colors, pixelation, and unreadable image structures. -
Will reinstalling Windows Photo Viewer or Photos fix the issue?
Reinstalling may fix app-related errors but won't repair a corrupted image. If the error persists, the photo file itself likely needs repair.


 ChatGPT
 Perplexity
 Google AI Mode
 Grok
Grok

