In this article
Are you frustrated with Google Photos sharing not working? You're not alone! Sharing hiccups can be caused by app quirks or connectivity problems. Fear not – this guide is your go-to troubleshooter, packed with tips to revive your Google Photos sharing. Whether tweaking settings, updating the app, or checking your network, we've got all angles covered. Let's tackle these hurdles together and bring back the smooth flow to your photo-sharing experience. Bid farewell to the hassles, and welcome back the joy of effortless sharing moments with Google Photos!
Why Google Photos Sharing Isn't Working?
Picture this: you're eager to share cherished moments on Google Photos, but frustration sets in – Google Photos sharing not working. Imagine the dismay as you attempt to connect with loved ones through the app, only to face roadblocks. Below are the reasons why this is happening:
✔Reason 1: Partner or you have set “Only show” photos: One common reason for Google Photos sharing issues is the configuration setting, whether you've designated a partner or set the option Only show photos. These choices may inadvertently hinder the sharing experience, contributing to frustration when attempting to connect and share moments.
✔Reason 2: Auto-save was disabled for partner sharing: A potential culprit for Google Photos sharing not working could be the disabling of auto-save for partner sharing. If this feature is turned off, it may disrupt the seamless sharing experience, creating a hurdle in connecting and preserving shared moments.
✔Reason 3: Unstable network connection: Another possible reason behind Google Photos sharing not working is an unstable network connection. A shaky or unreliable network can impede the smooth transfer of photos, leading to sharing issues. Ensuring a stable connection is crucial for a seamless and uninterrupted photo-sharing experience.
✔Reason 4: Your partner shares only a portion of the photo: Another factor contributing to Google Photos sharing not working may be that your partner only shares a portion of the photos. This selective sharing can lead to discrepancies in the content available, causing issues in the seamless sharing process. It's essential to ensure that both parties share shared preferences for a smoother experience.
✔Reason 5: Partner Sharing was set up for only one Google Account and not for both: Another possible reason for Google Photos sharing not working could be that Partner Sharing was set up for only one Google Account and not for both. Ensuring that both accounts are configured for sharing is crucial to overcome any hindrances in the collaborative photo-sharing experience.
Quick Fixes for Google Photos Sharing Not Working
Tired of the Google Photos sharing not working dilemma? No worries! Here's a list of quick fixes and an easy step-by-step guide:
Fix 1: Check network connection
If you're experiencing Google Photos sharing not working, ensure a stable internet connection via Wi-Fi or mobile data. Network fluctuations may impede photo transfer. If the issue persists, try restarting your router or switching networks for a potential solution. A reliable connection is vital for seamless Google Photos sharing.
Fix 2: Share all photos
If you're encountering issues with Google Photos sharing not working, opting for Share All Photos is a quick fix. This can help address any glitches associated with specific photo selections and enhance the overall sharing experience on Google Photos. Before sharing all photos, here's how to review Partner Sharing settings:
Step 1: Visit the Google Photos website and log in to your account, which is the source of the photos.
Step 2: Select the Settings icon, then navigate to Partner Sharing and expand the corresponding option.
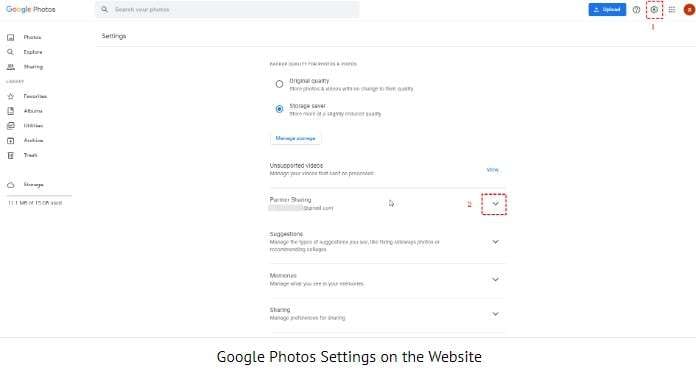
Step 3: Now, you can verify that the settings are configured correctly.
And here’s how to Share All Photos:
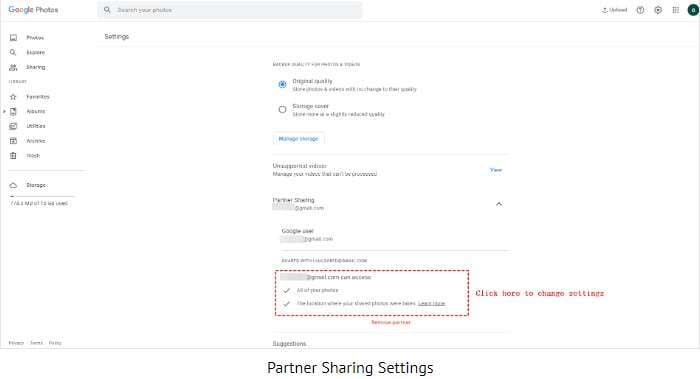
Step 1: Select the Google Photos account you've shared within the Partner Sharing section under SHARE WITH [gmail address].
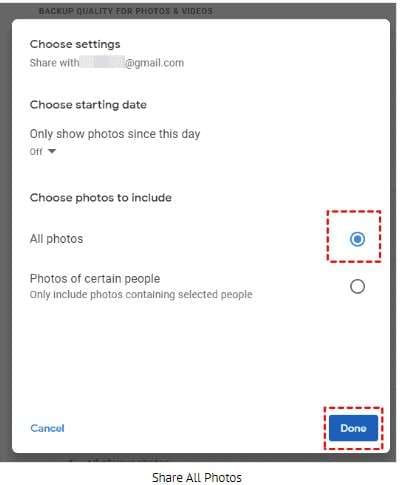
Step 2: Select all pictures in the Choose photos to include section and click the Done button.
Fix 3: Reset partner sharing - remove and share again
Try a quick fix for Google Photos sharing not working: initiate a reset partner sharing. Remove existing settings and reconnect to address glitches. This simple step often resolves sharing issues, enhancing your overall experience on the platform. Here are the simple steps:
Step 1: Kindly sign in to your Google Photos account.
Step 2: Click the Settings icon in the upper right corner, then open the Partner Sharing section.
Step 3: Scroll down and select the option to Remove Partner.
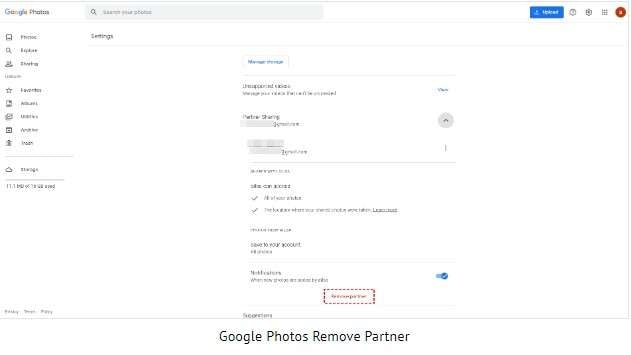
Step 4: Click on Remove to confirm.
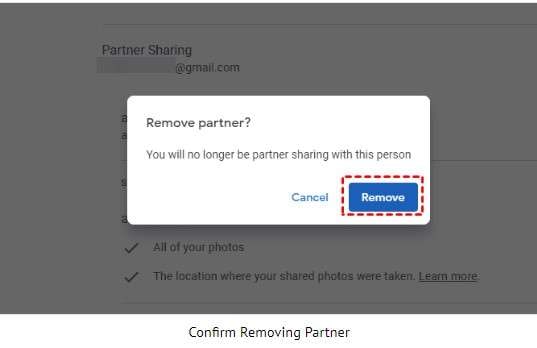
Step 5: Proceed to Sharing and click on Get Started next to Partner Sharing, or navigate to the Settings icon and choose Partner Sharing.
Step 6: Choose either Only display photos since this day or select a specific date under Choose starting date. Then, opt for All photos or Photos of specific people to include, and click Next.
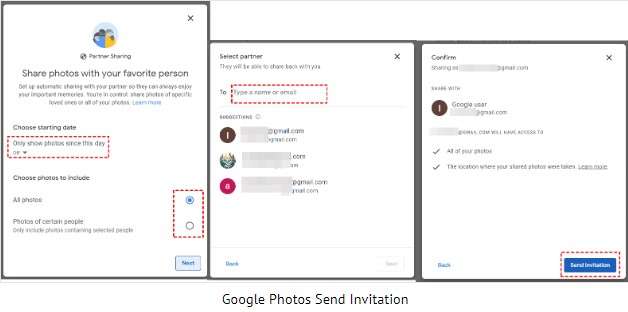
Step 7: Enter the email address for sharing and click on Next > Send Invitation.
Step 8: Navigate to the receipts account and select Sharing > View invitation.
Fix 4: Set up partner sharing for your account and your partner’s Google Photos account
At times, Google Photos Partner Sharing may not display all photos if sharing is enabled on only one side and not reciprocated. To address this, go through the sharing setup process for the other Google Photos account. Once Partner Sharing is established between the two accounts, it will automatically show the uploaded or backed-up item.
Fix 5: Make sure auto-save is enabled for partner sharing
Ensure your shared photos from Partner Sharing are automatically saved without affecting your cloud storage space, as long as your partner maintains the sharing arrangement. These photos remain accessible at all times, even if your partner removes them from Partner Sharing – they will still be stored in your cloud. To activate autosave for Partner Sharing, please follow the steps outlined below:
Step 1: Kindly login to the Google Photos account experiencing Partner Sharing issues.
Step 2: Select Sharing > Photos from .
Step 3: Choose either to activate automatic saving by clicking on Turn on Autosave at the top left or view these photos alongside your own by selecting the option at the top right.
Step 4: Check the box for saving all photos and click the Done button.
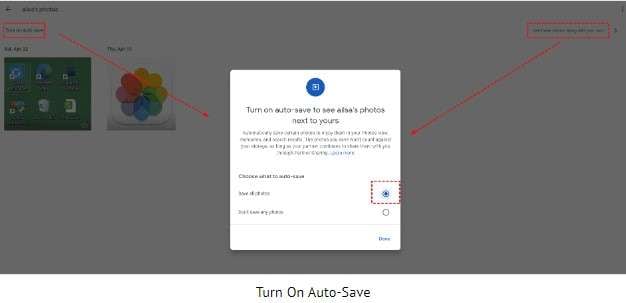
Step 5: Select the Photos tab on the left, then refresh your page; all the shared photos will be stored in this location.
Bonus Tip: Use Wondershare Repairit Photo Repair To Fix Corrupt Pictures
Enhance your photo-sharing experience with Wondershare Repairit Photo Repair – the competitive tool for fixing corrupt pictures. As a tip, Repairit effortlessly restores and enhances your cherished photos while addressing Google Photos Sharing issues, ensuring a seamless and flawless visual experience. Here's what Repairit can offer:
- It can improve the original quality of damaged images, making them eight times clearer.
- It can enhance clarity in old photographs or product shots during repair.
- It easily repairs photos in various formats, such as JPEG, PNG, JPG, CR3, CR2, NEF, NRW, RAF, DNG, ARW, GPR, TIF, TIFF, GIF, and more
- It effortlessly tackles incomplete data problems, rectifying pixelated or inaccessible photos with just a few clicks.
- By removing scratches, enhancing colors, and sharpening blurred areas, it revitalizes faded and damaged photos.
- Compatible with various devices and storage options, including Mac or Windows computer disks, USB flash drives, memory sticks, SD cards, digital cameras, or mobile phones.
Repairing photos is a piece of cake with Wondershare Repairit's simple interface. Just follow a few easy steps, and you're good to go. Here's a step-by-step guide:
Step 1: Download and open Wondershare Repairit on your computer and wait for the toolbars to load fully.
Step 2: Go to the sidebar, select More Types Repair, and choose Photo Repair.
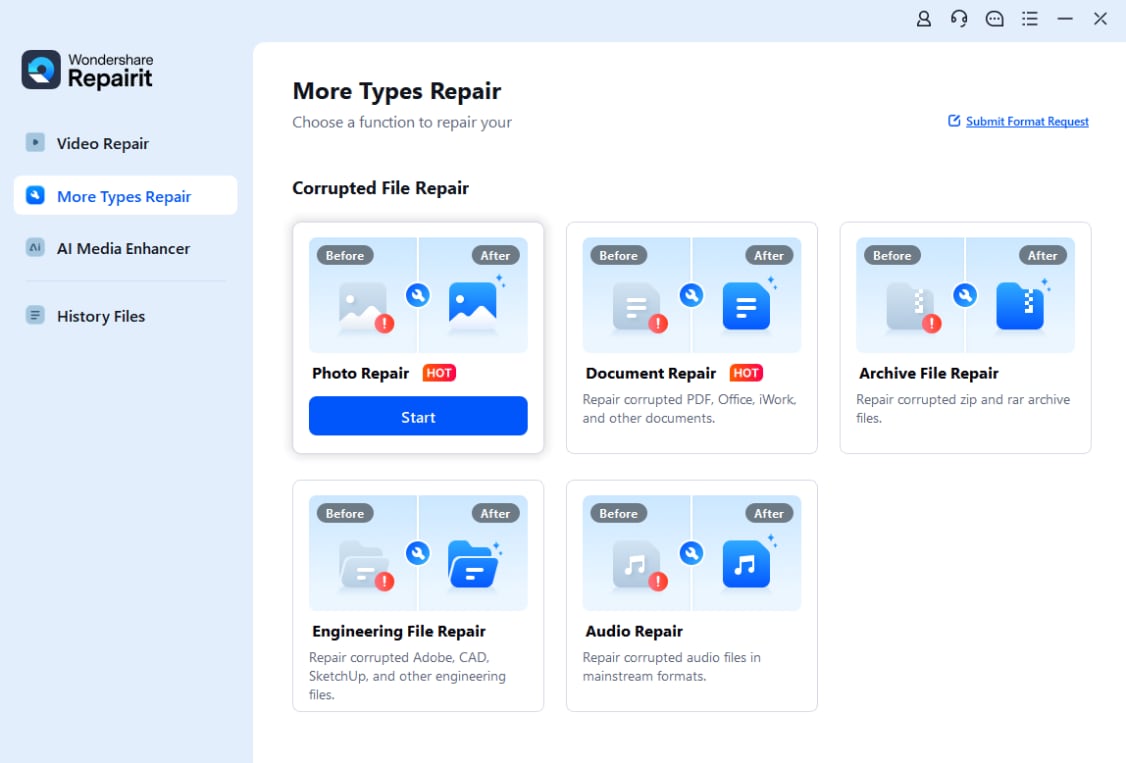
Step 3: Click Add, find the damaged files you want to fix, and upload them to the platform.
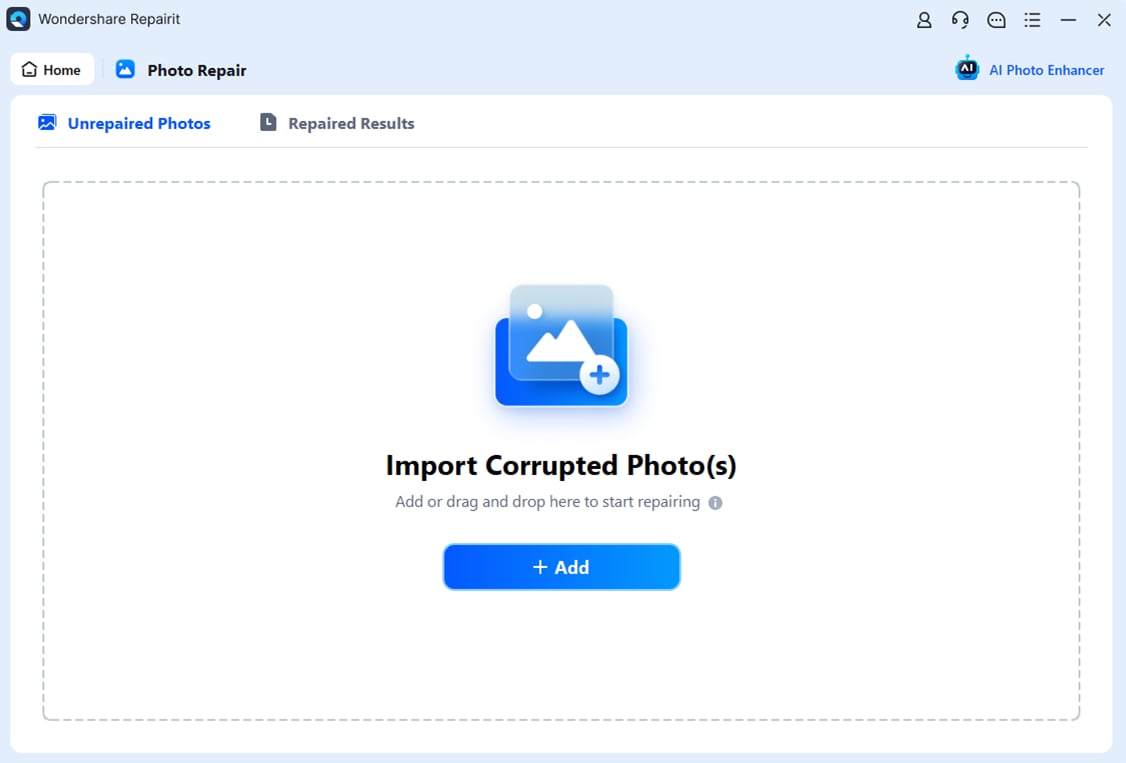
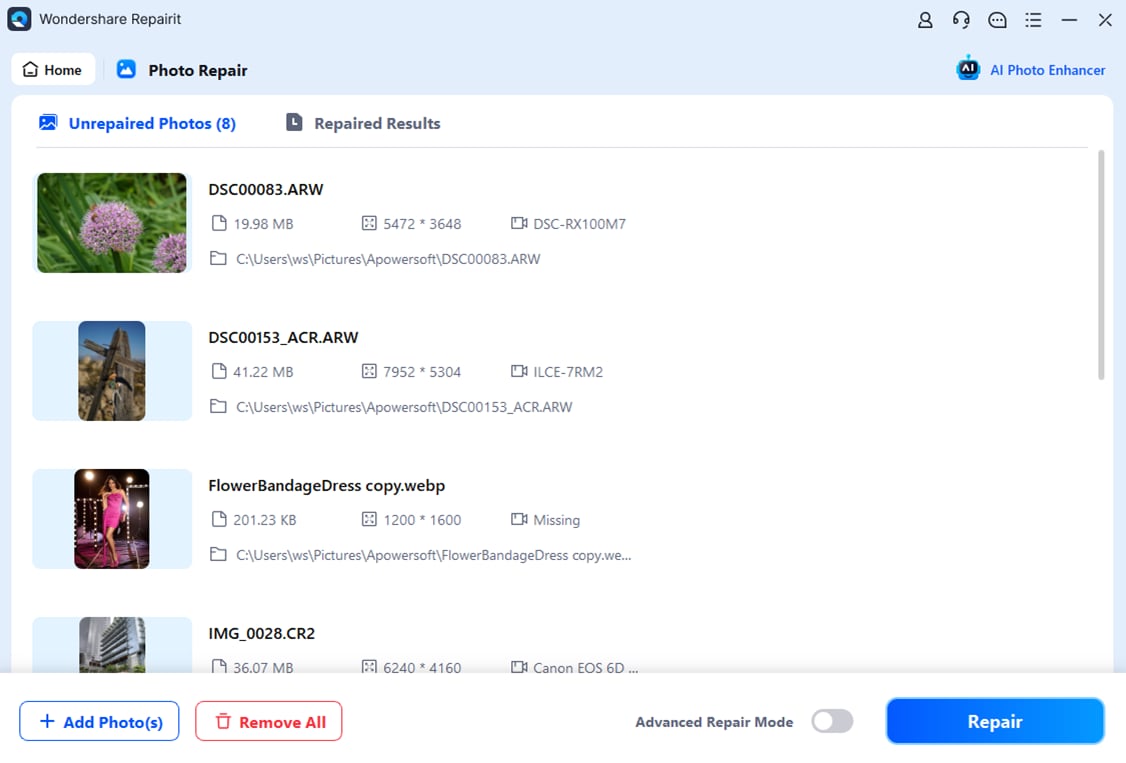
Step 4: Choose Repair to start restoring the damaged images.
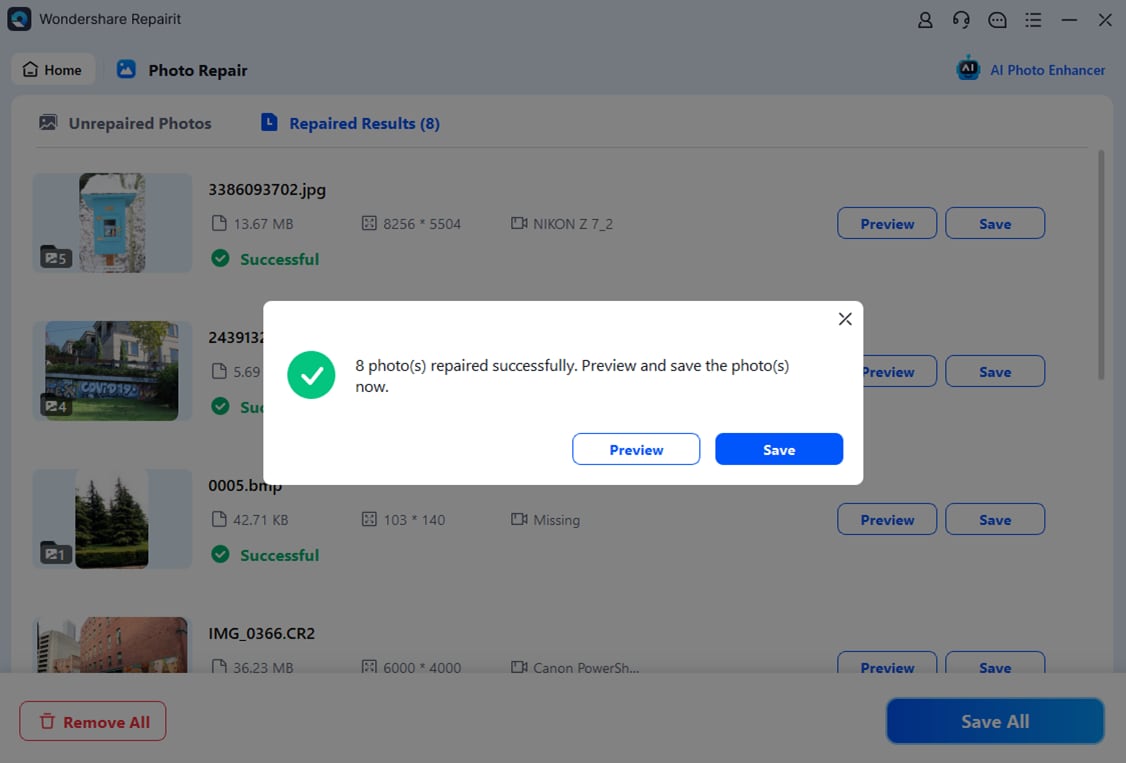
Step 5: Once done, a window will pop up, confirming successful repair. Click OK to preview the results.
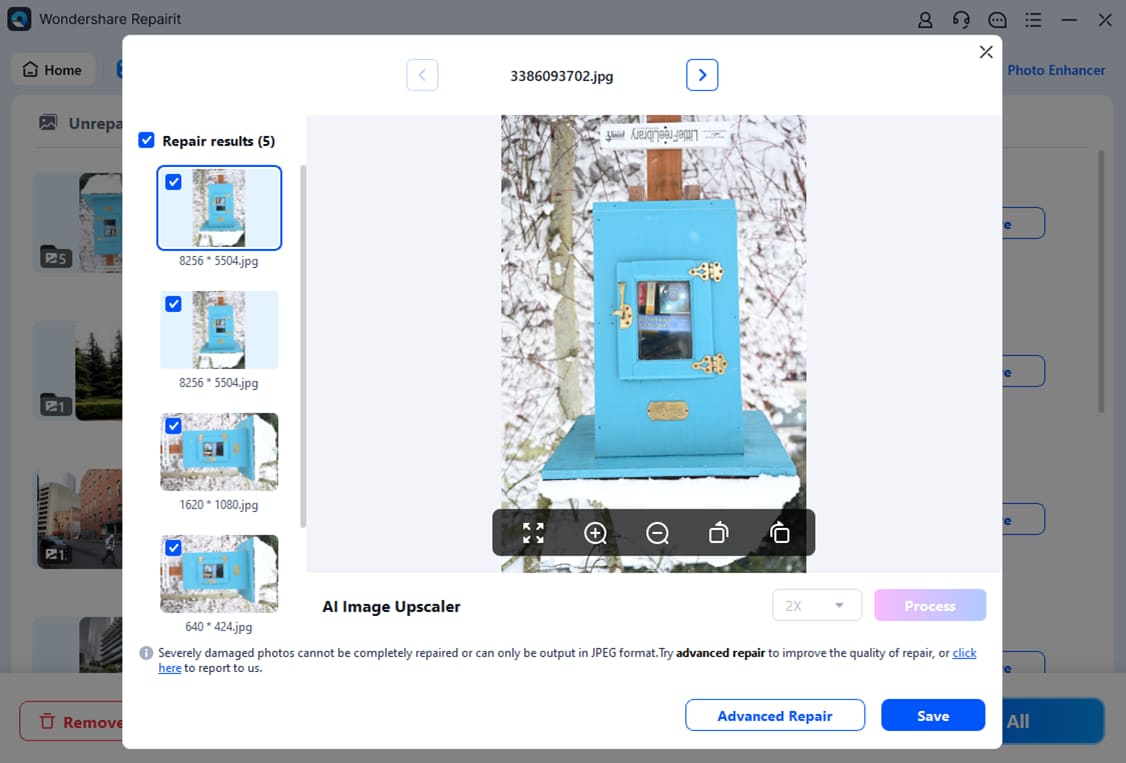
Step 6: Double-click the image thumbnail or select Preview to see the fixed images. If satisfied, click Save to download a copy to your computer. For extra editing options, choose Advanced Repair.
Conclusion
In a nutshell, this guide simplifies the resolution of Google Photos sharing not working issues. Whether you're facing challenges with partner sharing, photo accessibility, or removal, the step-by-step instructions offer a straightforward solution. Notably, Wondershare Repairit, a powerful tool for fixing corrupted pictures, is introduced as a bonus tip. It complements Google Photos troubleshooting and enhances damaged images, making it an invaluable addition to the guide. By following the outlined steps, users can troubleshoot Google Photos sharing issues effortlessly, ensuring a seamless experience. Seize the opportunity to optimize your photo-sharing on Google Photos with this user-friendly guide and the added advantage of Wondershare Repairit for picture-perfect results.
FAQ
-
What occurs if you end Partner Sharing on Google Photos?
If you stop Partner Sharing on Google Photos, it may result in issues related to Google Photos sharing not working, affecting the sharing functionality and access to shared content. -
Is Google Photos an effective platform for sharing pictures?
Yes, Google Photos is generally effective for sharing pictures. However, occasional issues like Google Photos sharing not working may impact the seamless sharing experience. -
Can I remove photos from Google Photos after sharing them?
Yes, you can remove photos from Google Photos after sharing them. However, be cautious as occasional issues, like Google Photos sharing not working, impact the removal process.


 ChatGPT
 Perplexity
 Google AI Mode
 Grok
Grok

