
Imagine that you capture the first time your child begins walking, but only to find out that the picture got all blurry and grainy. You will be so annoyed considering the importance of that picture.
Well, there is nothing to worry about as the blurry photo issue can easily be solved. The article features every aspect of grainy photos from scratch. It includes how to make a picture less grainy, why that happens, and how to solve it with & without using Photoshop. The article also features some useful tips to prevent the issue.
Part 1: Why My Digital Photos Are Grainy?
A blurry image can ruin all your candid moments and special memories. Numerous reasons contribute to the situation where your photo gets grainy. The typical and more frequent cause is photography lighting. But before we get into that in detail, you should know all about the grainy photo.
1. What Does Grainy Mean in photography?
In the era of analog photography, silver was the essential element to cover the plastic film to make the picture more light-sensitive. Its main function was to absorb the sunlight and also helped in the low-light areas as per different lSO settings. So, a grainy image appears when your camera sensor increases the light available to show the image.
Grain/blur (or sometimes referred to as noise) in the photo can be decreased by adjusting the way you capture the picture. As briefly mentioned earlier, a high ISO setting is a common cause of grain in an image.
2. What Makes Clear Pictures Look Grainy or Blurry?
What you thought to be a perfect 'clear' picture might come out as blurry or grainy. As we tend to capture a candid photo, whether it's night or day, a grainy photo is a common outcome. Moreover, people don't have access to a studio like lighting as professional photographers do. So, when you are wondering why do my pictures look grainy, you know precisely why!
3. Why Do Camera Pictures Look Grainy?
Images taken in daylight are less grainy than the images captured at night. A grainy photo is a result of various factors. Some crucial reasons that lead to the grainy images are lack of lighting options, small sensors, ISO settings, and camera type.
Part 2: How Can I Fix Grainy Photos within Clicks?
You can’t expect to take the same candid moment twice as the moment has passed. Once you capture a blurry picture, it is saved as a blurry photo in the memory card unless you fix it. In such a scenario, you need methods to fix photo grainy issues and make it clear.
If you're thinking about how to make photos less grainy, here are some useful methods to fix grainy photos.
Method 1: Use A Photo Repair Tool
While numerous ways can be used to fix the grainy effect in a photo, Repairit Photo Repair software serves as the best bet in repairing the corrupt photo. Irrespective of your operating system, it can improve all formats of photos, whether it's JPG or JPEG format file. From a memory card, a hard drive to a flash drive, or any other data storage medium, it repairs corrupt JPEG files stored at any storage device.
Before we get into the process of repairing a corrupt file, you need to download the Repairit software. Once the installation completes, tap on the software icon, and follow the process mentioned below.

Wondershare Repairit - Photo Repair
Security Verified. Over 7,302,189 have downloaded it.
-
Repair damaged photos with different corruption issues, such as grainy photos, dark photos, pixelated photos, faded photos, etc.
-
Repair images of diverse formats, such as JPG, JPEG, PNG, CR3, CR2, NEF, NRW, etc.
-
Repair critically damaged or corrupted photos available on SD cards, phones, cameras, USB flash drives, and more.
-
Repairit has a quick and advanced repairing mode. You can use either depending on the level of corruption the photos has undergone.
-
The "AI Image Upscaler" feature can enlarge the repaired photos to 2X, 4X, and 8X.
-
No limit to the number and size of the repairable photos compared with the online version of Repairit.
-
Support Windows 11/10/8/7/Vista, Windows Server 2003/2008/2012/2016/2019/2022, and macOS 10.10~macOS 14.
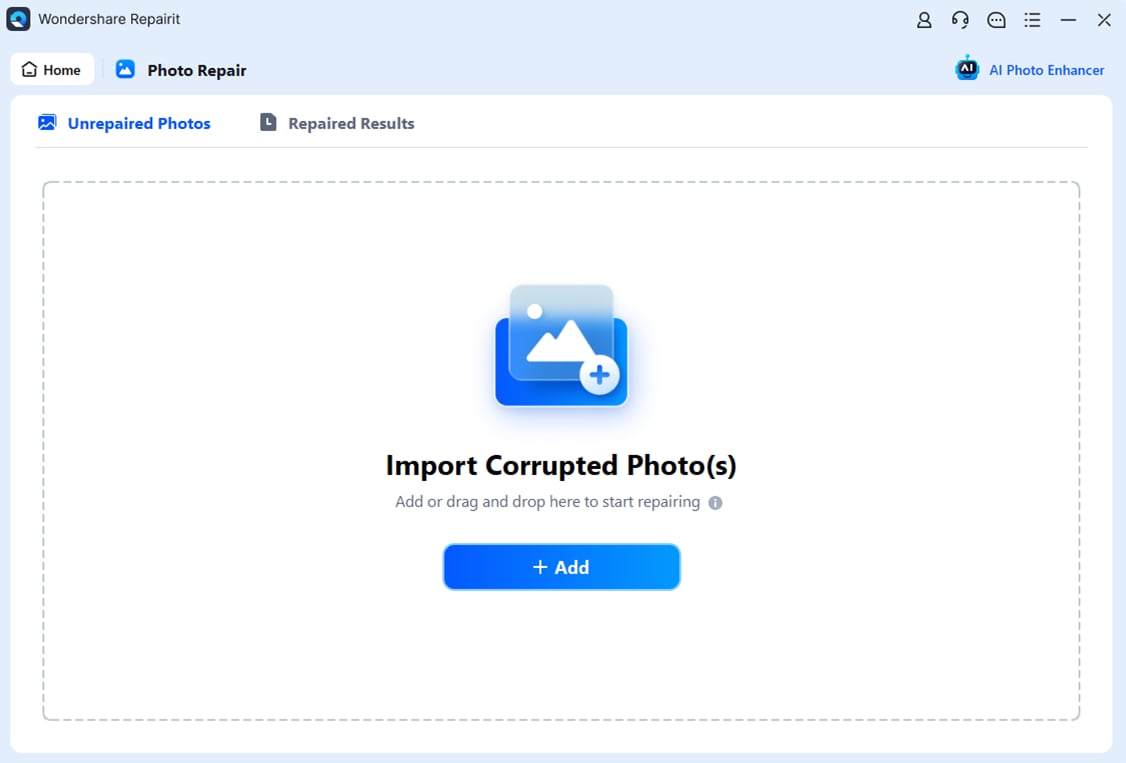
Step 1: Select a Location
Open Repairit and choose "Photo Repair" function from "More Types Repair", then click on the ‘Add file’ tab located at the center. Select the corrupted image files from the drive where it was saved.
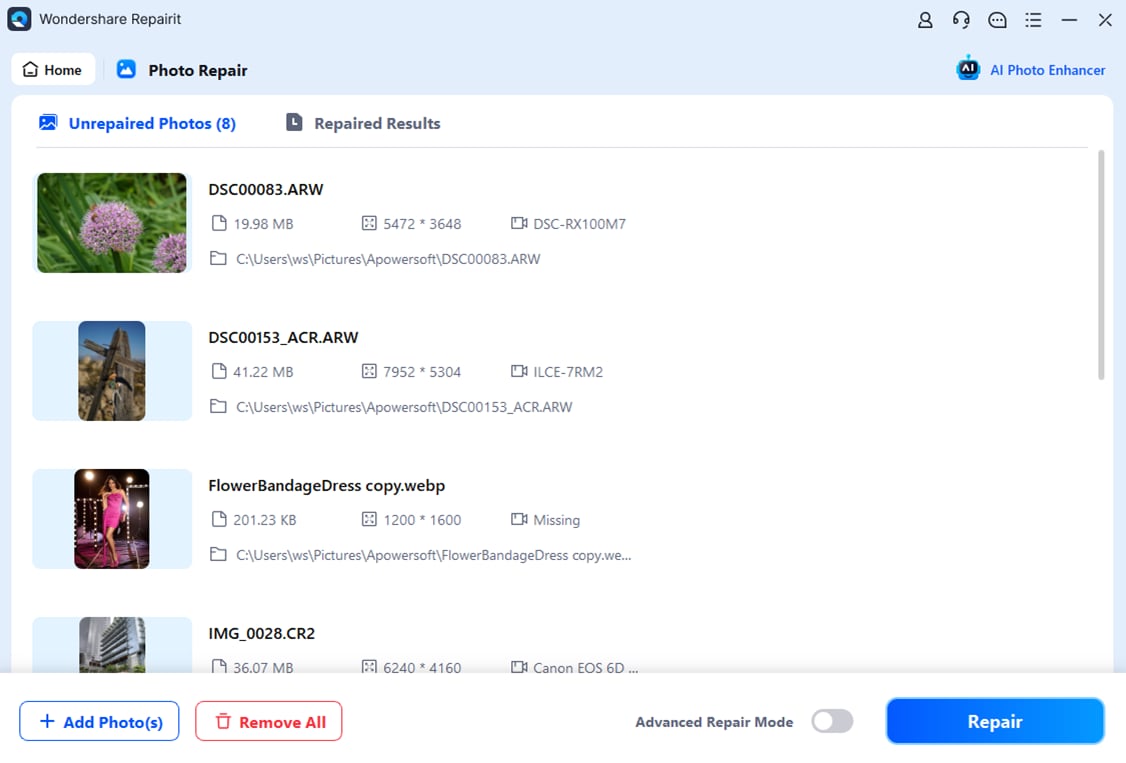
Step 2: Repair Corrupted Files
Once you select all the corrupted files from their source location, click on the 'Repair' tab. It will initiate the repair process.
Step 3: Save Repaired Files
The repair process may take some time to complete, as it depends on the photos and the file size. Once the process completes, you can preview the files. When you are assured that you got all the pictures you wanted, click on "Save" to save your repaired photos.
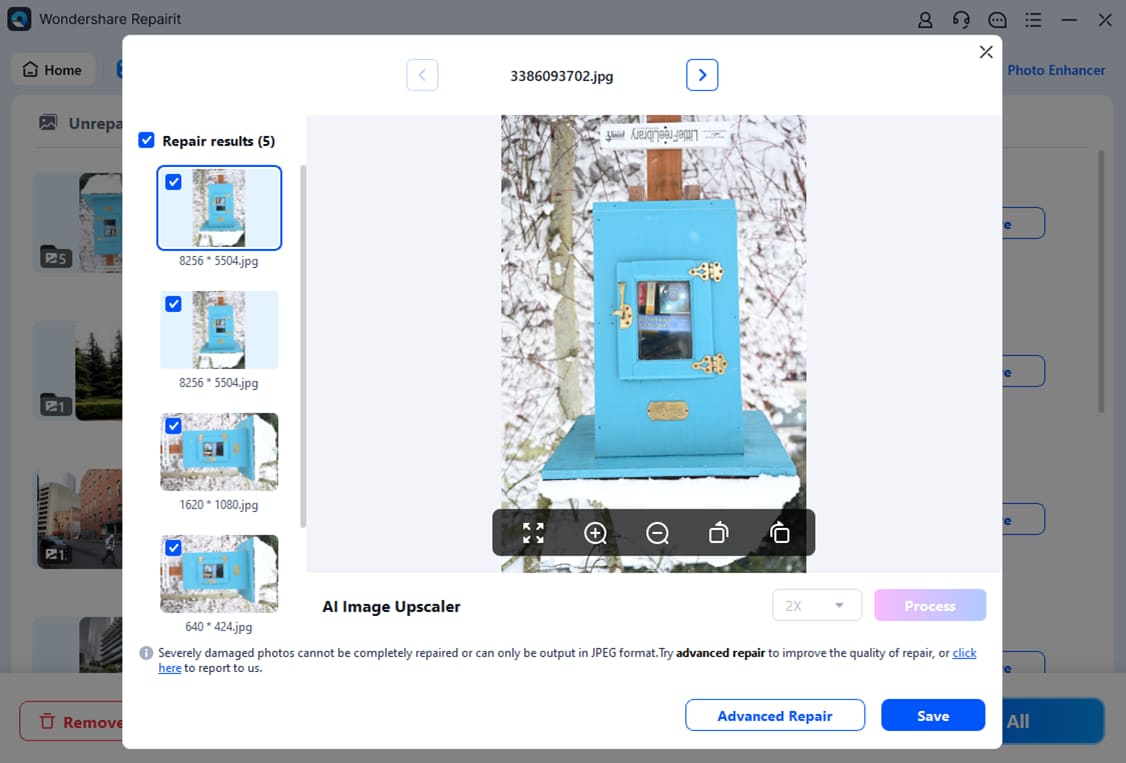
Tip: Make sure that you store the files at a different location and not from where you selected it in the first place. The above steps from the Repairit Repair tool will help you repair the corrupted images.
Attention:
If you want to repair photo online and your corrupted photo is no more than 300MB, you can try the online version of Repairit Photo Repair to get your photo repaired online.
Method 2: Use Adobe Lightroom
Speaking of grainy and fuzzy pictures, Adobe Lightroom is a useful software application that repairs sandy corruption in an image. Now, if you want to know how to fix photos in Lightroom, the following steps will help you to do so.
Step 1: Launch the Adobe Lightroom application on your system.
Step 2: Now, open the photo in the application.
Step 3: Select the option named ‘Detail’ in the right panel.
Step 4: Under the ‘Noise Reduction’ tab, there will be two options - Luminarc and Color.
Step 5: Adjust the noise reduction bars in the Luminarc using 'Detail' and the 'Contrast' option. Follow this step until you get rid of the grainy effect.
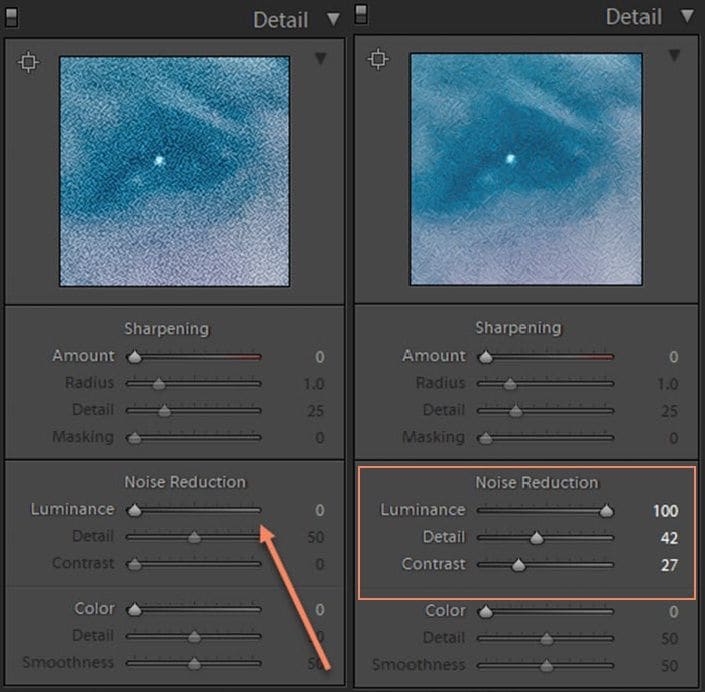
Step 6: Similarly, on the right side of the panel, adjust the ‘Slider’ tab. You can check the view on the right panel. If it looks like you got the desirable photo with a reduced grainy effect, you can save the edited picture.
Part 3: How to Make Pictures Less Grainy with Photoshop
As mentioned earlier, Adobe Photoshop is one of the best applications to how to repair grainy pictures. While the grainy effect of any image is not entirely achievable, you will be able to fix the blurry photo to some extent. It is equipped with a built-in feature that reduces noise in the pictures and repair images to some level.
If you have just started learning Adobe Photoshop, you can use the CS6 version to learn the basics of the application. It offers several key shortcuts as it provides an efficient approach to learn the basics of photo editing. Moreover, 'Photoshop 7.0' is one of the best versions to learn Photoshop editing tools from scratch.
Now, if you want to know how to fix grainy photos in Photoshop, you must download the application. As the installation completes, launch the applications and follow the steps mentioned below.
Step 1: Open the blurry picture on the application.
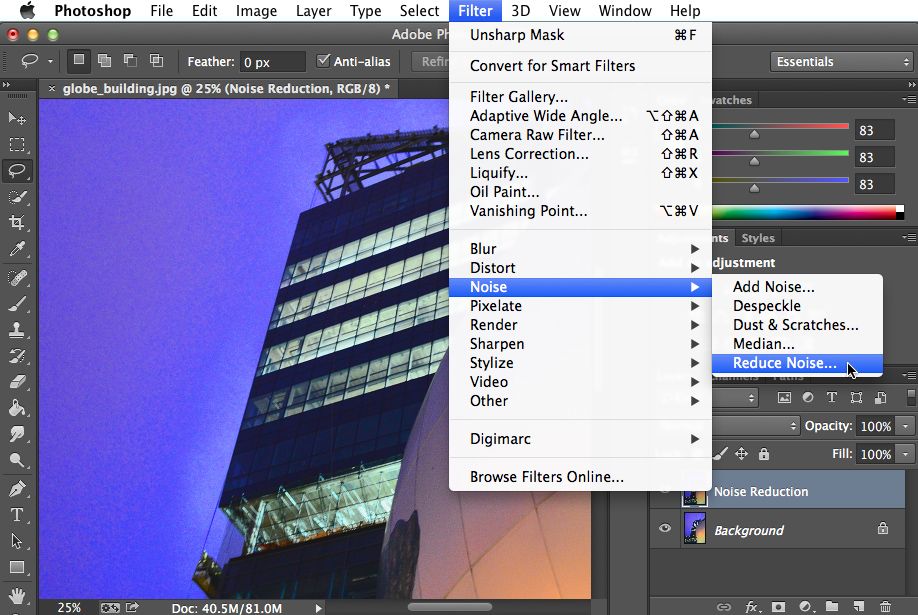
Step 2: Tap on the ‘Filter’ tab on the top bar and click on ‘Noise’ followed by ‘Reduce Noise.’
Step 3: Reduce Noise option contains three sliders, including Reduce Color Noise, Strength, and other features.
Step 4: Adjust these settings until you get rid of grains in the image to some extent.
Step 5: You can check the outcome on the right side of the screen by clicking on ‘Remove JPEG Artifact.’
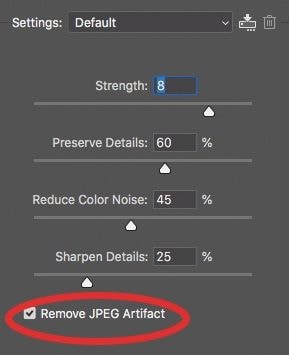
Step 6: Once you get rid of the grainy effect from the photo, tap on 'OK' and save the edited image.
Also, you can compare the before and after pictures to see the effect. While you might think that your picture is not free of grain, but it will be less prominent in comparison. Moreover, you cannot fully eliminate noise from the picture, especially in concert photography photos.
Part 4: Extended Tips for Photo Repair
The fact that conditions are not always in our favor, your photos might suffer from a grainy effect. But there are several steps that you could take to prevent the situation. Here are the answers to some basic questions related to reducing the grainy effect in a picture.
1. How to Take Less Grainy Pictures
If you think why do my pictures look grainy, you might not be following the basics of photography. It includes the ISO setting you are using on-camera, picture resolution, and other essential aspects. Here are some things you could do right to take less grainy pictures.
- Use Low ISO Setting on Camera
The best way to ensure that the photos aren't fuzzy is to use low ISO settings on the camera. While a high ISO setting is a necessity in night photography, you can use artificial lights to balance the ISO setting to take a perfect shot.
- Avoid Taking Pictures in Low Resolution
Low resolution can make your photo look grainy. Always ensure that you use high resolution to capture a picture. And if you are printing a photo, make sure that you don’t zoom in much as it will make the picture blurry.
- Try to Keep the Camera Steady While Capturing
If your hands aren't steady while capturing a picture, you are more likely to see a blurry picture. You can use a tripod to ensure that your camera is steady, and the picture is clear.
2. How to Prevent Clear Photos from Getting Grainy
Even after taking a clear picture, you might have come across this question – why do my pictures look grainy? Well, it happens if you are not focusing the camera on any specific object. You have to make sure that your eyes are in focus to a point over everything else. So, even when you zoom in the photo, the object in focus won't blur out.
3. How to Prevent Images or Photos from Getting Corrupted
Although picture corruption is a spontaneous event, you can take some precautionary steps to avoid such incidents in the future. Here are the steps that you could take to prevent picture corruption.
-
Avoid pulling out the SD card from the camera without following the safe ejection process.
-
Your computer might be infected with malicious viruses.
-
Make sure you don’t carry out any heavier tasks while transferring JPEG files from memory card to PC. It could corrupt the images and make them inaccessible.
-
Your JPEG file may be located in a bad sector of my hard drive. If that’s the case, it may also corrupt any other files in that sector.
Closing Words
No, whether you are an amateur photographer or a professional, you must have sufficient knowledge to take good photos. While the grainy effect can affect your photo, you can use all the tips and tricks mentioned in the article. If you happen to suffer from photo corruption for any reason, you can use the Repairit Photo Repair application to repair any digital photo.
Related Questions Searched Frequently
-
1. How are my photos grainy at low ISO?
If your photo looks grainy even at low ISO settings, you might not be getting adequate exposure in the camera. It's one of the reasons why even at low ISO Settings & underexposed, you get the blur in the photo. -
2. How do you fix grainy photos?
Clicking pictures at high ISO makes your captured images grainer or noisier. So, to capture clear images, it is advised to click memories in proper lightings, ISO settings, small sensors, and camera types. This can help you fix your grainy photos easily. -
3. How do you fix grainy raw photos?
You can use various software applications that are equipped with noise reduction sliders, contrast, and other related features. It works best to reduce grain from the picture. -
4. What app makes your photos grainy?
You can fix grainy images with Adobe Lightroom, Photoshop, and Repairit Photo Repair. But, if you like to make your photos grainy, then Color Splash, FilterLoops, Filmborn are some of the apps with various grainy filters that help you achieve the required results. -
5. At what ISO do pictures get grainy?
The higher the ISO, the grainer, or noisier will be your picture. If your ISO is higher than 1600 or more, you are more likely to see the grainy effect in the images.


 ChatGPT
 Perplexity
 Google AI Mode
 Grok
Grok
