
Have you ever tried taking a photo and felt frustrated because it didn't turn out the way you wanted it? Don't worry, you're not alone! Photography is an amazing way to capture the beauty around us, but it can be challenging to get that perfect shot.
Even when everything seems to be just right, pesky issues like red eyes, blurs, and overexposure can ruin it.
That's why we're here to help! In this discussion, we'll go over the top 10 common photography issues and give you some tips on how to fix photography problems in just a few clicks.
Let's get started!
In this article
10 Common Photography Issues
Here are 10 Common Issues in Photography:
1. Blurry Bloopers
Blurry photos can be a real bummer, but don't worry; it's a common problem that can be easily fixed!

Here are a few things you can do to avoid them:
Firstly, try to hold your camera steady when you take a photo. It can be tricky, but it's worth it! If you're in a low-light situation or using a zoom lens, you might want to consider using a tripod to keep the camera steady.
Another thing to keep in mind is to use the right shutter speed for the situation. If you're taking a photo of something moving, you'll need a faster shutter speed to freeze the action.
Lastly, make sure your lens is clean and free of any smudges or dirt before you start snapping away. It can make a big difference in the quality of your photos.
2. Incorrect Exposure
If your photos are turning out too bright or too dark, it could be due to incorrect exposure: the amount of light that reaches the camera sensor. To get well-lit photos, it's essential to have correct exposure.
Thankfully, your camera has a handy tool called a light meter that measures the amount of light in the scene and suggests appropriate exposure settings.
You can also check the exposure of your photos by looking at the histogram, which is a graph that shows the distribution of tones in the image. If the histogram is too far to the left, the image is underexposed. If it's too far to the right, the image is overexposed.
3. Taming the Red Eyes
Have you ever noticed that sometimes, in low light conditions, when using a flash, people's eyes appear red in photos? Don't worry; it's a common problem, and there are some easy tips to avoid it!

Firstly, you can use the red-eye reduction mode on your camera. Additionally, instead of pointing the flash directly at the subject, try bouncing it off a wall or ceiling.
Another useful tip is to use a diffuser to soften the light from the flash. Lastly, when taking the photo, have the subject look slightly away from the camera. These tips will definitely help you capture great photos without any red eyes!
4. Noise and Grain
Another common issue with pictures is too much noise and grain. It's usually caused by high ISO settings on your camera. ISO is a setting that controls how sensitive your camera is to light. Higher ISO settings can be really useful when you're shooting in low light, but they can also introduce more noise and grain into the image.

If you want to get rid of that noise and grain, try using the lowest ISO setting possible for the lighting conditions you're in.
And if you need to use a high ISO setting, don't worry! You can always use noise reduction software to reduce the noise after the fact.
5. Tilted Horizons
Have you ever snapped a photo and noticed that the horizon looks tilted? It's not uncommon, but it can make your pictures look less professional.

To avoid this, try your best to hold your camera level when taking shots. If you're not sure, no worries! Most cameras have gridlines on their LCD screens that can help you align the horizon perfectly.
6. Poor Composition
If you want to take your photography skills to the next level, one of the key things to focus on is composition. Basically, composition is the way you arrange the different elements in your photos. When you get it right, your photos will look more appealing and interesting.

A good starting point is to follow a simple guide called the rule of thirds. It's super easy to use; you just divide the frame into nine equal parts and place your subject at one of the four intersections of the gridlines.
But that's just one technique; there are many others you can experiment with, like leading lines, symmetry, and foreground elements. All of these can help make your photos look even more amazing!
7. White Balance Woes
Have you ever noticed that sometimes your pictures come out too white or too dark? It's because of the white balance setting in your camera. But don't worry, it's an easy fix!

Just head over to your camera's White Balance settings and adjust it manually. This way, you'll be able to capture the perfect shot every time.
8. Exposure Triangle Unbalance
Understanding the exposure triangle concept can help you understand how aperture, shutter speed, and ISO work together to create the perfect exposure for your photos.
So, basically, the aperture is like the size of the window that lets light into your camera. A bigger aperture lets in more light and creates a blurry background, while a smaller aperture lets in less light and keeps everything in focus.
Shutter speed is like a blink; the faster it is, the less motion blur you'll get, while a slower speed will give you some cool blur effects.
Finally, ISO is how sensitive your camera is to light. Higher ISOs work great in low-light situations, but too high of an ISO can add a lot of grain to your photos.
By understanding the exposure triangle, you'll be able to master your camera's settings and create stunning photos!
9. Lens Mix-Ups
Different lenses are designed for different types of photography. And using the wrong lens can really affect your final results!
So, when you're choosing a lens, think about the kind of photos you want to take. If you're into portrait photography, you'll need a lens with a longer focal length. But if landscapes are more your thing, then a lens with a wider field of view will be your best bet.
10. Gray Areas
Have you ever taken a photo or edited one only to find some distracting gray areas in the image? Don't worry, it happens to the best of us! But the good news is that there are ways to fix it.

Next time you're out taking photos, try to make sure your camera is charged up and stable to avoid any issues. Also, it's best not to mess around with the photo format too much, as this can cause editing issues.
These are the ten most common issues faced by photographers and their potential solutions. However, most of these solutions require some expertise in photography, like understanding the right balance between aperture, shutter speed, and ISO or how to adjust the white balance manually.
But what if you’re just a novice? What if you don’t have the high-end camera equipment to make all those technical adjustments? No, you won’t end up with unprofessional-looking pictures because we have just what you need!
10 Problems, 1 Solution: Wondershare Repairit
If you’re new to photography, or someone who does it for fun, or even if you’re a professional photographer who’s looking for a time-effective solution to fix small imperfections in their captured images.
We’ve got the perfect solution for you: Wondershare Repairit! It is a software program that can work wonders on your photos!
Repairit supports a wide variety of photo formats, so you don't have to worry about compatibility issues. It can help fix photography problems of all sorts, like blurry or noisy photos, photos that are too bright or too dark, and even damaged or missing pixels. Plus, it can even fix color distortion and compression artifacts!
How To Use Repairit?
Follow these easy steps to bring your photos back to life with RepairtIt:
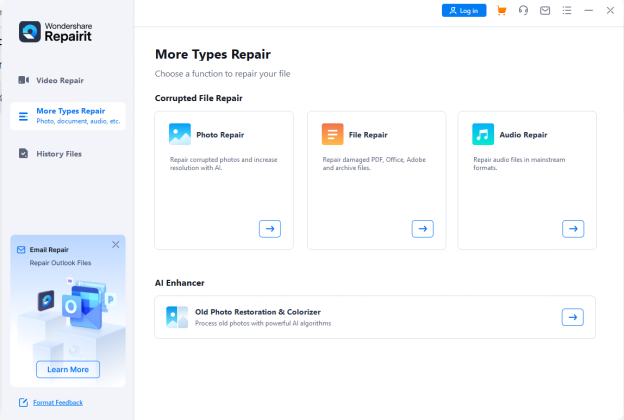
Step 1. Download and launch Wondershare Repairit on your PC, select “More Type Repair” from the menu on the left, and click “Photo Repair.”
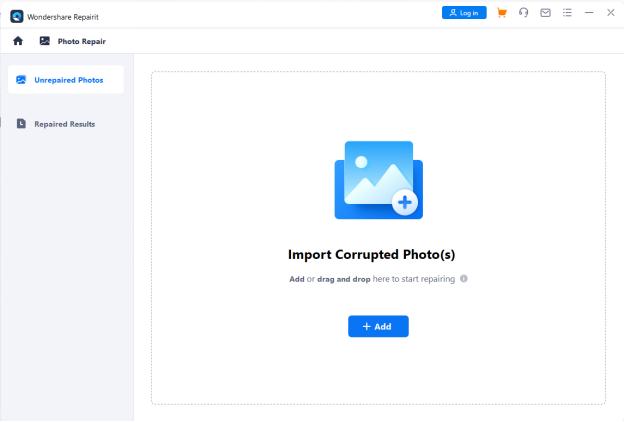
Step 2. Click on “Add” to import a corrupted or ruined image file.
Step 3. Once you have selected the images to be fixed, click “Repair.”

Step 4. Repairit will quickly scan the images and fix them, after which you can preview and save them to your local storage.

Advanced Repair with Repairit
The previous method was for images that had small issues. However, if you have images that are ruined to a larger extent, like old photos or pictures ruined by weather, you’ll need Repairit’s Advanced Repair to fix them. Here’s how:
Step 1. Click on “Add” to import a corrupted or ruined image file.

Step 2. Import the images you want to repair, and turn the toggle on for “Advanced Repair” before clicking “Repair.”

Step 3. The advanced repair feature may take a little more time than usual, after which you can preview and save the images.

How to Fix Images with Repairit Online
If you don’t want to get into the hassle of downloading software, you can also try Repairit online. Here’s how:
Step 1. Go to RepairIt Online Tools, and select the required tool from the 5 options. For instance, if you want to repair a damaged image, click on the “Online Photo Repair” option.

Step 2. Click on “Add” to upload the image you want to fix.

Step 3. Once the image is uploaded, click on “Repair” to fix it.
Step 4. Repairit will fix your image and show you the results. You can now download the image on your PC.

Fix Images Manually With More Customized Settings
Wondershare Repairit offers an automatic image-fixing solution; however, if you want to fix the images with a more personal touch, we recommend using professional image editors like Adobe Photoshop and Lightroom.
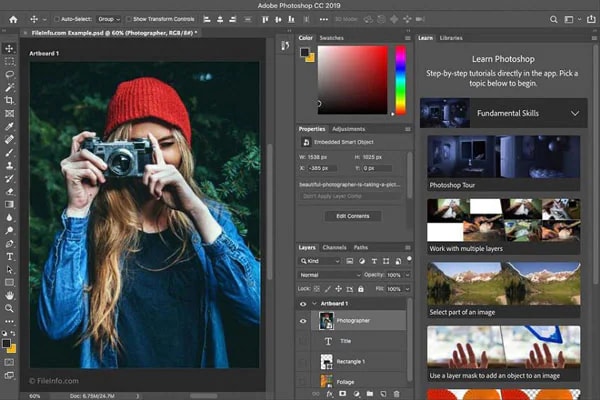
Adobe Photoshop
Adobe Photoshop is an amazing image editing software that's perfect for anyone, whether you're a beginner or a pro!
Created by Adobe Inc., it's packed with features that let you enhance, manipulate, and create stunning images. With Photoshop, you can retouch photos, add artistic filters, combine multiple images, and create amazing graphic designs. It's incredibly user-friendly, and even if you're not an expert, you can create beautiful digital art with ease.
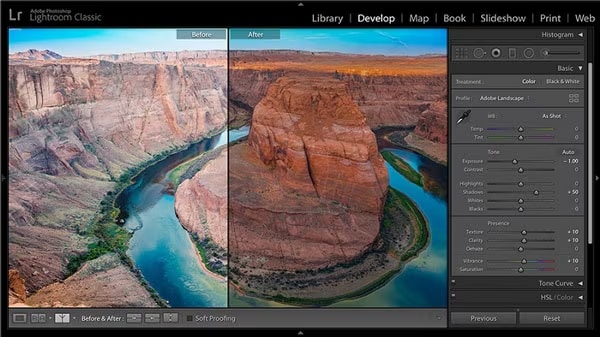
Adobe Lightroom
Adobe Lightroom is another software created by Adobe Systems that makes organizing, editing, and enhancing photos super easy and fun!
You don't have to worry about ruining your original images either, as Lightroom offers a non-destructive workflow, which means you can make adjustments without altering the original file. Plus, it has tons of amazing features like advanced photo cataloging and intelligent image searching.
With Lightroom, you can easily adjust exposure, color, and details to bring out the best in your photos.
And That’s a Wrap!
If you've ever had issues with your photos, like grainy images, blurred objects, or over-exposure, don't worry; you're not alone! The good news is you don't have to be a pro to fix these common photography problems.
With the help of Wondershare Repairit, you can easily fix photography problems with just a few clicks. And if you want to get creative and personalize your images, there are plenty of reliable image editors out there that you can use, too.
So don't let those pesky photo problems get you down; you've got this!