You might have tried to watch the YouTube video only to see the “This Video is Unavailable Error 4.” This can occur for multiple reasons, and this guide will cover them all, along with possible symptoms. So, go through the details and learn how you can fix this error with simple checks and fixes to restore smooth playback.

In this article
Part 1. Understanding the "This Video Is Unavailable - Error 4"
The “This Video is Unavailable Error 4” is a YouTube error that appears when a video fails to load or play correctly. To know the symptoms of this error, glance at the given details in this section:
Common Symptoms of the Error 4 Playback Failure
| Symptom | Description |
| Blank Video Player | The video player remains empty or fails to display playback content. |
| Error Message Pop-Up | “This video is unavailable. Error Code: 4” appears before or during playback. |
| Playback Stops Loading | The video begins loading but stops before playback starts. |
| Quality Change Failure | Playback may fail when changing video quality or loading different options. |
| Device-Specific Occurrence | The issue may appear on browsers, mobile apps, or streaming devices. |
| Persists After Refresh | Refreshing the page or restarting the app may not resolve the issue. |
| Embed Playback Failure | The video may fail on third-party websites but work directly on YouTube. |
Part 2. Quick Checks For "This Video is Unavailable - Error 4"
Before you go for the advanced solutions, perform the basic checks first to learn how to fix YouTube Error Code 4:
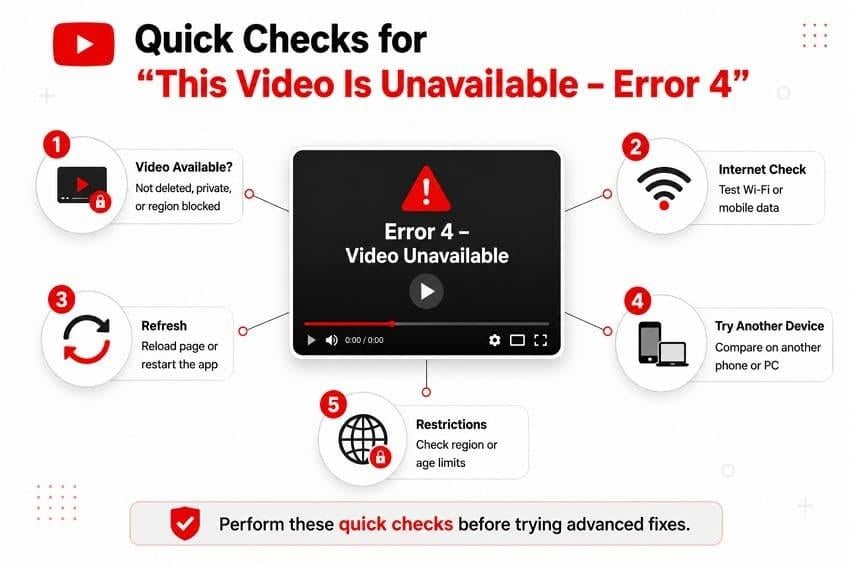
- Confirm the Video Is Available: Make sure the video has not been deleted, made private, or blocked in your region. If the video is unavailable to everyone, the issue is with the video, not the device.
- Test Your Internet Connection: A slow or unstable internet connection can prevent videos from loading properly. Check your network speed or switch between Wi-Fi and mobile data to rule out connection issues.
- Refresh the Page or Restart the App: Temporary glitches can stop a video from playing even if everything else is fine. Refresh the page or restart the app to reload the video and player.
- Try Another Device: Open the same video on another phone, computer, or browser to compare the results. This helps determine whether the problem is with the device or the video itself.
- Check Regional or Age Restrictions: Some videos are only available in certain countries or for age-verified users, says Google. If the video is restricted, it may not play even if your phone and internet connections work fine.
Part 3. 7 Advanced Fixes on How to Resolve YouTube Error 4
For the constant “This Video Is Unavailable Error 4,” try the 7 practical solutions given ahead:
Fix 1. Clear Cache and Cookies from Your Browser or App
Once cleared via the mentioned steps, it can remove stored data and fix playback problems caused by outdated cache files.
For Browsers (Chrome, Edge, Firefox, etc.):
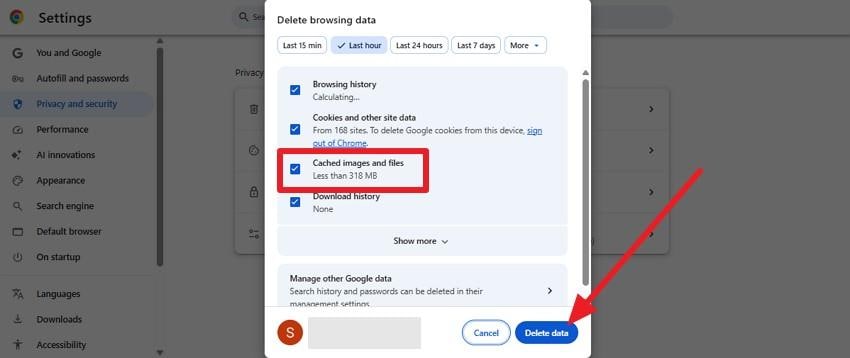
Step 1. Take Google as an example, and go to “Settings > Privacy and Security > Clear Browsing Data.”
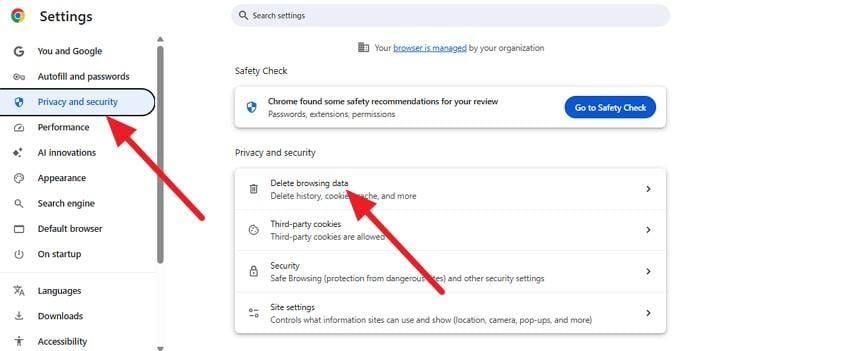
Step 2. Choose “Cached Images and Files” > Set the time range > Press “Delete Data” > Close and reopen the browser, then play the same video as you log in.
For Android
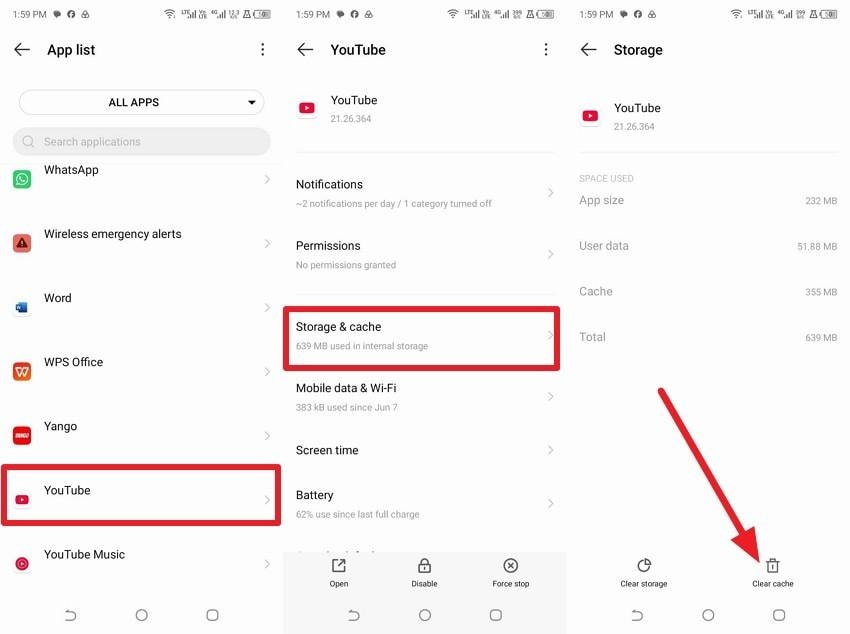
Instructions. In the settings, go to “All Apps > App List > Choose YouTube > Storage & Cache > Clear Cache.”
For Smart TVs (YouTube App on TV OS)
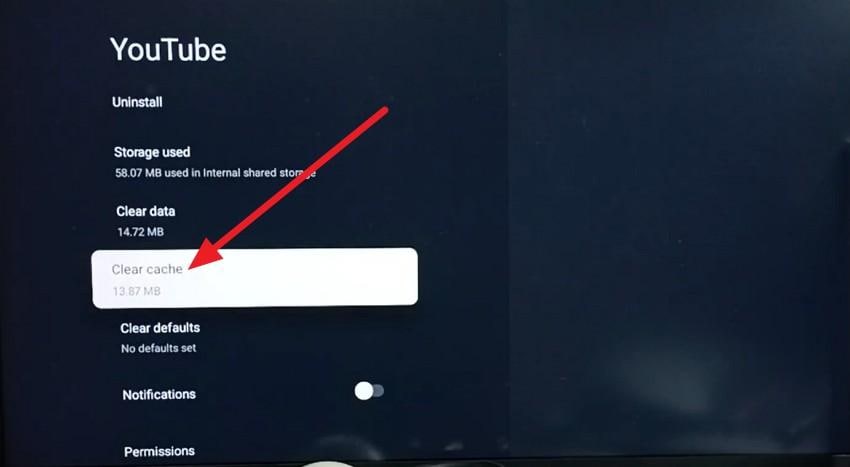
Instructions. On Google TV settings, choose “Apps > See All Apps > YouTube > Clear Cache > OK.”
For Streaming Sticks and Boxes (Chromecast, Fire TV, Roku, Android TV Box)
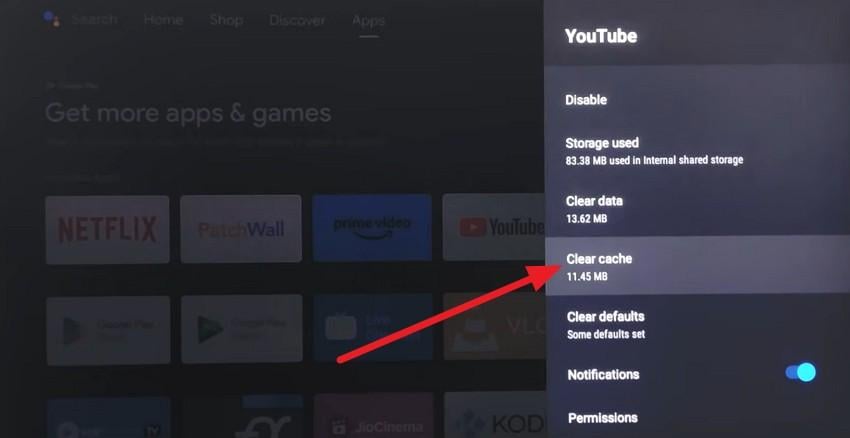
Instructions. Select the YouTube app on Android TV to choose “Info > Scroll Down > Clear Cache > OK.”
Fix 2. Disable Browser Extensions or VPN That Block Video Playback
Temporarily disable your extensions or VPN once you know what YouTube Error Code 4 is. If the video plays normally, re-enable your extensions one by one to find the one causing the problem, as shown:
For Browsers (Chrome, Edge, Firefox, etc.)
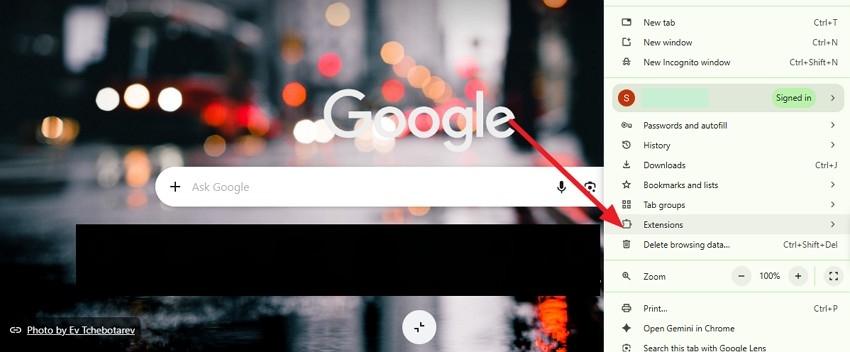
Step 1. In Chrome, click “Three Dots > Extensions > Manage Extensions.”
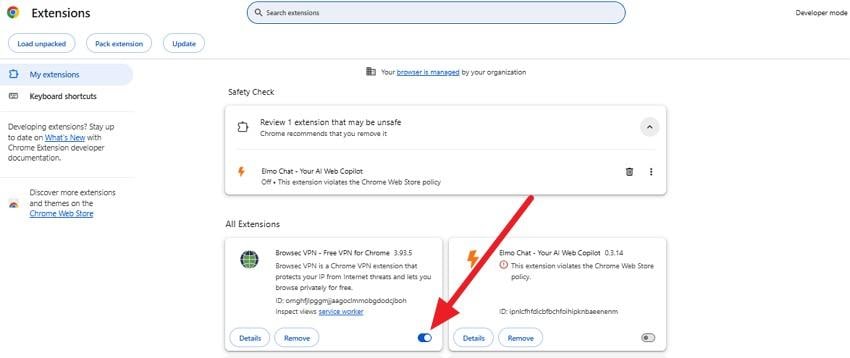
Step 2. Temporarily disable extensions, then play the video. If the video plays without Error 4, re-enable them one at a time.
For Android
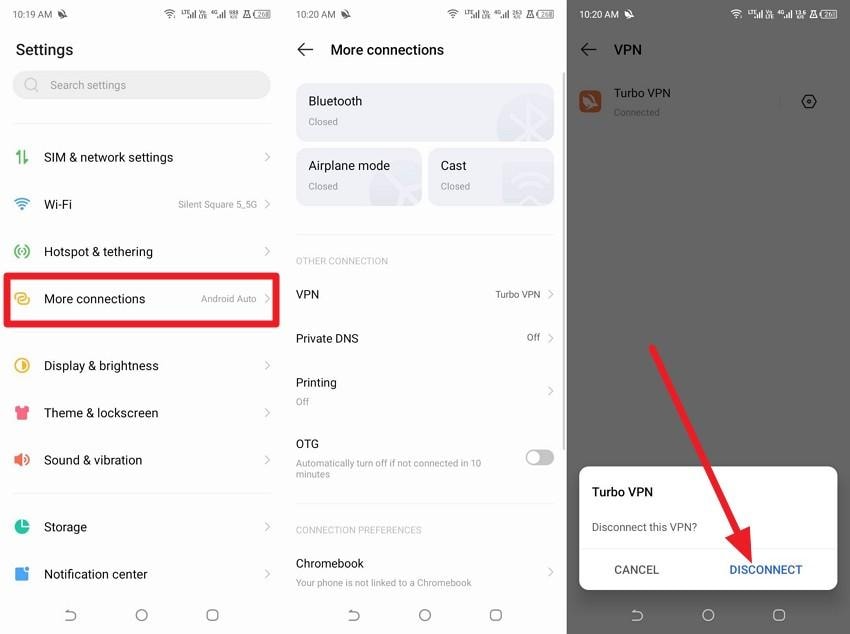
Instructions. Choose “More Connections” in the settings and temporarily “Disconnect” the VPN or custom DNS.
For iPhone
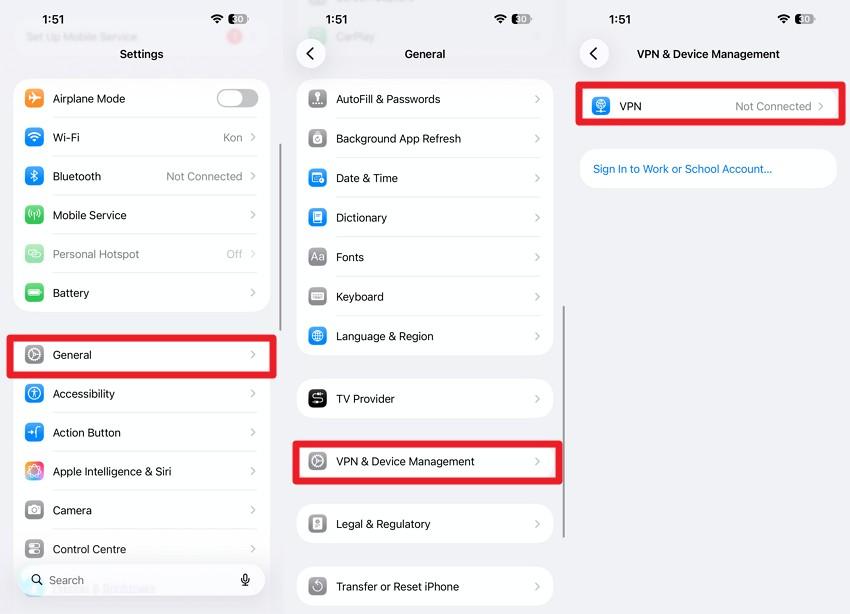
Instructions. Go to “General > VPN & Device Management” > Set the “VPN” option to “Not Connected.”
For Fire TV Stick
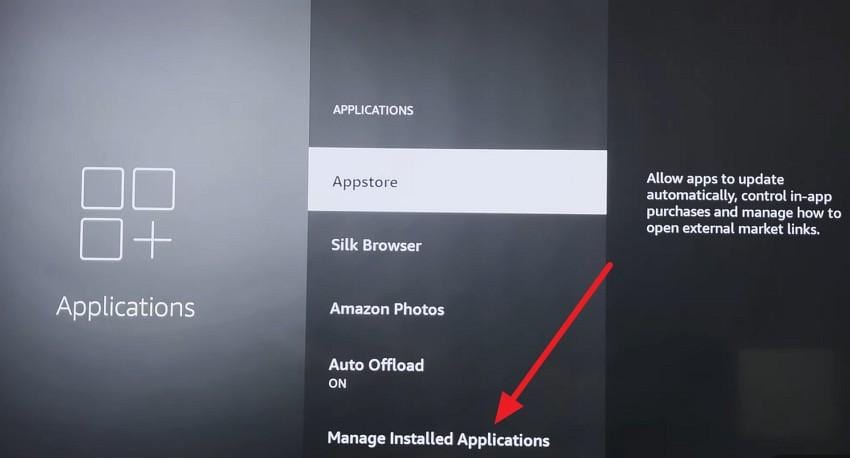
Step 1. Go to “Settings > Applications > Manage Installed Applications.”
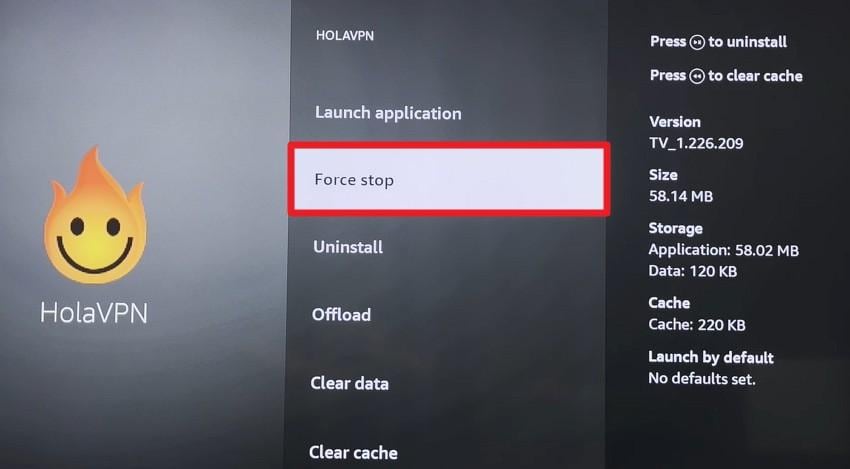
Step 2. Find and select your VPN app > Choose “Force Stop” option or launch the application to disable it.
Fix 3. Update Your Browser, App, or Smart TV Firmware
Check for updates and install the latest version of the browser, app, or smart TV’s firmware to fix known bugs and restore compatibility with YouTube, as illustrated:
For Browsers (Chrome, Edge, Firefox, etc.)
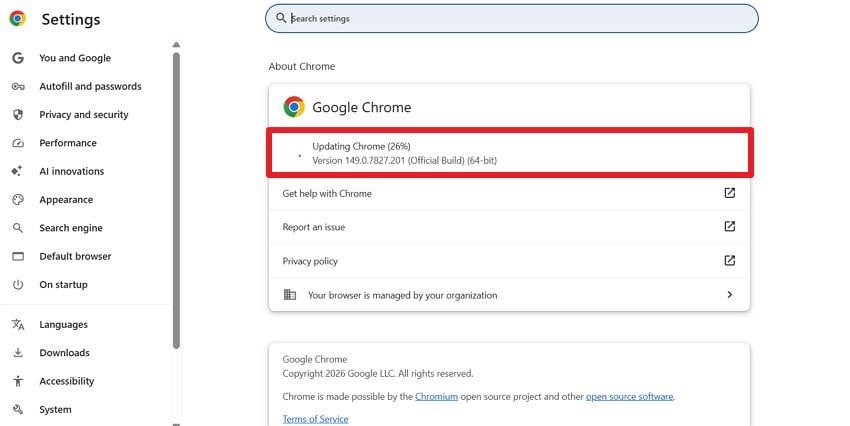
Step 1. Tap on “Three Dots > Help > About Chrome” and the browser will automatically check for updates.
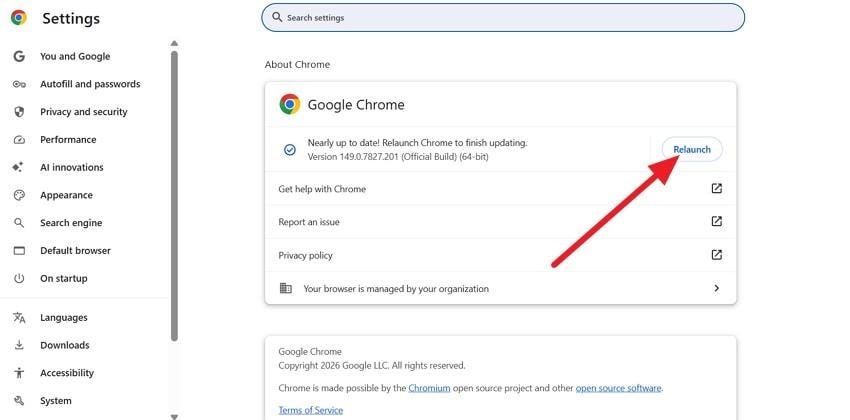
Step 2. As it ends, choose “Relaunch” to apply the update and see if the “This Video is Unavailable Error 4” error remains.
For Android
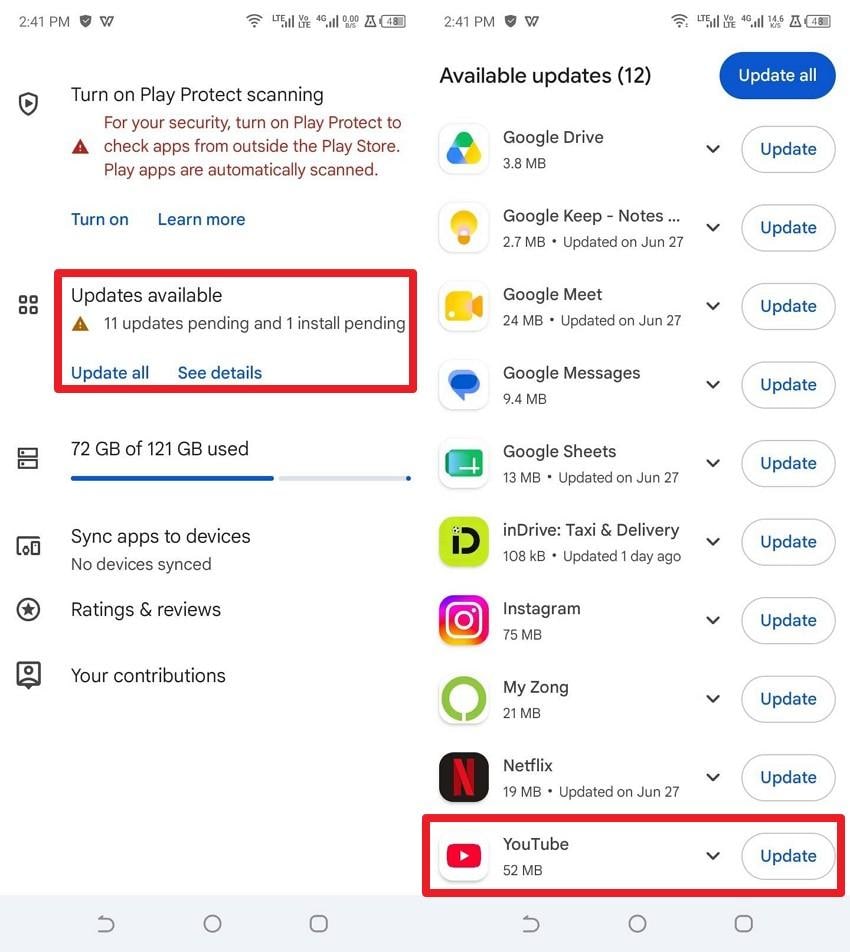
Instructions. In the Google Play Store, choose “Manage Apps & Device > Updates Available > YouTube > Update.”
For iPhone
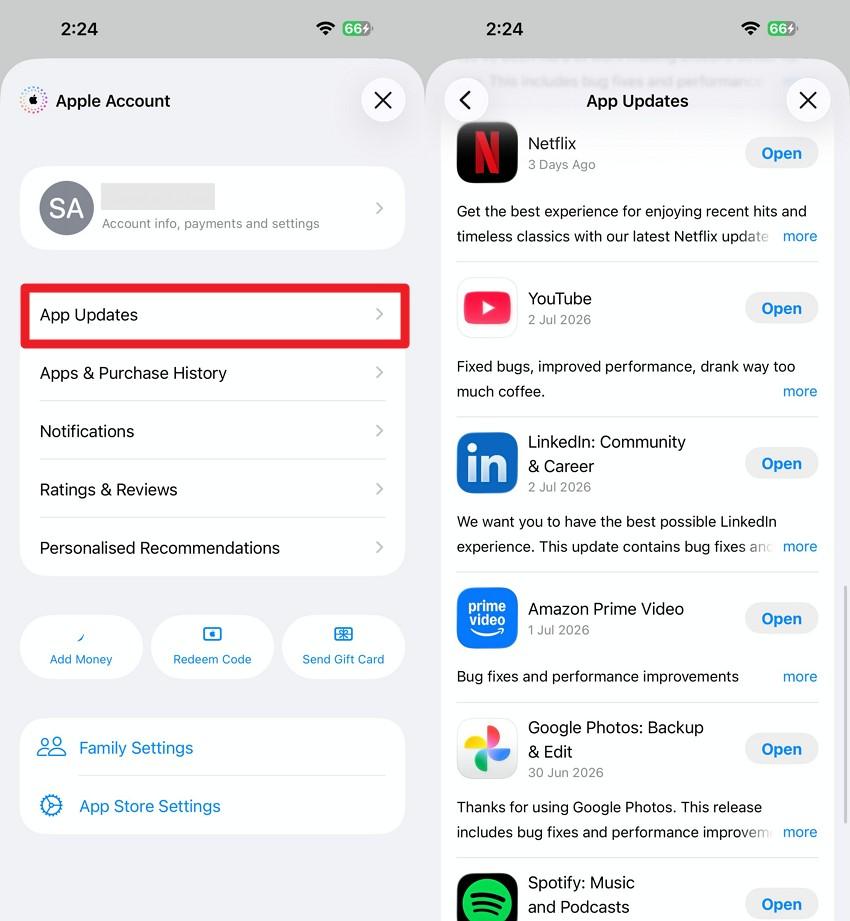
Instructions. Tap the “Profile” icon in the App Store and access “App Updates > YouTube > Update” if available.
For Smart TVs
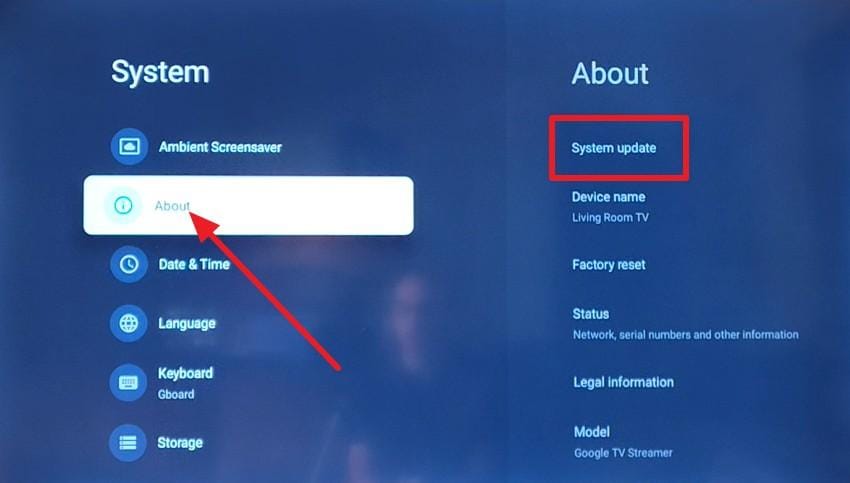
Instructions. Go to “Settings > System > About > System Update > Check for Updates” on Google TV to update.
For Streaming Sticks and Boxes (Chromecast, Fire TV, Roku, Android TV Box)
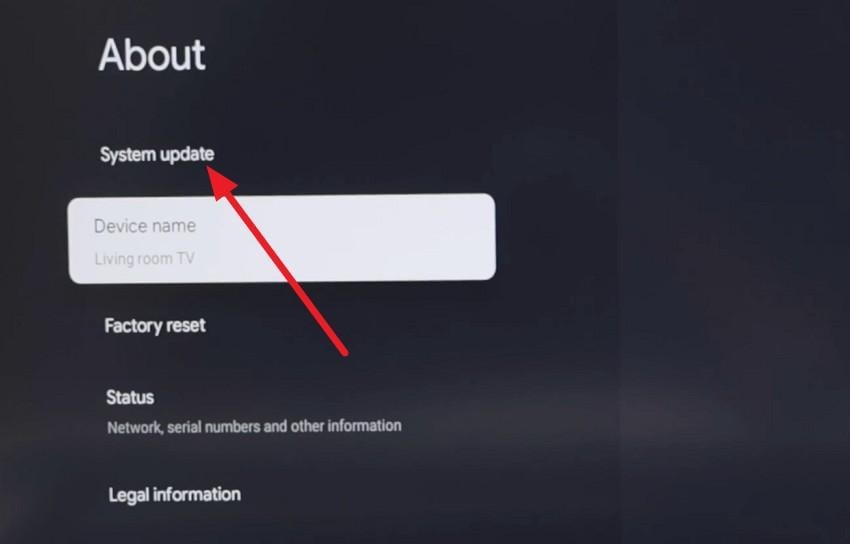
Instructions. On Chromecast, choose “Settings > System > About > System Updates > Check For Updates” to fix the YouTube Error Code 4.
Fix 4. Switch DNS Servers To Fix Network Connectivity
When the error is because of a network issue, use a reliable DNS service. This can improve connection stability and restore YouTube playback, as guided:
For Browsers (Chrome, Edge, Firefox, etc.)
Step 1. In Chrome Settings, access “Privacy and Security > Security.”
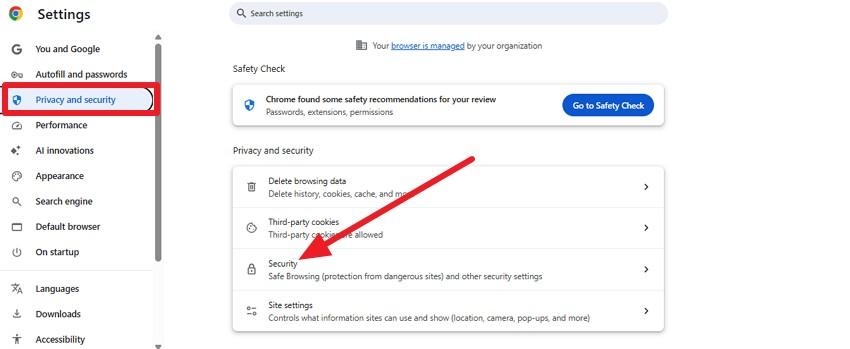
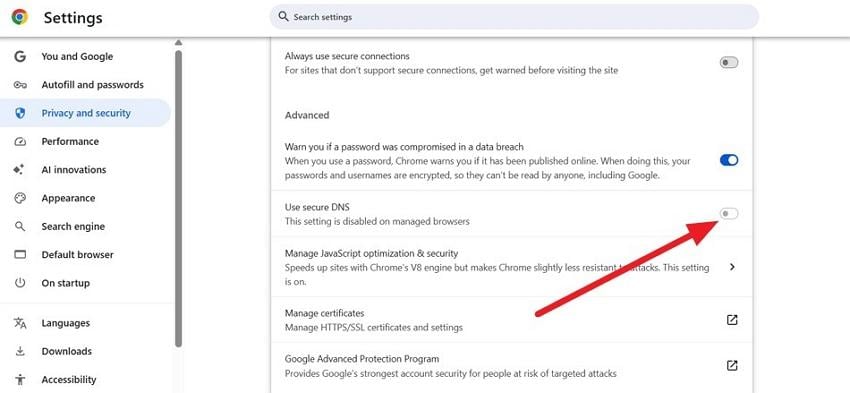
Step 2. Enable “Use Secure DNS,” then select a provider and choose a DNS server. Once added, close the settings tab and reload YouTube to test the same video.
For Mobile App (Android and iPhone)
Note: Changing the DNS settings on your device or network affects all apps, including YouTube.
For Android
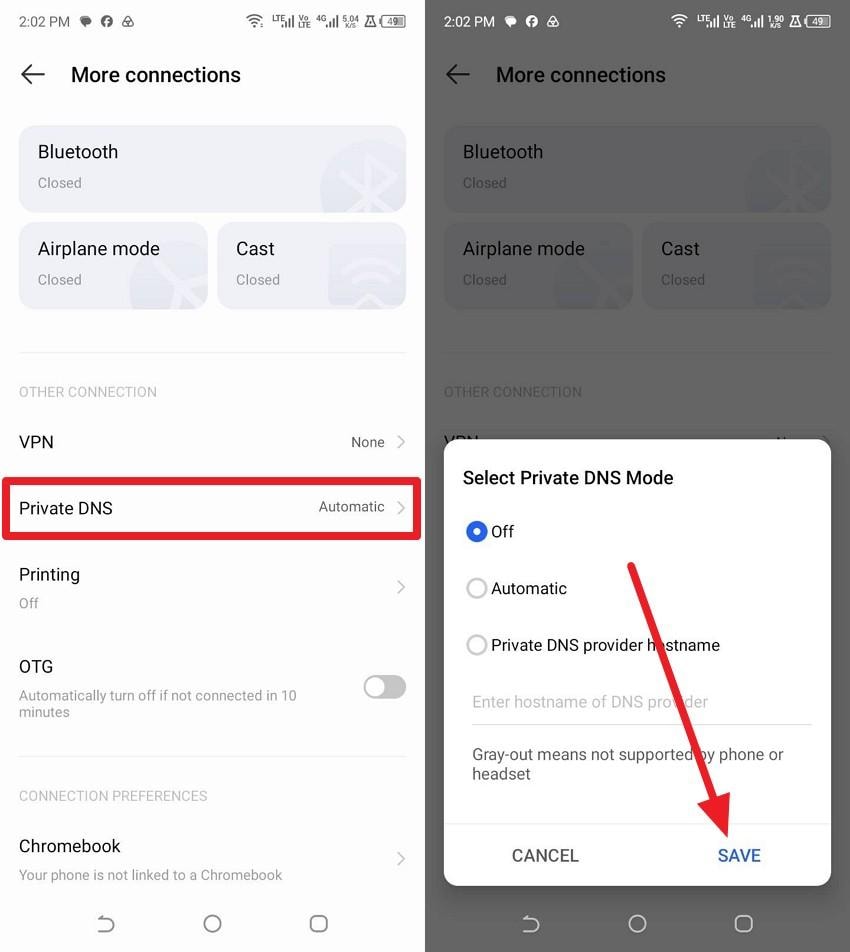
Instructions. In “More Connections” settings, go to “Private DNS > Private DNS Provider Hostname,” enter the preferred hostname, tap “Save,” and check if the YouTube video plays correctly.
For iPhone
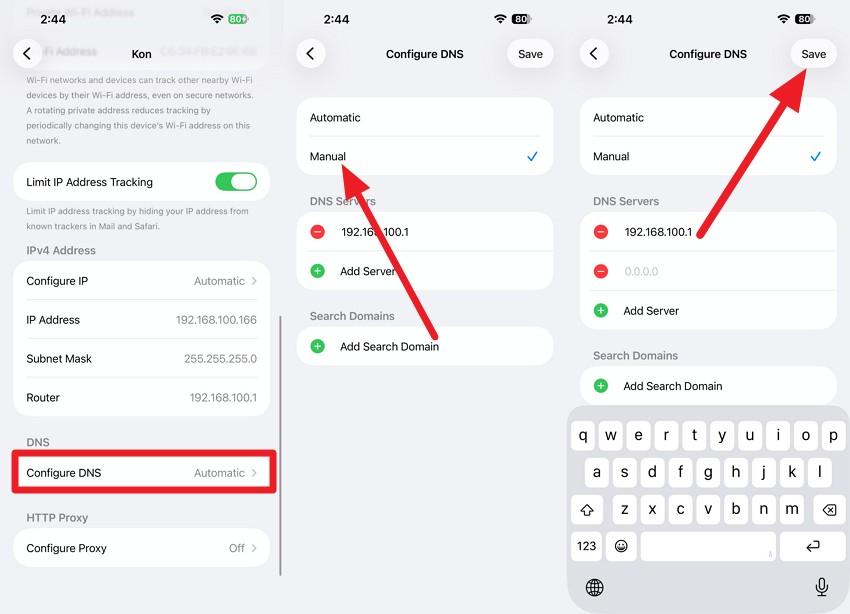
Instructions. Go to Wi-Fi Settings, tap “i” next to your connected network, then select “Configure DNS > Manual > Add Server” and tap “Save” to apply the changes.
For Smart TVs (YouTube App on TV OS)
Step 1. From Samsung Smart TV settings, access “General > Network” to change the DNS settings.
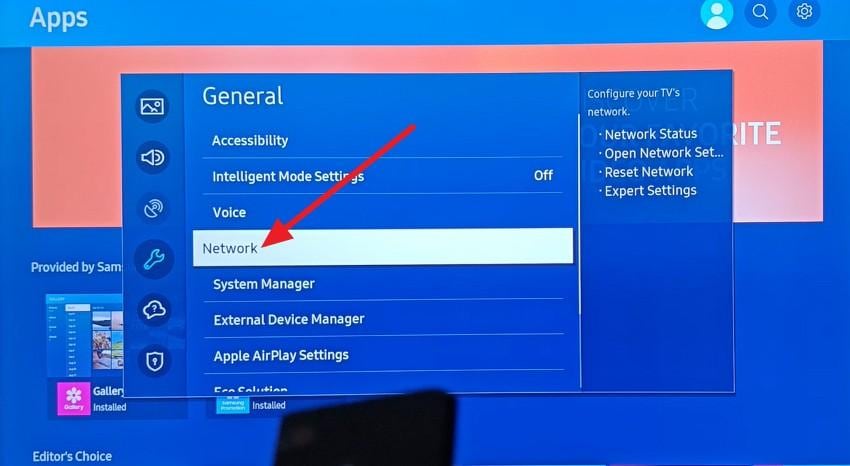
Step 2. Under “Network Status,” choose “IP Settings > DNS Settings” > “Enter public DNS Servers” > Press “OK.”
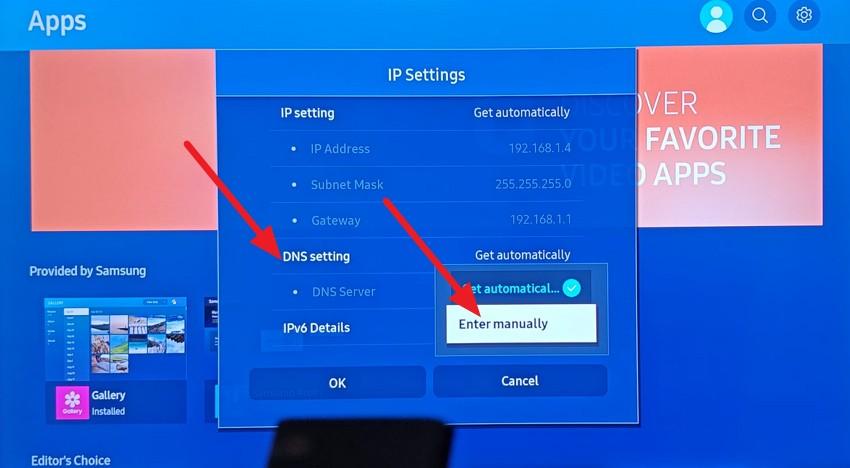
For Streaming Sticks and Boxes (Chromecast, Fire TV, Roku, Android TV Box)
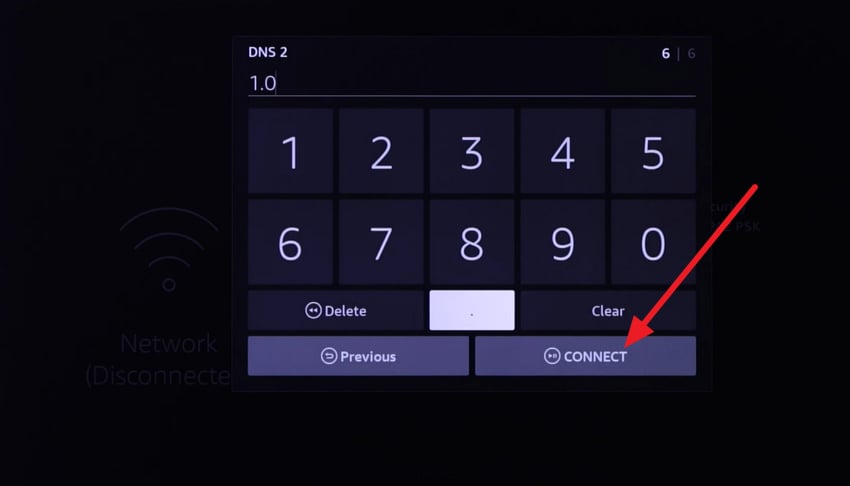
Step 1. On Fire TV, go to “Network” settings > Forget the Wi-Fi passcode > Again add the passcode to the forgotten Wi-Fi and press “Advanced.”
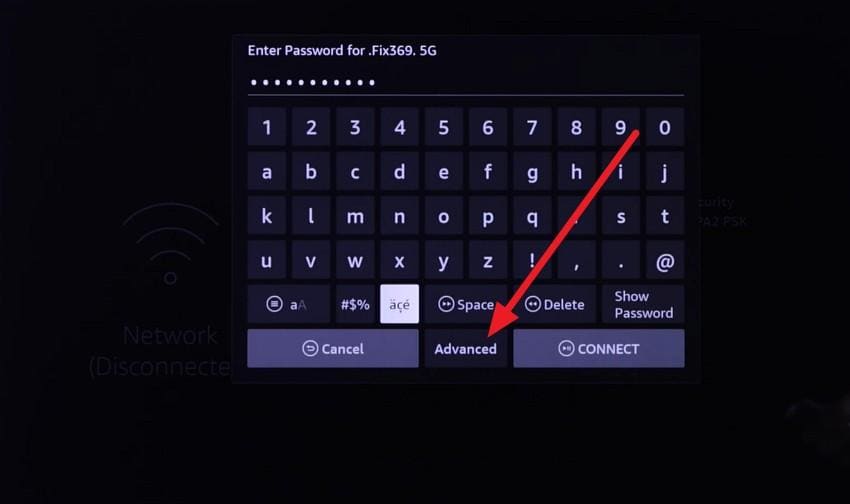
Step 2. Add the IP Address > “Next” > Add the same “Gateway” address > Input “Enter Network Prefix Length” > “Next.”
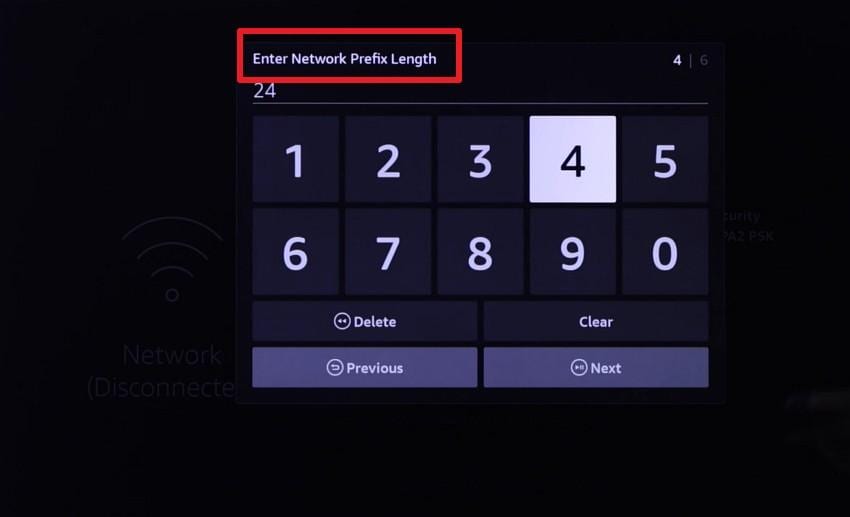
Step 3. Add DNS1 (1.1.1.1), select “Next,” then enter DNS2 (1.0.0.1). Press the “Play/Pause” button on the remote to connect, then open Network Status to verify that the DNS settings have been updated.
Fix 5. Reset Network Settings on Your Device
This restores your Wi-Fi, mobile data, DNS, VPN, and proxy settings to their default values to remove hidden network problems, as shown:
For Windows
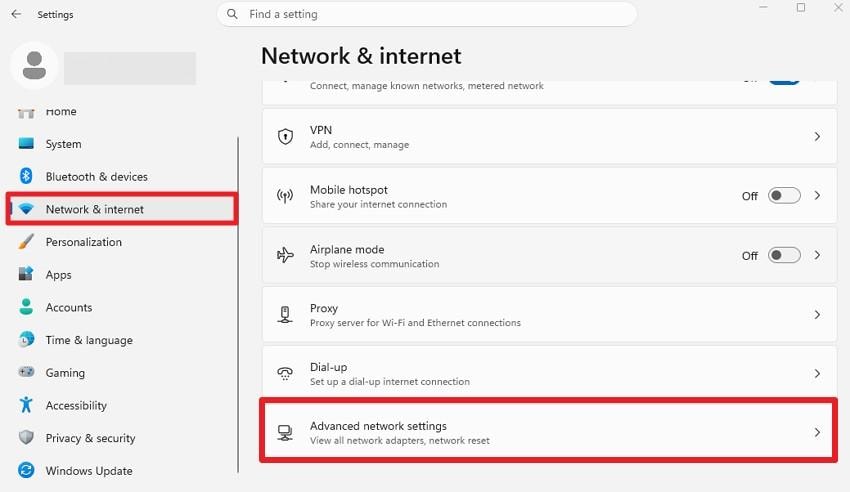
Step 1. In “Settings,” go to the "Network & Internet" tab and choose “Advanced Network Settings.”
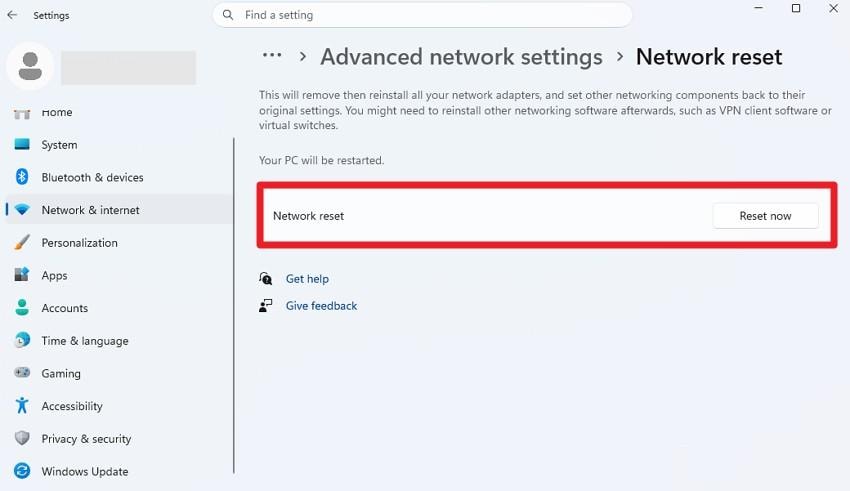
Step 2. Pick the “Network Reset” option and click on “Reset Now” to continue.
For Mac
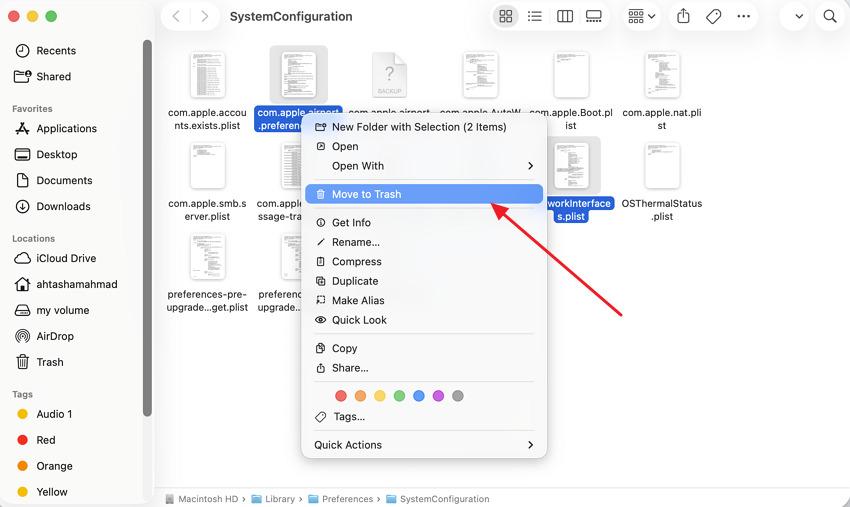
Step 1. Tap on the “Wi-Fi” icon, turn off Wi-Fi, and select “Go > Go to Folder.”
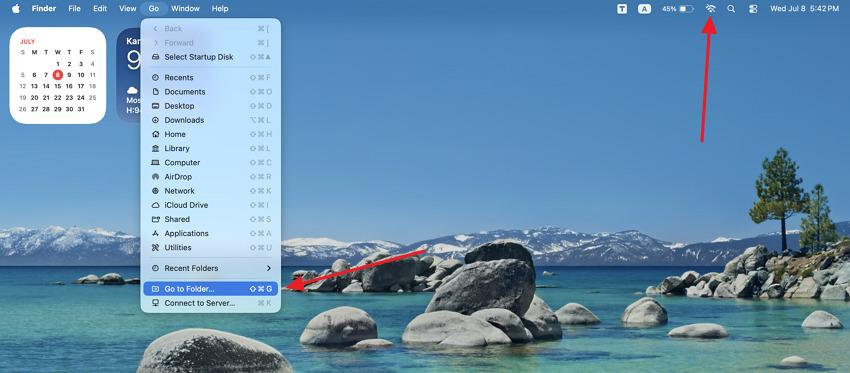
Step 2. Type “/Library/Preferences/SystemConfiguration/” in the pop-up and press the "Enter.” key. Choose the following files depending on the macOS:
- com.apple.airport.preferences.plist
- com.apple.network.identification.plist
- com.apple.network.eapolclient/configuration.plist
- com.apple.wifi.message-tracer.plist
- NetworkInterfaces.plist
- preferences.plist
Press “Command + Click” to choose files, then press “Control + Click” to select “Move to Trash.” Confirm the deletion, restart the Mac, and enable Wi-Fi. The deleted files will automatically regenerate to fix your network settings.
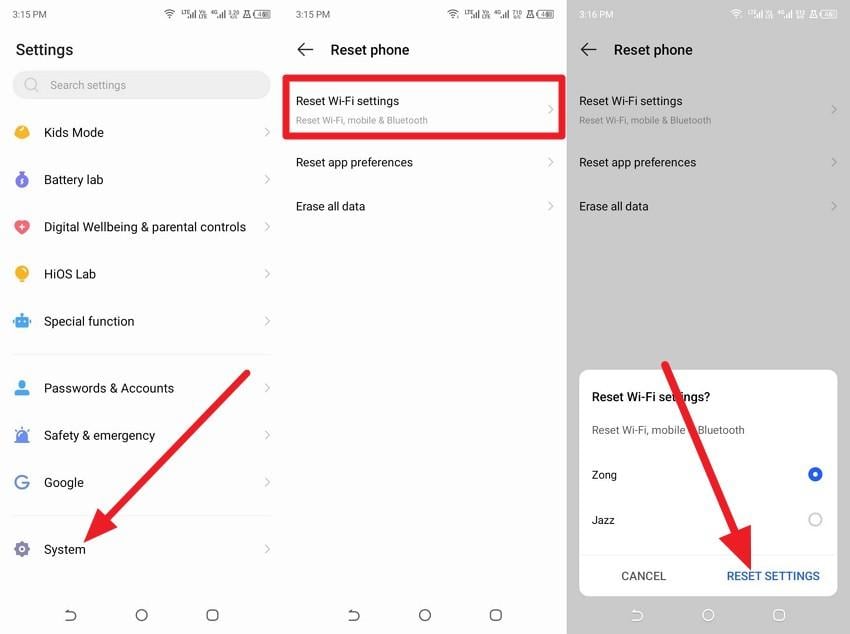
For Android
Instructions. In the System settings, choose “Reset Phone > Reset Wi‑Fi Settings > Reset Settings.”
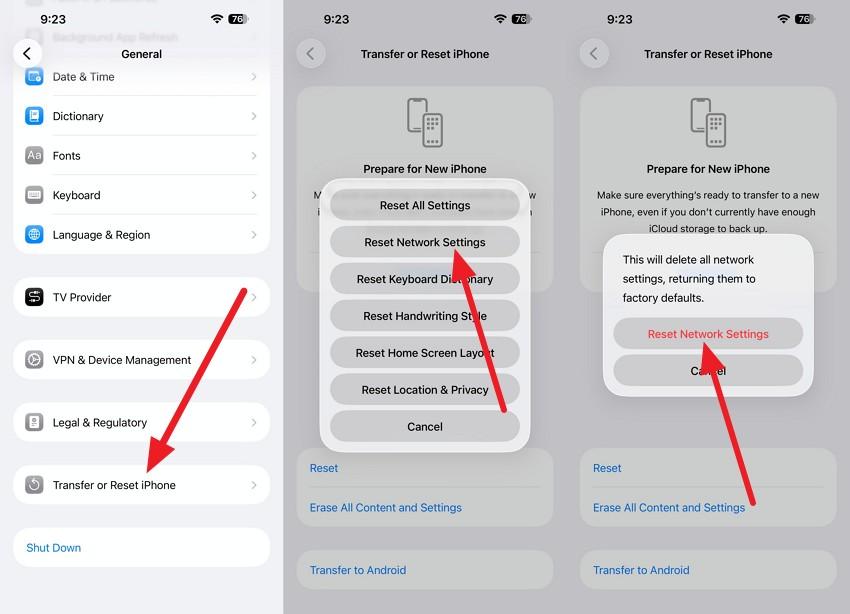
For iPhone
Instructions. Go to “General > Transfer or Reset iPhone > Reset > Reset Network Settings > Add Passcode > Reset Network Settings.”
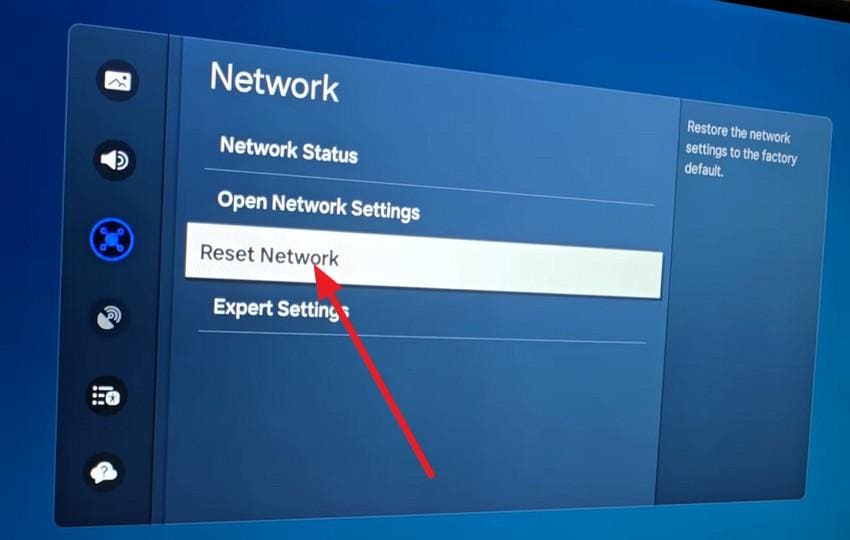
For Smart TVs (YouTube App on TV OS)
Instructions. On a Samsung TV, choose “Settings > All Settings > Connection > Network > Reset Network,” then select “Reset” to confirm.
For Streaming Sticks and Boxes (Chromecast, Fire TV, Roku, Android TV Box)
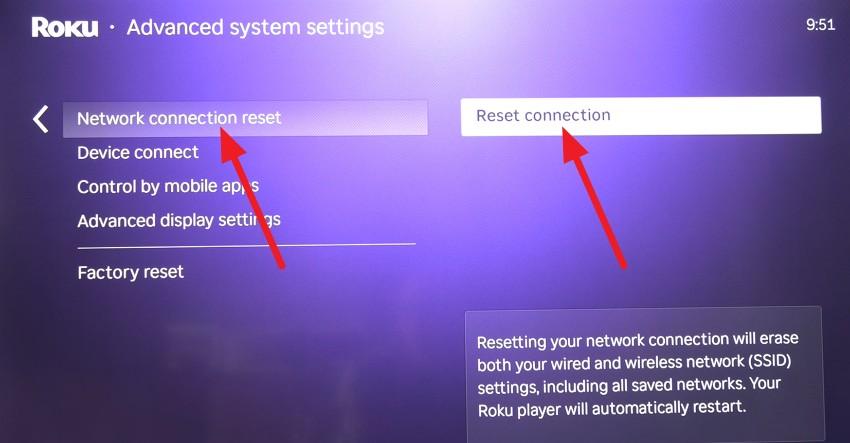
Instructions. In the Roku settings, select “System > Advanced System Settings > Network Connection Reset > Reset Connection. “
Fix 6. Try an Incognito or Private Browsing Window
To learn how to fix YouTube Error Code 4, this solution starts a fresh browser session without most extensions or cache data. If the video works in Incognito mode via the mentioned steps, the issue is likely a browser extension or cache files:
For Browsers (Chrome, Edge, Firefox, etc.)
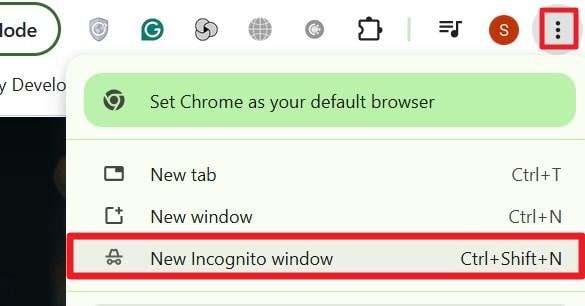
Option 1: Tap the “Three Dots” icon, then choose “New Incognito Window,” and play the YouTube video to see if the Error 4 remains.
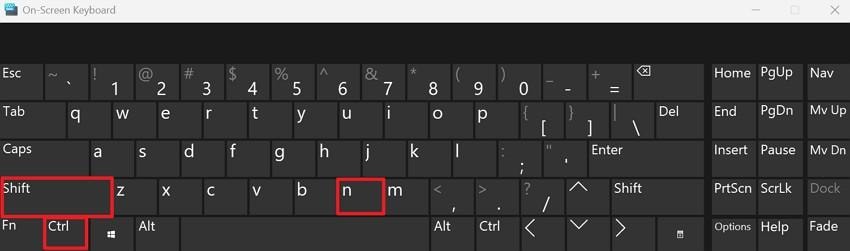
Option 2: You can also press “Ctrl + Shift + N” on Windows and “Command + Shift + N” on Mac to open a new incognito window and play the YouTube video.
Fix 7. Contact the Platform's Support if the Issue Persists
As a last resort, contact YouTube Support or visit the YouTube Help Center to fix “This Video is Unavailable Error 4.” They can check the account specifically, compatibility, regional outages, and known bugs and issues.
Pro Tip. Repair Damaged YouTube Downloaded Files Instantly with Repairit
In addition to the YouTube Error Code 4, you might sometimes see “Playback error” or similar errors. This can happen to downloaded or saved YouTube videos on your device that have become corrupted or damaged. Here, you can use Repairit, which supports multiple video formats and handles various corruption scenarios. The tool uses AI repair technology, and you can repair formats like MP4, MOV, etc.
Furthermore, you can use Standard and Advanced Repair Modes to fix severely corrupted videos. The repair process addresses issues like header corruption, flickering, choppy playback, and other playback errors in just 3 simple steps. You can also add videos from various sources, including computers, phones, cameras, and drones.
Key Features
- Online + Desktop: You can repair any corrupted video either on the online or the desktop tool, which makes Repairit versatile.
- Professional Mode Video Repair: For RAW formats, HDR/LOG footage, or advanced video codecs, you can use this mode to preserve the original encoding.
- AI Video Enhancement: If the YouTube download or any other video is blurry, use this feature to unblur and colorize the video with AI.
How to Fix Corrupted YouTube Downloads with Repairit
After learning how to fix YouTube Error Code 4, follow the guide below to repair corrupted YouTube downloads:
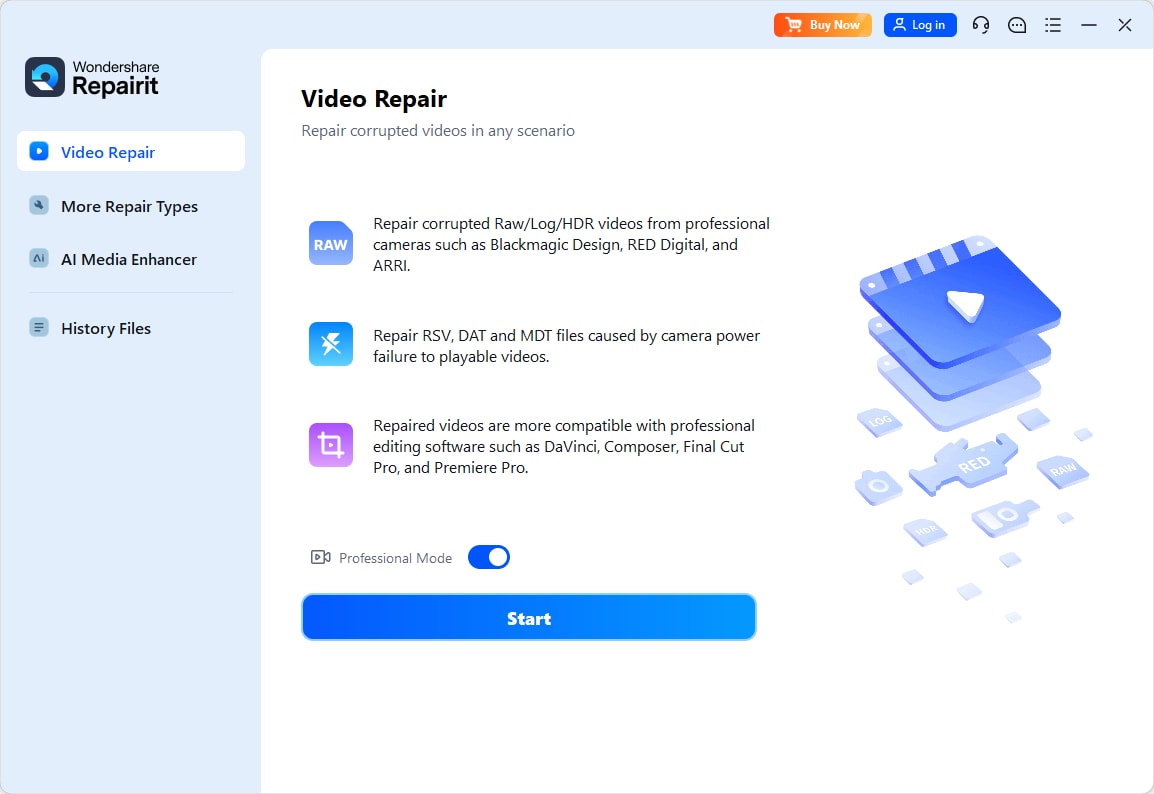
Step 1. Access Video Repair on Repairit
Tap “Start” in the “Video Repair” tool, then add the corrupted YouTube downloads.
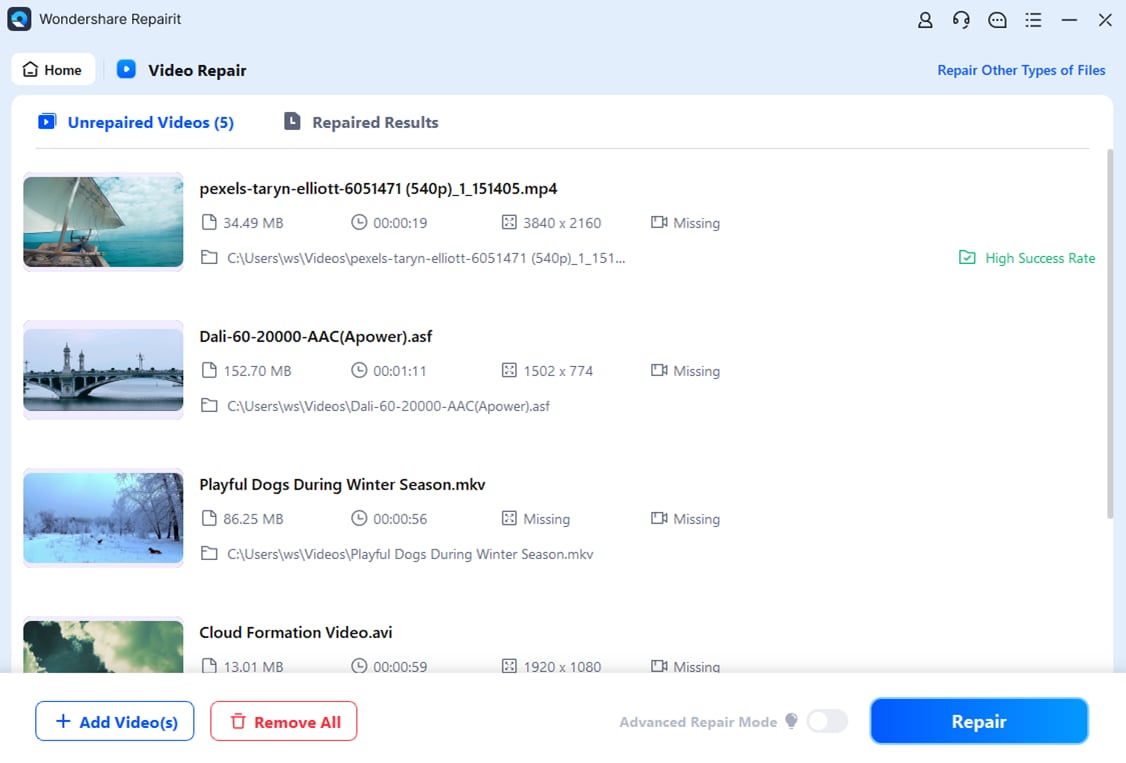
Step 2. Add YouTube Videos to Start Repair
Press the “+Add Files(s)” and choose “Repair” to start the scan in Standard Mode.
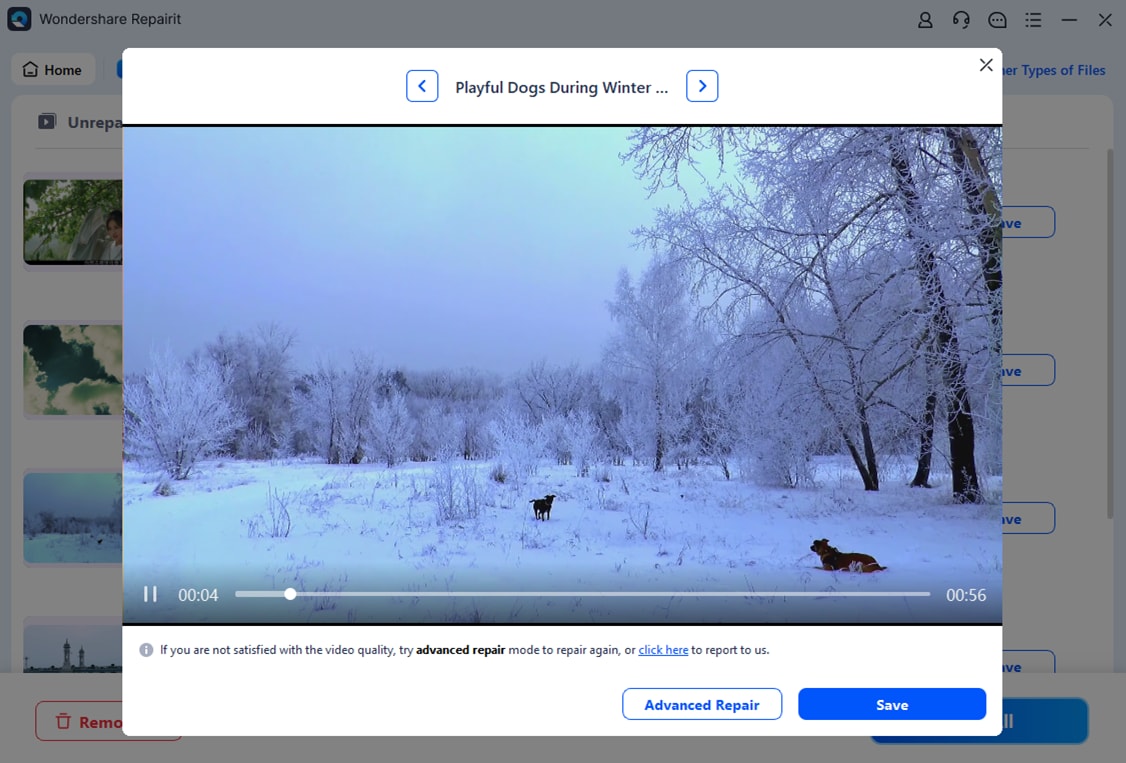
Step 3. Save YouTube Videos or Use Advanced Repair
Preview and press “Save” or “Advanced Repair” if the corruption persists.
Conclusion
This guide has explained how to fix “This Video is Unavailable Error 4" on the YouTube app, browser, Smart TV, or streaming devices. If you encounter any other relevant errors due to a corrupted video, it is recommended to use Repairit. It can help repair damaged video files and restore smooth playback when standard troubleshooting methods fail.
FAQ
-
Does verifying game files delete my saved progress?
No, verifying game files only checks and repairs core game data. Your saved progress and settings remain completely untouched during this process. This method only replaces missing or corrupted files, not personal saves. -
Should I disable my antivirus before reinstalling the game?
Temporarily disabling antivirus during installation can prevent unnecessary file interference issues. This allows the installer to write files without any security blocks. Yet, remember to enable your antivirus again after the installation finishes. -
Does reinstalling the game delete my saved files too?
Reinstalling typically only removes core game files, not your cloud saves. However, local saves stored outside cloud sync may get deleted. If files go missing, tools like Recoverit may help restore your lost data. -
Does using a wired connection help prevent the black screen issue?
Yes, unstable internet connections can worsen server-related black screen problems. When you use a wired connection, it provides more stable connectivity than wireless networks. This reduces connection drops that sometimes trigger black screen freezes.