
What if you open your PC to adjust graphics settings, but the NVIDIA app won't load? The screen stays blank, or the app closes without warning. You try again, but nothing changes, so know that this problem can stop you from updating drivers, changing display options, or optimizing games. It can feel confusing, especially when your system worked fine before.
Many users face this issue after updates or system changes, but most of the causes are simple. Therefore, this guide explains clear steps to fix the "There was a problem with NVIDIA app" issue and restore full control of your PC.
Table of Contents
Part 1. Why "There Was a Problem with NVIDIA App" Happens
There was a problem with the NVIDIA App, which is a common start error from NVIDIA's new app, which replaces GeForce Experience and parts of the Control Panel. It means the app couldn't start or load a required service, not that your GPU is damaged.
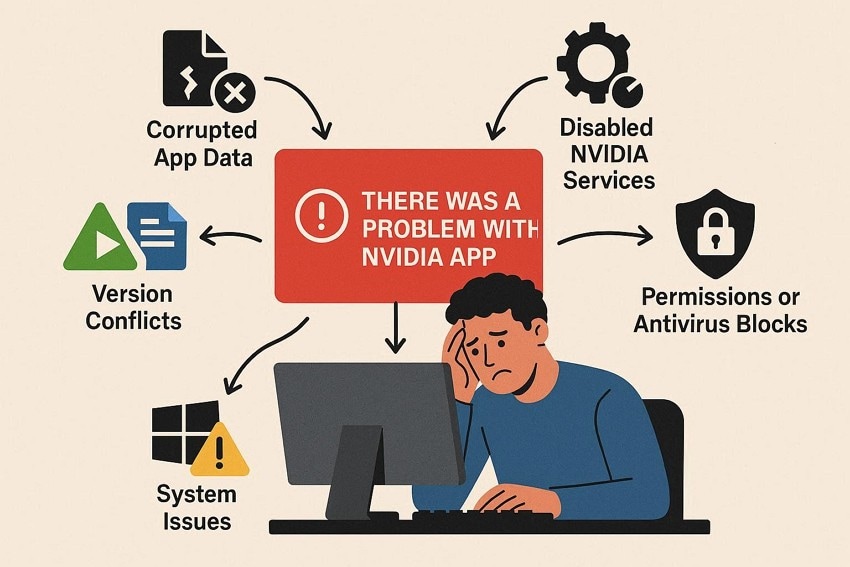
Having the basics cleared, adhere to the 5 main causes mentioned below behind this issue:
- Corrupted NVIDIA App Files or Cache: Broken update files or damaged cache data can block proper app startup. As a result, the app shows an error instead of opening normally.
- Disabled or Broken NVIDIA Services: There is a chance that required NVIDIA background services are stopped or disabled in Windows. Therefore, the app cannot connect to the driver and fails, causing the "There was a problem with NVIDIA app" issue.
- Driver or App Version Conflicts: The display driver and NVIDIA App version may not match correctly. Hence, due to this mismatch, the app may crash or refuse to load.
- Windows Permissions or Security Interference: This issue occurs when the app lacks admin rights or proper system permissions. In addition, antivirus or firewall software may block components and cause this issue.
- Underlying Windows System Issues: Know that corrupted system files or pending updates can disrupt app startup. As a result, the NVIDIA App fails even if the GPU works, leading to an app issue.
Part 2. Recognizing "There Was a Problem with NVIDIA App" Errors - 5 Signs
To further know how you can indicate the "There was a problem with NVIDIA app" issue, look for the 5 listed signs:
| Signs | What You Notice |
| Pop-up Error Message | A window shows "There was a problem with NVIDIA app," then the app closes. |
| The Window Flashes, Then Closes | The app briefly appears, then disappears; Task Manager shows it stops immediately. |
| The App Will Not Open | Drivers are installed, and the GPU shows in Device Manager, but the app still does not open. |
| Error After Update | The issue starts right after a driver or NVIDIA app update. |
| Crashes Inside the App | The app freezes during features, shows the error, then closes again. |
Part 3. NVIDIA App Not Working? Try These Top 7 Solutions
For users who seek to fix the "There was a problem with NVIDIA app" issue, 7 practical solutions are explained below:
Fix 1: Restart NVIDIA Services
Know that the app needs background services to start, connect to the driver, and show its interface. If the services are stopped, stuck, or set wrong, the app often fails with that message. So, it's suggested to start services like NVIDIA Display Container LS and set them to Automatic to restore the required backend. Thus, once done via these steps, this will clear hung or crashed services and avoid unnecessary reinstallations:
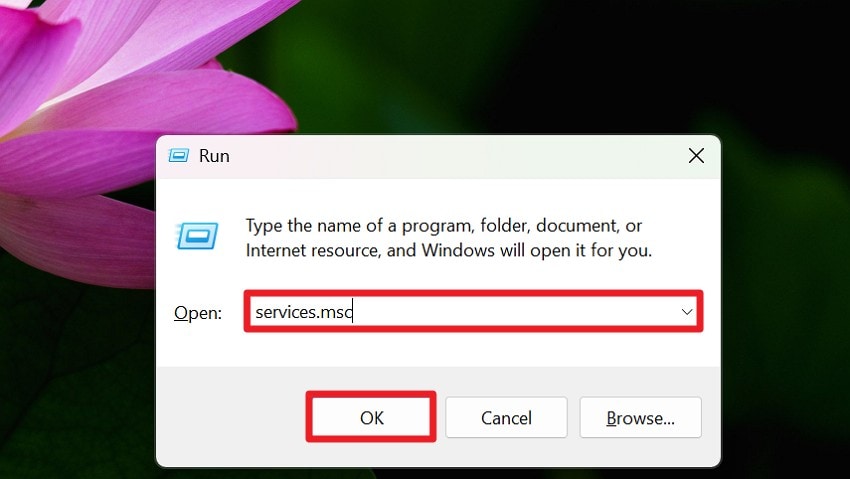
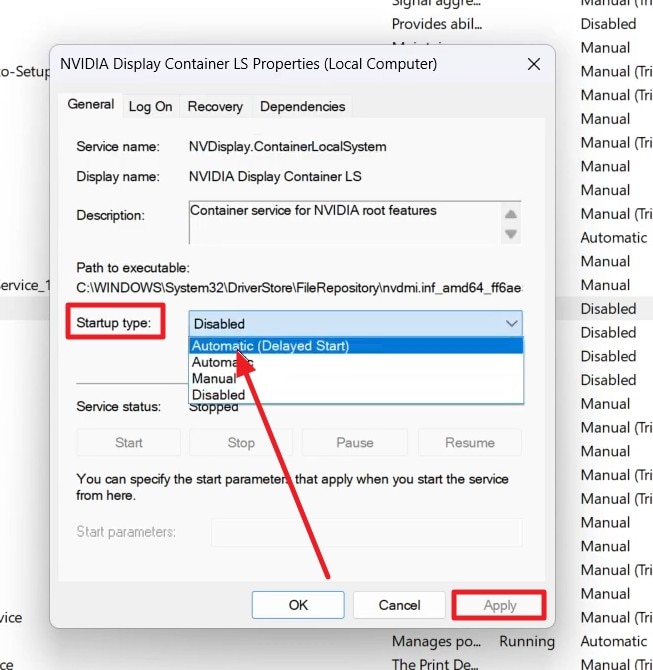
Step 1. Press "Win + R," type "services.msc" in the textbox, and press the "OK" button to access the "Services" window.
Step 2. There, locate the "NVIDIA Display Container LS, NVIDIA LocalSystem Container, NVIDIA NetworkService Container."
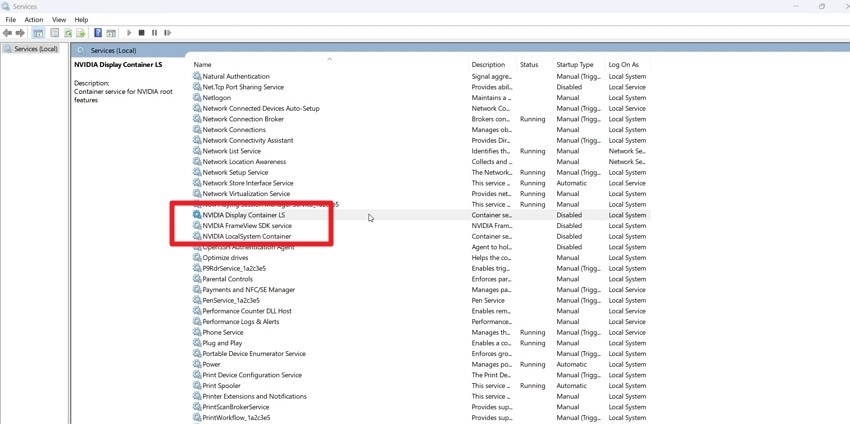
Step 3. Double-tap on each one and pick the "Startup Type" menu to set it to "Automatic (Delayed Start)." After that, press the "Apply" button and save the changes.
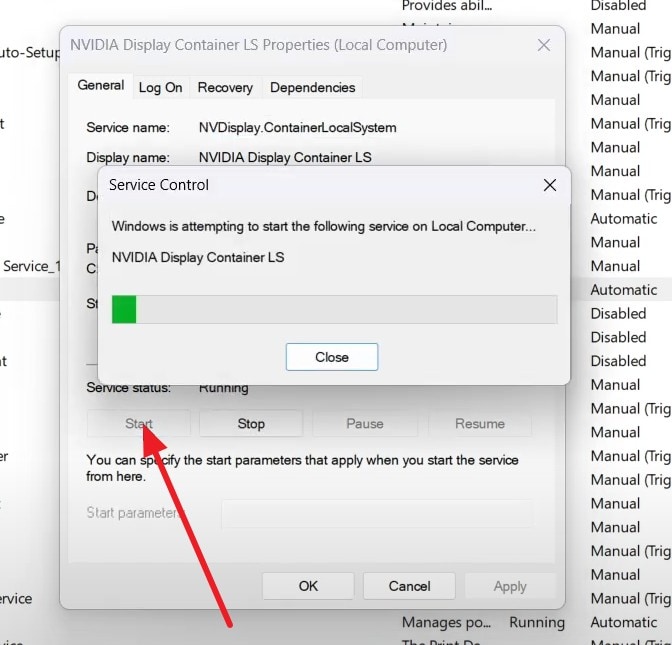
Step 4. If the "Start" button is highlighted in the same window, tap it to restart the service.
Fix 2: Run the NVIDIA App as an Administrator
It also fixes "There was a problem with NVIDIA app" because it gives full access to system files, services, and registry keys that normal user rights may block. Admin rights let the app access its config files, cache, and driver settings without issues. Furthermore, it helps when Windows blocks access to GPU settings or NVIDIA services. So, here is how you can perform this action in a few simple clicks:
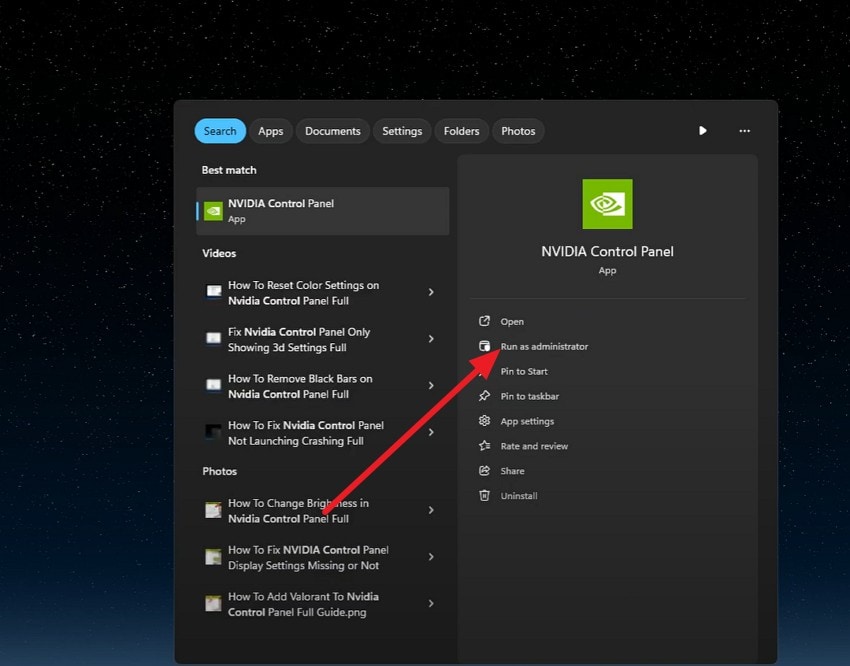
Instructions: Search for "NVIDIA" in the Start menu and press the "Run As Administrator" option. After that, press "Yes" on the pop-up that appears to confirm the action.
Fix 3: Update NVIDIA Drivers and Windows
You can also try to update NVIDIA drivers and Windows to resolve the "There was a problem with the NVIDIA app" issue. This is important because the NVIDIA App needs a compatible driver and a fully current system to work with the GPU. Thus, a current driver removes version mismatch issues where the app fails to see the driver at all. Whereas the Windows updates add system and graphics fixes, once updated via the mentioned ways:
Update NVIDIA Driver (Manually from NVIDIA’s Website)
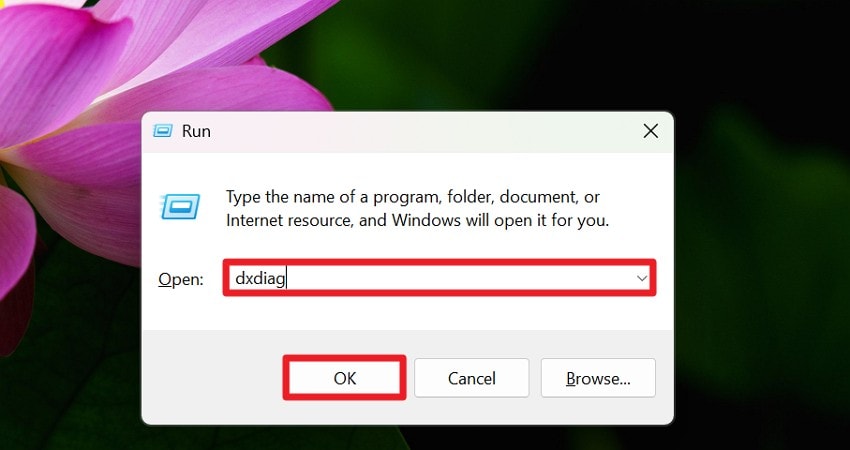
Step 1. Press "Win + R," type "dxdiag" in the textbox, and press the "Ok" button. After that, press "Yes" in the pop-up that appears and go to the "Display" tab to check and note the GPU model.
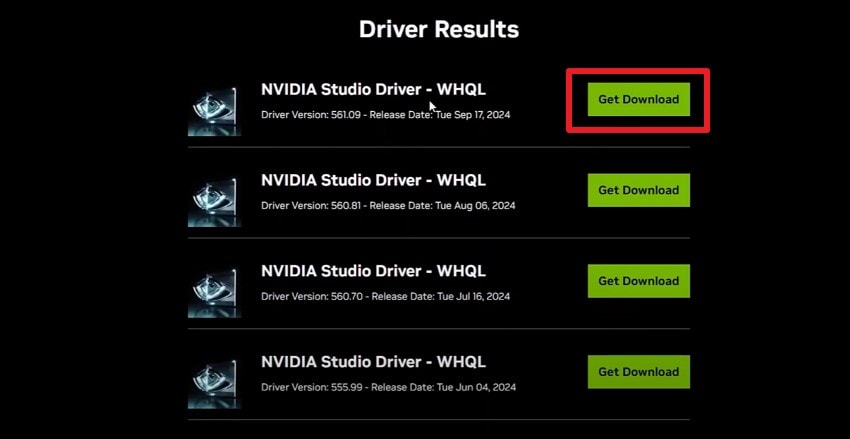
Step 2. Now search for the "NVIDIA Driver Download" page on the PC and locate the "GeForce Drivers" section. Scroll down to the "Manual Driver Search" section and choose "GPU Series, Model, Windows Version (10/11), and Language" details and press the "Start Search" button.

Step 3. As you get the "Driver Results," choose one and press the "Get Download" button. Fill in the details in the new interface and save the ".exe" file directly to the desktop. After that, choose "Express Installation" and when it ends, restart the PC.
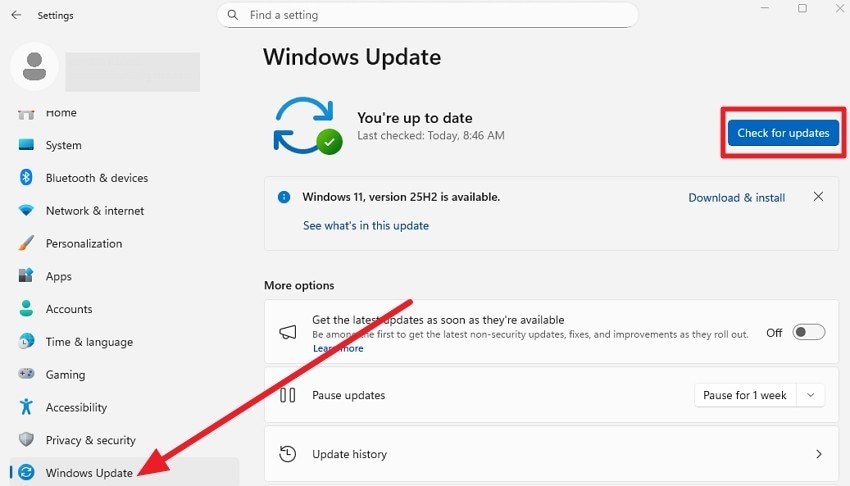
Update Windows
Instructions: As you go to the "Windows Update" section in settings, press the "Check for Updates" button. This will let you install all important and recommended updates, and restart the PC when prompted.
Fix 4: Repair NVIDIA GeForce Experience
For the "There was a problem with NVIDIA app" issue, try to repair the NVIDIA GeForce Experience. If shared files are damaged, a repair replaces missing or broken components that block launch. In addition, it restores NVIDIA background services such as Display Container and Telemetry, which the app needs to detect your GPU. Furthermore, repair clears old config files and cache that may clash with the new app, as guided:
Step 1. In the "Apps and Features" setting, locate the "NVIDIA GeForce Experience" and pick the "Uninstall" button. When the pop-up menu appears, click the "Uninstall" button again and restart the PC when it completes.

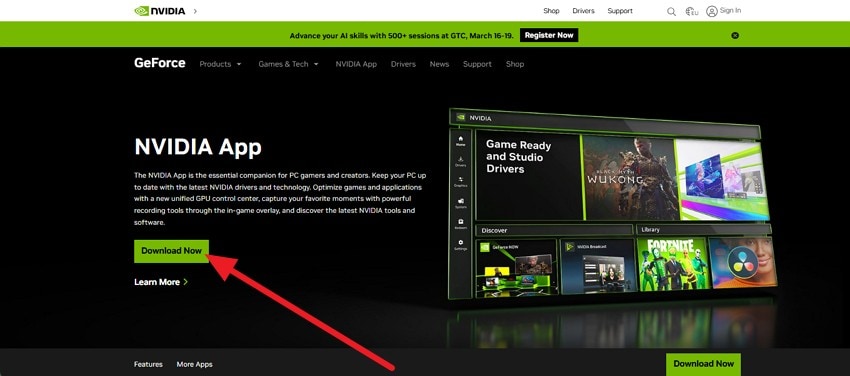
Step 2. Now, search for "GeForce Experience Download" in the browser and press the "Download Now" button to get the latest installer. When it ends, go to the "GeForceExperience.exe" folder, run it as administrator, accept the license terms, and continue. After the installation finishes, open GeForce Experience and sign in if it asks.
Note: Restart your PC, then open the NVIDIA App as an admin. If the error stays, remove all NVIDIA software, restart, and install the latest version from the official site.
Fix 5: Run System File Checker and DISM
Run System File Checker (SFC) and DISM to fix the "There was a problem with NVIDIA app." They repair damaged Windows system files that the NVIDIA App needs to work. SFC scans protected system files and replaces bad copies with correct ones. Alternatively, if more serious damage exists in the Windows image, DISM repairs the component store so SFC can complete its job, as illustrated below in detail:
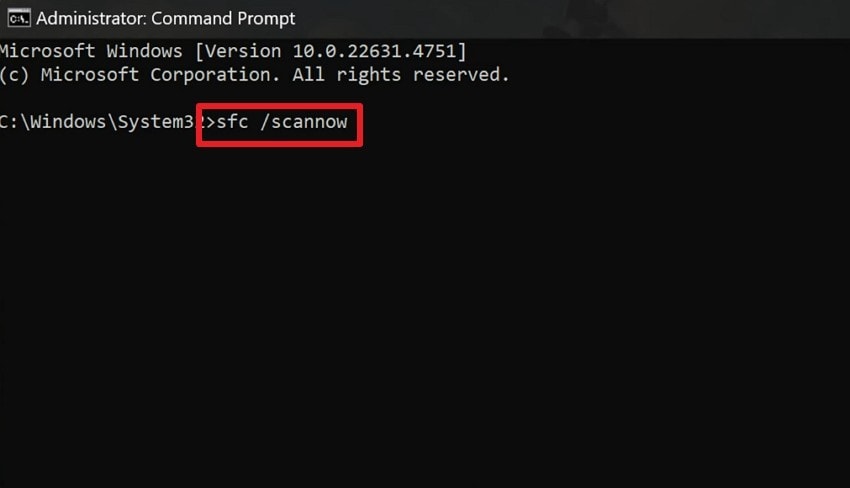
Step 1. Run Command Prompt as administrator, press "Yes" when prompted, type the command "dism /online /cleanup-image /restorehealth," and press "Enter."

Step 2. When the command ends, restart the PC, relaunch the Command Prompt as administrator, and type "sfc /scannow." After that, press the "Enter" key and wait until it reaches 100% and says it found and repaired files. Then, restart the PC and access the NVIDIA App to see if the issue is resolved.
Fix 6: Reinstall NVIDIA App / GeForce Experience
If the "There was a problem with NVIDIA app" issue remains, reinstall the NVIDIA app by following the steps mentioned in Fix 4. A full reinstall removes broken files, clears bad cache, resets faulty settings, and restores the default configuration. In addition, it installs the latest compatible version, which reduces conflict with current drivers or Windows updates.
Fix 7: Enable WPN Service in Registry
This solution will also resolve "There was a problem with NVIDIA app" because the NVIDIA app depends on the Windows notification framework to load its interface and features. If WpnService or WpnUserService is disabled, the app may fail at launch and show this error. So, set their value data to 2 (Automatic) so they load with Windows. This restores notification APIs that the app uses for prompts and overlays, as shown:
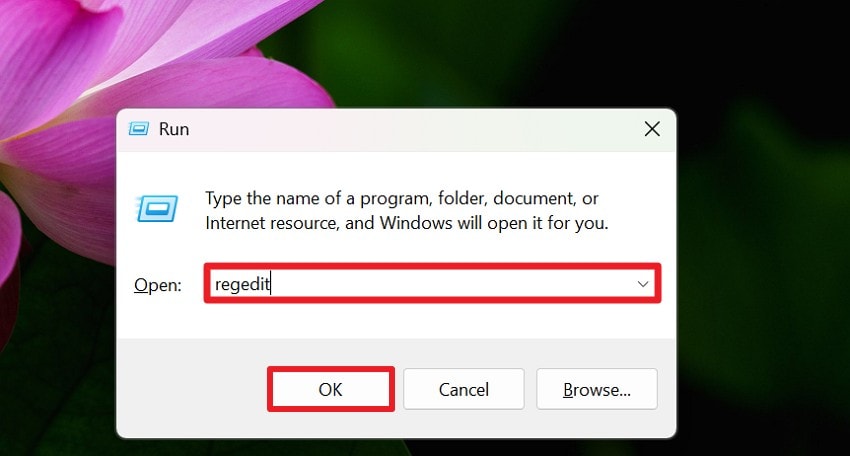
Step 1. Type "regedit" in the textbox and press "OK" as you press "Win + R."
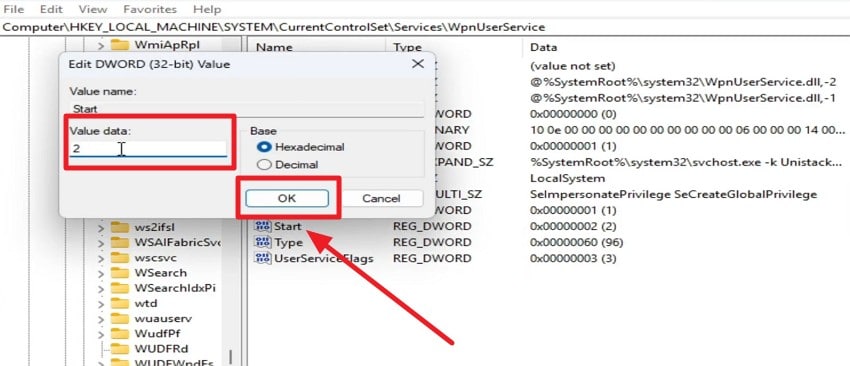
Step 2. In the Registry Editor Window, head to the "HKEY_LOCAL_MACHINE\SYSTEM\CurrentControlSet\Services\WpnService" location. There, double-click the "Start" option and set the "Value Data" to "2" and pick "OK."

Step 3. After that, go to "HKEY_LOCAL_MACHINE\SYSTEM\CurrentControlSet\Services\WpnUserService." Right-click on the "Start" option to pick "Modify." Repeat the same process for all listed "WpnUserService" and when the pop-up appears, set the "Value Data" to "2" and click "OK."
Pro Tip: Repair Corrupted NVIDIA App Files Using Repairit [Tested]
When trying to resolve "There was a problem with NVIDIA app," if the NVIDIA App or its related files, logs, or documents are damaged or corrupted, use Repairit. This AI-powered tool is designed to fix damaged videos, photos, and documents in formats like Word, RAR, Text, ZIP, HTML, etc. In this regard, the AI fixes corrupted files and enhances media in 3 simple steps.
Additionally, users can batch-process corrupted app files and leverage its support for Advanced Video Repair. This includes support for RAW, HDR, LOG, and high‑resolution footage with minimal or no quality loss. Furthermore, the tool lets you preview the fixed file for common and standard formats, such as MP4, MOV, MKV, JPEG, and PNG, to assess accuracy.
Key Features

-
Repair Corrupted NVIDIA Related Files: Repairs damaged NVIDIA recordings, screenshots, and associated media files that may interfere with application functionality.
-
Fix Gameplay Capture Video Errors: Restores ShadowPlay captured videos that fail playback, preventing crashes or issues when the NVIDIA app accesses them.
-
Simple Guided Repair Workflow: Add corrupted files, run the repair process, preview results, and save fixed files without complex technical steps.
Detailed Guide to Resolve the Corrupted NVIDIA App Files
To know how you can use this tool to deal with corrupted NVIDIA files, adhere to the steps given below in detail:
Step 1. Open the File Repair Toolkit
If you seek to repair your corrupt NVIDIA files, go to the "More Types Repair" tab and click the "Start" button for the "Document Repair" tool.

Step 2. Repair & Export Your NVIDIA App Files
Press the "+Add" button to import all your corrupt NVIDIA app files and click the "Repair" button. Once the process is completed, preview and export all the NVIDIA app files back to their folders.
Resolve the Corrupted Files
 Security Verified. Over 7,302,189 people have downloaded it.
Conclusion
In conclusion, many users want to know what the "There was a problem with NVIDIA App" issue is and how to identify it. 7 solutions are provided in detail for you to try to regain access to the NVIDIA App. However, if you have any corrupted gameplay videos or app files of any format, use Repairit to fix them in batches.
Frequently Asked Questions
-
1. Does this NVIDIA error mean my GPU is damaged?
No, this error happens because software files or drivers fail, not the GPU. However, you should still check drivers and system updates to ensure proper GPU operation. -
2. Can antivirus or firewall settings cause this NVIDIA error?
Yes, an antivirus or firewall can block NVIDIA services, files, or network access required by the app. Therefore, allow NVIDIA folders and services in security settings to prevent this error. -
3. Will Windows updates trigger this NVIDIA error?
Yes, updates may replace system files, reset permissions, or conflict with existing NVIDIA drivers. Thus, repair or update NVIDIA drivers after Windows updates to restore normal app function.
