When your important images turn corrupted, blurry, or pixelated, choosing the right desktop tool to fix them matters. This guide compares Repairit Photo Repair vs Kernel Photo Repair so you can match each tool to your skills and repair needs. We will look at how they handle corrupted photos, what kinds of workflows they support, how easy they are to use, and which users are likely to benefit most from each option.
Instead of focusing only on feature lists, this comparison highlights real-world factors: how guided or technical the workflow feels, how approachable the interfaces are for beginners, and when each tool can better fit different types of damaged images.
Repair Corrupted Photos with Repairit Photo Repair
 Security Verified. Over 7,302,189 people have downloaded it.
In this article
- Repairit Photo Repair vs Kernel Photo Repair: Quick Verdict
- Repairit Photo Repair vs Kernel Photo Repair: Key Differences
- Repairit Photo Repair vs Kernel Photo Repair: Comparison Table
- What Repairit Photo Repair and Kernel Photo Repair Are Best For
- Repairit Photo Repair vs Kernel Photo Repair: Features and Capabilities
- Repairit Photo Repair vs Kernel Photo Repair: Supported Formats and Compatibility
- Repairit Photo Repair vs Kernel Photo Repair: Workflow and Ease of Use
- Repairit Photo Repair vs Kernel Photo Repair: Pricing and Trial Options
- Who Should Choose Repairit Photo Repair
- Who Should Choose Kernel Photo Repair
- Pros and Cons of Repairit Photo Repair and Kernel Photo Repair
- How to Repair Corrupted Photos After Choosing the Right Tool
Repairit Photo Repair vs Kernel Photo Repair: Quick Verdict
Both tools aim to repair corrupted photos on desktop, but they feel quite different to use.
Repairit Photo Repair focuses on a guided, modern workflow that reduces technical decisions. In most cases, this suits people who simply want their damaged images fixed with as little friction as possible.
Kernel Photo Repair takes a more utility-style, traditional approach. Its technical interface can appeal to users who are used to classic Windows tools and prefer more hands-on control over the repair process.
For everyday users with mixed photo issues, Repairit Photo Repair often feels more approachable. For technically confident users who like traditional utilities, Kernel Photo Repair can still be a practical option.
Repairit Photo Repair vs Kernel Photo Repair: Key Differences
The main difference between Repairit Photo Repair vs Kernel Photo Repair is how they guide you through fixing damaged images.
- Best fit: Repairit Photo Repair tends to fit users who want step-by-step guidance and a visual interface. Kernel Photo Repair tends to fit users who are comfortable with utility-style tools.
- Ease of use: Repairit leans on prompts and a cleaner layout, while Kernel uses a more technical, traditional design that may feel familiar to IT-oriented users.
- Repair depth in daily use: Both target corrupted or distorted photos, but Repairit is positioned to handle a range of everyday damage with less manual tuning. Kernel is oriented around focused, targeted repairs.
- Workflow style: Repairit aims for a streamlined, wizard-like flow. Kernel relies more on user input and manual choices, which some power users might prefer.
- Audience: Repairit generally favors beginners, mixed-skill teams, and casual photographers. Kernel Photo Repair can better match advanced users who are comfortable with a dated but direct interface.
Repairit Photo Repair vs Kernel Photo Repair: Comparison Table
| Dimension | Repairit Photo Repair | Kernel Photo Repair |
|---|---|---|
| Best for | Users who want guided photo repair and broader, more automated help for damaged images. | Users comfortable with classic repair tools and manual workflows who prefer targeted fixes. |
| Ease of use | Designed to be beginner-friendly with a more modern, visual interface. | More technical, utility-style desktop interface that can feel dated for new users. |
| Repair depth | Strong choice for varied and more severe photo corruption in everyday scenarios. | Focused repair capability that works well for specific, targeted image issues. |
| Workflow | Streamlined, wizard-like steps that reduce manual decisions for non-technical users. | Technical and traditional workflow that leans on user input and settings choices. |
| Strengths | Guided experience, broader repair scenarios, easier for non-experts to get results. | Focused repairs, utility-style controls, appealing to users who like manual tuning. |
| Weaknesses | May feel simplified for power users who want fine-grained control over every step. | Dated UI and lower beginner appeal, which can slow down less technical users. |
What Repairit Photo Repair and Kernel Photo Repair Are Best For
Kernel Photo Repair positions itself as a utility-style desktop photo repair software with a technical interface, best for users comfortable with classic repair tools and manual workflows. Compared with the more guided and modern approach of Repairit Photo Repair, Kernel Photo Repair leans into a focused, traditional desktop experience that can suit people who like to manage their own repair settings and handle targeted image fixes.
In most everyday situations where you want to quickly fix a batch of corrupted, blurry, or pixelated photos, Repairit Photo Repair can feel more intuitive. Kernel Photo Repair is more suitable when you already understand basic repair concepts and are fine with a less modern, more tool-like interface.
Repairit Photo Repair vs Kernel Photo Repair: Features and Capabilities
Both photo repair software options aim to fix damaged images, but they emphasize different experiences. Repairit Photo Repair emphasizes a smoother, more modern flow, while Kernel Photo Repair offers focused repair capability with a more traditional interface that experienced users may appreciate despite its dated feel.
At a high level, they share several core capabilities:
- Import corrupted or damaged image files from local storage for repair.
- Attempt to fix visual issues like distortion, artifacts, or pixelation in common photo formats.
- Preview repaired images before deciding whether to save them.
Beyond the basics, they begin to diverge in how the repair work is framed:
- Guided repair (Repairit Photo Repair): Offers a more guided process for handling a range of damaged photos with minimal manual tuning, keeping technical complexity low.
- Focused passes (Kernel Photo Repair): Provides focused repair passes that can suit targeted fixes for specific images where you are willing to experiment.
- Editing workflow compatibility: Both tools can be used alongside other editing workflows, letting users fine-tune output in separate photo editors after repair.
If you want a tool that suggests the next step and hides most complexity, Repairit Photo Repair may be a better fit. If you prefer to feel closer to the underlying repair actions in a utility-style environment, Kernel Photo Repair may align more with your habits.
Repairit Photo Repair vs Kernel Photo Repair: Supported Formats and Compatibility
Both tools focus on repairing common photo and image file types typically used on Windows or macOS desktops. Repairit Photo Repair tends to highlight support for widely used formats, while Kernel Photo Repair follows a similar pattern for standard camera and phone images. In most cases, either option can handle everyday photo libraries saved on local drives or external storage devices.
For typical users working with images from digital cameras, smartphones, or shared folders, there is unlikely to be a major gap between the two. If you rely on unusual or specialized formats, it is safer to confirm each products official support list before committing.
Repairit Photo Repair vs Kernel Photo Repair: Workflow and Ease of Use
Workflow design is where Repairit Photo Repair vs Kernel Photo Repair feel most different.
Repairit Photo Repair prioritizes a straightforward, guided flow with fewer technical decisions. The interface focuses on clear prompts, large buttons, and a sequence that encourages you to import, repair, then preview and save without needing to interpret complex options.
Kernel Photo Repair follows a more technical and traditional workflow. The interface can suit users who are used to classic Windows utilities, but newcomers may find Repairits cleaner layout and clearer prompts easier for repairing corrupted photos without digging into detailed options.
If you are handing this task to a non-technical teammate or family member, Repairit Photo Repair will usually be faster to explain. If you personally like compact utility windows and are comfortable exploring options, Kernel Photo Repair may not feel challenging.
Repairit Photo Repair vs Kernel Photo Repair: Pricing and Trial Options
Both Repairit Photo Repair and Kernel Photo Repair are typically offered as paid desktop applications, and either may provide a trial or demo so you can test basic repairs before committing. Instead of focusing on exact pricing, it is more practical to compare what each plan includes, how many photos you expect to fix, and whether you prefer a guided experience or a more utility-style interface for ongoing use.
When evaluating cost, also consider:
- How frequently you encounter corrupted or distorted images.
- Whether multiple people in your household or team need to use the software.
- How much value you place on an easier, low-friction workflow versus a more technical tool.
Who Should Choose Repairit Photo Repair
Repairit Photo Repair is generally a better fit when you want your repair workflow to feel simple and guided. It focuses on helping you fix corrupted photos without demanding deep technical knowledge.
- Users who want a guided, modern interface that walks them through repairing corrupted photos.
- People with mixed levels of damage across many images who prefer an easier, consistent workflow.
- Beginners or non-technical users who feel overwhelmed by traditional utility-style tools.
- Anyone who values a smoother, visually clear experience over manual tuning of every repair step.
If you are often asked to help others fix damaged images, choosing Repairit Photo Repair can also reduce the time you spend explaining what to click and when.
Who Should Choose Kernel Photo Repair
Kernel Photo Repair suits a different audience, one that is more comfortable working with classic desktop utilities and does not mind a slightly dated look if the controls are direct.
- Users comfortable with classic repair tools and a more technical, traditional workflow.
- People who like a utility-style desktop photo repair software with direct access to repair options.
- Those who mainly need focused, targeted fixes for specific damaged images rather than large batches.
- Experienced or IT-oriented users who do not mind a dated UI and lower beginner appeal if the controls feel familiar.
If you already use several technical maintenance tools on your PC and prefer that style, Kernel Photo Repair may fit naturally into your workflow.
Pros and Cons of Repairit Photo Repair and Kernel Photo Repair
Looking at pros and cons side by side can clarify which photo repair software better matches how you like to work.
Repairit Photo Repair Pros and Cons
Kernel Photo Repair Pros and Cons
How to Repair Corrupted Photos After Choosing the Right Tool
Once you understand the differences between Repairit Photo Repair and Kernel Photo Repair, the next step is actually fixing the corrupted or blurry images sitting on your computer. Even if you lean toward a technical utility, many users prefer having at least one guided option available for tricky or large batches of photos.
For a straightforward, desktop-based process, using Repairit Photo Repair can be a practical way to repair damaged images without juggling too many decisions. Below is an overview of how it works in everyday use.
Key Features
- Guided photo repair workflow that simplifies fixing corrupted or distorted images.
- Support for commonly used image formats from cameras and mobile devices.
- Preview of repaired photos before saving, so you can confirm visual improvements.
Step-by-step guide
Here is how a typical repair session looks in Repairit Photo Repair on desktop.
- Add damaged photos
Launch Repairit Photo Repair and import the damaged or corrupted photos you want to fix.
- Run the repair
Click the repair button and let the tool scan and fix the selected image files automatically.
- Preview and save
Preview the repaired results and save the fixed photos to your preferred location.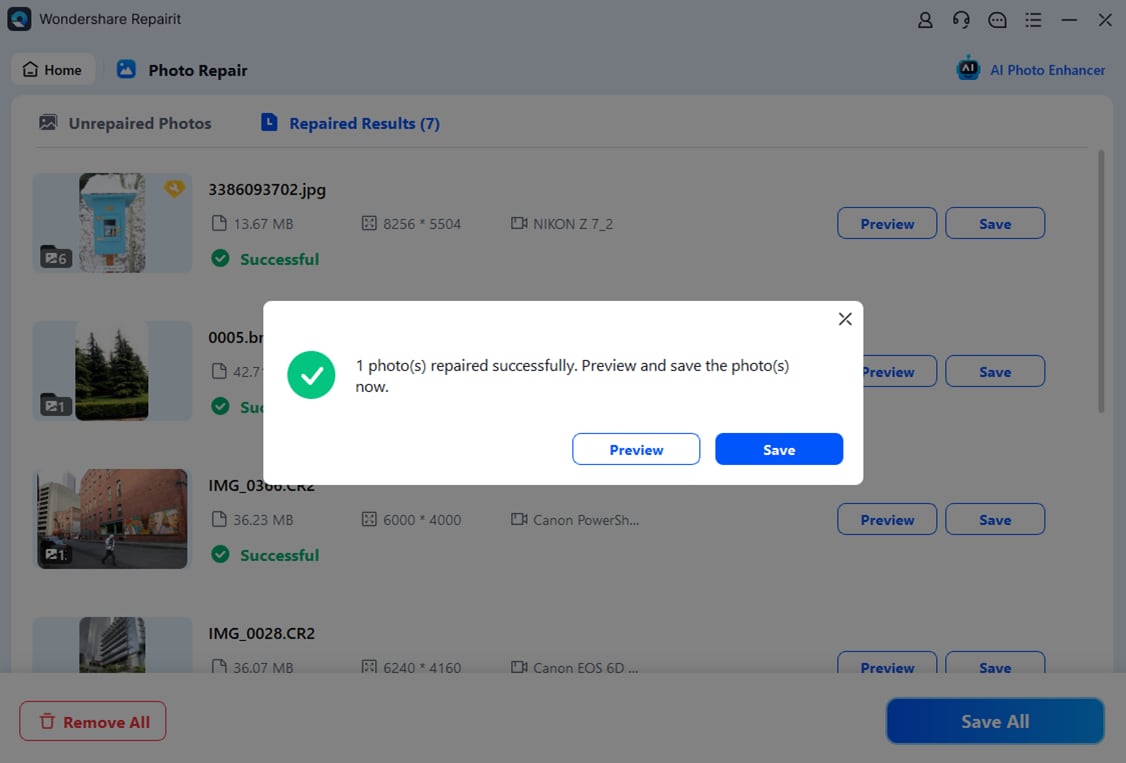
Final Verdict
Repairit Photo Repair is a stronger choice for users who want a modern interface, guided steps, and flexible handling of different levels of photo corruption without diving into technical details. It suits individuals and teams that prioritize a clear workflow and predictable results across many images.
Kernel Photo Repair may be enough if you prefer a utility-style desktop photo repair software with a technical interface and you are comfortable managing a more traditional, manual workflow. For targeted fixes on specific images, and for users who like classic tools, Kernel Photo Repair can still be a practical alternative.
In many real-world situations, some people use a guided tool like Repairit Photo Repair as their main option and keep utility-style tools available as backups. Whichever route you choose, the key is matching the software to your comfort level and the type of image damage you face most often.
Next: Repairit Photo Repair vs Remo Photo Repair
FAQ
-
1. Which is better for beginners, Repairit Photo Repair or Kernel Photo Repair?
For most beginners, Repairit Photo Repair is easier to start with because of its guided workflow and modern interface, while Kernel Photo Repair suits more technical users who are already comfortable with classic utilities. -
2. When should I choose Kernel Photo Repair over Repairit Photo Repair?
Kernel Photo Repair can be a better fit when you want a utility-style desktop experience, are comfortable with manual workflows, and mainly need focused fixes on specific corrupted or distorted images. -
3. Can both Repairit Photo Repair and Kernel Photo Repair fix severely corrupted photos?
Both tools aim to repair corrupted photos, but results depend on how damaged the files are. Repairit Photo Repair is a stronger choice if you want more help handling varied or more severe visual issues in a guided way. -
4. Do Repairit Photo Repair and Kernel Photo Repair support the same image formats?
Both generally focus on common photo formats used by cameras and phones. If you work with unusual file types, it is best to check each tools official format list before deciding which one to purchase. -
5. Can I still edit my photos after repairing them with these tools?
Yes. In most cases you can open the repaired images in your usual photo editor to apply color correction, cropping, or retouching after the repair step is complete.