
OBS (Open Broadcaster Software) has become the top choice for streamers, content creators, and online educators. Are you struggling with how to improve OBS recording quality? Many streamers and video creators face the same frustration: you hit record in OBS, only to find your video is blurry, laggy, or just plain low quality, despite having solid hardware.
If you're searching for how to improve OBS video quality or wondering how to get better recording quality in OBS, you're in the right place.
Let’s make your recordings smooth, sharp, and professional—whether you're recording tutorials, gameplay, or streaming content.
In this article
Part 1. Why OBS Recordings Often Suffer in Quality
OBS gives you complete control—but that power comes with complexity. Many users hit “Start Recording” without fully understanding the technical settings, and that’s where quality issues begin.
Here are the key reasons your OBS recordings might not look great, and how each factor affects the final result:
Factor 1. Bitrate, Resolution, and Encoder Settings
- Bitrate: This defines how much data is used per second of video. A low bitrate = smaller files, but it also means blurry, pixelated video, especially in high-motion scenes.
- Resolution: If you’re capturing in 720p when your screen is 1080p or 4K, your recording will look soft or stretched.
- Encoder Settings: OBS allows software (x264) or hardware (NVENC/AMD) encoding. Choosing the wrong encoder for your system can lead to slow performance and choppy results.
Factor 2. Common OBS Quality Issues
Even with decent settings, you might face:
- Pixelation during fast movement
- Dropped frames from system overload
- Audio-video desync if the CPU is maxed out or overloaded
- Motion blur due to mismatched frame rates
These aren’t always obvious during recording, but can be devastating during playback, especially if you don’t notice until it’s too late.
Factor 3. System Limitations & Format Choices
Your computer’s performance directly impacts recording quality in OBS:
- CPU Usage: OBS is CPU-intensive. If you’re multitasking or gaming while recording, expect frame drops or encoding lag.
- GPU Usage: Using a GPU encoder (like NVENC) can ease CPU load, but only if your graphics card supports it properly.
- Recording Format: Saving in FLV or MKV is safer than MP4 (which can get corrupted if OBS crashes), but each format has pros and cons for editing and sharing.
| Factor | What Can Go Wrong | Resulting Issue |
| Low Bitrate | Not enough data for video clarity | Blurry, pixelated footage |
| Wrong Encoder | CPU/GPU overuse | Laggy or choppy recordings |
| Low Resolution | Downscaled visuals | Soft or unclear video |
| Background Processes | System overload | Dropped frames, delays |
| File Format Choice | Risk of crash-related data loss | Unplayable or incomplete file |
In the next section, we’ll walk you through how to tweak these settings to instantly boost your OBS recording quality.
Part 2. How to Improve OBS Recording Quality – Step-by-Step
If your OBS recordings look blurry, pixelated, or laggy, it’s often due to incorrect settings. Here’s how to optimize OBS to get smooth, high-quality recordings.
Method 1. Adjust Output Resolution
Open OBS, go to Settings>Video. Make sure both the Base (Canvas) Resolution and Output (Scaled) Resolution are set to 1920x1080 for Full HD. Matching these values helps avoid scaling issues that can lead to blurry video.
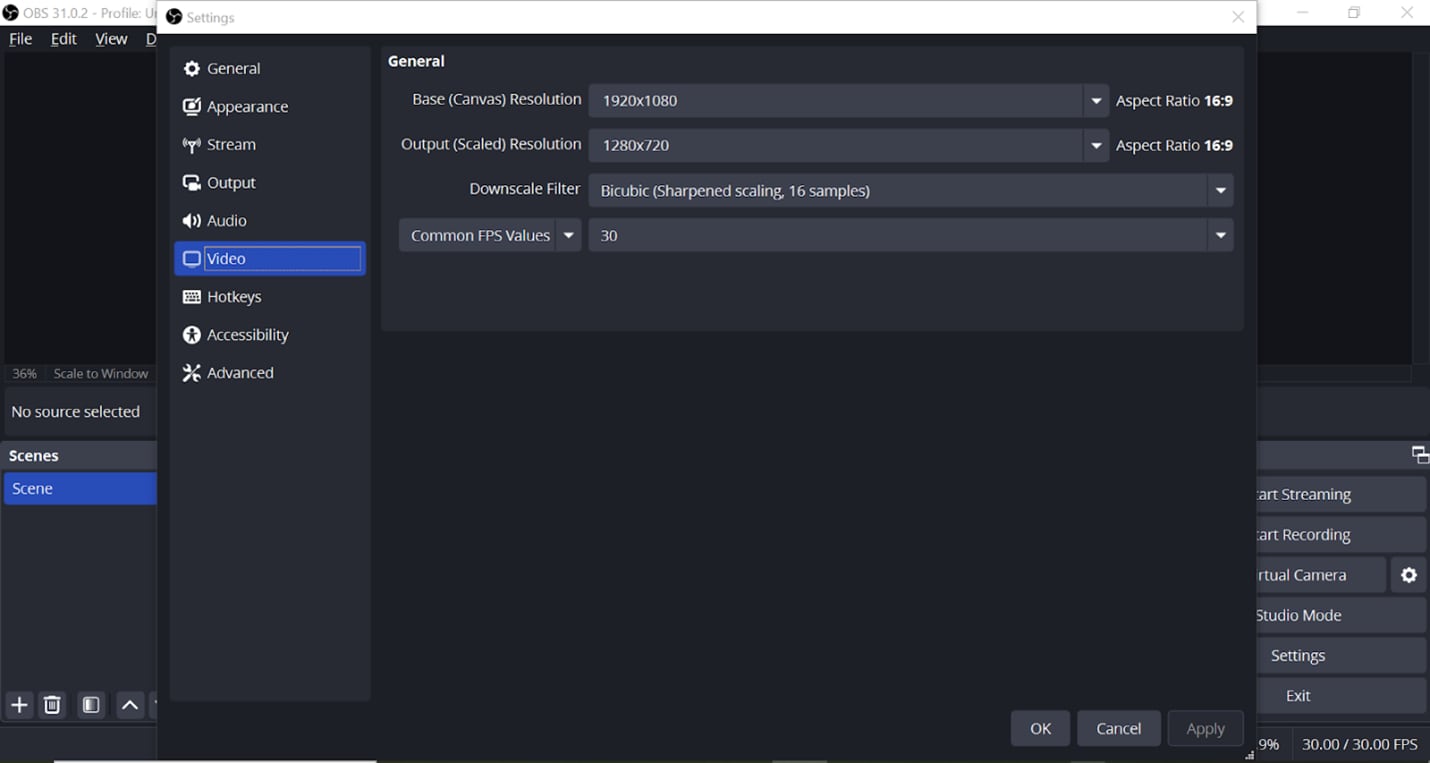
If your system can’t handle 1080p smoothly, use 1280x720 as a fallback, but ensure both settings still match.
You can also use the "Downscale Filter" option here—choose Lanczos (36 samples) for the sharpest downscaling if needed.
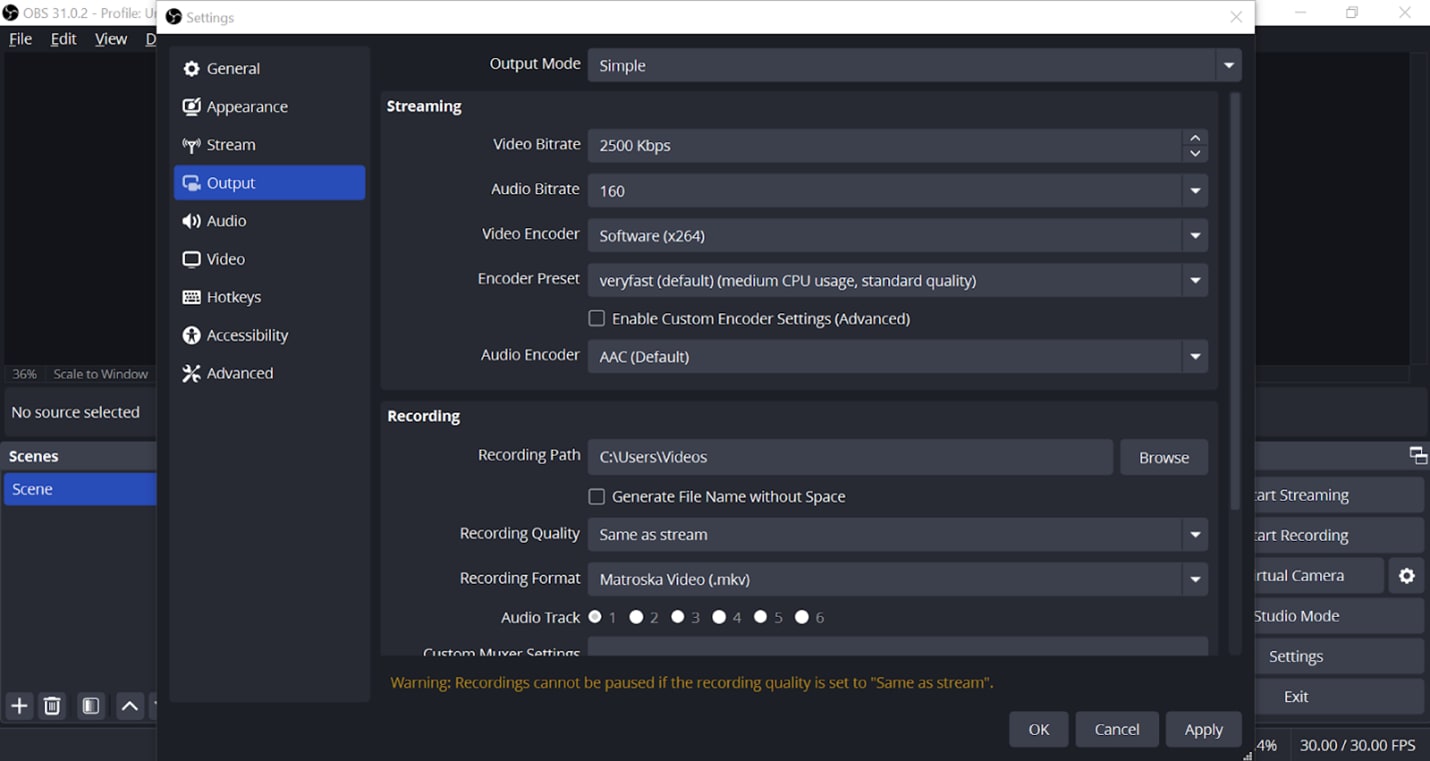
Method 2. Use a Higher Bitrate
Navigate to Settings > Output > Recording and increase your video bitrate. Higher bitrate improves clarity but also increases file size.
Note: Recommended bitrate settings:
- For 1080p at 30fps: 6000–8000 Kbps
- For 1080p at 60fps: 8000–10000 Kbps
- For 720p at 30fps: 3000–5000 Kbps
Make sure your internet upload speed (for streaming) or disk write speed (for local recording) can handle the chosen bitrate.
Method 3. Choose the Right Encoder
Still in the Output settings, select the appropriate Encoder. If you have a dedicated GPU, choose:
- NVENC for NVIDIA graphics cards
- AMD Encoder for AMD cards
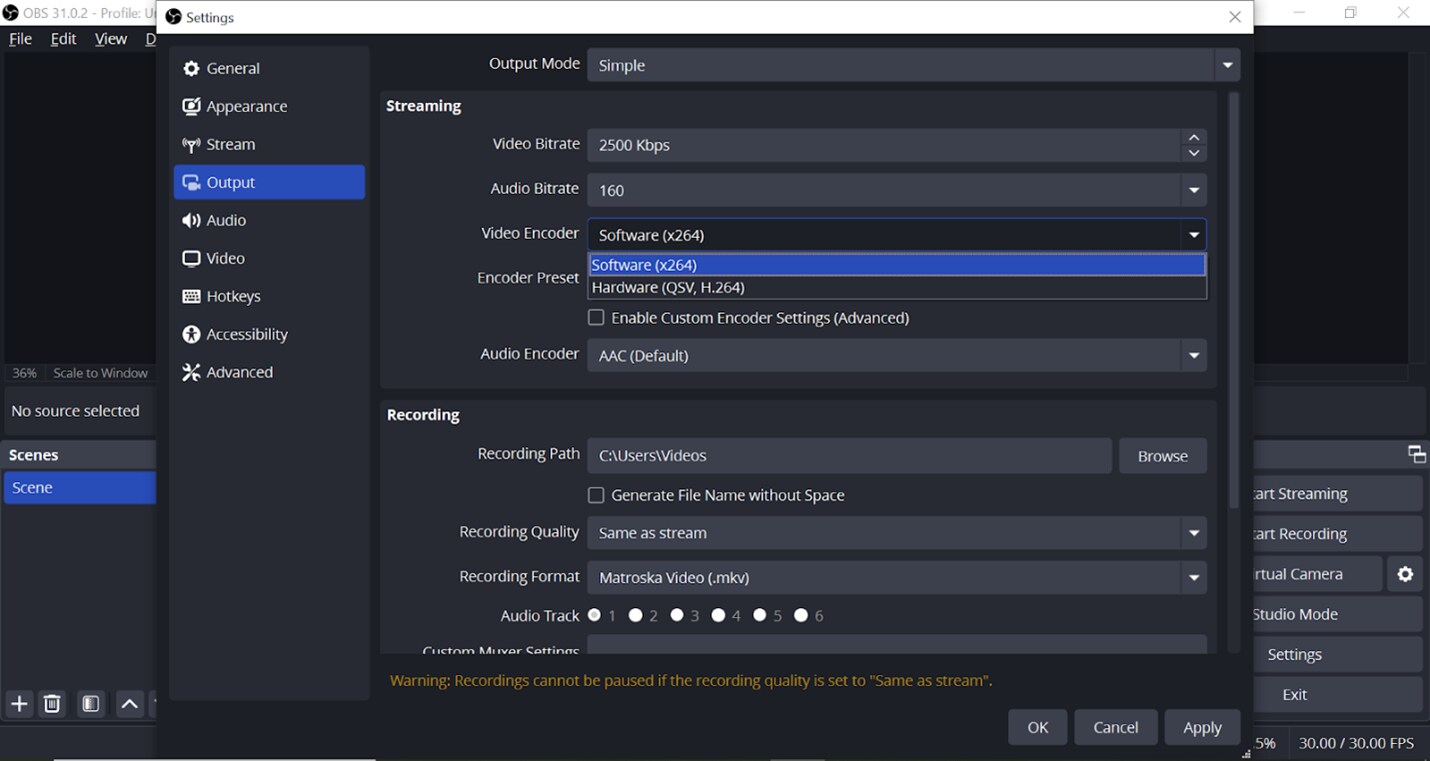
These offload the encoding from your CPU and result in smoother recordings. If you don’t have a GPU, you can use x264, but be aware that it’s more CPU-intensive.
Method 4. Use CBR or CQP for Consistent Quality
Also under Output, look for the Rate Control option. Choose either:
- CBR (Constant Bitrate) – Keeps bitrate stable and predictable, useful for streaming
- CQP (Constant Quality) – Adjusts bitrate to maintain visual quality, ideal for local recording
If using CQP, start with a quality level between 18–23. Lower numbers mean higher quality and larger files. CBR is more consistent if you want to control file size.
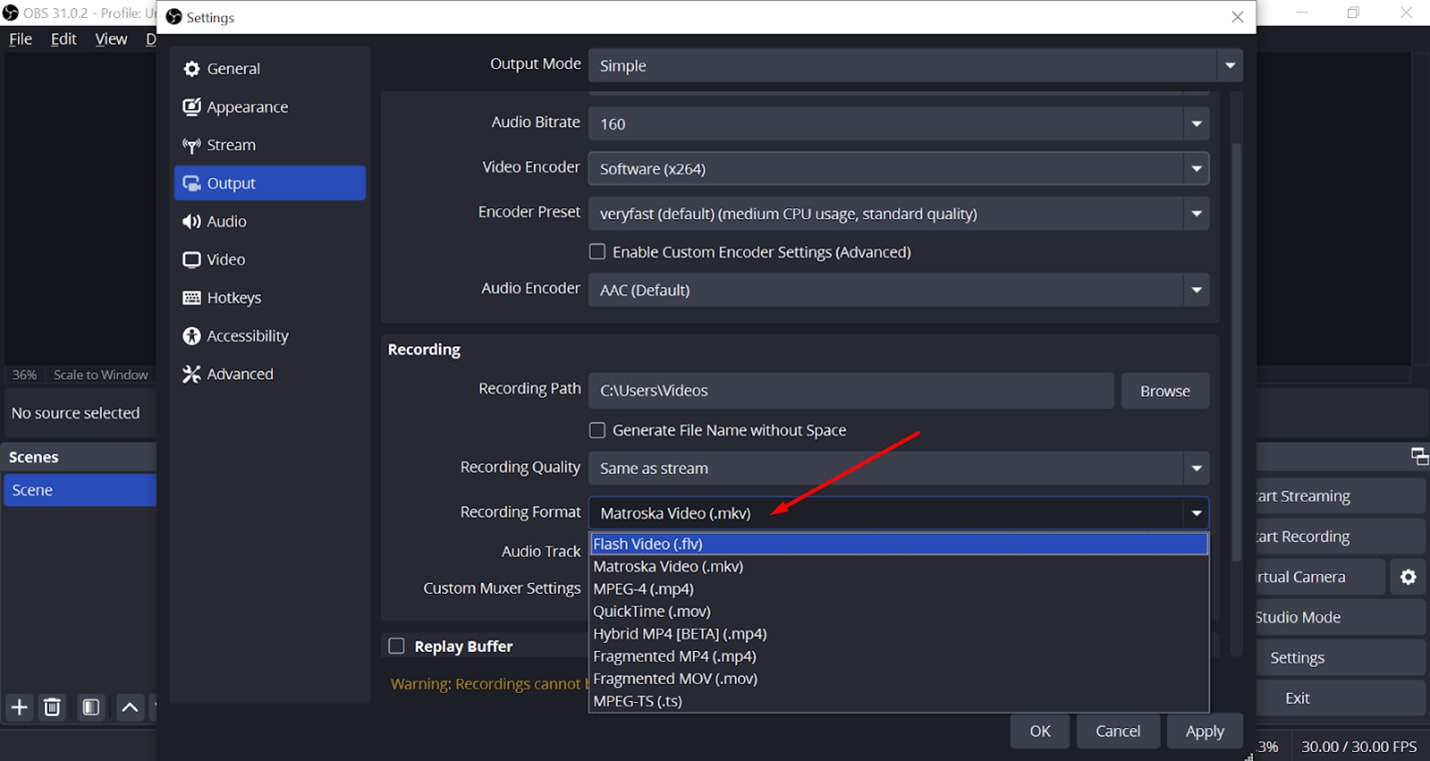
Method 5. Record in MKV, Then Convert to MP4
Go to Settings > Output > Recording Format and choose MKV. It’s safer because it prevents file corruption if OBS crashes mid-recording.
After you’re done recording, you can convert the MKV to MP4 within OBS itself by going to File > Remux Recordings. This makes the file easier to edit or upload to platforms like YouTube.
Method 6. Enable Game Mode and Graphics Performance (for gamers)
If you’re recording gameplay, enable Game Mode in Windows by going to Settings > Gaming > Game Mode and turning it on.
Then, go to System > Display > Graphics Settings, add OBS, and set it to High Performance. This ensures your system prioritizes OBS while recording.
Recap–Quick Settings Checklist:
- Use MKV format for safety
- Match resolution and FPS to content type
- Enable hardware encoder for smooth processing
- Set the right bitrate using the chart above
- Close all background tasks before hitting the record
- Always test and tweak before a real session
With these tweaks, you’ll notice an instant improvement in your OBS recordings. But what if your footage is already ruined or corrupted?
Part 3. When OBS Settings Aren’t Enough
Even after perfecting your OBS setup, things can still go wrong. And when they do, OBS has no way to fix the damage.
Here’s what can happen:
- Crashes, Glitches & Corrupted Recordings
- OBS crashes mid-recording due to software conflicts or hardware overload.
- Sudden system shutdowns leave files incomplete or unplayable.
- High CPU usage causes blurry, laggy, or choppy video.
- Incorrect file format settings lead to missing audio or distorted visuals.
- OBS Doesn’t Offer Post-Recording Fixes
OBS is great at capturing video, but it’s not a repair tool. If your footage gets corrupted, your only option is usually to re-record… unless you have a dedicated solution.
This is where Repairit comes in—a powerful, AI-driven tool designed to repair damaged or unreadable video files.
A professional video repair solution that:
- Fixes corrupted, blurry, or choppy OBS recordings
- Works with MP4, MOV, MKV, AVI, FLV, and more
- Supports batch repair and advanced preview
- Compatible with Windows, Mac, and web
Key Features of Repairit

-
AI-based repair engine for a high success rate
-
Supports multiple video formats (MP4, MKV, FLV, MOV, etc.)
-
Works on both Windows and macOS
-
Repairs audio and video sync issues, pixelation, and file errors
-
Available as desktop and online versions
How to Use Repairit to Fix OBS Recordings
Step 1. Launch Repairit and upload your corrupted OBS files (supports multiple formats)

Step 2. Click “Repair” to start the AI-powered process.

Step 3. Preview and export your restored high-quality video

Advanced Mode also allows deep repair using sample videos if needed.
Improve Your OBS Video Files Quality Now
 Security Verified. Over 7,302,189 people have downloaded it.
Part 4. OBS Settings vs. Repairit – Which to Use and When?
You’ve now seen both sides: the power of OBS settings and the reliability of Repairit when things go wrong. But when should you use one or both?
Here’s a breakdown of common recording scenarios and the best tool to handle each:
| Scenario | Recommended Tool | Why It Works |
| Preventing low-quality recordings | OBS Settings | Gives you full control over bitrate, resolution, and FPS. |
| Fixing choppy or corrupted video files | Repairit | Repair files that OBS can’t play or fix |
| Enhancing clarity in existing videos | Repairit | Restores visuals, fixes sync issues, and improves overall quality |
| Avoiding issues before and after | OBS + Repairit | Combines prevention (OBS) and recovery (Repairit) for best results |
When to Use OBS Settings Alone
- You're setting up a new recording environment.
- You haven’t recorded yet, and want to maximize quality.
- You want to avoid bitrate drops, lag, or pixelation from the start.
Ideal for prevention and control before recording.
When to Use Repairit
- You’ve already recorded, and the video is:
- Choppy or frozen
- Missing audio
- Won’t open or play correctly
- You need to recover a corrupted or unreadable file.
Perfect for saving irreplaceable recordings and restoring professionalism.
When to Use Both Together
- You’re working on an important project or client delivery.
- You want to future-proof your workflow.
- You prefer peace of mind knowing you can record and recover anytime.
Best approach for creators, streamers, and professionals who can’t afford quality issues.
Conclusion
Recording high-quality videos with OBS is possible—if your settings are right. By tweaking resolution, bitrate, encoder type, and output formats, you can prevent most quality issues before you hit record.
But sometimes, even the best settings can't stop crashes, glitches, or file corruption. That’s where Repairit becomes essential.
Whether you're a YouTuber, gamer, teacher, or content creator, combining OBS with Wondershare Repairit ensures your recordings always look professional, no matter what.
FAQ
-
What causes low OBS recording quality despite good hardware?
Incorrect OBS settings—like low bitrate, mismatched resolution, or CPU overload—are the usual culprits. Even great hardware needs the right configuration to deliver clear recordings. -
Can Wondershare Repairit fix completely unplayable OBS files?
Yes, Repairit is designed to repair even severely corrupted or unplayable videos, including those from OBS, by analyzing and restoring audio-visual data. -
Is there a free version of Repairit available for testing?
Yes, you can try Wondershare Repairit for free! The free version allows file preview after repair, so you can confirm if it works before upgrading.
