

Any photographer desiring fineness and sharpness of the image seeks the finest RAW photo editors that will bring them accuracy and creative power. These applications help them manipulate RAW picture files, modifying and improving them in their own way. Additionally, they have AI-based functionality, real-time editing, and cross-platform synchronization to enable editing for all.
While you can print or share your photos directly, modern photographers now seek advanced tools to refine their RAW files into breathtaking visuals. Therefore, this article will provide you with the top 5 tested RAW image editing tools, along with guidelines.
Table of Contents
Part 1. What Makes a RAW Photo Editor So Important
A RAW editor empowers the user with the highest control over the RAW images, as they can go beyond average editing. The following explains the other reasons why these editors are essential:
- Preserves Complete Image Data: A RAW photo editor processes uncompressed data directly from the camera sensor, ensuring maximum detail, dynamic range, and true-to-life color accuracy.
- Offers Extensive Editing Flexibility: It offers impressive exposure, white balance, contrast, and shadow controls so that you can adjust each of the aspects without compromising the quality of the image.
- Corrects Camera Shortcomings: Simple adjustments like fixing the wrong white balance, bad lighting, or distortion of the lens can be done with ease throughout the post-processing to get a professional-level result.
- Ensures Non-Destructive Editing: All edits are stored separately from the original RAW file, allowing you to revise, reset, or experiment freely without losing the original data.
- Delivers Higher Bit Depth: With up to 12 or 14-bit color depth, RAW files capture smoother tonal transitions and richer details compared to standard JPEG formats.
Part 2. Top 5 Tested RAW Photo Editors
Now, let’s explore the top-rated RAW image editors, each paired with simple, step-by-step guides to help you enhance and refine your images effortlessly.
1. Repairit Photo Enhancer
When photographers capture RAW images, they may appear blurred or low-resolution, but this can be fixed with Repairit Photo Enhancer. This software has innovative image recognition features that optimize the colors, sharpen the blurry edges, and improve the quality of the image. Besides, the Repairit AI can provide optimal clarity even in the case of motion, lens blur, or static in the image.
With its Portrait Enhancer feature, you can get brightened faces, precise face focus, and distinguishable facial features. Not only can this program remove noise from images, but it can also balance overexposed images and even brighten dark ones. In addition, Repairit supports AI color correction that restores natural tones and vibrancy without over-saturation.
Key Features

-
Real-Time Preview: Lets users compare before-and-after results instantly to refine enhancement quality with precision.
-
Old Photo Restoration: This app can restore old black and white photos and transform them into colorful and lively images with a high-quality resolution.
-
AI Motion Clarity: Reduces blur from motion or camera shake, recovering lost details with stunning accuracy.
Simplified Guide to Enhance RAW Images Using Repairit
You can follow these simple steps and learn to use this AI image enhancer for your blurry RAW images:
Step 1. Access the Photo Enhancer Feature
Open the “AI Media Enhancer” tab, and under the “AI Photo Enhancer” section, choose “Blurry Photo Enhancer.” Next, click the “+ Add” button to import the RAW image you want to enhance.

Step 2. Start the AI Image Enhancement Process
Once the image is uploaded, start the procedure by hitting the “Preview” button.

Step 3. Preview Your Enhanced Image & Export
Once the AI enhancement process is completed, preview the enhanced RAW image, and press “Export All” to save it.

You can get more from the advanced AI-enhancing features of Repairit, and that is by utilizing its mobile app (Android/iOS). The Repairit App also contains intelligent enhancement capabilities and can turn any blurry RAW image into a studio-quality image. Moreover, you can access other AI tools, like prompting, filters, beatification, and more. So, try this app for yourself by downloading it today and enhancing your RAW image.
Edit Your RAW Photo Now
 Security Verified. Over 7,302,189 people have downloaded it.
2. Adobe Lightroom
Lightroom is another reliable RAW photo editing application that can be used to control images precisely and manage colors efficiently. Moreover, cloud synchronization is integrated within Lightroom, which enables the ease of editing and working simultaneously on two or more devices. Another thing that makes the software interesting is the ability to organize the photos, manage metadata, and process a significant number of photos within a batch.
Key Features
- Automatically refine tone, exposure, and color for detailed RAW photos.
- Precisely edit selected areas for balanced lighting and perfect focus.
- Reduce image noise while maintaining sharpness and clarity.
Tutorial to Edit a RAW Image Using Lightroom
Step 1. Once you've imported the RAW image, access the “Basic” section under the “Adjustment” tab. Now make the desired changes, such as highlights and more.

Step 2. After that, open the garage “Calibration” section, and adjust the hue and saturation of the “Shadows,” “Red Primarily,” and others.
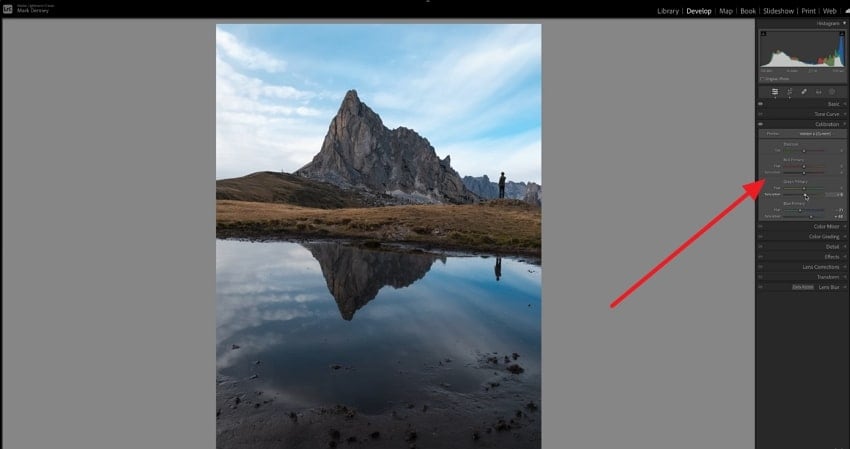
Step 3. Once that's done, head to the last tab, and adjust the sky, tones, and add suitable effects.

3. CaptureOne
This is one of the photo editors for RAW files, which has robust RAW processing and tethered shooting capabilities. It comes with smart color correction, high-quality tone mapping, and deep image recovery features specifically designed for professional photographers. Besides, CaptureOne offers wide camera compatibility and user-friendly profiles, enabling accurate color representation, greater image depth, and a smooth workflow to optimize creativity.
Key Features
- Layer-based editing with powerful masking tools for detailed local enhancements.
- Tethered shooting lets photographers capture and edit images in real-time during studio sessions.
- Customizable interface and workspace layouts optimize user productivity and workflow.
Guide to Edit a RAW Photo Using Capture One
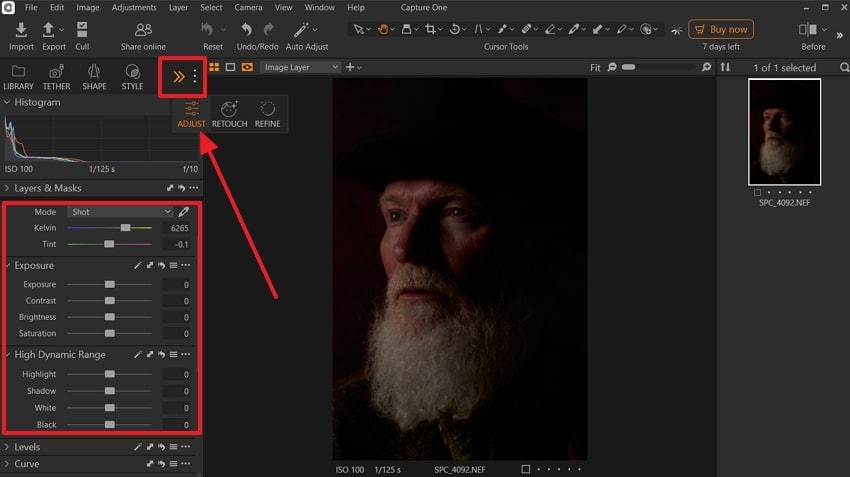
Step 1. Once the RAW image is imported, expand the left-side toolbar option and select the “Adjust” option. Now, make the desired adjustments in the “Layers & Masks” and other sections.
Step 2. Now, go to the “Color Balance” section and adjust the levels and color combinations to find the best colors for your image.
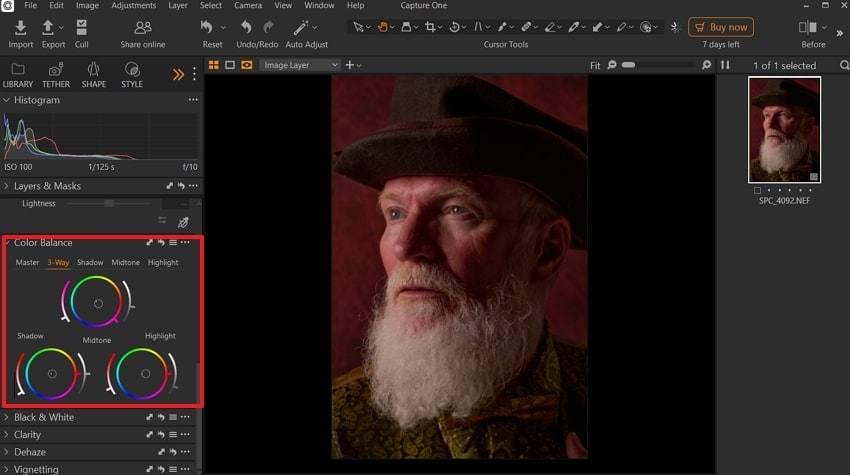
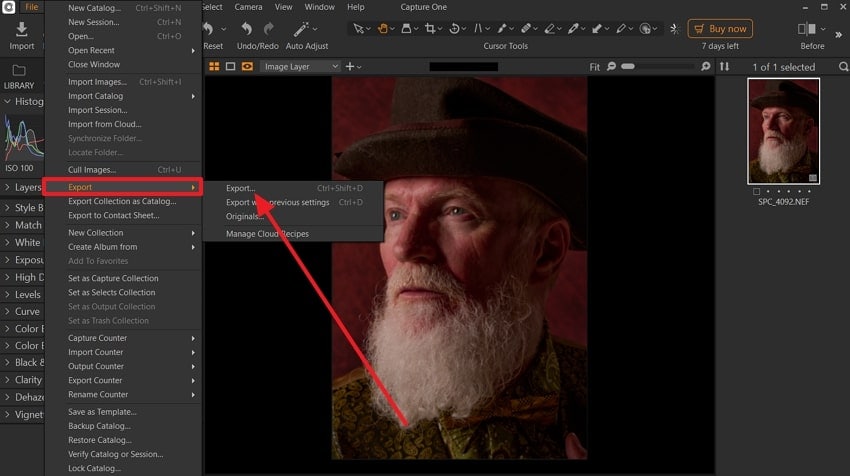
Step 3. When you're happy with the results, press the “File” tab, choose “Export,” and click “Export” to save the edited image.
4. Affinity Studio
This powerful RAW photo editor delivers professional-grade processing with precise pixel-level editing. It has sophisticated retouching tools, HDR merging, and layer-based editing for full creative freedom. Moreover, it encourages endless layers and non-destructive live filters, which offer much creative control. On a MacBook, it also supports pen input and touch gesture support, which enhances the creative workflow.
Key Features
- Innovative RAW development offers complete control over exposure, color, and tone.
- HDR merger can combine multiple RAW shots for balanced lighting and detail.
- The lens correction tool automatically fixes distortion and chromatic aberration.
Instructions to Customize a RAW Image via Affinity Studio
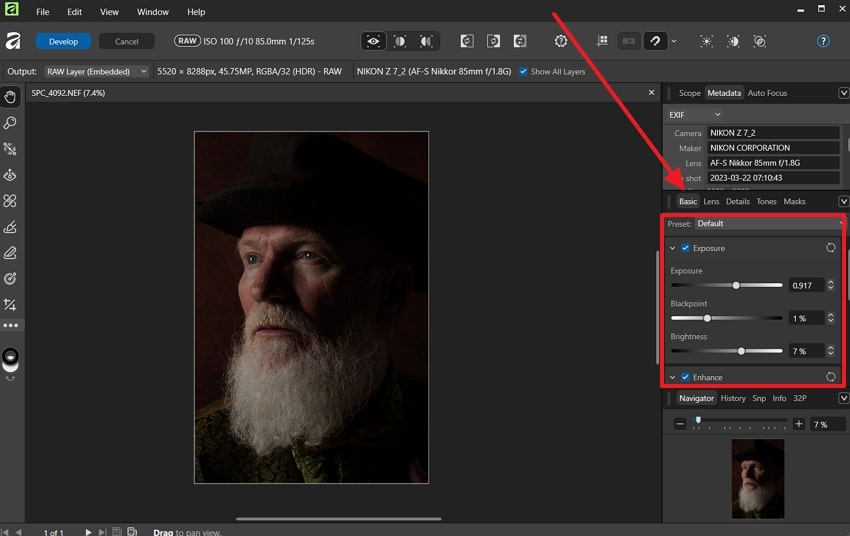
Step 1. Begin in the “Basic” tab and adjust “Exposure,” “Brightness,” and “Blackpoint” to set the right balance for your image. Here, turn on “Enhance” to make your photo look sharper and more defined.
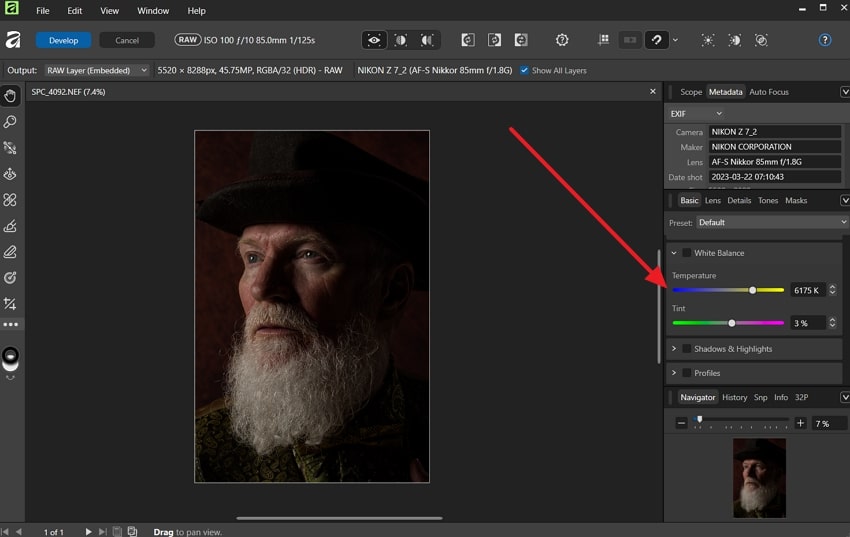
Step 2. Go to the “White Balance” area and fine-tune the “Temperature” and “Tint.” This brings natural warmth or coolness to your photo, making the colors appear realistic and balanced.
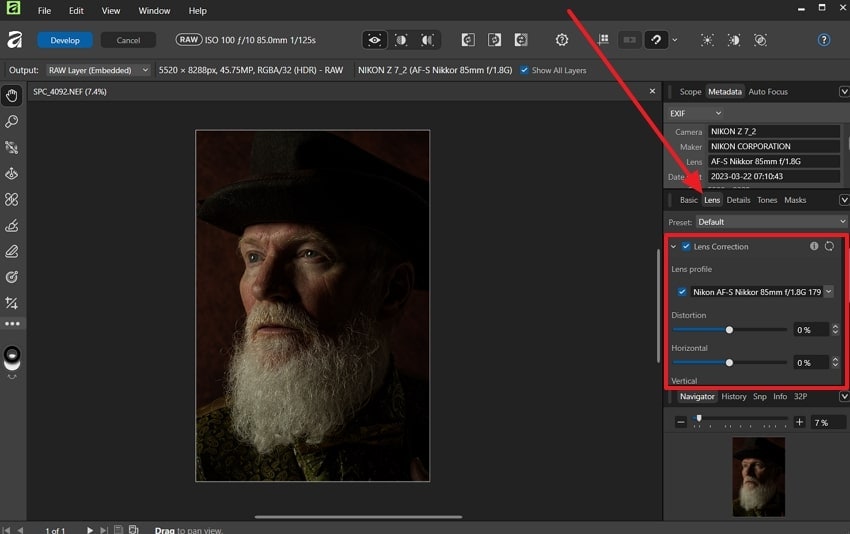
Step 3. Open the “Lens” panel to correct “Distortion” or slight alignment issues. Here, choose the right “Lens Profile,” adjust the “Horizontal” and “Vertical” sliders, and save your edited RAW photo.
5. On1
It is a good choice in case you want a RAW image editor that combines both AI technology and manual editing. On1 provides AI noise suppression and portrait features, as well as advanced masking and local adjustments. Besides, it allows you to use layers, filters, and effects to make pictures come alive literally. This tool also features intelligent color correction, automatically balancing tones and enhancing vibrancy for natural, true-to-life RAW photo results.
Key Features
- AI-powered tools for repairing, erasing, transforming, and adjusting basic colors.
- Fast RAW processing engine optimized for handling large photo libraries efficiently.
- Integrated photo browser and catalog for easy organization and retrieval of images.
Walkthrough to Make Changes to RAW Images via On1
Step 1. Head to the right panel, enable the “Brilliance AI” section, and let the AI decide the image exposure, tone, and vibrancy, which you can manually adjust.

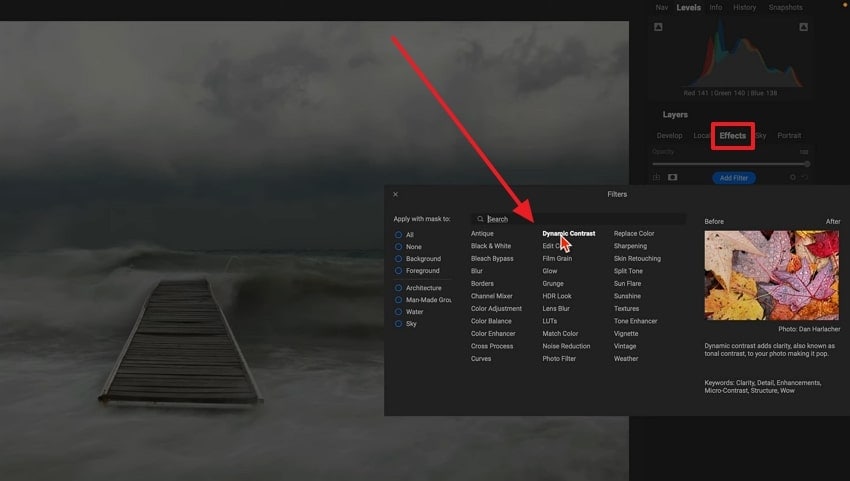
Step 2. Now, open the “Effects” tab, press the "Add Filter" button, and choose any effect you want to add.
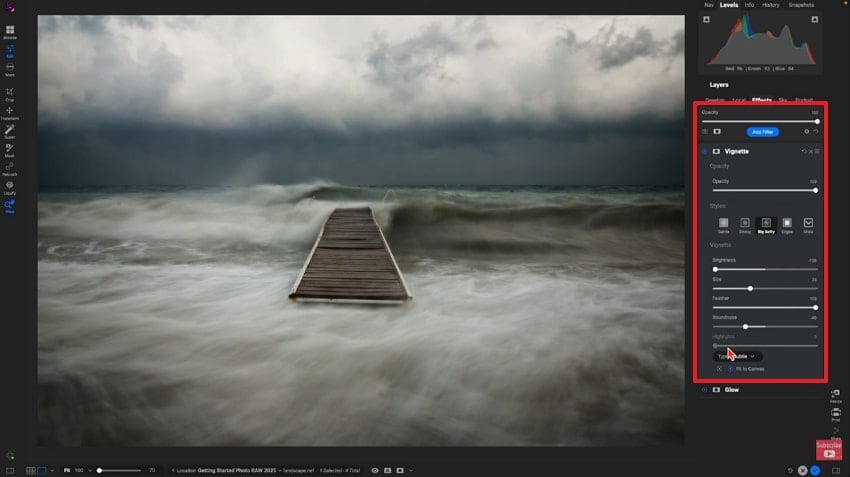
Step 3. Moving forward, choose the desired opacity, brightness, highlight, and more until the RAW image looks good.
Part 3. Choosing the Best RAW Photo Editor for Every Skill Level
The following table is a comprehensive understanding of the previous 5 best RAW file editors, which can help you choose the best fit:
| RAW Photo Editor | AI Enhancement | Color Accuracy | Editing Flexibility | Ease of Use | Performance Speed |
| Repairit Photo Enhancer | Advanced AI sharpens, denoises, and restores clarity automatically | Natural, balanced tones with precise lighting correction | Portrait enhancement and smart auto repair | One-click editing, beginner-friendly interface | Instant processing with smooth AI performance |
| Adobe Lightroom | AI detail boost and tone correction | Excellent professional color grading | Masking, layering, and batch editing tools | Moderate learning curve | Efficient but slower with large files |
| Capture One | Manual precision, limited AI use | Exceptional tonal and color control | Layers, masks, and tethered shooting | Complex for beginners | Fast with high-resolution RAW files |
| Affinity Photo | Manual enhancement, no AI tools | Consistent and realistic color output | Layers, HDR merge, and panorama tools | Simple and intuitive interface | Stable with detailed RAW edits |
| On1 Photo RAW | AI for noise and tone adjustment | Good automatic color balance | Combines AI and manual features | Easy and flexible workflow | Fast rendering and quick previews |
As the table states, Repairit offers users a wide variety of AI-powered enhancer features and image beautification. You don’t need to worry about manually adjusting anything or face any learning curve, as this tool is designed for both beginners and professionals. Moreover, you turn any blurry, low-resolution image into a high-quality picture within seconds. Therefore, test this tool by downloading it today and enhancing your images.
Conclusion
In conclusion, you looked into several RAW photo editors, as today's photographers require powerful tools to turn RAW photos into stunning works of art. This article showed you the top 5 editors, along with simple instructions, to help you understand which one performs best. After comparing their features and results, it's clear that Repairit Photo Enhancer delivers professional-grade edits with incredible clarity and precision.
FAQs
-
Q1. Can I repair corrupted RAW files with these editors?
While traditional editors focus on editing, Repairit stands out for its AI-based repair of corrupted RAW files. You can easily repair any corrupted file in seconds without losing image quality or visuals. -
Q2. What AI features are integrated in the RAW mobile editor?
The Repairit App integrates advanced AI features designed to simplify and elevate RAW photo editing. Its Text-to-Edit function allows users to apply natural language commands for instant, precise adjustments. -
Q3. How easy is it to migrate between different RAW editors?
Many support exporting standardized formats like PNG or TIFF for interoperability, but layers or edits cannot fully transfer. That’s why the best tools for image migration include Adobe Lightroom and Capture One, as they offer ecosystem integrations.
