
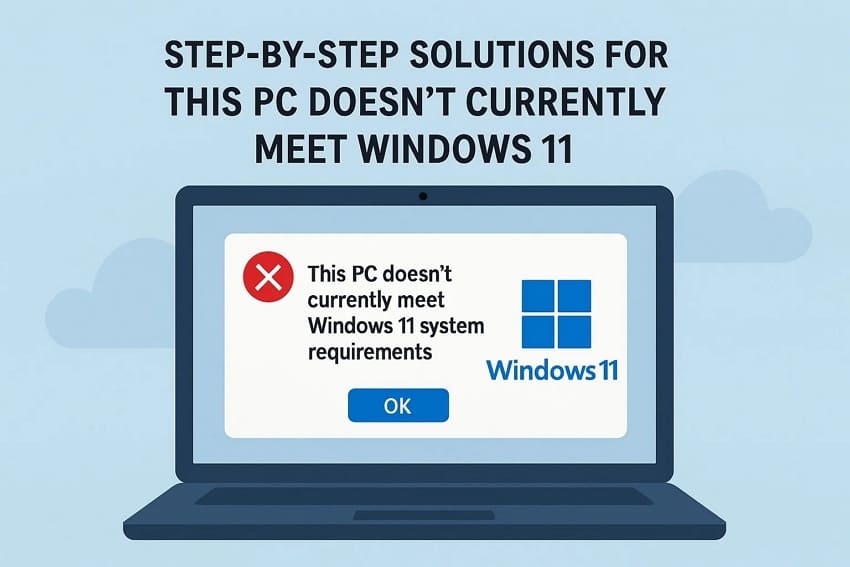
Encountering the "This PC doesn't currently meet Windows 11 system requirements" error can be frustrating. This prompt may prevent important updates, security improvements, and new features from installing. It can slow productivity and expose your system to potential vulnerabilities if left unattended.
Understanding its causes helps you decide whether to upgrade hardware or adjust settings. However, proper fixes can make this problem go away effectively. To learn more about this Windows OS error and how to deal with it, read this article.
Table of Contents
Part 1. How to Fix "This PC Doesn't Currently Meet Windows 11" - 5 Solutions!
After having a quick overview of the error, it is important to know how this compatibility error can be fixed. The following section takes a look at the ways this problem can go away:
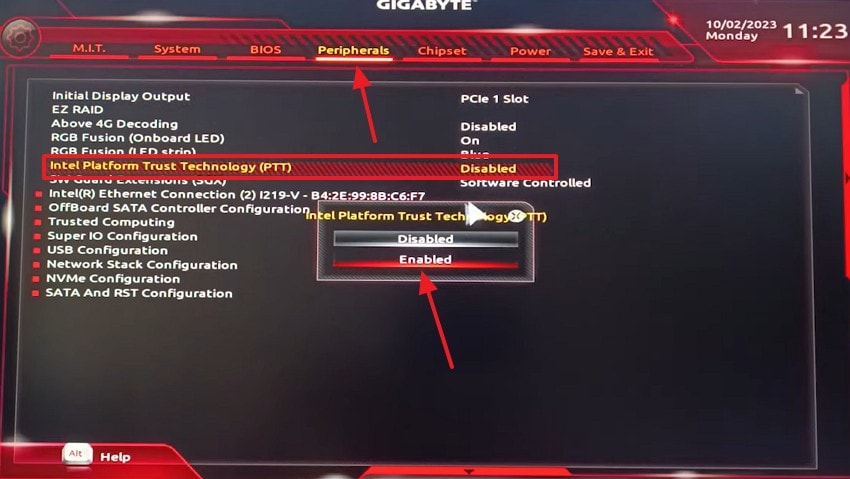
1. Enable TPM 2.0 on Your PC
Enabling TPM 2.0 strengthens system security by supporting encryption and trusted device verification. It also fulfills a core Windows 11 requirement, allowing your PC to pass essential compatibility checks. Follow the steps below and learn how to enable TPM 2.0 to fix the This PC doesn't currently meet Windows 11 system requirements error.
Note: While this process varies according to your device's motherboard, the following are the steps for enabling TPM 2.0 on your Intel processor devices. For AMD systems, the same setting is available under the name of "fTPM." Whereas, for Dell, Lenovo, and HP laptops, you should look for the "TPM" phrase settings within the BIOS menu.
Step 1. To begin, press the "Power" button of your PC and keep pressing your dedicated device key, such as F12, until the BIOS interface opens. In the BIOS menu, enter the "Peripherals" section and set the "PTT" option to "Enabled" from the dialogue box that opens next.
Step 2. Once enabled, enter the "Save & Exit" tab to choose "Yes" on the following dialogue box.

2. Change from TPM 1.2 to TPM 2.0 & Enable Secure Boot
Changing from TPM 1.2 to TPM 2.0 enables modern encryption standards needed for newer operating systems. Secure Boot ensures only trusted software loads during startup, blocking tampered boot files. Both features work together to protect system integrity, prevent unauthorized access, and meet Windows 11's mandatory security requirements. If you want to learn how to execute this to resolve the "This PC doesn't currently meet Windows 11" issue, follow this guide:
Change from TPM 1.2 to TPM 2.0
Upgrading your TPM from 1.2 to TPM 2.0 has some prerequisites. The following section explains the requirements for this process and the guide to get it done:
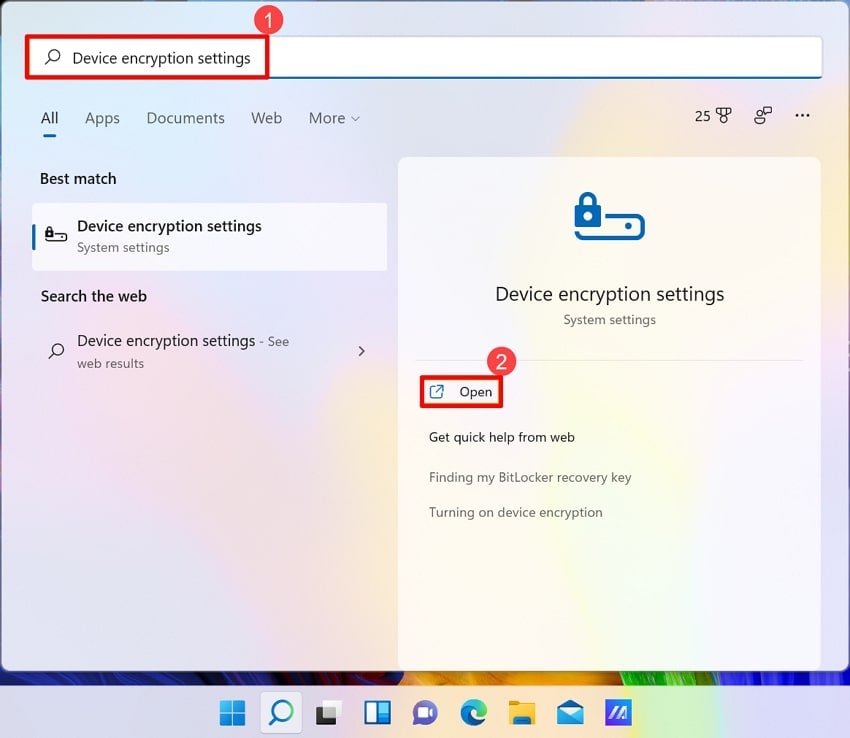
Step 1. First, back up the critical data on your device, as firmware updates could subject your system to failure. Next, open the "Start" menu and search for "Device Encryption Settings."
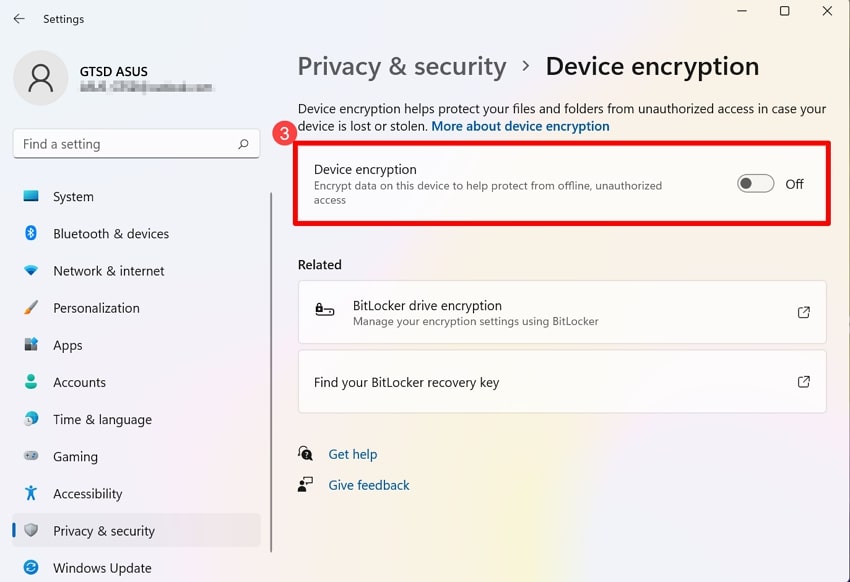
Step 2. Now, locate the "Device Encryption" toggle and turn it off. After you have confirmed this change, wait for the completion of this process. For an uninterrupted process, make sure to keep the power connection on throughout the process.
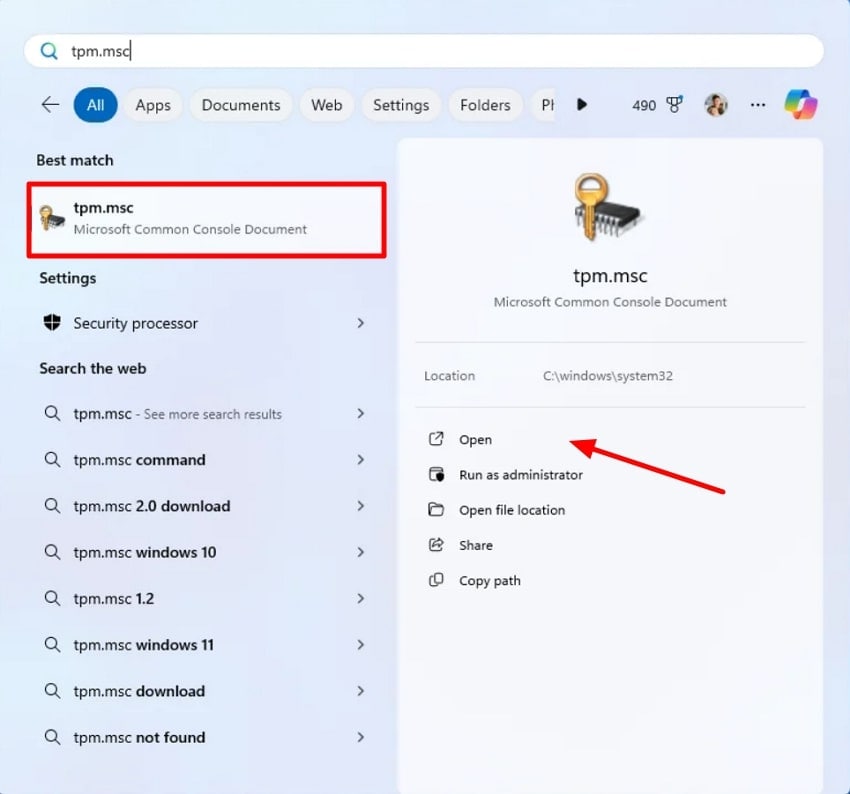
Step 3. The method of TPM upgrade varies from device to device. However, these instructions feature the process execution on Dell devices. On your Dell PC, open the "Start" menu and search for "TPM.MSC". Using the next interface, locate your current TPM and proceed if it's 1.2. Now, shut down your device and hit the BIOS (F2) key upon restart.
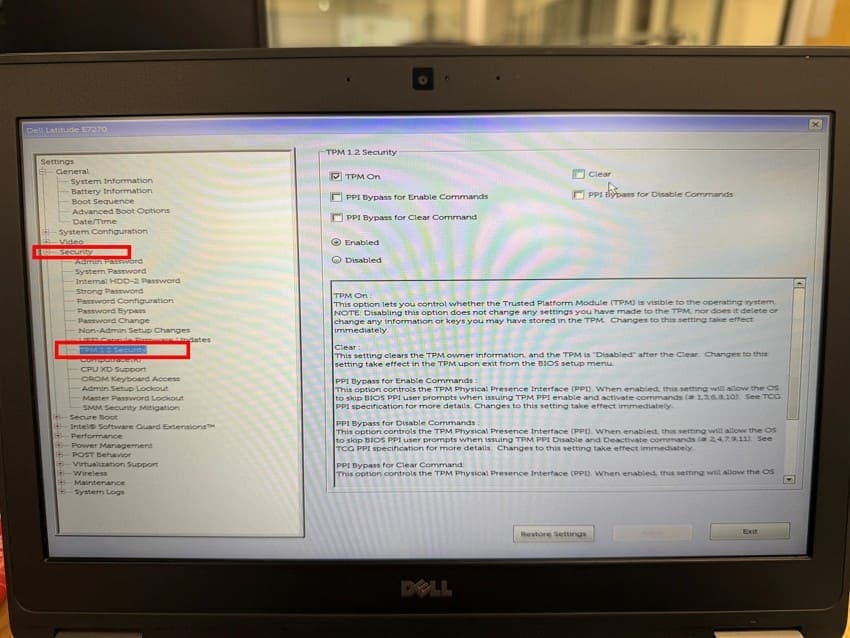
Step 4. In the BIOS menu, enter the "Security" tab and select the "TPM 1.2 Security" option to continue. In the following interface, select the "Clear" option, apply the changes, and hit the "Exit" button. When your device restarts, press the "Esc" key to confirm the changes. Now, you will have to sign in again, as the old PINs would have been reset.
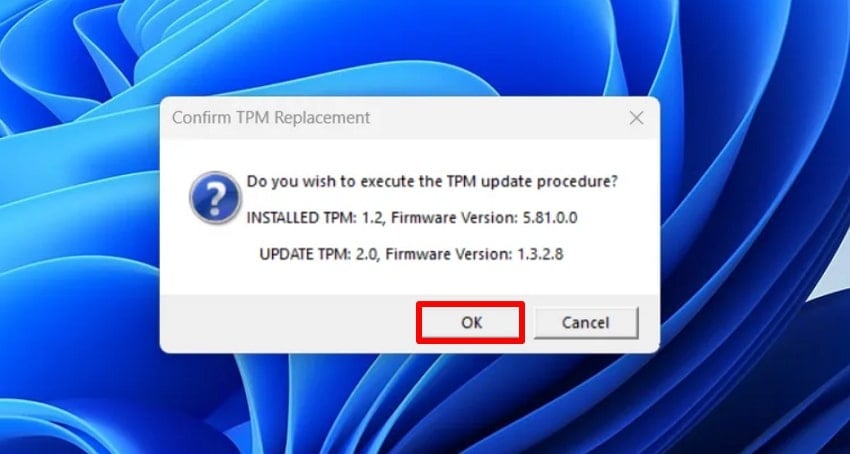
Step 5. Next, visit Dell's official website and download the firmware onto your device. Once the TPM 2.0 file has been downloaded, locate and click on it for installation. In the TPM update approval dialogue box, select "OK" to proceed. To install the new TPM version, restart the device, and you will see a TPM update message next to Dell's. Now, your device will restart multiple times.
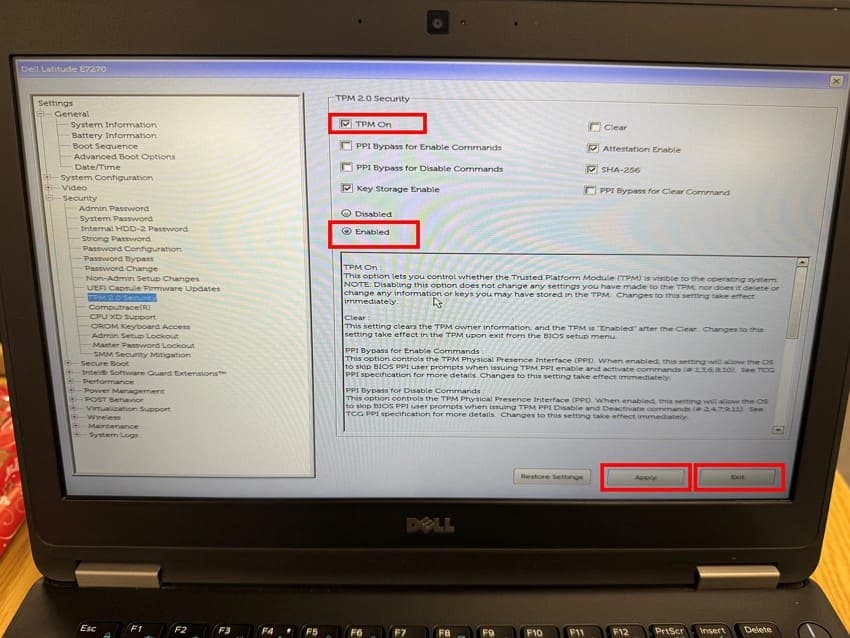
Step 6. Once you are in the OS interface, keep pressing the F2 key until you have reached the BIOS setup. Under the TPM Security section, check the "TPM On" box and select the "Enabled" option. After selecting these options, select the "Apply" and "Exit" buttons to continue. Now, wait for the device to start and use it with the updated TPM.
Enable Secure Boot
Follow the guide below to learn how to enable Secure Boot on your device:
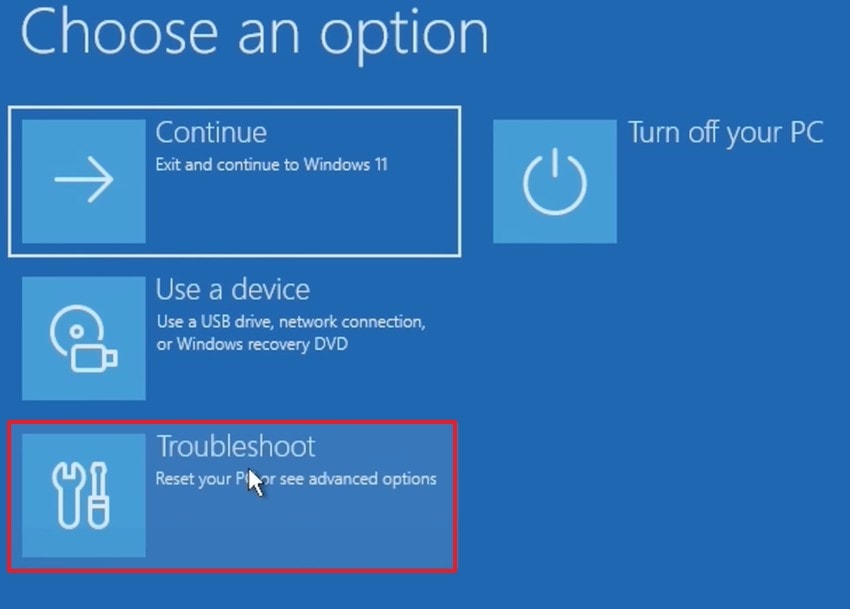
Step 1. Before starting the process, make sure that your BIOS mode is UEFI. Now, open the "Start" menu and press the "Restart" button and the "Shift" key together to open the Windows Recovery Environment. Here, select the "Troubleshoot" tab and click "Advanced Options" to continue.
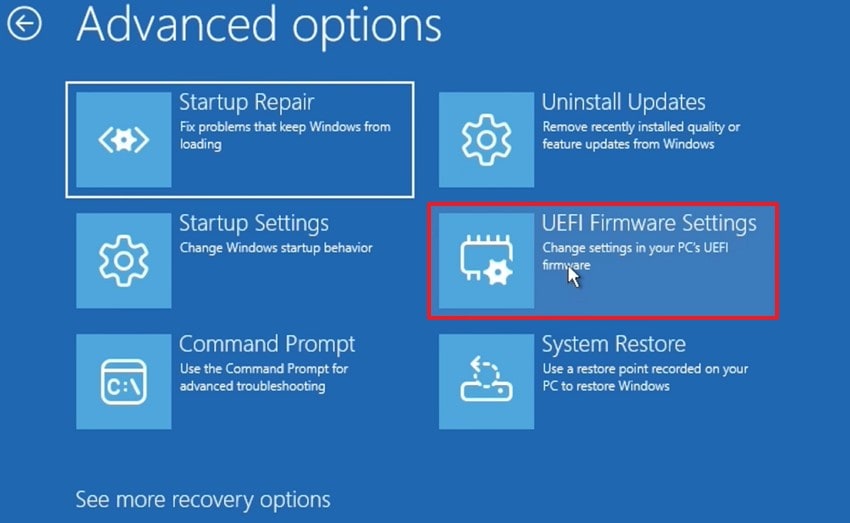
Step 2. Using the "Advanced Options," select the "UEFI Firmware Settings" option and restart your device.
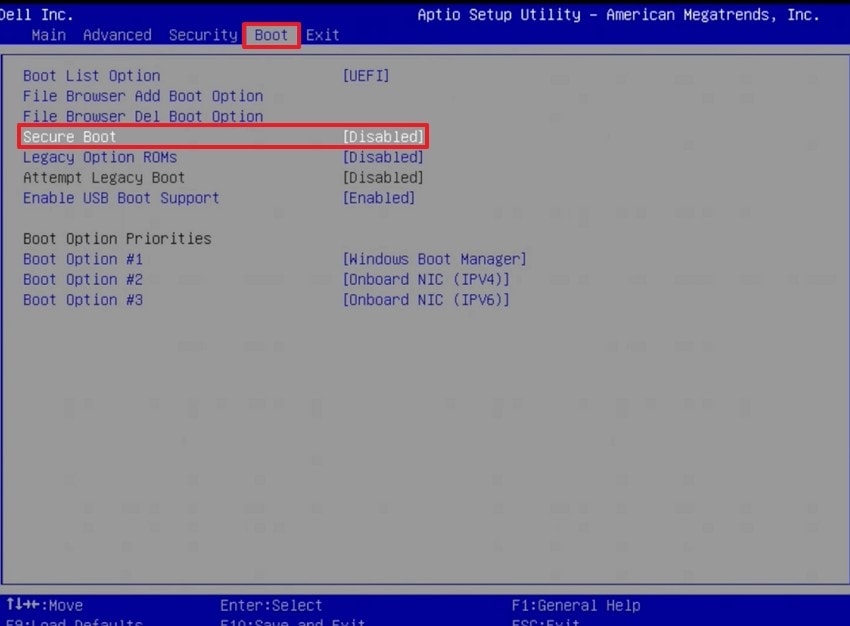
Step 3. The BIOS screen is different for every machine used. The following method is for Dell machines. Once the restarted PC displays the BIOS menu, enter the "Boot" tab and select the "Secure Boot" tab to "Enable" it. Using the F10 key, open the next screen, apply the changes, save them, and exit the screen. Now, let the device start, then go back to "System Information." Your Secure Boot mode will be shown as on.
3. Create Registry Entry & Bypass TPM and CPU Requirements
Bypassing hardware checks allows older computers to install Windows 11 despite unsupported components. This method offers flexibility, although it may reduce long-term stability and official update eligibility. The steps below outline the guide to fixing the This PC doesn't currently meet Windows 11 error using this method:
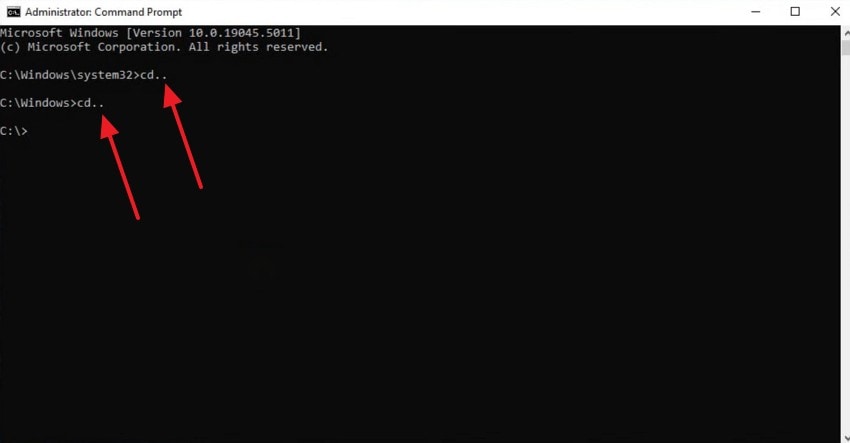
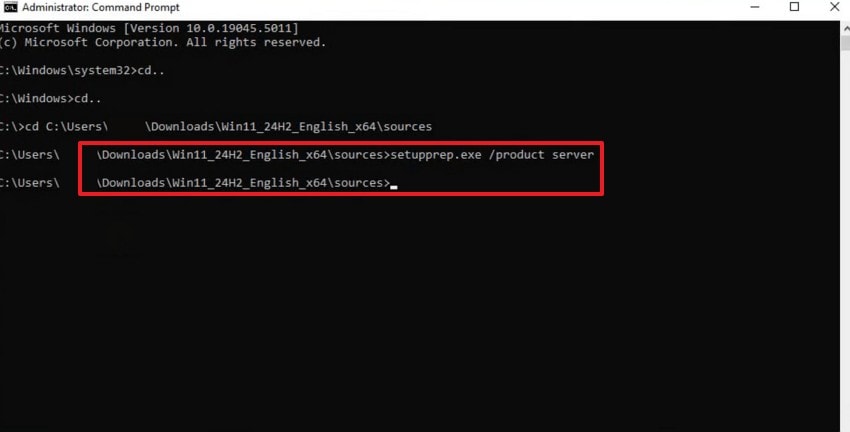
Step 1. In the Command Prompt window, use the "cd .." command to navigate back into the "Windows" folder within your C:/ drive.
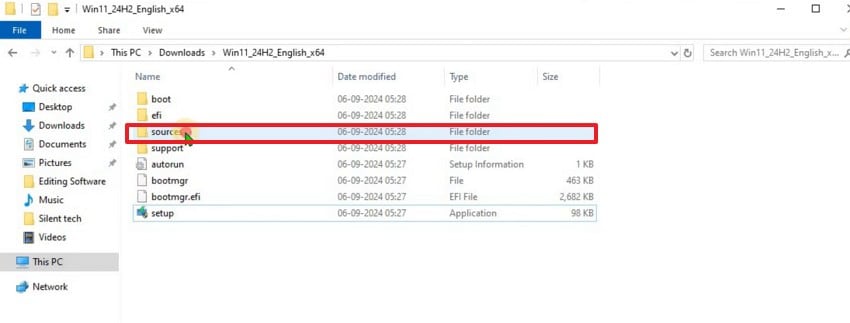
Step 2. In the C:/ drive, select the "Sources" folder and copy the pathway from the top bar.
Step 3. Now, open the CMD window again, paste the copied pathway, and press Enter. Now, give the "Win11_24H2_English_x64\sources>setupprep.exe /product server" command. Next, enter the "Win11_24H2_English_x64\sources>" code and wait for the Windows Installer window to open.
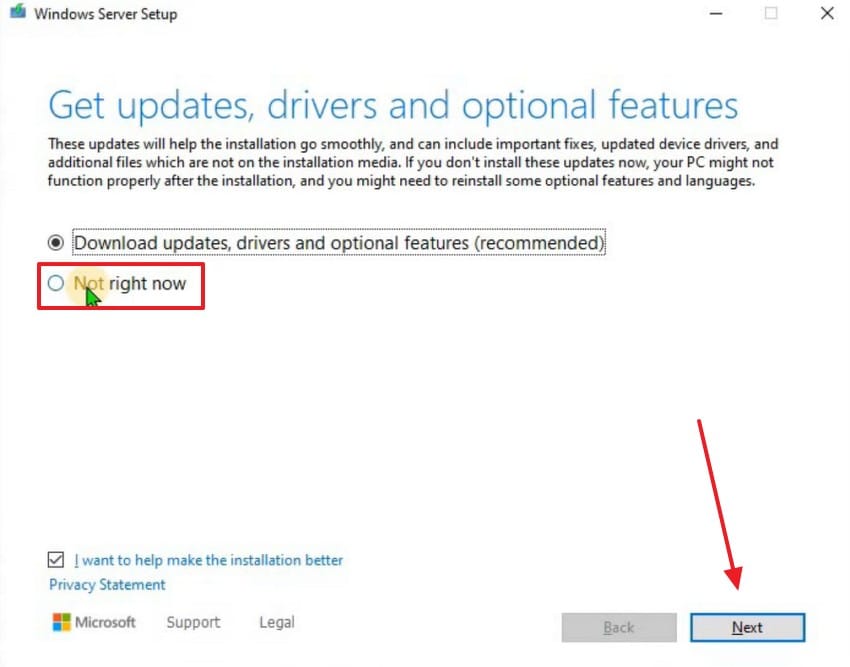
Step 5. Here, select the "Not Right Now" radio button and click "Next" to continue.
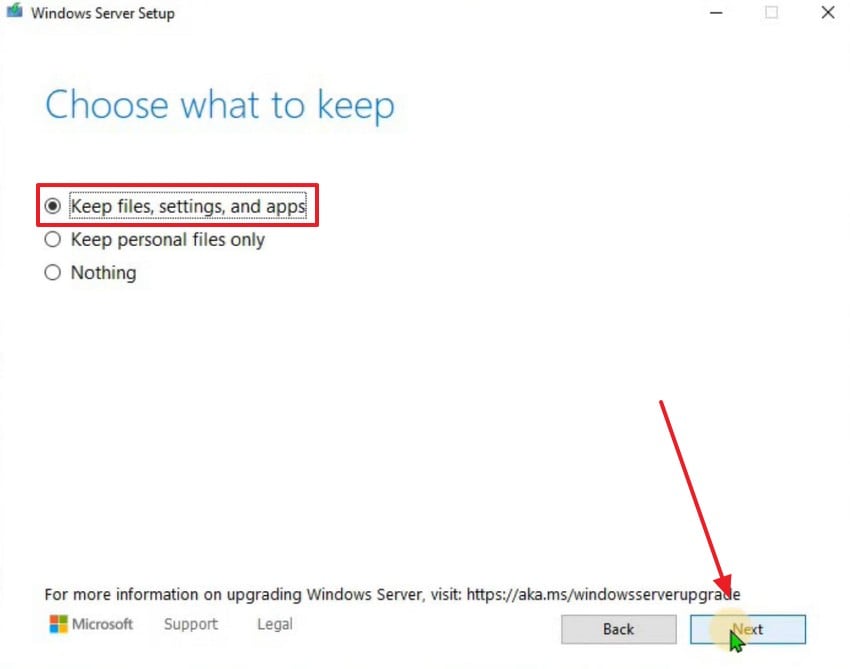
Step 6. Using the following window, select the "Keep Files, Settings, and Apps" option to preserve your data. Your system will update Windows while bypassing TPM and CPU requirements.
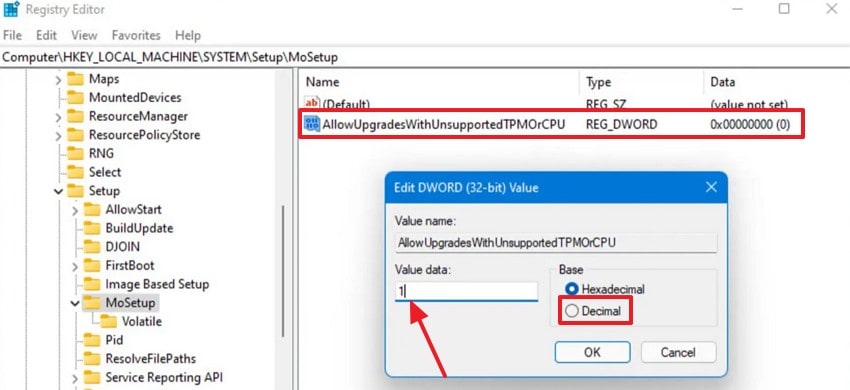
4. Reg Keys to Bypass SecureBoot, TPM 2.0, and RAM Check
Editing registry keys helps users skip multiple hardware requirements during installation. It allows installation on low-spec systems, but it potentially compromises performance and reduces overall security safeguards. If you want to learn how to solve the This PC doesn't currently meet Windows 11 issue, the following guide will help:
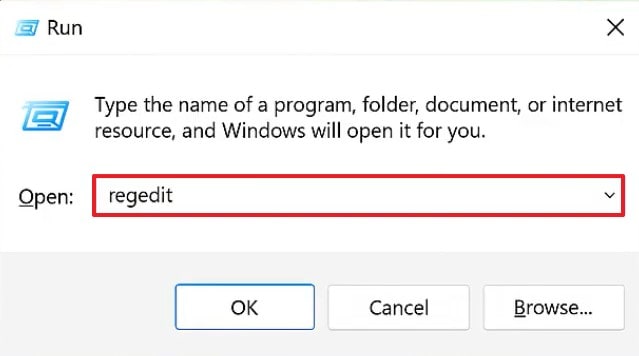
Step 1. First, enter the "Win+R" keys and enter the "regedit" command in the Run window.
Step 2. In the Registry Editor window, right-click on the "HKEY_LOCAL_MACHINE" tab from the left panel. In the extended pop-up, hover the cursor over "New" and select the "Key" option.
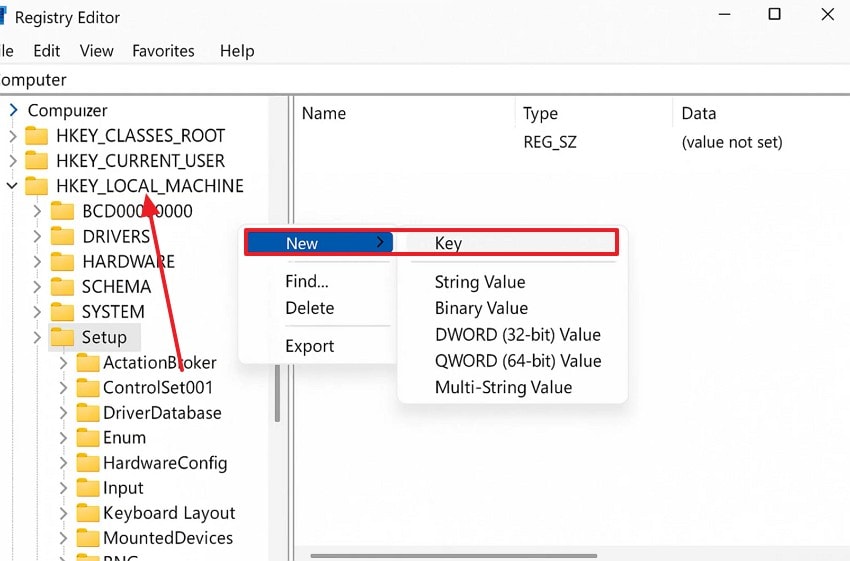
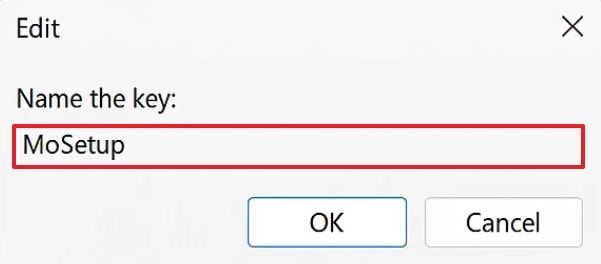
Step 3. In the following window, name the setup as "MoSetup" and click "OK" to continue.
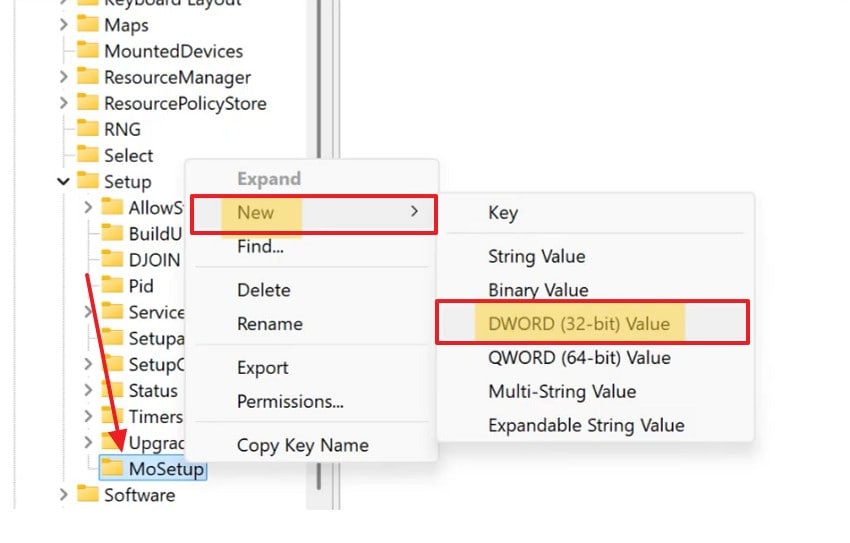
Step 4. When the "MoSetup" option emerges in the left panel, right-click on it and expand the "New" menu. Now, select "DWORD (32-bit) Value" and proceed to the next step.
Step 5. Using the right side of the screen, select the "Allow Updates" option. In the "Value Data" field, enter "1" and select "Decimal" to click "OK." Now, restart your device, and the Windows 11 version will automatically start installing.
5. Purchase Compatible Hardware to Install Windows 11
Buying modern hardware guarantees full compliance with Windows 11 system requirements. This ensures optimal performance, improved security, and access to long-term feature updates without limitations. Before you purchase the hardware, make sure that it is certified for Windows 11 compatibility.
Part 2. How to Check If Your PC Meets Windows 11 Requirements
As stated, there are certain requirements for installing the Windows 11 version. The following section explores the requirements of this action, helping you prevent the "This PC doesn't currently meet Windows 11" issue:
- Use the PC Health Check Tool: Microsoft's PC Health Check tool quickly analyzes your hardware and reports overall compatibility status. It provides clear guidance about failing components so users can identify what needs upgrading.
- Review Windows Settings: The "About" section displays key hardware details like processor, RAM, and system type. These specifications help users compare their device capabilities against Windows 11's officially published requirements.
- Check TPM Status in Security Processor Settings: The Security Processor section shows whether TPM 2.0 is installed and functioning properly. If TPM is missing or disabled, the device automatically becomes incompatible with Windows 11.
- Verify Secure Boot Status in BIOS: Secure Boot settings in BIOS indicate whether your system supports trusted boot processes. Enabling Secure Boot ensures your computer meets Microsoft's essential security standards for Windows 11.
- Confirm Storage and Partition Style: UEFI systems using GPT partitions are necessary for a smooth Windows 11 installation. Older MBR formats or unsupported configurations prevent the installer from recognizing the drive as compatible.
To learn about the requirements of this OS version, go through the table below:
| Component | Minimum Requirement |
| Processor (CPU) | 1 GHz or faster, 2 or more cores, compatible 64‑bit processor or SoC |
| RAM | 4 GB or more |
| Storage | 64 GB or larger storage device |
| System firmware | UEFI, Secure Boot capable |
| TPM | TPM (Trusted Platform Module) version 2.0 |
| Graphics card | DirectX 12 or later compatible GPU with WDDM 2.0 driver |
Pro Tip: Repairit: The Smart Solution for Unreadable or Corrupted Files on Windows 11
The section above discussed fixing the "This PC doesn't currently meet Windows 11 system requirements" problem. Now that you have successfully installed Windows 11 on your device, you will possibly have corrupt files in it as well. To repair these damaged documents, Repairit can fix files with extensive and chronic file damage, regardless of the cause of damage.
This platform supports more than 1000+ file formats, from multimedia and Microsoft Office to AutoCAD. To make sure that you are downloading the right file, use the File Preview feature before saving files. Once the files are repaired, they are saved in the cloud storage for easy access in the future.
Key Features

-
Repair damaged files with all levels of corruption, including blank files, files not opening, unrecognizable format, unreadable content, files layout changed, etc.
-
Support to repair all formats of PDF, Word, Excel, PowerPoint, Zip, and Adobe files.
-
Perfectly repair corrupted files with a very high success rate, without modifying the original file.
-
No limit to the number and size of the repairable files.
-
Support Windows 11/10/8/7/Vista, Windows Server 2003/2008/2012/2016/2019/2022, and macOS 10.13~macOS 15.
A Guide to Using Repairit to Fix Corrupted Files on Windows 11
Repairit is a user-friendly tool that requires just a few steps to fix a damaged file on Windows 11. The steps below explore how to use this tool for effective file repair:
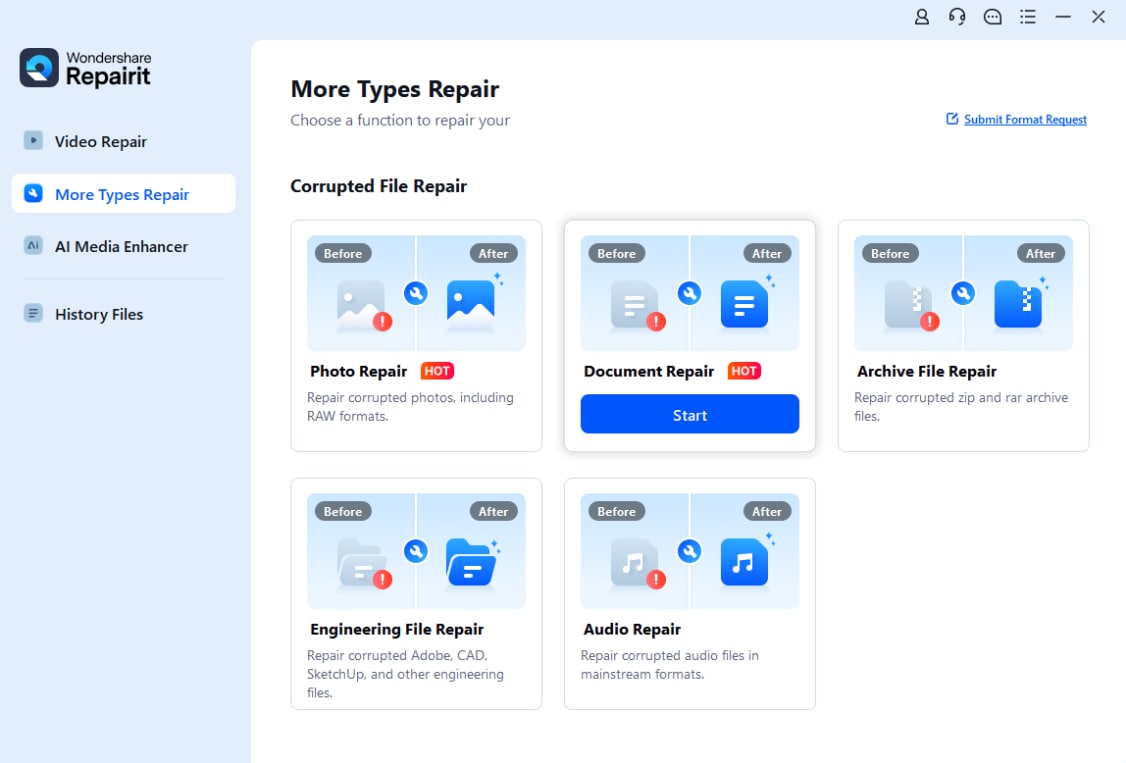
Step 1. Import a File in the Document Repair Interface
To start the process, enter the "More Types Repair" tab from the left panel and select the "Document Repair" option from the right.
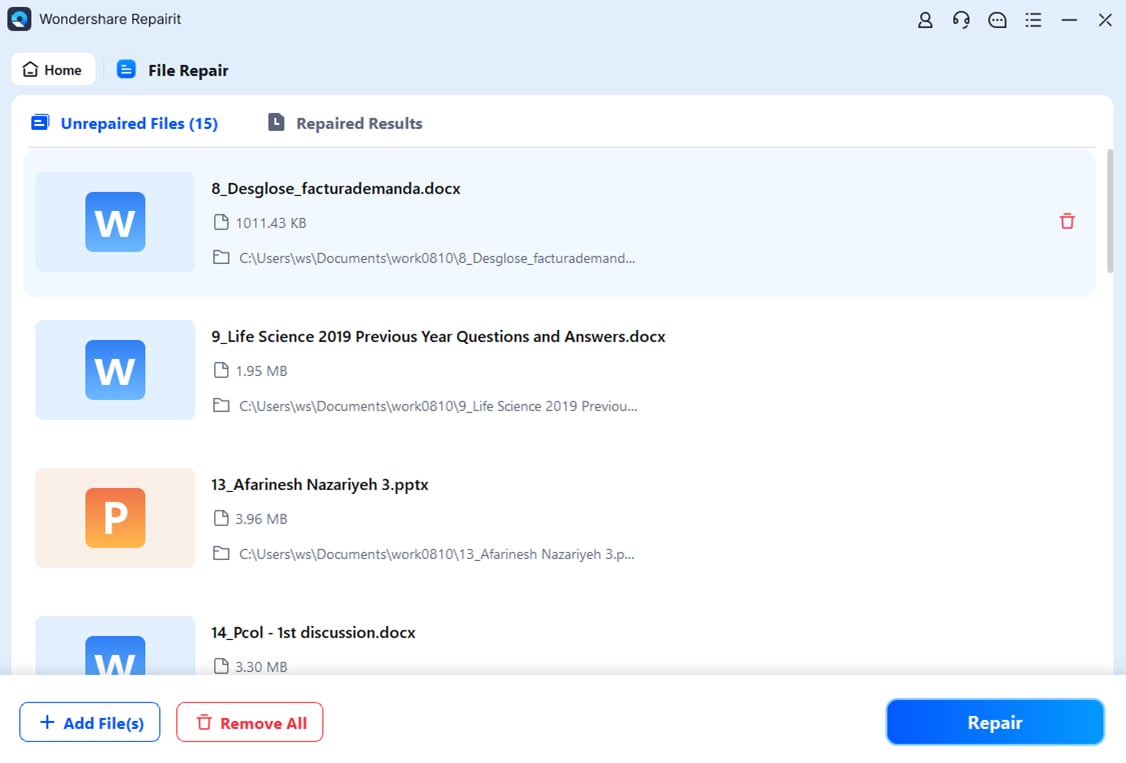
Step 2. Repair Batch Damaged Files
Once you have imported batch-damaged files, wait for them to appear and press the "Repair" button to start fixing.
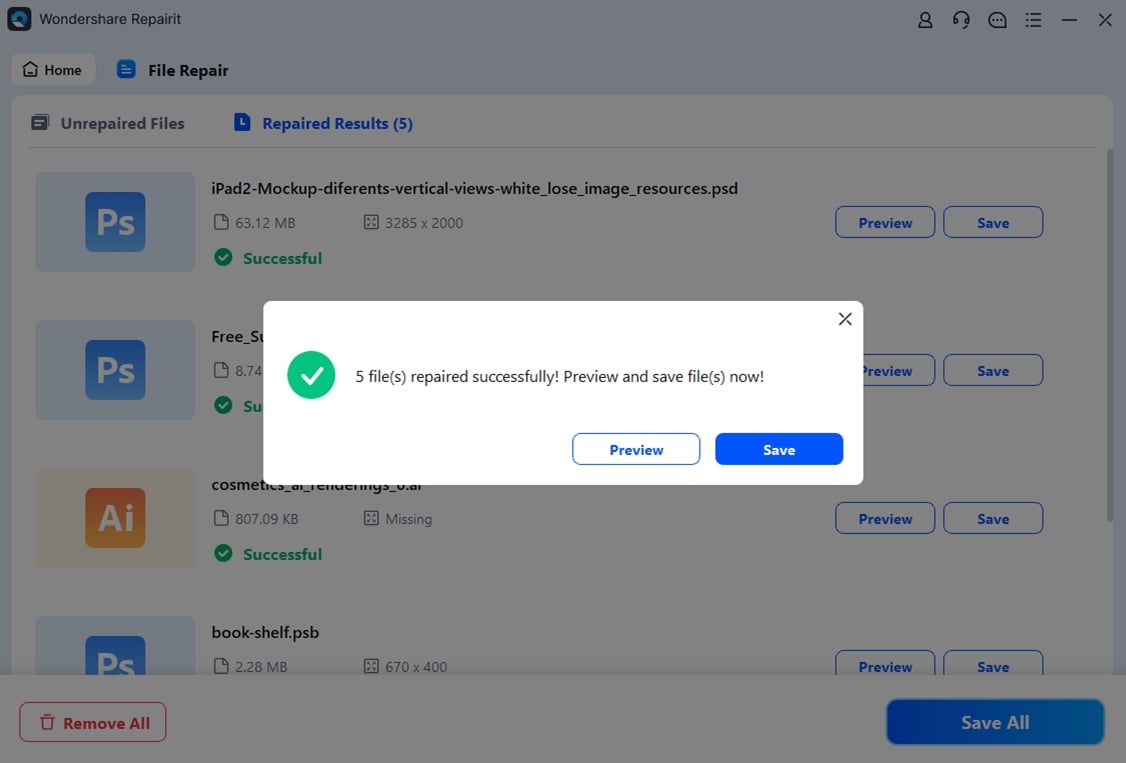
Step 3. Save or Preview the Files to End the Process
Once the files are repaired, a dialogue box will appear next. Here, click "Save" to download the fixed file, or "Preview" to view it before saving.
Repair Corrupted RAR Files
 Security Verified. Over 7,302,189 people have downloaded it.
Conclusion
In essence, the "This PC doesn't currently meet Windows 11 system requirements" error can hinder your tasks. This article was a detailed guide to resolving this error and making your machine compatible with Windows 11. Once you have installed the latest version, it is possible that you may encounter damaged files. If so, use Repairit to repair these documents and execute batch processing to fix them all in a single task.
FAQs
-
1. Why does my PC show "This PC doesn't currently meet Windows 11 requirements"?
This message appears when your hardware lacks essential security or performance features required by Windows 11. The system blocks installation until those specific limitations are resolved or bypassed safely. -
2. Can I still install Windows 11 if my PC is incompatible?
Yes, you can install Windows 11 using certain registry-based bypass methods during setup. These methods allow installation but may reduce stability and block important security updates. -
3. What to do if my files get damaged after upgrading to Windows 11?
If you see any corrupted documents after installing Windows 11, use Repairit to fix them. With its Advanced Repair Mode, this tool dives deep into the damage and fixes it in no time.
