Choosing between Repairit Photo Repair and 4DDiG Photo Repair can be confusing when all you want is to fix corrupted, blurry, pixelated, or unopenable photos quickly. Both tools focus on desktop photo repair and promise to restore photo quality with minimal hassle, but they approach the task a bit differently. This guide compares workflows, strengths, and limitations so you can understand where Repairit Photo Repair is a stronger option and when 4DDiG Photo Repair may still fit your needs.
Repair Corrupted Photos with Repairit Photo Repair
 Security Verified. Over 7,302,189 people have downloaded it.
In this article
- Repairit Photo Repair vs 4DDiG Photo Repair: Quick Verdict
- Repairit Photo Repair vs 4DDiG Photo Repair: Key Differences
- Repairit Photo Repair vs 4DDiG Photo Repair: Comparison Table
- What Repairit Photo Repair and 4DDiG Photo Repair Are Best For
- Repairit Photo Repair vs 4DDiG Photo Repair: Features and Capabilities
- Repairit Photo Repair vs 4DDiG Photo Repair: Supported Formats and Compatibility
- Repairit Photo Repair vs 4DDiG Photo Repair: Workflow and Ease of Use
- Repairit Photo Repair vs 4DDiG Photo Repair: Pricing and Trial Options
- Who Should Choose Repairit Photo Repair
- Who Should Choose 4DDiG Photo Repair
- Pros and Cons of Repairit Photo Repair and 4DDiG Photo Repair
- How to Repair Corrupted Photos After Choosing the Right Tool
Repairit Photo Repair vs 4DDiG Photo Repair: Quick Verdict
Both Repairit Photo Repair and 4DDiG Photo Repair are desktop tools focused on fixing damaged images rather than full editing suites. Overall, Repairit Photo Repair tends to be a stronger choice if you deal with a mix of mildly and more seriously corrupted photos and want guided previews before saving. 4DDiG Photo Repair usually suits beginners who need fast, straightforward repairs for a smaller batch of typical corruption, blur, or pixelation issues.
If you want more structure and control over how repaired photos are reviewed and saved, Repairit Photo Repair is likely to feel more comfortable. If you prefer a minimal interface and quick decisions, 4DDiG Photo Repair can be enough for many everyday problems.
Repairit Photo Repair vs 4DDiG Photo Repair: Key Differences
When comparing repairit photo repair vs 4ddig photo repair, several practical differences stand out:
- Best fit users: Repairit Photo Repair aims at users who regularly fix corrupted photos and may face tougher damage; 4DDiG Photo Repair is more focused on beginners and light, occasional use.
- Ease of use: Both are user friendly, but 4DDiG typically keeps options to a minimum, while Repairit offers a step based flow with more on screen guidance.
- Repair depth: Repairit Photo Repair is positioned to handle a broader range of corrupted or visually damaged files in everyday scenarios, whereas 4DDiG mainly targets common corruption and blur.
- Workflow style: Repairit emphasizes structured import, repair, preview, and export steps; 4DDiG streamlines these into a quicker sequence with fewer decisions.
- Control vs speed: Repairit usually offers more chances to evaluate results; 4DDiG favors speed over fine tuning.
Repairit Photo Repair vs 4DDiG Photo Repair: Comparison Table
| Dimension | Repairit Photo Repair |
|---|---|
| Best for | Users who need guided repair for a wide range of corrupted, blurry, or severely damaged photos; beginners who want fast, straightforward fixes for common photo corruption issues. |
| Ease of use | User friendly with a clear, step based interface and helpful prompts; very simple UI designed for quick, no fuss repairs on desktop. |
| Repair depth | Well suited for more complex or heavily corrupted images in many everyday scenarios; focuses on typical corruption, blur, or pixelation and may struggle with extreme damage. |
| Workflow | Guided workflow with structured steps from import to preview and export; simple and guided, optimized for quick repair runs with minimal decisions. |
| Strengths | Versatile repair options, intuitive guidance, and practical handling of tough cases; simple UI, fast processing, and solid handling of common corruption scenarios. |
| Weaknesses | May feel more detailed than necessary for users who only need basic, quick fixes; limited manual control or fine tuning for severely corrupted images. |
What Repairit Photo Repair and 4DDiG Photo Repair Are Best For
Both tools are desktop photo repair software focused on fixing corrupted, blurry, pixelated, or unopenable images rather than editing or organizing photos. According to the overall positioning, each tool excels in slightly different situations:
Repairit Photo Repair is typically better suited for:
- Handling a mix of lightly and more seriously corrupted image files from cameras, phones, or computers.
- Users who want a guided, step by step flow, including previewing repaired results before saving.
- People who expect to repair damaged photos regularly and prefer clearer control over what gets exported.
4DDiG Photo Repair generally works best for:
- Beginners who want a very simple interface to repair corrupted photos without many options to configure.
- Small batches of damaged, blurry, or pixelated photos that need quick improvement.
- Users who mostly face common corruption scenarios rather than extremely damaged image files.
In short, Repairit Photo Repair leans toward broader day to day use with more structure, while 4DDiG Photo Repair focuses on fast, straightforward repair tasks.
Repairit Photo Repair vs 4DDiG Photo Repair: Features and Capabilities
The main overlap between these two tools is that they are designed to repair damaged images, not to recover deleted photos or act as full editing suites. Their shared and differing capabilities can be summarized as follows.
Shared core focus
As highlighted in the overview, both applications concentrate on fixing corrupted, blurry, pixelated, or unopenable photos on desktop. They are intended to restore photo quality enough for everyday viewing and sharing.
Core features both tools tend to offer include:
- Repair corrupted or unopenable image files from common photo formats.
- Fix blurry or pixelated photos to improve overall visual clarity.
- Batch process multiple damaged images in a single repair session.
How their capabilities differ
According to the provided summary, Repairit Photo Repair and 4DDiG Photo Repair share a focus on repairing damaged images rather than complex editing. The difference is how they balance power and simplicity:
- Repairit Photo Repair tends to offer more flexible handling for tougher or more complex corruption cases, giving users a guided yet capable toolkit.
- It also provides structured previews that help you evaluate repaired images before saving, which is useful when working with a lot of damaged photos.
- 4DDiG Photo Repair concentrates on a streamlined, simple, and guided workflow that prioritizes speed over fine tuning, with fewer manual adjustments.
This means that if you frequently deal with challenging or varied damage, Repairit Photo Repair can be more reassuring. If your main need is quick, simple runs on a few problematic images, 4DDiG Photo Repair may feel lighter and faster.
Repairit Photo Repair vs 4DDiG Photo Repair: Supported Formats and Compatibility
Both tools focus on popular image formats you are likely to get from cameras, phones, and desktops. As described, both Repairit Photo Repair and 4DDiG Photo Repair focus on popular image formats typically used from cameras, phones, and desktops, such as common JPEG or similar file types.
Key points around formats and devices include:
- You can transfer photos from phones, cameras, memory cards, or cloud backups to your computer and then repair them with either tool.
- Each application runs on desktop platforms, making them suitable for users who prefer local, offline processing of corrupted photos.
- Repairit Photo Repair generally emphasizes broader day to day repair scenarios, which can matter if your collection mixes photos from multiple devices and sources.
- 4DDiG Photo Repair focuses more on straightforward cases and a simple workflow across those same common formats.
In practice, most users who work with standard image files should find both tools compatible for their everyday photo repair jobs.
Repairit Photo Repair vs 4DDiG Photo Repair: Workflow and Ease of Use
Workflow is one of the clearest differences in this photo repair software comparison.
4DDiG Photo Repair workflow
- Uses a simple and guided process that walks beginners through adding damaged files and running quick repairs.
- Makes very few demands on the user, with minimal decisions and configuration steps.
- Feels familiar if you prefer a near one click style repair sequence.
Repairit Photo Repair workflow
- Keeps the process accessible but adds more structure around previewing and confirming results.
- Guides you through clear stages: import, repair, preview, and export, which helps maintain control over what you keep.
- Can be especially helpful when managing a larger set of corrupted photos or more complex damage, where reviewing results matters.
According to the workflow summary, 4DDiG Photo Repair uses a simple and guided workflow with very few choices, while Repairit Photo Repair tends to add more structure around previewing and confirming results. If you value speed and simplicity above all, 4DDiG may feel more direct. If you want safe, guided steps with more visibility into outcomes, Repairit can be more reassuring.
Repairit Photo Repair vs 4DDiG Photo Repair: Pricing and Trial Options
Pricing can change over time, so the safest approach is to treat it as a comparison of general models rather than exact numbers.
The provided information notes that both Repairit Photo Repair and 4DDiG Photo Repair are typically offered as paid desktop applications, often with trial versions or limited free tests. That means you can usually:
- Download the software and run limited repairs or previews before paying.
- Test how each tool handles your specific corrupted, blurry, or pixelated photos.
- Decide whether the results justify upgrading to a full license.
Since exact pricing, discounts, and license types can vary by region or promotion, it is best to visit each product site directly to check the latest offers before choosing.
Who Should Choose Repairit Photo Repair
Based on the outlined scenarios, Repairit Photo Repair is likely the better fit if any of the following sounds like you:
- Users facing more severe or varied photo corruption who want a guided yet capable repair process.
- People who regularly fix damaged images from cameras, phones, or cloud backups and need reliable results.
- Anyone who values structured previews and clearer control over which repaired photos to keep.
- Users who want a scalable tool that can grow with more complex repair needs over time.
If your work or hobbies lead you to handle different types of photo damage and you care about checking quality before saving, Repairit Photo Repair can be a practical long term companion.
Who Should Choose 4DDiG Photo Repair
4DDiG Photo Repair may be a better match if you are primarily looking for a light, straightforward desktop photo repair tool. It is typically a good choice for:
- Beginners who want a simple UI and minimal decisions while repairing damaged photos.
- Users needing fast, guided repair runs for a small number of corrupted or blurry images.
- People who mainly deal with common corruption scenarios, not extreme or deeply damaged files.
- Anyone who prefers a lightweight desktop tool focused on speed over fine tuning.
If your main goal is to quickly fix a handful of visibly damaged photos from time to time without digging into many options, 4DDiG Photo Repair can be sufficient.
Pros and Cons of Repairit Photo Repair and 4DDiG Photo Repair
To make the repairit photo repair vs 4ddig photo repair decision easier, it helps to look at the pros and cons side by side.
Repairit Photo Repair Pros and Cons
4DDiG Photo Repair Pros and Cons
How to Repair Corrupted Photos After Choosing the Right Tool
Once you have compared Repairit Photo Repair vs 4DDiG Photo Repair and decided which one suits your needs, the next step is actually repairing your corrupted or blurry photos. Instead of staying at the comparison level, it helps to see how a real repair workflow looks in practice.
Repairit Photo Repair is a practical example of a guided desktop process: you add damaged images, let the software analyze and fix visible issues, then preview and save the repaired versions. The same general idea applies to other desktop photo repair tools, even if their screens look different.
Key Features
- Repair corrupted or unopenable photo files from common image formats.
- Improve clarity in blurry or pixelated images with guided repair steps.
- Preview repaired photos before saving to keep only the versions you like.
Step-by-step guide
- Add damaged photos
Launch Repairit Photo Repair and import the damaged or corrupted photos you want to fix.
- Run the repair
Click the repair button and let the tool scan and fix the selected image files automatically.
- Preview and save
Preview the repaired results and save the fixed photos to your preferred location.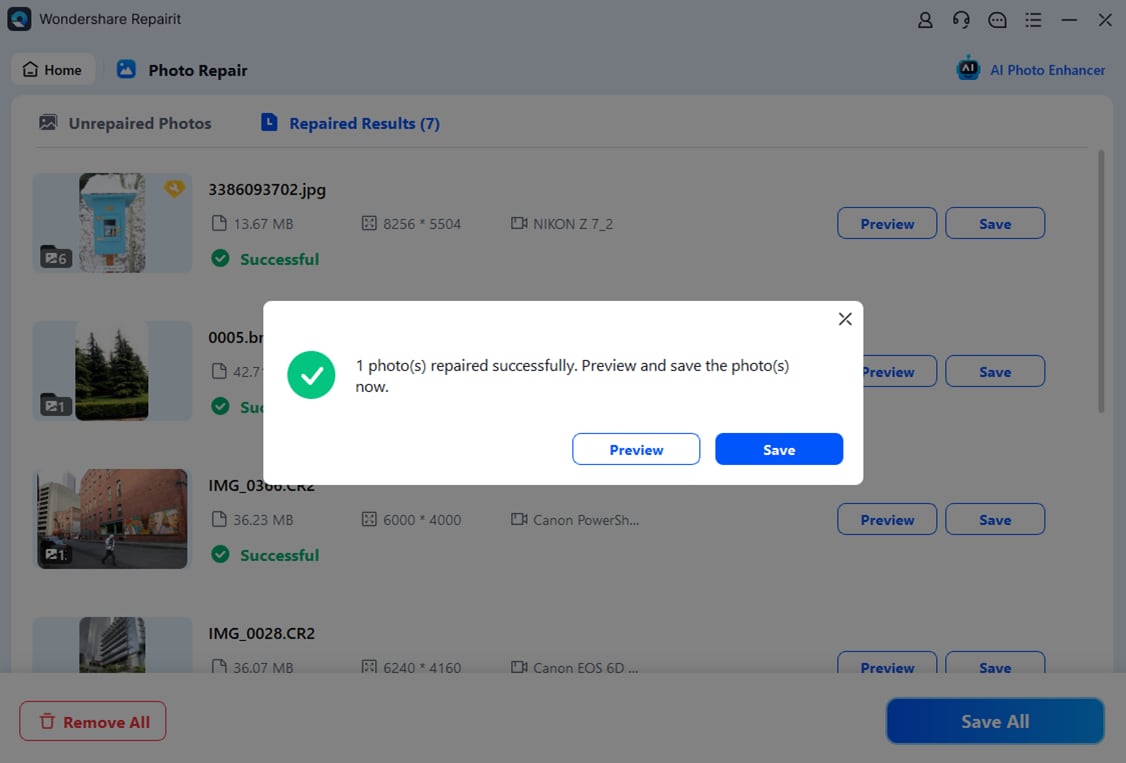
This type of guided process helps you move from comparing tools to actually repairing corrupted photos with confidence, while avoiding accidental overwrites or keeping unsatisfactory results.
Final Verdict
Viewed side by side, both Repairit Photo Repair and 4DDiG Photo Repair aim to fix corrupted, blurry, or pixelated photos on desktop, but they prioritize slightly different users and workflows.
According to the comparison overview, both tools are desktop photo repair software focused on fixing corrupted, blurry, pixelated, or unopenable images. 4DDiG Photo Repair is best for beginners and users needing fast, guided repair for damaged photos, while Repairit Photo Repair positions itself as a stronger option when you need more robust handling of challenging corruption and broader day to day repair needs.
In many situations, Repairit Photo Repair is a stronger choice if you often deal with a mix of mildly and heavily corrupted photos, want a guided yet capable workflow, and appreciate preview steps that help you decide which repaired images to keep. It suits users who expect to handle challenging or repeated repair tasks over time.
4DDiG Photo Repair may still be enough if you are a beginner or occasional user who mainly needs fast, simple fixes for common corruption, blur, or pixelation. Its simple and guided workflow, combined with a focus on quick processing, makes it a practical option for smaller, everyday repair jobs where deep fine tuning is less important.
Next: Repairit Photo Repair VS Stellar Repair For Photo
FAQ
-
1. What is the main difference between Repairit Photo Repair and 4DDiG Photo Repair?
The key difference is that Repairit Photo Repair leans toward handling a wider range of damaged photos with a more structured workflow, while 4DDiG Photo Repair focuses on a very simple, fast process aimed at common corruption scenarios. -
2. Is Repairit Photo Repair better than 4DDiG Photo Repair for severely corrupted photos?
In many cases, Repairit Photo Repair can be a stronger choice for more severe or complex corruption because of its guided, step based approach, while 4DDiG Photo Repair is better suited to typical, everyday damage. -
3. Which tool is easier for beginners, Repairit Photo Repair or 4DDiG Photo Repair?
Both are beginner friendly, but 4DDiG Photo Repair may feel slightly simpler for first time users thanks to its very minimal interface and quick guided process, while Repairit offers a bit more structure and options. -
4. When should I choose 4DDiG Photo Repair instead of Repairit Photo Repair?
You might choose 4DDiG Photo Repair if you mainly repair a few corrupted or blurry photos occasionally, prefer a very simple UI, and do not need much control over extreme or unusual corruption cases. -
5. Can I try Repairit Photo Repair before buying a license?
Both tools are generally offered as paid desktop applications with trial versions or limited free tests, so you can usually download Repairit Photo Repair, see how it handles your corrupted photos, and then decide whether to purchase.