
"Hello ! Every time I start my laptop, I get an error screen from Microsoft Visual C++ saying:" Microsoft Visual C++ Runtime Library. I don't know how to fix it, mostly as someone who knows little to no IT nor how to enable JIT. When I open Microsoft Visual C++ it immediately crashes. If anyone has any tips, it would be appreciated ! - AnxiousStage6707"
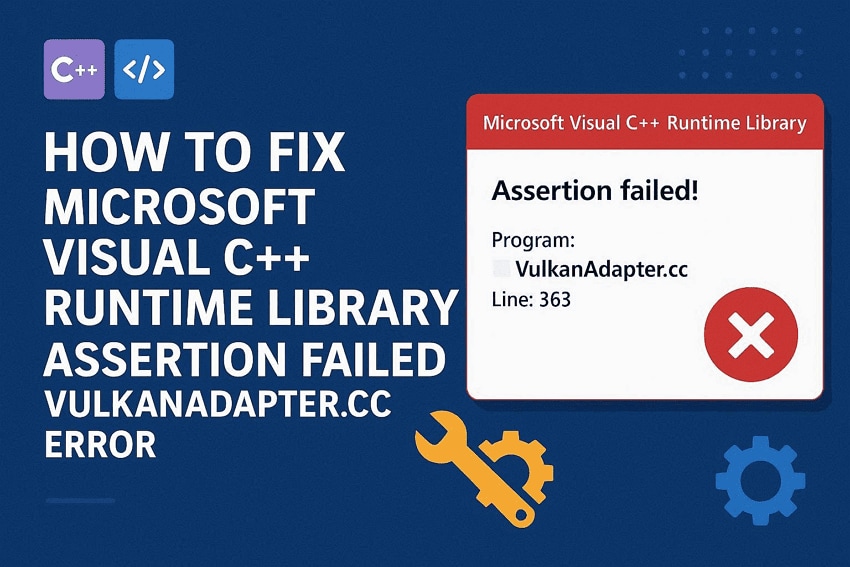
Many Windows users rely on Adobe apps for editing and creative work. Yet, sudden runtime errors can interrupt projects and create confusion during work sessions. A common issue appears as the Vulcanadapter.cc assertion failed runtime library message. This error occurs when Adobe components conflict with system runtime dependencies.
As a result, apps may crash or fail to start on Windows PCs. So, learning how to fix Microsoft Visual C++ Runtime Library Assertion Failed Vulcanadapter.cc Error (Adobe) Windows PC becomes essential. Thus, this ultimate guide explains practical fixes and tips to prevent it from returning.
Table of Contents
-
- Fix 1. Install/Repair Visual C++ Runtimes
- Fix 2. Disable/Remove Adobe CCX Background Processes
- Fix 3. Uninstall the Problematic Adobe App from the PC
- Fix 4. Reinstall Adobe Apps / Creative Cloud
- Fix 5. Run SFC and DISM System Repairs
- Fix 6. Clean Boot to Rule Out Conflicts
- Fix 7. Rename or Remove Faulty Vulkan/Vulcan Files
Part 1. What is Microsoft Visual C++ Runtime Library?
The Microsoft Visual C++ Runtime Library is a crucial component for many Windows apps. It contains shared DLL files that allow programs to use core C and C++ functionalities. These include tasks like memory allocation and data processing operations. Every program built with Visual C++ depends on these libraries to run on Windows systems.
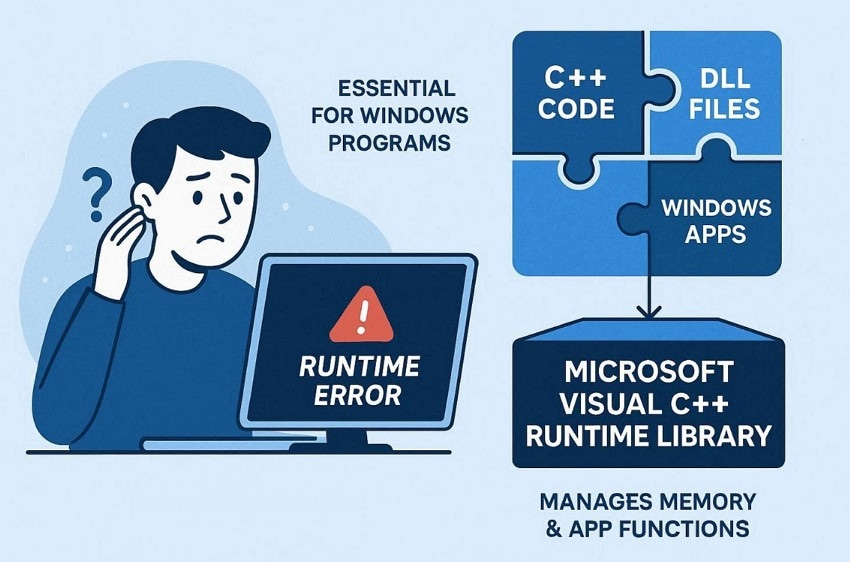
When you run software, these components manage the startup and shutdown procedures. Programs may fail to interact with your hardware even without these specific files. As such, they fill the interfaces between low-level codes and high-level user interfaces. Understanding this library helps you appreciate why runtime errors often disrupt your work.
Role of Vulcanadapter.cc in Adobe Applications
Adobe Creative Cloud uses several background modules to coordinate communication between its apps. The following table highlights the primary functions and common issues of this component:
| Aspect | Description |
| File Location | Part of Adobe CCX or Creative Cloud background services, not individual apps. |
| Primary Role | Acts as an adapter between Adobe’s Vulcan message system and Node/VulcanJS runtime. |
| Used For | Managing inter-app communication, extension loading, and cloud synchronization. |
| Runs Through | Processes like CCXProcess.exe and Creative Cloud Service. |
| Error Cause | Corrupted Creative Cloud installation or leftover Vulcan files. |
| Visible Error Message | "Microsoft Visual C++ Runtime Library – Assertion Failed – vulcanadapter.cc…" |
Common Causes of Vulcanadapter.cc Assertion Failed Error
The following are the common causes behind this assertion failure and related crashes:
- Corrupted Files: Damaged CCXProcess or Creative Cloud service files can interrupt communication between Adobe background components and trigger runtime assertion errors.
- Leftover Folders: Incomplete uninstalls may leave behind CCX or Vulcan service remnants that continue loading during system startup.
- Missing Runtimes: Missing or outdated Visual C++ Redistributables can break dependencies required for proper interaction between Adobe software and Windows.
- Duplicate Entries: Multiple CCXProcess startup entries in the Windows registry can create conflicts during Creative Cloud initialization.
- Outdated Builds: Older Creative Cloud versions may contain unresolved bugs affecting the Vulcanadapter communication layer.
Part 2. 7 Simple Fixes for Microsoft Visual C++ Runtime Library Error
Addressing the Microsoft Visual C++ runtime issues requires performing specific repairs. So, the given 7 practical solutions help you resolve your current application errors:
Fix 1. Install/Repair Visual C++ Runtimes
This solution restores essential libraries needed for stable software functioning. It replaces missing or corrupted runtime components that trigger system crashes. The process ensures proper execution of apps relying on shared C and C++ frameworks. Upon doing this, you minimize runtime conflicts and improve overall program stability. Thus, the following steps will guide you through installing these Visual C++ packages:
Step 1. Head over to the official "Microsoft Visual C++ Redistributable" download page. Scroll through the available options and select the "X64/X86/ARM64" link to get the installer.
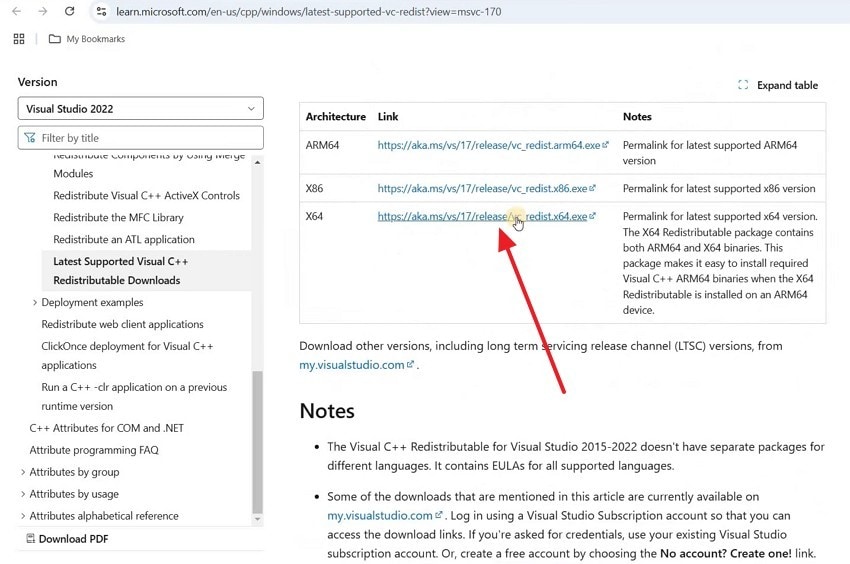
Step 2. After the file finishes downloading, open the ".exe" setup file. Here, check the box labeled "I Agree to License Terms and Conditions," then click "Install."

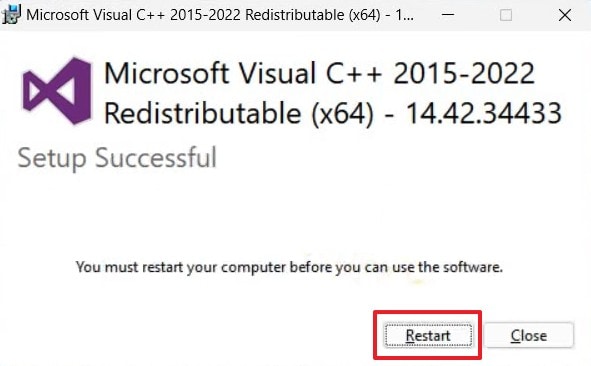
Step 3. Adhere to the visual prompts for the installation to complete. Once the setup wizard confirms it’s finished, click "Restart" to reboot your system.
Fix 2. Disable/Remove Adobe CCX Background Processes
Adobe background processes trigger conflicts that disrupt your creative editing app workflow. Disabling these services stops the errors that plague your Microsoft C++ Runtime Library. This action creates a stable space for your software to function without crashing. Moreover, it improves system performance and helps prevent future runtime application errors. Go through the steps to deactivate the problematic processes on your Windows system:
Step 1. As you run the "Adobe Creative Cloud" app, click the "Profile" icon and opt for "Preferences."
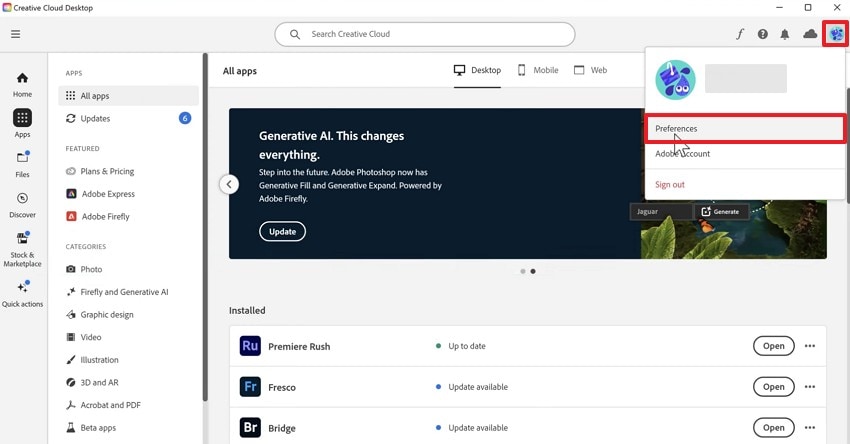
Step 2. Here, disable the "Launch Creative Cloud At Login" toggle and press "Done."

Fix 3. Uninstall the Problematic Adobe App from the PC
Sometimes, a specific Adobe application may be corrupted, causing repeated runtime errors. Therefore, uninstalling the problematic Adobe application helps remove corrupted program files. This process clears leftover configurations that could trigger vulcanadapter.cc assertion failures. It also ensures a clean environment for reinstalling software without conflicts or crashes. Hence, perform these clear and simple steps to remove the problematic app:
Step 1. To initiate, access the "All Apps" section inside the "Adobe Creative Cloud" program. Then, click the "Three Dots" icon next to the problematic app and choose "Uninstall."
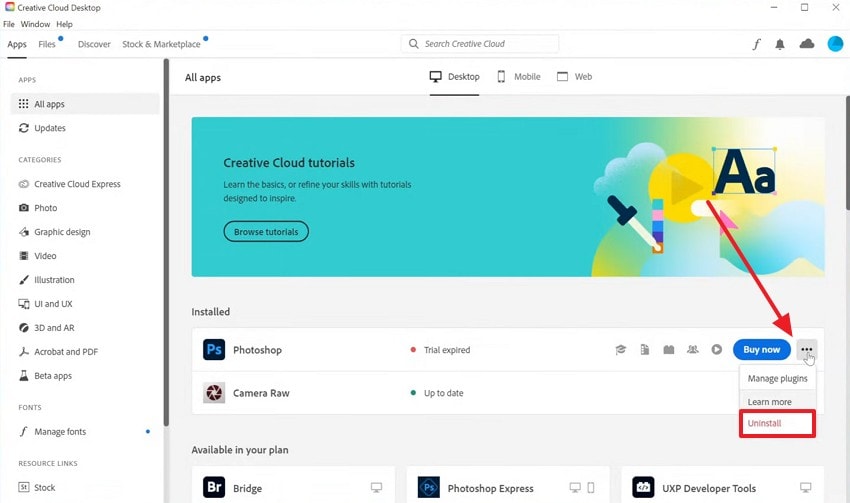
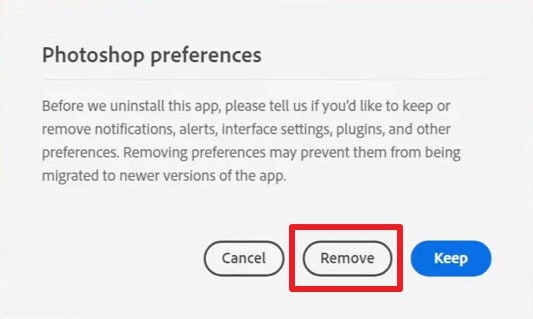
Step 2. Upon seeing a confirmation prompt, press the "Remove" button.
Fix 4. Reinstall Adobe Apps / Creative Cloud
Fresh installations replace damaged files and restore missing connections for your software tools. It repairs internal conflicts related to the required Microsoft Visual C++ runtime library. So, reinstalling Creative Cloud ensures all services function without triggering errors. Moreover, a clean installation offers a foundation for your heavy editing tasks on Windows systems. Follow these specific steps below to reinstall your software and restore system stability:
Step 1. Navigate to the "All Apps" tab and find the specific application. Press the "Three Dots" icon and select "Uninstall" from the menu that appears.

Step 2. Click "Remove" once the confirmation prompt appears on your screen.

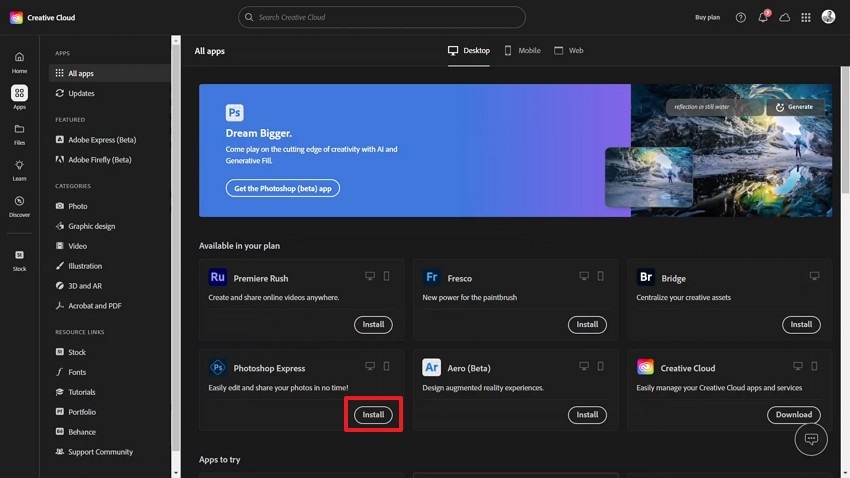
Step 3. After a while, press the "Install" button inside the newly uninstalled program.
Fix 5. Run SFC and DISM System Repairs
System File Checker and DISM scan your drive for any damaged operating files. These powerful tools verify the integrity of the critical Microsoft C++ runtime library. They repair corrupted system components that cause those application crashes and errors. Restoring these files ensures your Adobe software communicates with your Windows OS. Thus, execute these specific command-line operations to resolve your underlying system issues:
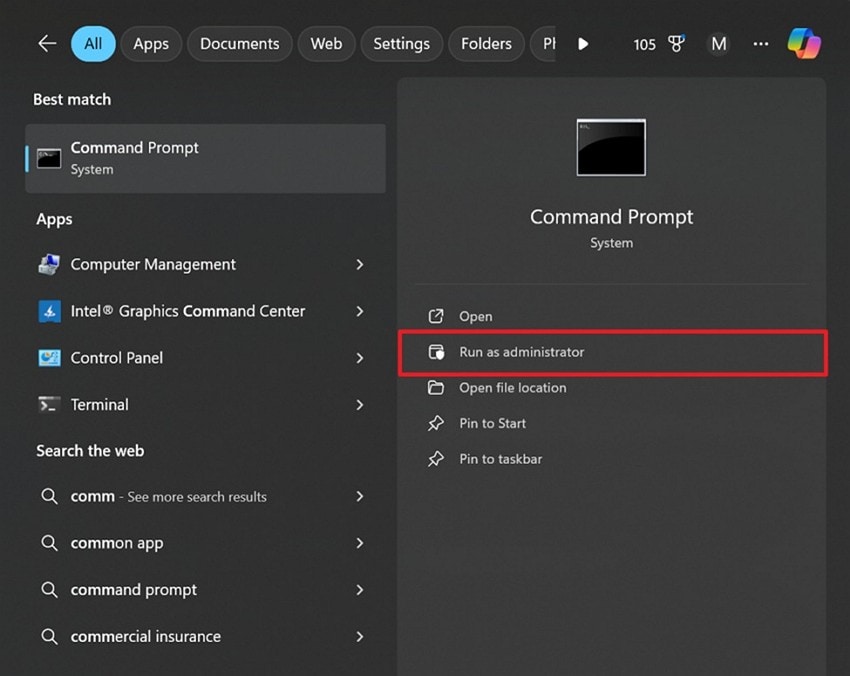
Step 1. Type "Command Prompt" in the search bar and opt for "Run as Administrator."
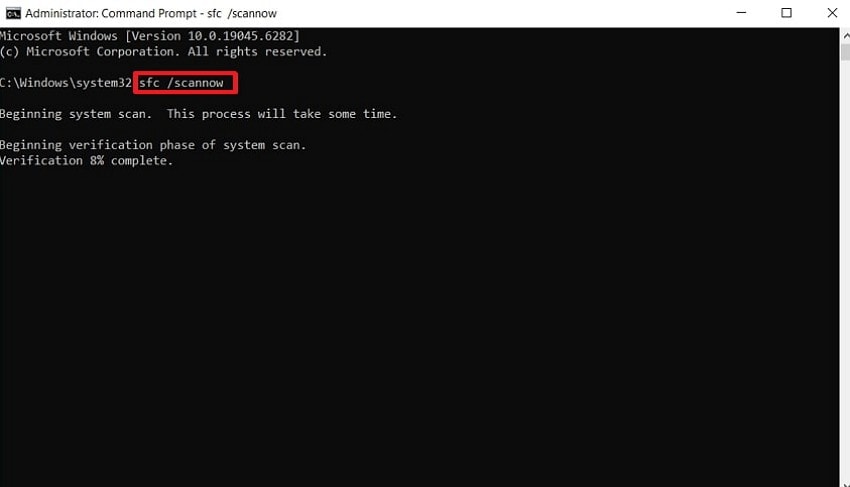
Step 2. Once the terminal window opens, you need to type the "sfc /scannow" command and hit "Enter."
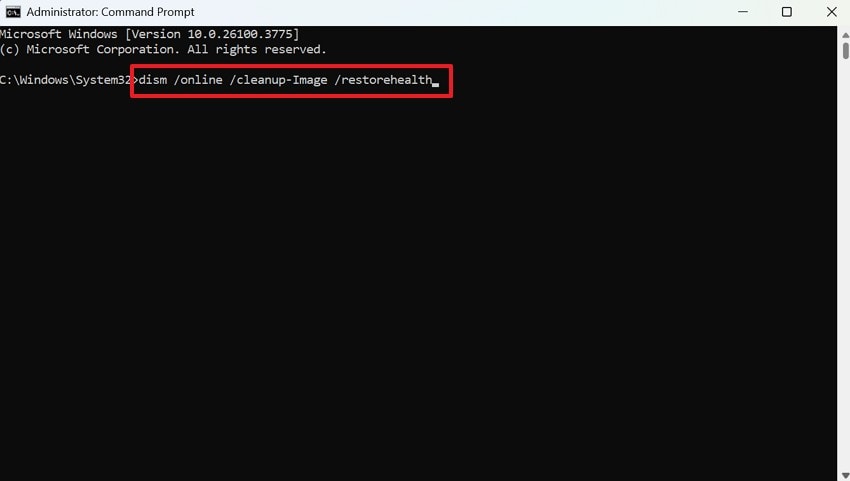
Step 3. Apart from the above, input "dism /online /cleanup-image /restorehealth." After that, press the "Enter" key to repair the underlying system image.
Fix 6. Clean Boot to Rule Out Conflicts
A clean boot disables all non-essential external startup programs on your Windows device. This process isolates software conflicts that might interfere with your Adobe app startup. You can verify if external apps cause your Microsoft C++ runtime library errors.
Therefore, identifying the specific source of these conflicts makes resolving the issue easier. So, the upcoming steps explain how to perform a clean boot on your Windows system to fix the Microsoft Visual C++ Runtime Library Assertion Failed Vulcanadapter.cc Error (Adobe) Windows PC:
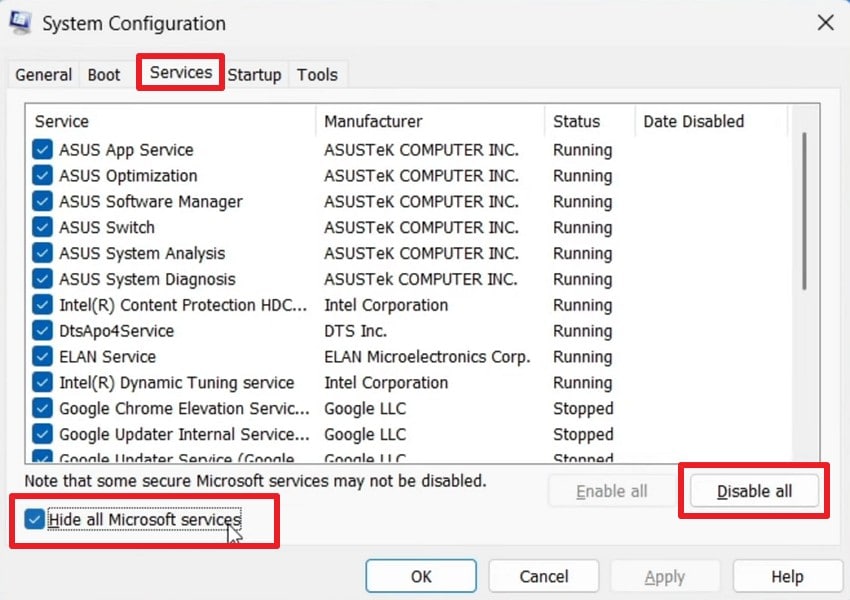
Step 1. Open the "Run" dialog box upon pressing "Windows + R." Now, input "msconfig" in the provided field and press the "OK" button.

Step 2. Afterward, access the "Services" tab and tick "Hide All Microsoft Services." Upon doing this, you need to press the "Disable All" button.
Step 3. Following this, head to the "Startup" tab and click "Open Task Manager."
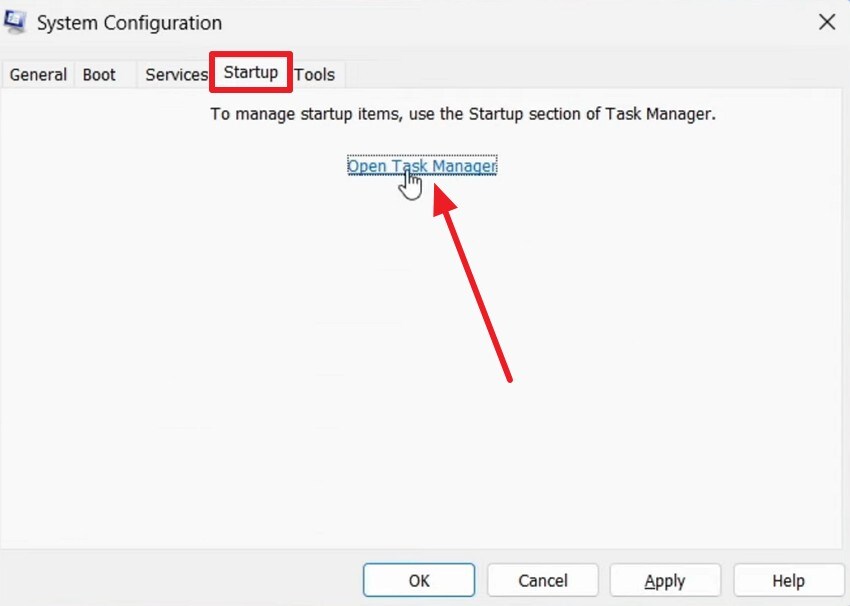
Step 4. Next, right-click the unnecessary running app to choose "Disable" and close it.

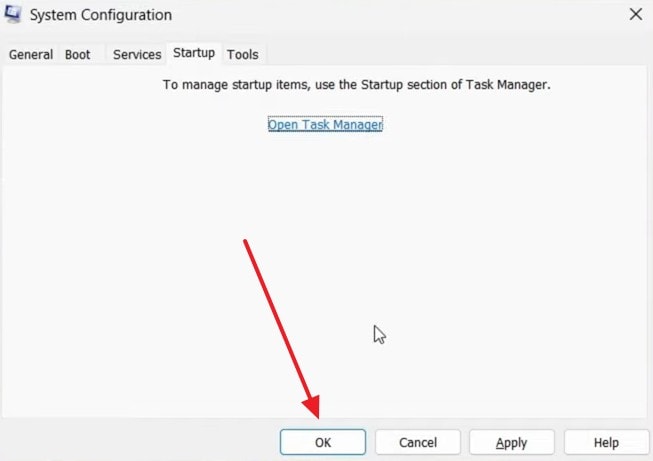
Step 5. Once you disable all the unnecessary programs, click the "OK" button.
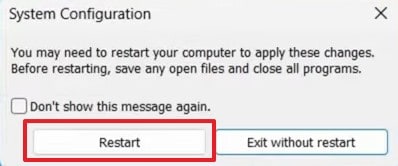
Step 6. Upon seeing a prompt screen, click "Restart" to find out conflicting apps or services and uninstall them.
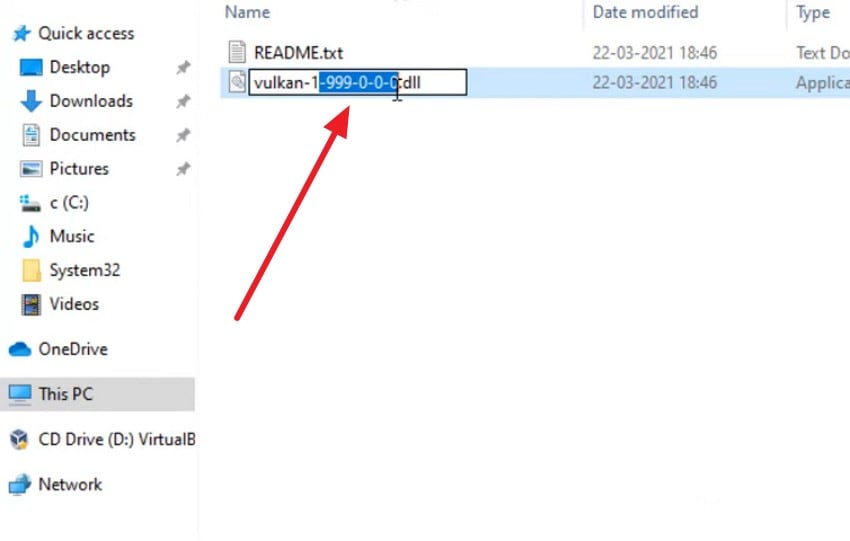
Fix 7. Rename or Remove Faulty Vulkan/Vulcan Files
Faulty Vulcan files create persistent errors within your Adobe software communication layer. Renaming these remnants forces the application to generate clean versions upon next launch. This process stabilizes dependencies related to your Microsoft Visual C++ runtime system. Removing or renaming these files stops the assertion failures from appearing during boot. Thus, adhere to the steps below to rename or delete these problematic Vulcan files:
Step 1. To initiate, access the "Vulkan" file on your "File Explorer" and right-click on it. Upon seeing the menu, opt for the "Rename" option.
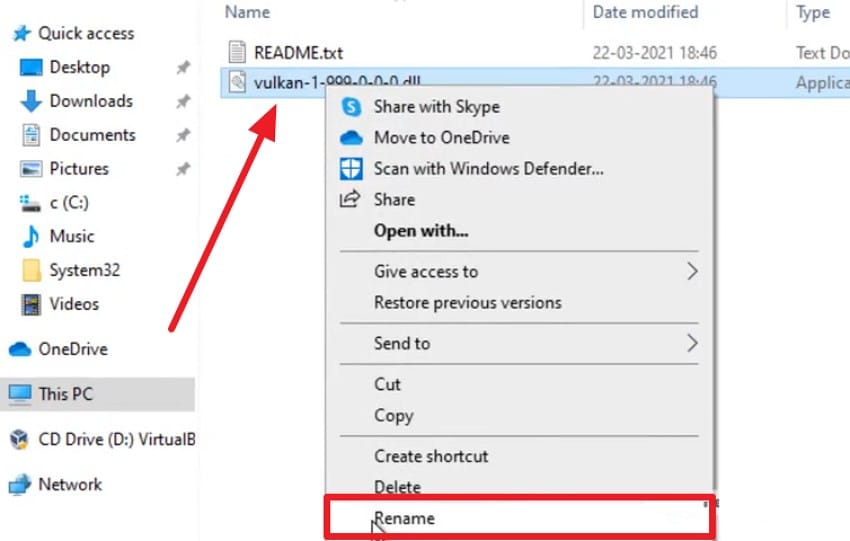
Step 2. After that, change the "Vulkan" file name and click the empty area to save changes.
Pro Tip. Recover Corrupted Adobe & System Files in a Single Click with Repairit
Persistent corrupted Adobe project files often accompany Microsoft C++ Runtime Library errors. When runtime failures damage files like PSD or AI, manual recovery becomes impossible. In such cases, Repairit offers the perfect solution for recovering these creative assets. It supports over 30 file formats across productivity and media apps on Windows and macOS. Besides, the tool repairs all Adobe files, such as PSD and PRPROJ, without hassle.
Moreover, it uses intelligent AI‑based algorithms to analyze and recover damaged files. Plus, each repair restores layers and even metadata without losing design accuracy. Users can also preview fixed Adobe/System files before exporting them to verify stability. It even processes multiple corrupted files together with its reliable batch repair functionality. So, Repairit ensures you never lose your creative assets again after runtime disruptions.
Key Features

-
System Repair: Repairs corrupted media and document files affected by system crashes or software errors, including Adobe project files.
-
Runtime Resilience: Recovers files that become damaged after the Microsoft C++ Runtime Library or Vulcanadapter.cc related application crashes.
-
Read-only Safety: Operates in read-only mode to keep your original corrupted files unchanged.
Guide to Repair Your Corrupted Adobe/System Files with Repairit
Using Repairit’s file repair tool ensures effortless recovery of corrupted files. So, review the upcoming stepwise guide to restore all damaged files without hassle:
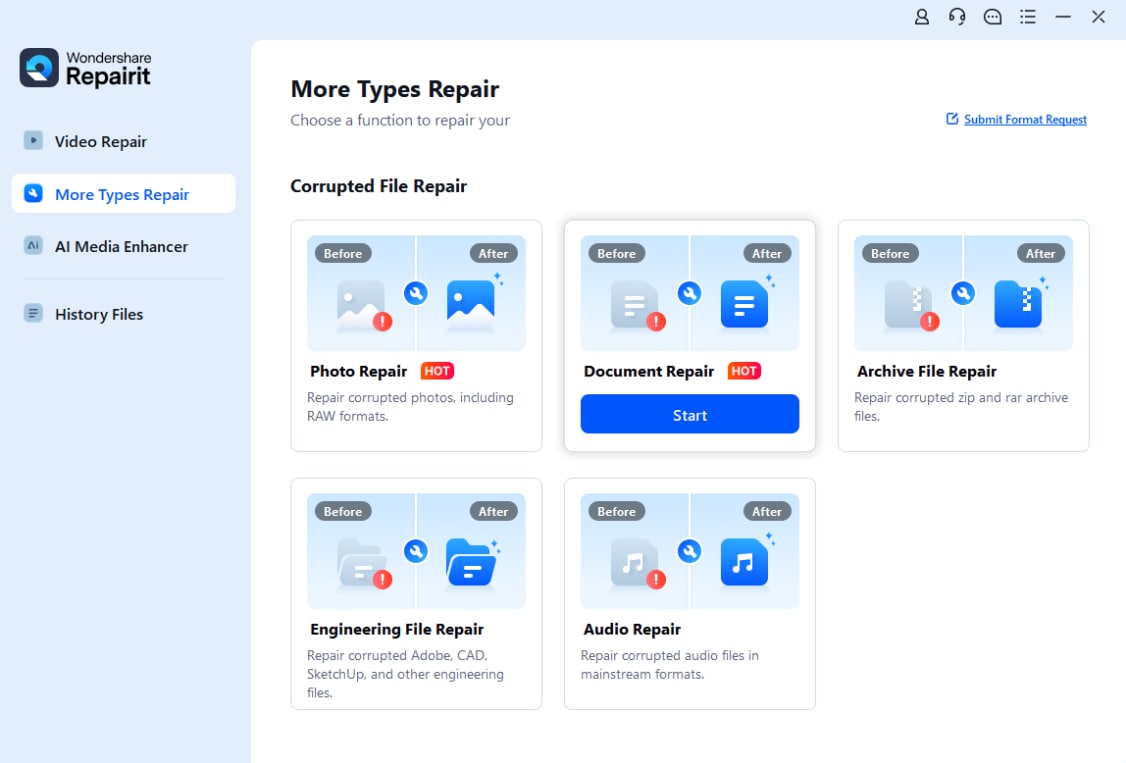
Step 1. Access Repairit to Fix Adobe/System Files
As you access the "More Types Repair" tab, opt for "Document/Engineering File Repair" by pressing "Start." Click "+Add" to import the damaged Adobe/System files.
Step 2. Fix the Damaged Adobe/System Files
Upon importing the corrupted Adobe/System files, press the "Repair" button.
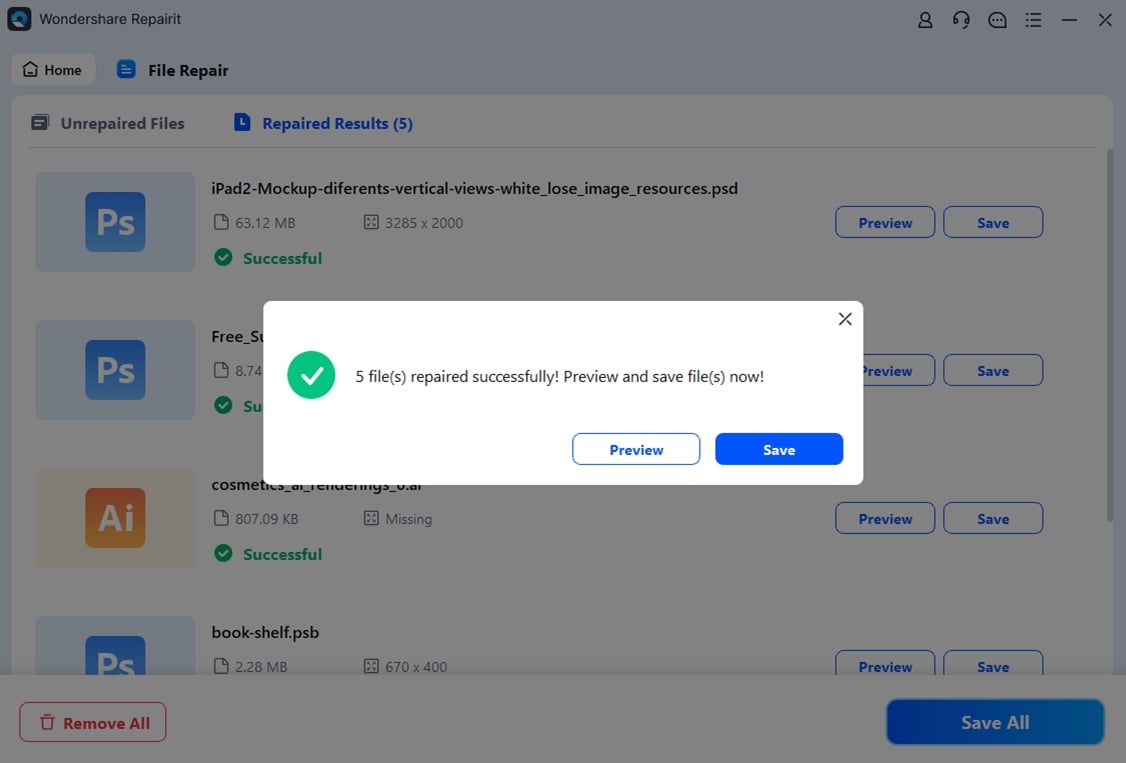
Step 3. Save the Fixed Adobe/System Files
Once your Adobe/System files get repaired, click the "Preview" button to check the result. Finally, hit the "Save All" button to export the fixed files to your computer.
Repair Corrupted Adobe/System Files
 Security Verified. Over 7,302,189 people have downloaded it.
Part 3. Preventing Microsoft Visual C++ Runtime Errors in the Future
Preventing these issues requires keeping your system and software updated for better stability. The following key practices will help minimize runtime issues and improve performance:
- Regular Updates: Keep Adobe and Windows software updated to prevent runtime conflicts. So, updating ensures compatibility with the latest Microsoft C++ runtime library components.
- Backup Files: Maintain frequent backups of project files to avoid data loss. Backups allow quick restoration if Adobe projects encounter corrupted runtime errors.
- Limit Extensions: Avoid Adobe plugins or extensions that may interfere with app stability. Fewer extensions reduce the chances of conflicts, causing assertion failures.
- Antivirus Check: Use reputable antivirus software to block malware from application runtimes. Clean systems reduce background interference with Adobe and Visual C++ operations.
- Clean Uninstall: Always use official uninstall tools to remove Adobe apps from storage. Removing residual folders avoids leftover CCX files, causing recurring runtime crashes.
Conclusion
In conclusion, runtime errors can severely disrupt your Adobe workflow and productivity. Fix Microsoft Visual C++ Runtime Library Assertion Failed Vulcanadapter.cc Error (Adobe) Windows PC requires careful and systematic repair steps. These solutions restore your computer system's performance and improve stability. Plus, regular backups and antivirus scans further protect against failures. Also, if corrupted Adobe files persist after fixes, use Repairit for accurate recovery.
FAQ
-
What does the Vulkanadapter.cc file do in Adobe applications?
It manages communication between Adobe apps and Creative Cloud background services. This helps coordinate user interface synchronization across Creative Cloud tools. When corrupted, it triggers assertion failures, disrupting Adobe software communication stability. -
Can hardware issues cause the Vulkanadapter.cc assertion failed error?
Yes, unstable RAM or failing hard drives can corrupt essential Adobe or runtime files. Hardware instability breaks dependencies needed by Adobe background components. Regular hardware diagnostics and memory checks help prevent Microsoft C++ runtime library crashes. -
How do I fix repeated Adobe file corruption after runtime crashes?
Frequent corruption means incomplete recovery after runtime crashes, damaging Adobe project dependencies. Yet, using Repairit restores corrupt PSD or PRPROJ files back to a usable state. It repairs layers and metadata to ensure full creative data regeneration.
