
Image gamma correction is a behind-the-scenes adjustment that shapes how bright, dark, and detailed your photos and videos look on different screens. You may run into it when editing pictures, exporting files from your camera, preparing visuals for the web, or calibrating a monitor. Understanding gamma helps you avoid washed-out or muddy images, keep contrast under control, and make sure your work looks consistent on phones, laptops, and TVs.
Repair Corrupted Files To Save Your Data
 Security Verified. Over 7,302,189 people have downloaded it.
In this article
What Is Image Gamma Correction?
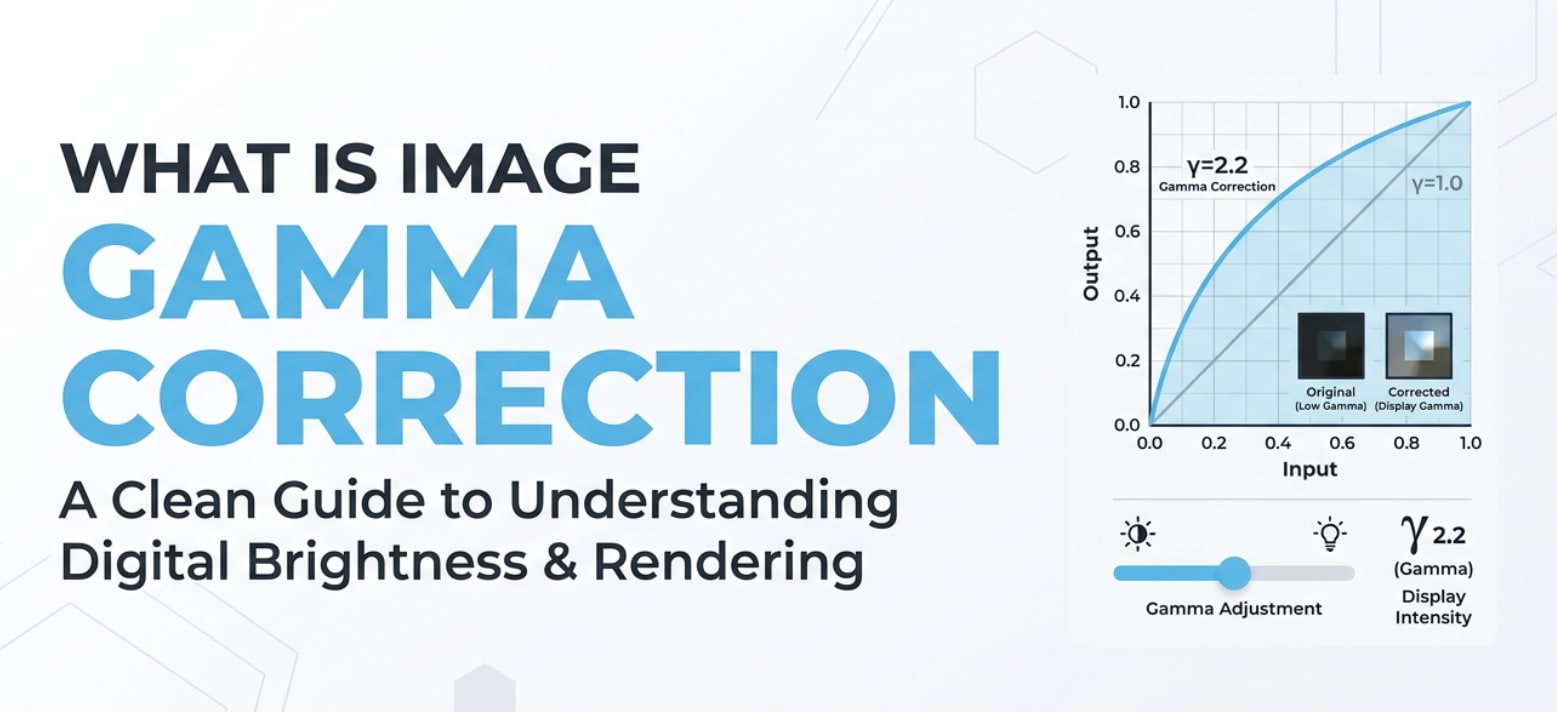
Gamma correction is an image parameter that adjusts the relationship between a pixel value (the input signal) and the actual brightness you see on a screen. In plain English, it tells your display how quickly to move from black to white as numbers go from 0 to 255 (or 0 to 1 in floating-point formats).
Technically, it is a nonlinear curve applied during recording, encoding, or playback so that digital images match how human vision responds to light. Cameras, photo editors, operating systems, and displays all rely on a standard gamma curve (such as sRGB gamma around 2.2) so an image looks natural and not too flat or too contrasty.
Because it defines how midtones are rendered, image brightness and contrast across most photos, exports, and online images are deeply tied to image gamma correction.
What Does Image Gamma Correction Affect?
Image gamma correction primarily affects how tones are distributed between shadows, midtones, and highlights. That directly changes how you perceive depth, contrast, and detail in a photo or video frame.
Brightness and contrast perception
The same file can look totally different depending on the gamma applied:
- Low gamma (for example 1.6) makes the image brighter, lifting midtones and shadows. This can make dark images easier to see but also risks a flat, washed-out look.
- High gamma (for example 2.4) darkens midtones and shadows, increasing perceived contrast but making details in darker areas harder to see.
- Standard gamma (around 2.2, like sRGB) is a balanced middle ground used by most modern monitors, web images, and consumer devices.
Because gamma is nonlinear, it changes midtone brightness much more than pure black or pure white. This is why tweaking a gamma slider often feels different from simply changing exposure or brightness in a photo editor.
Color accuracy and consistency
Color accuracy depends on applying the right gamma correction for the color space and display. When gamma is mismatched:
- Colors can look dull or muddy even if saturation is unchanged.
- Skin tones may appear either overly harsh or strangely flat.
- Gradients (like skies) may band or posterize because tones are pushed into the wrong part of the curve.
Gamma also affects cross-device consistency. A file encoded with sRGB gamma may look right on a calibrated monitor but appear too dark on a TV set to a different gamma curve. That is why display calibration and using standard color spaces are essential when exporting, streaming, and sharing images online.
How Does Image Gamma Correction Work in Real Use?
In real workflows, gamma shows up at almost every stage: camera capture, editing, encoding, exporting, and playback.
- Cameras and smartphones: Most consumer cameras record still images in sRGB or Adobe RGB, both of which assume a gamma around 2.2. Some cameras offer "gamma" or "picture profile" options for video (Rec.709, Log curves, HDR gamma, and more).
- Photo editing software: Apps like Photoshop, Lightroom, and other editors interpret your file using its embedded color profile and gamma. Certain tools or filters include a gamma correction or "midtone" slider that remaps tones without clipping highlights and shadows.
- Operating systems and displays: Windows, macOS, and most browsers assume sRGB gamma for typical content on standard monitors. Calibrating your display sets both color and gamma so that what you see while editing is closer to what others will see.
- Encoding and exporting: When exporting JPEGs, PNGs, or web images, the chosen color space (usually sRGB) includes an implied gamma curve. For video, standards like Rec.709 or Rec.2020 specify gamma or transfer functions that players must respect.
- Streaming and playback: Video platforms and image viewers read gamma-related metadata to present correct brightness. If metadata is missing, ignored, or misinterpreted (for example, a file tagged with a wrong color profile), the image may look too dark or washed out.
In short, gamma correction is the glue that keeps the brightness and contrast of your images consistent from capture to final playback, as long as the same assumptions are followed at every step.
Common Mistakes and Quick Tips
Here are typical problems beginners face with image gamma correction, plus simple ways to avoid them.
- Stacking multiple gamma corrections: Applying gamma adjustment in-camera, then again in editing, and then again on export can lead to harsh contrast or crushed shadows. Try to keep gamma changes intentional and minimal.
- Ignoring color profiles: Opening or exporting images without embedding a profile (like sRGB) can cause other devices to guess the wrong gamma. Always embed a standard profile unless you have a specific workflow reason not to.
- Using brightness instead of gamma for midtones: Dragging only the brightness slider can clip highlights or shadows, while a controlled gamma adjustment changes midtones more gently. Use curves, levels, or a dedicated gamma correction tool when you mainly need midtone changes.
- Trusting one uncalibrated screen: Editing on a screen that is too bright or has incorrect gamma often results in exports that look wrong elsewhere. At minimum, reduce screen brightness to a moderate level and check your images on at least one other device.
- Confusing gamma with exposure: Exposure controls how much light the sensor captures. Gamma determines how those captured values are mapped to brightness on-screen. Use exposure tools in-camera or RAW editors first, then fine-tune gamma or curves.
Quick takeaways: work in sRGB for general use, avoid repeated gamma tweaks, check your work on multiple devices, and always export with the correct color profile to keep image brightness and contrast predictable.
How to Use Repairit to Fix a Corrupted Photo File
Repairit introduction
If a transfer error, crash, or power failure leaves your photos corrupted, even the best gamma correction and color tools will not help until the files can actually open. Wondershare Repairit offers an easy way to scan, repair, and restore damaged images so you can get back to editing tone, contrast, and image brightness safely. You can download it from the Repairit official website and follow a simple guided process, even if you are not technical.
Key features
- Fixes broken or corrupted image files from cameras, phones, memory cards, and computers while preserving as much original quality as possible.
- Repairs corrupted or unplayable videos from many camera brands and formats, helping you rescue important footage alongside your photos.
- Offers a streamlined, step-by-step workflow that suits both beginners and advanced users who need fast, reliable file repair.
Step-by-step guide
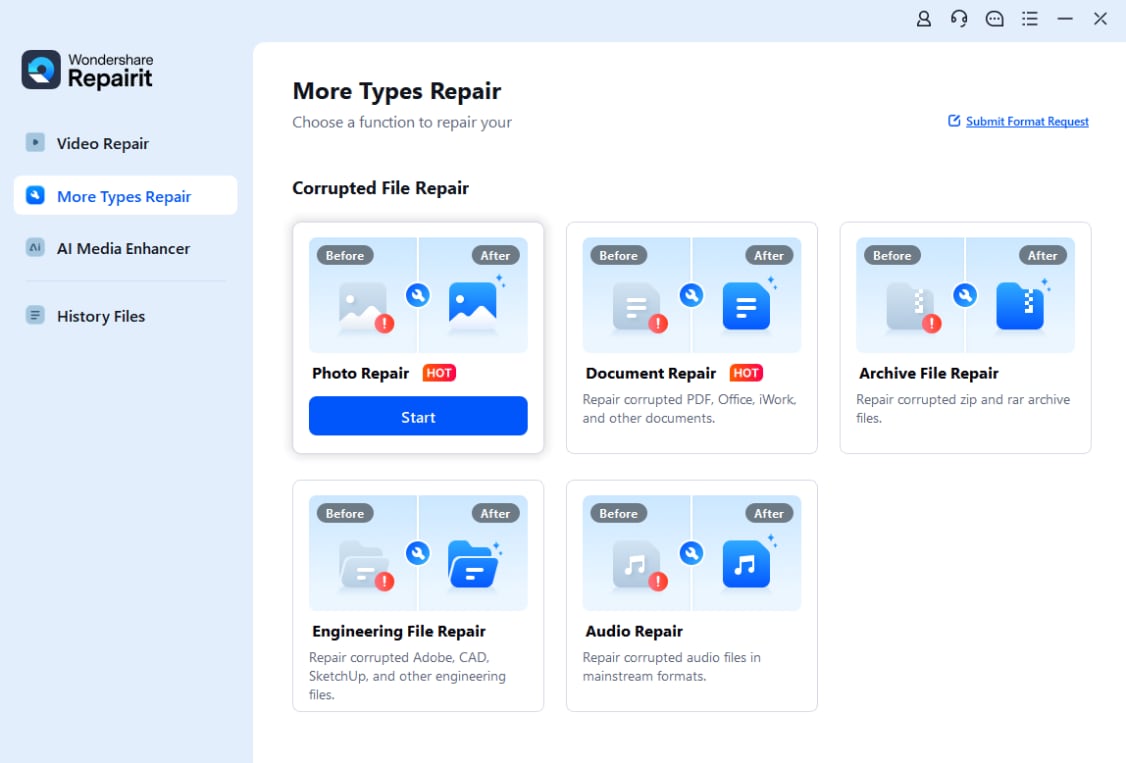
- Add corrupted photo files
Install and launch Wondershare Repairit, then open the Photo Repair module. Click the add button or drag and drop your corrupted images into the window. Repairit will list all selected files and prepare them for analysis so you can see exactly what is queued for repair.
- Repair photo files
Select the photos you want to fix and click the Repair button. Repairit automatically scans each file, detects structural issues, and attempts to rebuild headers, data blocks, and other damaged parts. You can monitor the progress bar as the program works through your images.

- Save the repaired photo files
When the repair process finishes, preview the recovered images inside Repairit to confirm that they open correctly and look normal. If you are satisfied, click Save, choose a secure folder that is different from the source location, and export all repaired photos so you can safely continue editing gamma, color, and exposure.

Conclusion
Image gamma correction quietly shapes how every photo and video frame appears, from deep shadows to bright highlights. By understanding the gamma curve and how it maps pixel values to visible image brightness, you can avoid washed-out exports, unexpected dark images, and color shifts between devices.
Use standard gammas like sRGB 2.2, keep your display reasonably calibrated, and apply gamma-related tools carefully instead of stacking multiple heavy corrections. If you ever run into corrupted images that refuse to open or preview correctly, tools like Wondershare Repairit can restore the files so you can confidently continue refining tone, contrast, and color.
Next: What is Image Orientation Metadata?
FAQ
-
1. What is image gamma correction in simple terms?
Image gamma correction is a mathematical adjustment that changes how pixel values are turned into visible brightness on a screen. Instead of increasing exposure, it reshapes the brightness curve so midtones look more natural to the human eye on non-linear displays. -
2. Why do my photos look darker or lighter on another device?
Different devices can use different gamma curves, brightness settings, and calibrations. If your photo was edited on a very bright or miscalibrated screen, the same file may look too dark, too bright, or low in contrast on another monitor, phone, or TV. -
3. Can gamma correction fix an underexposed photo?
Gamma correction can brighten midtones and reveal more detail in shadows, which helps a mildly underexposed image look better. However, it cannot recreate information the camera never captured, so severely underexposed areas may still remain noisy or blocked up. -
4. What is the typical gamma value for images and displays?
Most modern computer monitors, operating systems, and web content assume a gamma of about 2.2. The sRGB color space is designed around this, which is why 2.2 is commonly considered the standard gamma for general-purpose images and online photos. -
5. How can I avoid gamma problems when exporting photos?
Work on a reasonably calibrated display, export in a standard color space like sRGB, always embed the color profile, and avoid applying multiple heavy gamma adjustments. Before final delivery, check your exports on at least one other device to catch unexpected brightness or contrast shifts.
