
Dots per inch, or DPI, pops up whenever you print photos, scan artwork, export graphics for clients, or prepare images for different screens. It describes how densely tiny printed dots or pixels are packed into each inch of space, which directly affects how sharp or soft your pictures look on paper. Understanding image DPI helps you avoid blurry prints, jagged logos, and oddly sized photos across cameras, editors, printers, and online platforms.
Repair Corrupted Files To Save Your Data
 Security Verified. Over 7,302,189 people have downloaded it.
In this article
What Is Dots Per Inch (DPI)?
DPI, short for dots per inch, is an image and print resolution parameter that describes how many tiny dots of ink or toner a printer places in one inch of paper. In digital workflows, it is often used alongside PPI (pixels per inch) to describe how a photo file is mapped to a physical size when printed.
In simple terms, DPI tells you how tightly those dots are packed:
- Higher image resolution settings such as 300 DPI pack more dots into each inch, which usually means sharper, smoother-looking prints.
- Lower settings such as 72–150 DPI spread the same pixels over more space, which can look soft or pixelated when viewed up close.
DPI does not create detail by itself; instead, it controls how existing pixels from your camera or editor are distributed onto paper or another physical medium.
What Does Dots Per Inch (DPI) Affect?
DPI plays a big role in how your images behave once they leave the screen and appear in the real world.
| Factor | How DPI Influences It |
|---|---|
| Print sharpness | Higher DPI makes edges, text, and textures look cleaner and less jagged at normal viewing distance. |
| Physical print size | The same pixel dimensions produce smaller prints at higher DPI and larger prints at lower DPI. |
| Perceived quality vs. distance | Large posters viewed from far away can use lower DPI, while small prints held close need higher DPI. |
Quality and appearance
- At 300 DPI, most photo prints look crisp for albums, frames, and client proofs.
- At 150–240 DPI, large wall prints, banners, or canvases can still look excellent because you stand farther away.
- At 72–96 DPI (typical screen DPI), prints often look blurry or blocky unless the image is physically small.
File size and workflow
- Changing only the DPI tag without changing pixel dimensions does not change file size.
- Upscaling an image to increase both pixels and DPI can create larger files and heavier workloads for RIPs, printers, and layout software.
Compatibility and user experience
- Print labs, magazines, and stock sites often require image DPI values like 240–350 for predictable layout.
- For websites, browsers ignore DPI meaning and focus on pixel dimensions, but the DPI value can still matter when users download and print your image later.
How Does Dots Per Inch (DPI) Work in Real Use?
DPI shows up in cameras, photo editors, print dialogs, and scanner settings, and it influences how your pixels move from capture to final output.
DPI in printing and photo output
In printing, DPI is tied directly to how printers fire ink or toner onto paper.
- Inkjet and laser printers may advertise high engine resolutions such as 1200 or 2400 DPI, but for photo work you typically prepare files at 240–360 DPI.
- Photo labs commonly request images at 300 DPI for small to medium prints and 200–240 DPI for larger enlargements.
Example: turning pixels into a physical print
- You have an image that is 3000 × 2000 pixels.
- At 300 DPI, it prints as 10 × 6.7 inches (3000 ÷ 300 = 10 inches).
- At 150 DPI, the same file becomes a 20 × 13.3 inch print, but with softer detail up close.
In editing software like Photoshop, Lightroom, or GIMP, export dialogs and "Image Size" panels let you set both pixel dimensions and DPI. To maintain quality:
- Keep enough pixels for the desired physical size at your target DPI.
- Avoid stretching small, low-resolution images into large, high-DPI prints without intelligent upscaling, or they will look fuzzy.
DPI in scanning and digital workflows
Scanners use DPI to define how finely they sample analog originals such as prints, negatives, slides, or documents.
- 300 DPI is standard for scanning text documents and everyday photos for reprinting at their original size.
- 600 DPI or higher is used for detailed artwork, small originals, or when you plan to crop or enlarge later.
In digital-only workflows, DPI behaves more like metadata:
- Most monitors and mobile screens operate around 90–220 PPI, and browsers display based on pixel dimensions, not DPI.
- Changing DPI metadata in an image file without resampling does not alter how it appears in a browser or video editor; it only affects default print size or how layout tools (InDesign, Illustrator, Word) place it on a page.
For cross-platform consistency (web, print, social, slides), many creators export master files at high pixel dimensions and 300 DPI, then create optimized derivatives for web or social platforms as needed.
Common Mistakes and Quick Tips
Frequent misunderstandings about DPI
- Thinking DPI is the same as overall image resolution; in reality, resolution is about pixel count, while DPI is how those pixels map to inches.
- Believing you can "fix" a low-quality image by simply changing DPI from 72 to 300 without adding pixels.
- Assuming that higher DPI always looks better, even for huge prints viewed from a distance, where moderate DPI is often enough.
- Forgetting that websites care about pixel dimensions, not the DPI meaning stored in the file metadata.
Quick practical tips
- For most photo books, albums, and framed prints, export at around 300 DPI, making sure you have enough pixels for the desired size.
- For large posters and banners, 150–240 DPI is often fine, especially if viewers stand several feet away.
- For on-screen use (web, social media, slides), focus on pixel dimensions (e.g., 1920 × 1080) and file size; DPI can remain at any reasonable value.
- Always check your printer or lab's recommended print resolution before final export to avoid soft or pixelated output.
- When upscaling older or low-resolution images, use specialized tools or AI upscalers that can intelligently add detail rather than just stretching pixels.
Key takeaways
- DPI is a print and scanning density setting, not a magic quality switch.
- Pixel dimensions determine how much detail exists; DPI controls how that detail is spread across inches.
- Match pixel count and DPI to how and where the image will be viewed.
How to Use Repairit to Fix a Corrupted Photo File
Repairit introduction
Even if you choose the perfect DPI and resolution, photo files can still become corrupted during transfer, storage, or editing, leaving you with images that will not open or export correctly. Wondershare Repairit is a dedicated repair tool that focuses on fixing damaged or corrupted media so your photos and videos are usable again. With a clean interface and guided workflows on the Repairit official website, you can troubleshoot broken image files from cameras, phones, memory cards, or editing systems and bring important shots back into your projects.
Key features
- Repairs various photo and video formats with a guided workflow so you can handle different camera and platform outputs in one place.
- Provides quick repair and advanced repair modes to deal with both light glitches and severe corruption that affects playback or preview.
- Lets you preview repaired files before saving them, helping you verify quality before you commit to overwriting or archiving.
Step-by-step guide
- Add corrupted photo files
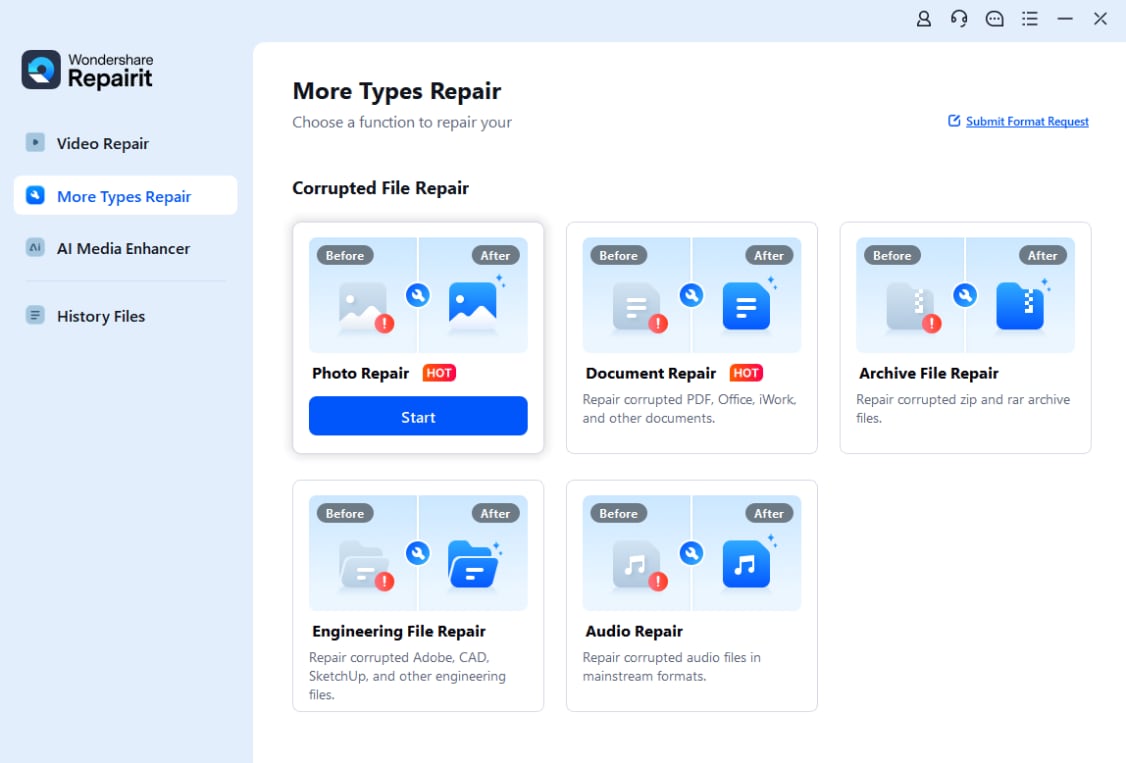
Open Repairit on your computer and choose the Photo Repair feature from the main dashboard. Click the add button to browse your folders, memory cards, or external drives, then select the corrupted or unreadable photo files you want to fix. You can import multiple images at once to save time.
- Repair photo files

After the photos are loaded into the list, start the repair process. Repairit analyzes each selected file, locates structural errors and damaged data blocks, and then automatically applies targeted fixes. When the initial pass is finished, you can preview the repaired photos inside the program to confirm that key details, colors, and framing look correct.
- Save the repaired photo files

Once you are satisfied with the previews, choose a secure destination folder that is different from the original location to prevent overwriting damaged copies. Click to save the repaired photos, and Repairit will export them as usable image files ready for editing, printing at your preferred image DPI, or sharing across platforms and devices.
Conclusion
Dots per inch (DPI) is a key part of how digital photos make the jump to paper or scanned archives. While pixels define how much detail an image contains, DPI determines how tightly that detail is packed into each inch, which controls print size and perceived sharpness.
By matching your pixel dimensions and print resolution to the final use, you can avoid soft prints, jagged logos, and bloated files. Combine smart resolution choices with reliable tools like Wondershare Repairit to protect and repair corrupted images, and your visual projects will stay sharp, consistent, and ready for both screen and paper.
Next: What is Image Aspect Ratio?
FAQ
-
1. Is DPI the same as resolution?
No. Resolution usually refers to pixel dimensions, such as 4000 × 3000 pixels. DPI describes how densely those pixels (or printed dots) are packed into each inch when you print or scan. You need both pixel count and an appropriate DPI value to get sharp prints. -
2. Does DPI matter for images on a website?
For on-screen viewing, what matters most is pixel dimensions (for example, 1920 × 1080). Web browsers ignore the DPI field and simply display pixels. However, setting a sensible DPI can help users who download your image for printing because it provides a default print size. -
3. What DPI should I use for high-quality photo printing?
For most high-quality photo prints, 300 DPI is a safe standard. It provides enough dot density for sharp-looking photos at typical viewing distances. For big posters or banners viewed from farther away, 150–240 DPI can still deliver excellent results. -
4. Can I increase DPI to improve image quality?
Simply changing the numeric DPI value without adding pixels does not improve quality; it only changes how the image is scaled on paper. To genuinely improve perceived detail, you must capture more pixels at the start or use an intelligent upscaling tool that creates new pixels based on the existing content. -
5. What is the difference between DPI and PPI?
PPI (pixels per inch) usually describes pixel density on screens or inside digital image files, while DPI (dots per inch) traditionally describes how many ink or toner dots a printer puts on paper. In everyday speech they are often mixed, but technically they refer to different parts of the workflow.
